

Clean fridge coils – sounds like a chore, right? But trust me, it’s one of those simple DIY tasks that can make a HUGE difference in your home and save you money in the long run! We often overlook the back of our refrigerators, but those coils are the unsung heroes keeping our food fresh and our energy bills reasonable. Think of it like this: your fridge is working overtime if those coils are dusty and grimy, struggling to release heat.
Refrigeration, as a concept, has been around for centuries in various forms, from ice harvesting to early mechanical systems. While we’ve come a long way since then, the basic principle remains the same: remove heat to preserve food. And those coils? They’re a crucial part of that process. Ignoring them is like neglecting the engine of your car – eventually, it’ll break down or, at the very least, run inefficiently.
So, why do you need this DIY trick? Because a clean fridge is an efficient fridge! By learning how to clean fridge coils yourself, you’ll not only extend the life of your appliance but also lower your electricity bill. Plus, it’s incredibly easy and requires minimal tools. I’m going to walk you through the process step-by-step, so you can tackle this task with confidence and enjoy the benefits of a happy, healthy refrigerator. Let’s get started!
DIY: Breathe New Life into Your Fridge by Cleaning the Coils!
Okay, friends, let’s talk fridge maintenance. It’s not the most glamorous topic, I know, but trust me, cleaning your refrigerator coils is one of the easiest and most effective things you can do to keep your fridge running efficiently and save money on your energy bill. Think of it as giving your fridge a much-needed spa day! I’ve been doing this for years, and I’m always amazed at the difference it makes. So, grab your tools, and let’s get started!
Why Clean Your Fridge Coils?
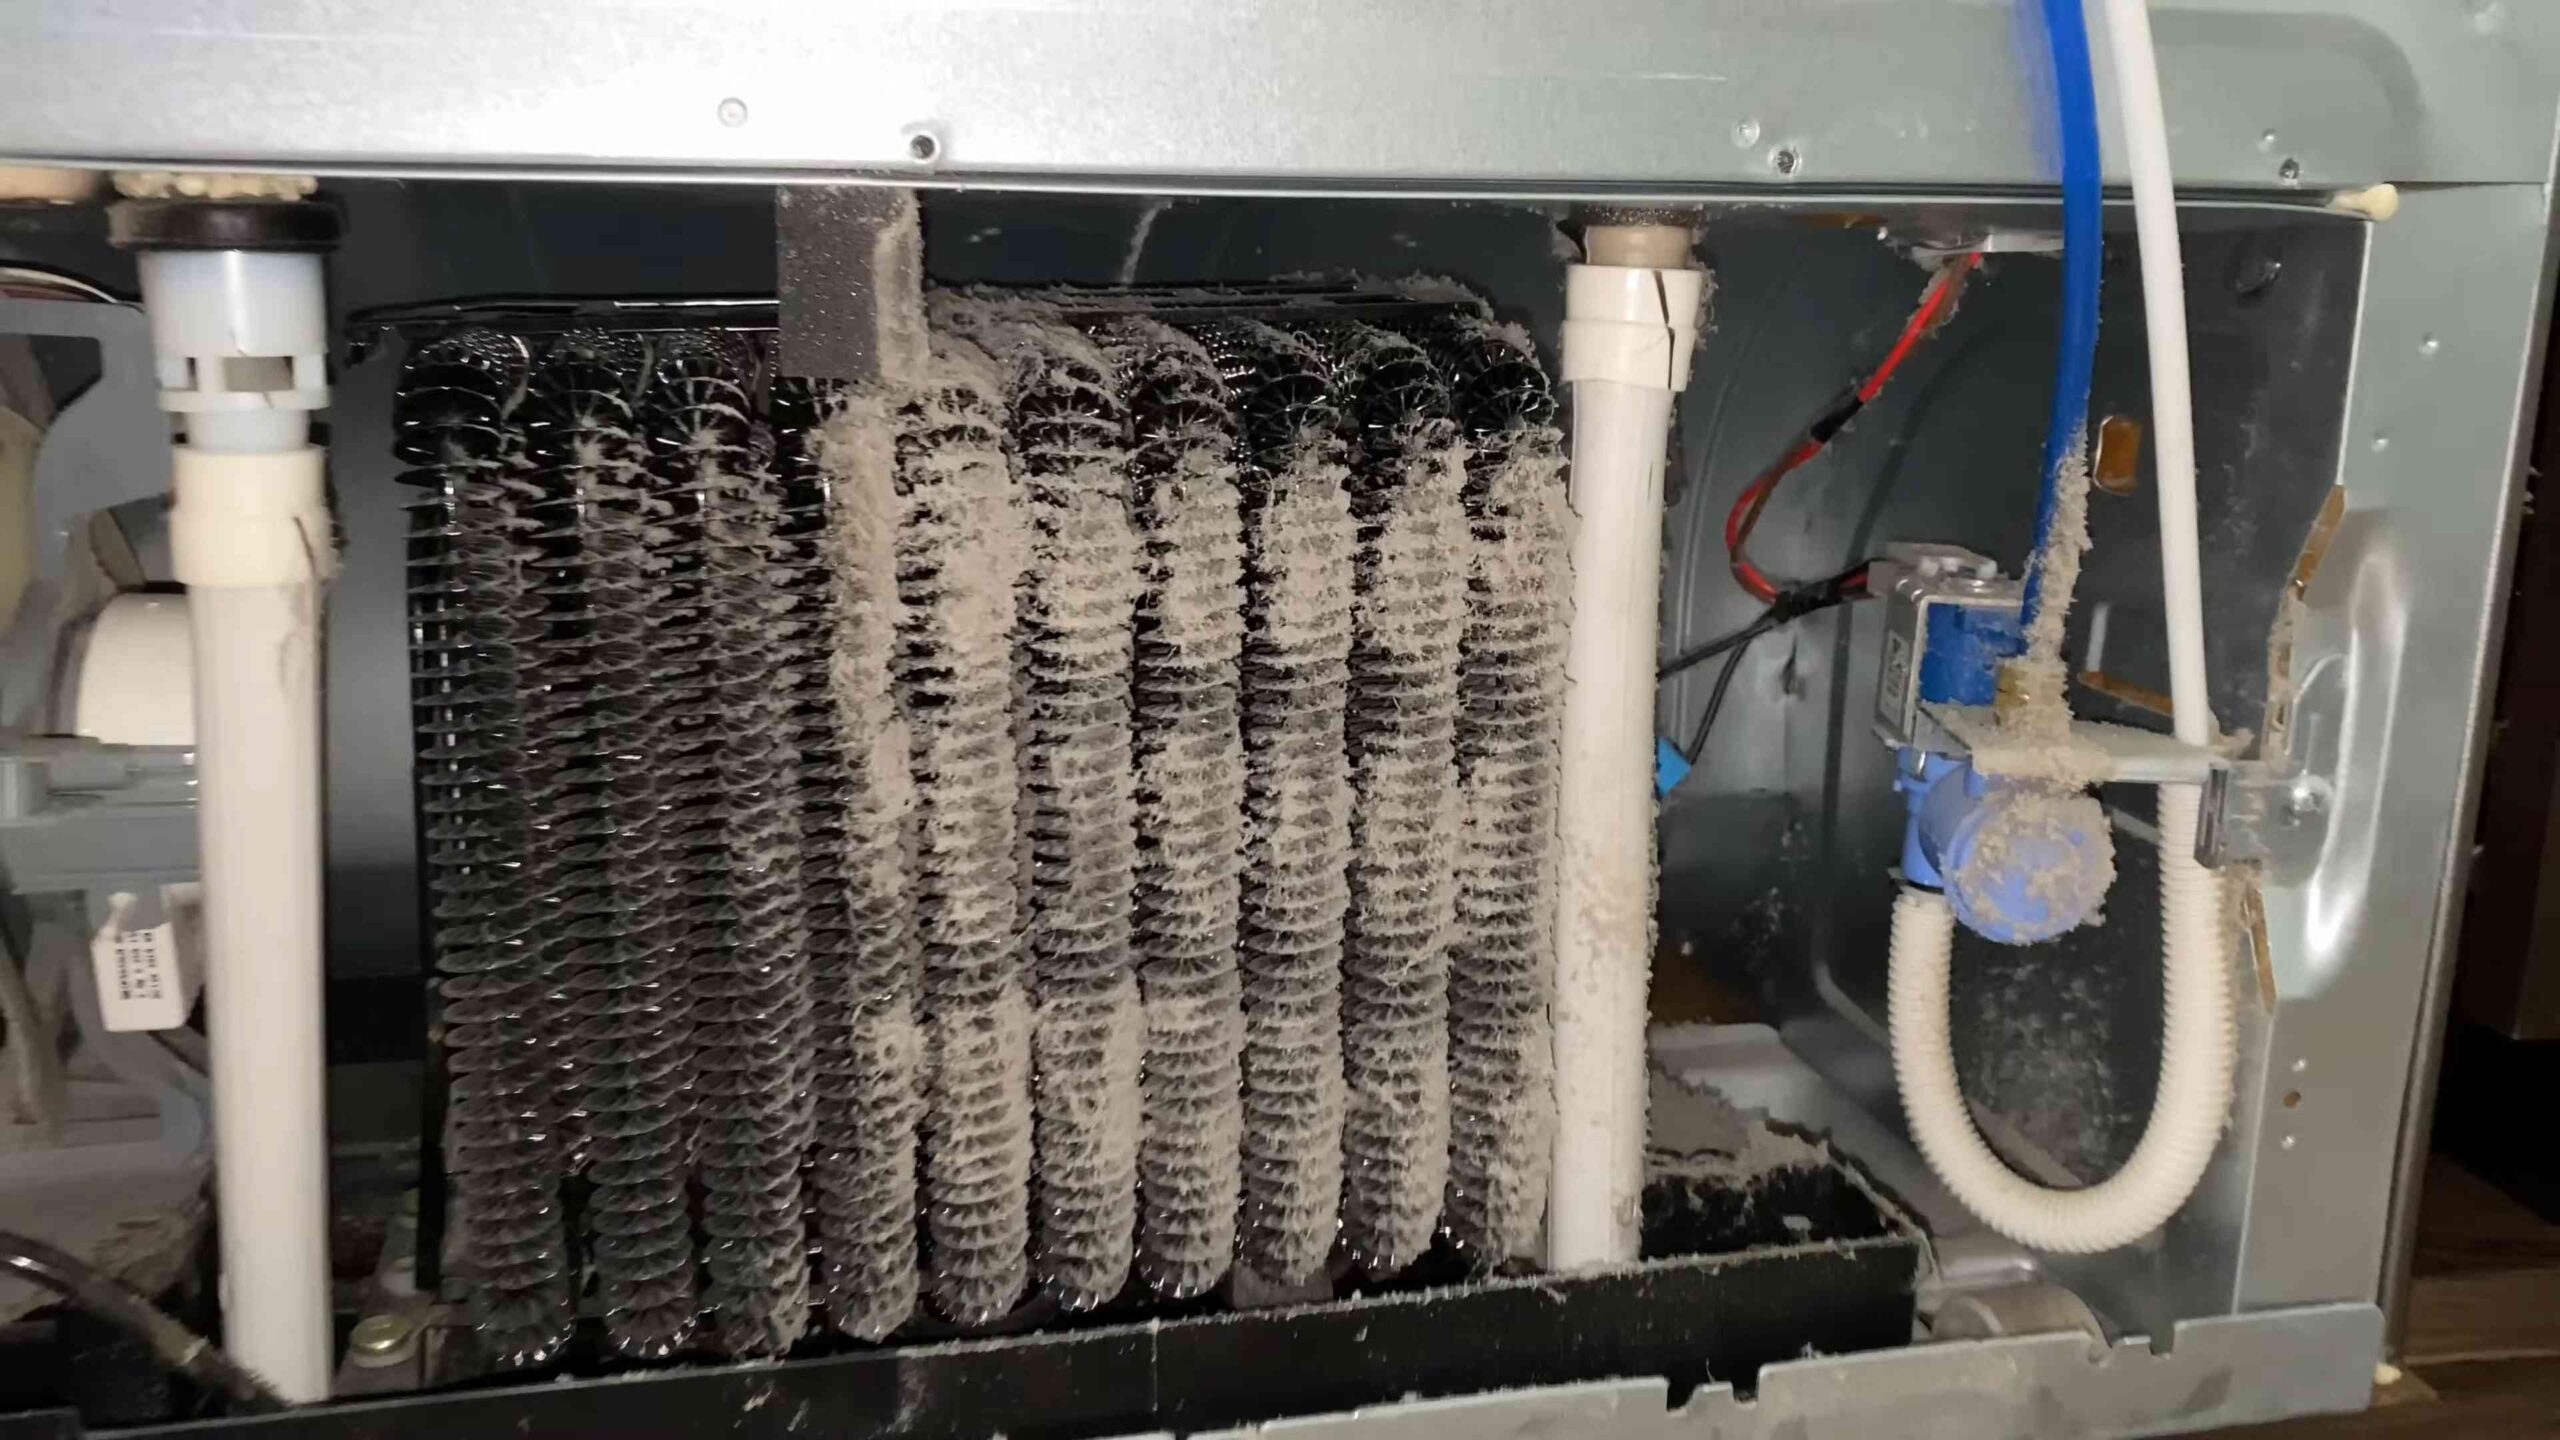
Before we dive in, let’s quickly cover *why* this is so important. Your refrigerator coils are responsible for releasing heat as the refrigerant circulates. When they’re covered in dust, pet hair, and other gunk, they can’t do their job properly. This forces your fridge to work harder, using more energy and potentially shortening its lifespan. A clean fridge is a happy fridge (and a happy wallet!).
What You’ll Need
Here’s a list of the supplies you’ll need. Don’t worry, most of these are probably already in your house!
* Screwdriver: You’ll likely need a Phillips head or flathead screwdriver to remove the access panel.
* Vacuum Cleaner with Hose Attachment: A vacuum with a brush attachment is ideal.
* Coil Cleaning Brush (Optional but Recommended): These are specifically designed for cleaning fridge coils and can reach tight spaces. You can find them at most hardware stores or online.
* Soft Cloth or Rag: For wiping down any remaining dust or debris.
* Work Gloves (Optional): To keep your hands clean and protected.
* Flashlight or Headlamp: To help you see in those dark, dusty corners.
* Appliance Dolly (If Needed): If your fridge is built-in or difficult to move, you might need an appliance dolly to pull it out slightly.
* Safety Glasses (Recommended): To protect your eyes from dust and debris.
Getting Started: Safety First!
Before you do anything, unplug your refrigerator! This is crucial for your safety. We don’t want any electrical shocks while we’re working. Once it’s unplugged, you’re ready to move on.
Step-by-Step Guide to Cleaning Your Fridge Coils
Okay, let’s get down to business! Here’s the step-by-step process I use to clean my fridge coils:
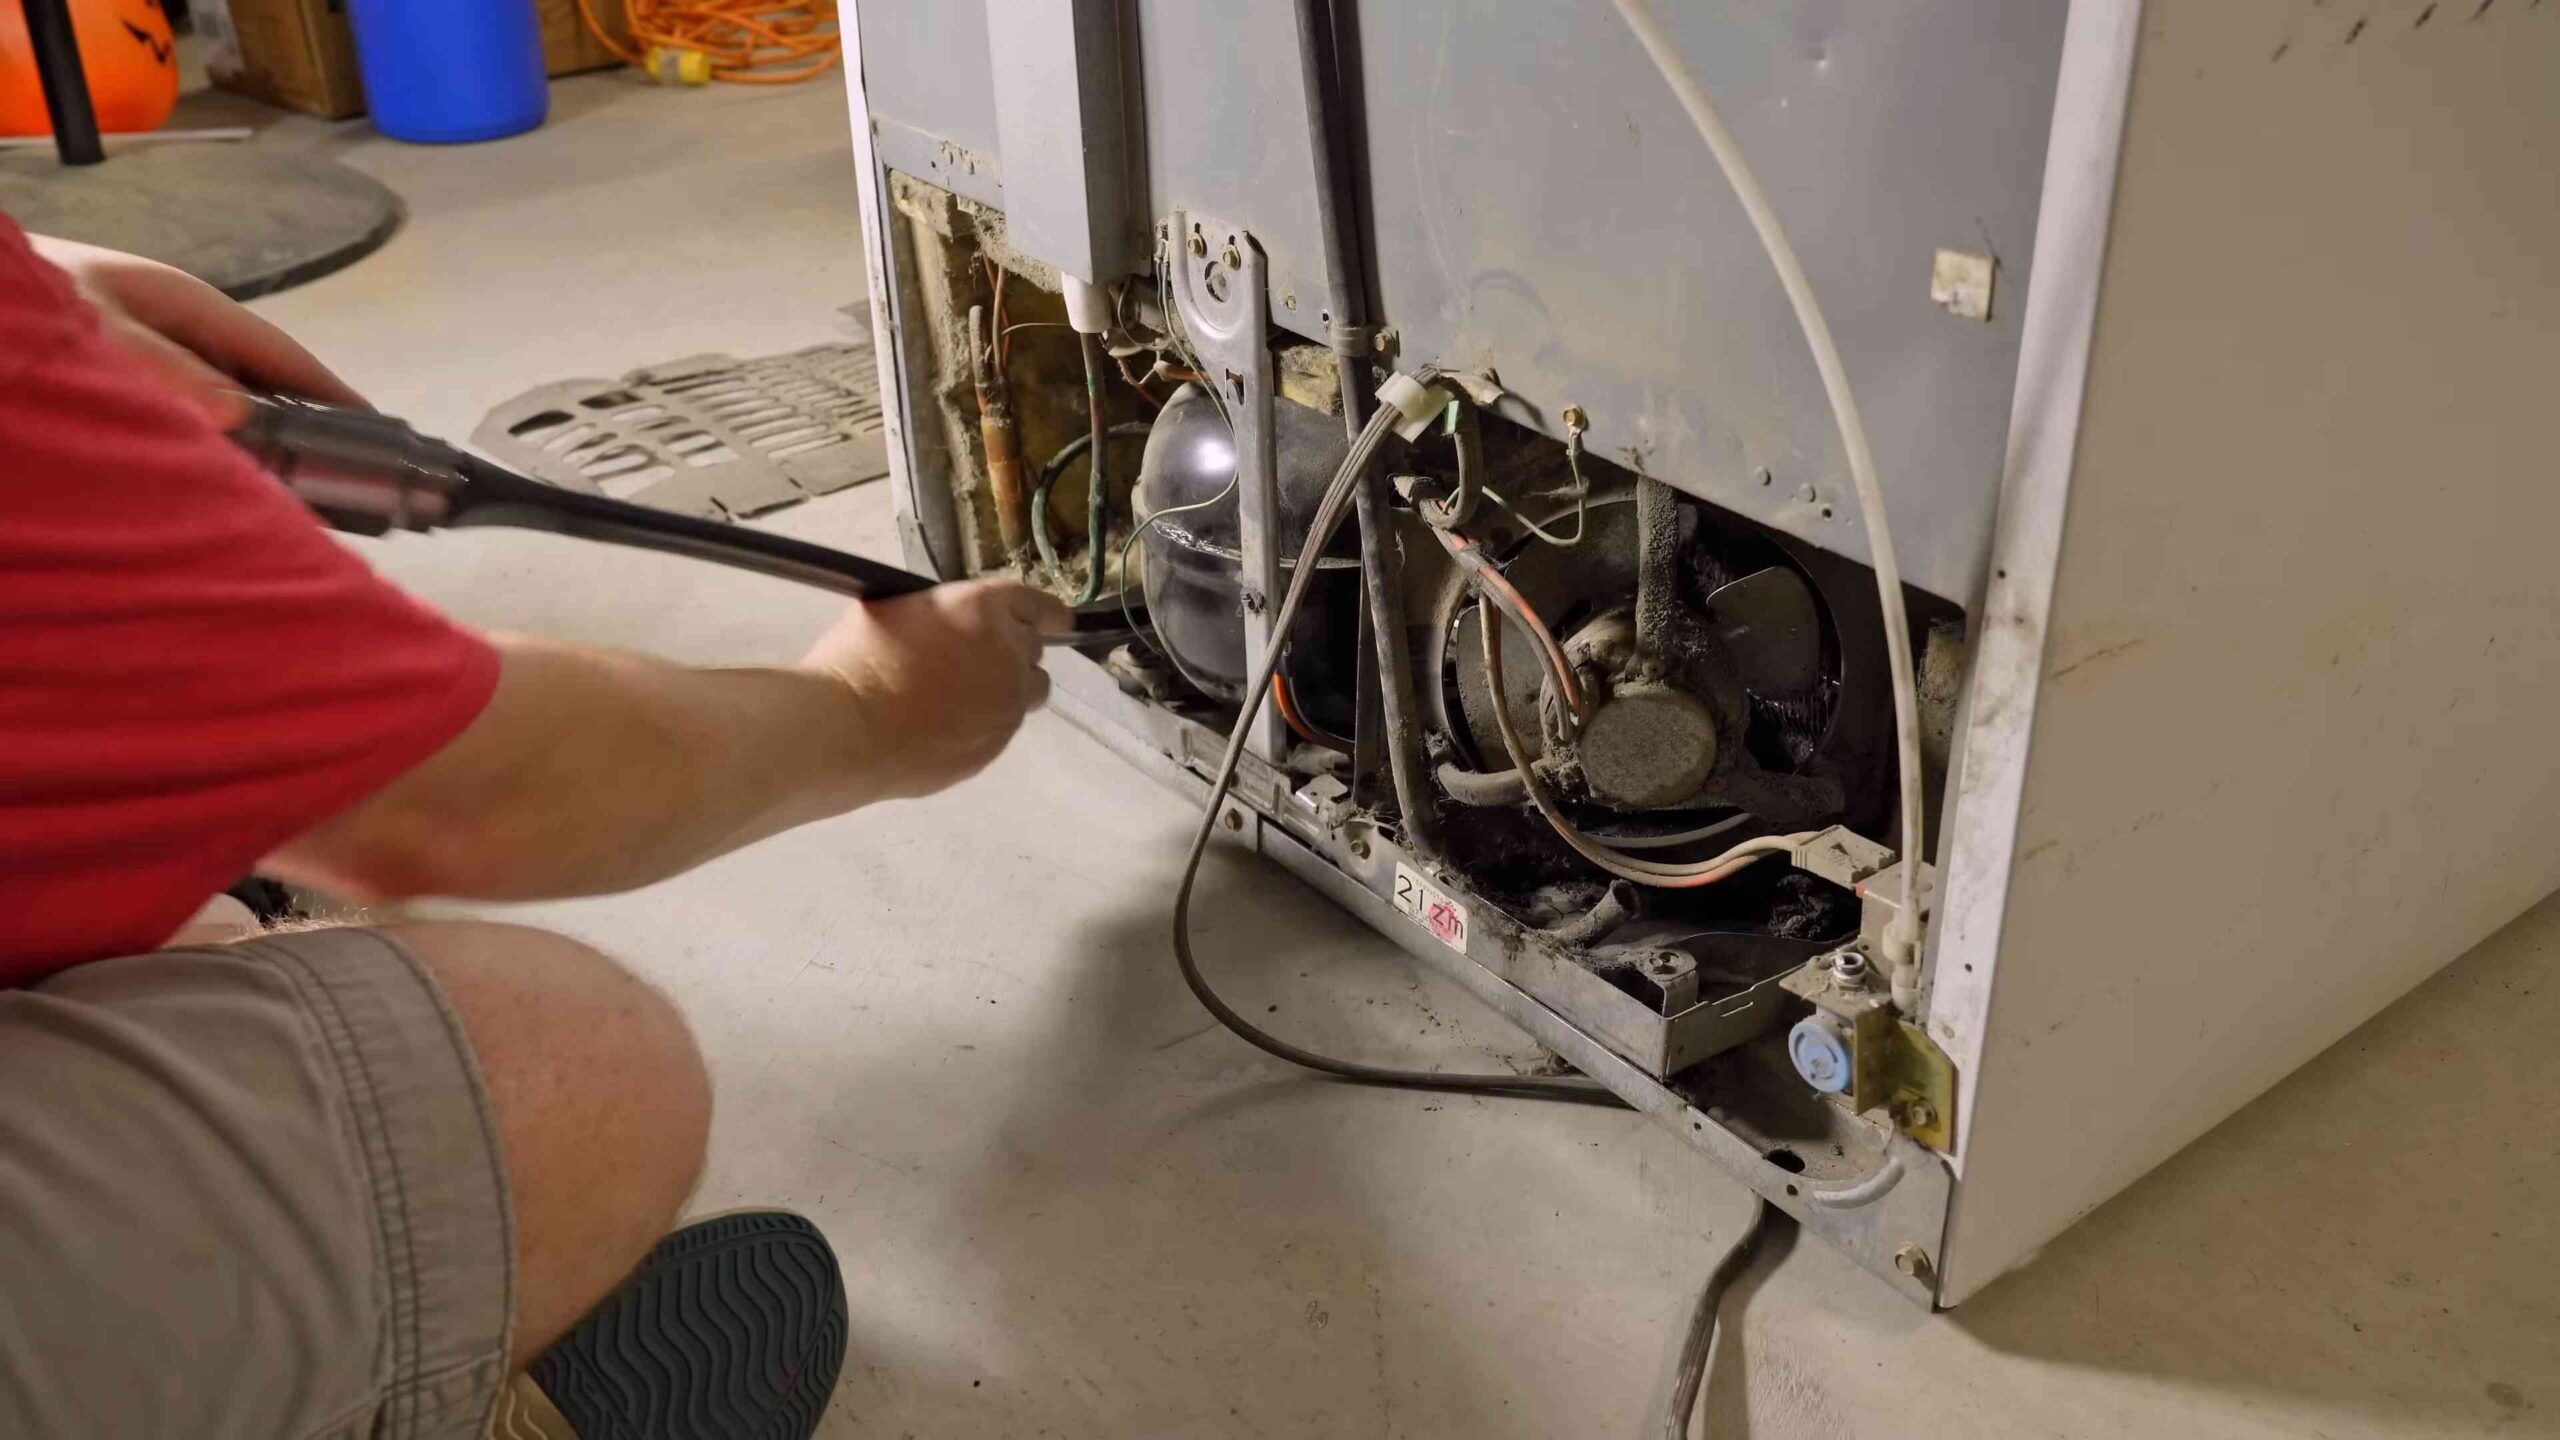
1. Locate the Coils: This is the first and most important step. The location of your fridge coils depends on the model. They’re usually located in one of three places:
* On the Back of the Fridge: This is the most common location. You’ll see a large, black panel covering the coils.
* At the Bottom of the Fridge (Behind a Grill): Some refrigerators have the coils located at the bottom, behind a removable grill.
* On Top of the Fridge: Less common, but some older models have the coils on top.
If you’re unsure, consult your refrigerator’s owner’s manual. It should have a diagram showing the location of the coils.
2. Prepare the Area: Once you’ve located the coils, you’ll need to prepare the area.
* Move the Fridge (If Necessary): If the coils are on the back, you’ll need to carefully pull the refrigerator away from the wall. Be careful not to damage the floor or the wall. If your fridge is built-in, you might need an appliance dolly to move it slightly.
* Protect the Floor: Place a drop cloth or old towel behind the refrigerator to protect your floor from dust and debris.
3. Remove the Access Panel or Grill: Now it’s time to access the coils.
* Back Panel: If the coils are on the back, use your screwdriver to remove the screws holding the access panel in place. Carefully remove the panel and set it aside.
* Bottom Grill: If the coils are at the bottom, you should be able to simply pull the grill off. Some grills may have clips or screws holding them in place.
* Top Coils: If the coils are on top, there may be a removable cover. Consult your owner’s manual for instructions on how to remove it.
4. Vacuum the Coils: This is where the vacuum cleaner comes in.
* Use the Hose Attachment: Attach the hose attachment to your vacuum cleaner. A brush attachment is ideal, but if you don’t have one, the regular hose will work.
* Vacuum Thoroughly: Carefully vacuum the coils, removing as much dust and debris as possible. Pay close attention to the areas between the coils, where dust tends to accumulate. Work from top to bottom to prevent dust from falling onto areas you’ve already cleaned.
* Be Gentle: Be careful not to damage the coils while vacuuming. They can be delicate.
5. Use a Coil Cleaning Brush (Optional but Recommended): If you have a coil cleaning brush, now’s the time to use it.
* Brush Between the Coils: Gently insert the brush between the coils and move it back and forth to loosen any stubborn dust or debris.
* Vacuum Again: After brushing, vacuum the coils again to remove the loosened dust.
6. Wipe Down the Coils (If Necessary): If there’s still some dust or grime clinging to the coils, you can use a soft cloth or rag to wipe them down.
* Dampen the Cloth: Lightly dampen the cloth with water. Be sure to wring out any excess water. You don’t want to get the coils too wet.
* Wipe Gently: Gently wipe down the coils, removing any remaining dust or grime.
7. Clean the Fan (If Accessible): While you’re at it, take a look at the fan near the coils. If it’s dusty, use your vacuum cleaner or a soft brush to clean it. A clean fan will help improve airflow and efficiency.
8. Clean the Surrounding Area: Before you put everything back together, take a moment to clean the area around the coils. Vacuum up any dust or debris that may have fallen on the floor or behind the refrigerator.
9. Reassemble: Now it’s time to put everything back together.
* Replace the Access Panel or Grill: Carefully replace the access panel or grill, making sure it’s securely fastened.
* Push the Fridge Back into Place: Carefully push the refrigerator back into its original position. Be careful not to pinch any cords or hoses.
10. Plug the Fridge Back In: Finally, plug your refrigerator back in.
11. Monitor Performance: After cleaning the coils, monitor your refrigerator’s performance. You should notice that it runs more efficiently and the motor doesn’t work as hard.
How Often Should You Clean Your Fridge Coils?
I recommend cleaning your fridge coils at least twice a year, or more often if you have pets or live in a dusty environment. A good rule of thumb is to clean them every time you change your clocks for daylight saving time.
Troubleshooting
* Can’t Find the Coils: If you’re having trouble locating the coils, consult your refrigerator’s owner’s manual. It should have a diagram showing their location.
* Coils are Frozen: If the coils are frozen, there may be a problem with your refrigerator’s defrost system. Contact a qualified appliance repair technician.
* Still Not Cooling Properly: If your refrigerator is still not cooling properly after cleaning the coils, there may be another issue. Contact a qualified appliance repair technician.
Extra Tips and Tricks
* Use a Condenser Coil Cleaner: For heavily soiled coils, you can use a condenser coil cleaner. These cleaners are specifically designed to remove stubborn dirt and grime. Be sure to follow the manufacturer’s instructions carefully.
* Check the Door Seals: While you’re cleaning your fridge, take a moment to check the door seals. If they’re cracked or damaged, they may be letting warm air in, causing your refrigerator to work harder. Replace the seals if necessary.
* Keep the Fridge Organized: An organized fridge is an efficient fridge. Make sure to keep your food properly stored and avoid overcrowding. This will help improve airflow and keep your fridge running smoothly.
Conclusion
Cleaning your fridge coils is a simple but effective way to improve your refrigerator’s performance and save money on your energy bill. By following these steps, you can keep your fridge running smoothly for years to come. So, go ahead and give your fridge some love! You’ll be glad you did.
Conclusion
So, there you have it! Mastering the art of cleaning your fridge coils is not just about ticking off another chore on your to-do list; it’s about investing in the longevity and efficiency of your refrigerator. We’ve walked you through a simple, effective method that requires minimal effort but yields significant results. Think of it as a small act of self-care for your fridge, the unsung hero of your kitchen.
Why is this DIY trick a must-try? Because a clean fridge coil translates directly to a cooler fridge, lower energy bills, and a reduced risk of food spoilage. A refrigerator working harder than it needs to is a drain on your wallet and a potential hazard to the food you’re storing. By removing the dust and debris that accumulate on the coils, you’re allowing your fridge to breathe, to cool efficiently, and to maintain the optimal temperature for preserving your groceries.
Beyond the immediate benefits, regularly cleaning your fridge coils can extend the lifespan of your refrigerator. Over time, a build-up of dust can cause the compressor to overheat and eventually fail, leading to costly repairs or even the need for a complete replacement. A little preventative maintenance goes a long way in avoiding these headaches.
But don’t just take our word for it! We encourage you to try this simple DIY trick and experience the difference for yourself. You might be surprised at how much dust and grime accumulates on those coils, even if you clean your fridge regularly.
Looking for variations? Consider using a soft-bristled brush attachment on your vacuum cleaner for a more thorough cleaning. If you have pets, you might need to clean your coils more frequently, as pet hair can quickly clog them up. For hard-to-reach areas, a long, flexible duster can be a lifesaver. You can also purchase specialized coil cleaning brushes designed specifically for this purpose. Some people prefer to use compressed air to blow away the dust, but be careful not to damage the coils with excessive pressure. Always unplug your refrigerator before attempting any cleaning.
We’re confident that once you see the results of cleaning your fridge coils, you’ll make it a regular part of your home maintenance routine. It’s a small investment of time that pays off in big ways.
Now, we want to hear from you! Have you tried this DIY trick? What were your results? Did you notice a difference in your fridge’s performance? Share your experiences, tips, and tricks in the comments below. Let’s create a community of fridge coil cleaning enthusiasts! Your insights could help others discover the benefits of this simple yet effective practice. Let’s all work together to keep our fridges running smoothly and efficiently. Remember, a clean fridge coil is a happy fridge coil, and a happy fridge coil means a happy you!
Frequently Asked Questions (FAQs)
Why is it so important to clean my fridge coils?
Cleaning your fridge coils is crucial for several reasons. Firstly, dust and debris accumulate on the coils, acting as an insulator and preventing the efficient release of heat. This forces your refrigerator to work harder to maintain the desired temperature, leading to increased energy consumption and higher electricity bills. Secondly, an overworked compressor is more likely to overheat and fail, potentially shortening the lifespan of your refrigerator and resulting in costly repairs or replacement. Finally, a fridge that isn’t cooling efficiently can lead to food spoilage, which is both wasteful and potentially harmful to your health. Regularly cleaning your fridge coils ensures optimal performance, energy savings, and food safety.
How often should I clean my fridge coils?
The frequency of cleaning depends on several factors, including the location of your refrigerator, the presence of pets, and the overall cleanliness of your home. As a general guideline, it’s recommended to clean your fridge coils at least every six months. However, if you have pets that shed a lot, or if your fridge is located in a dusty area, you may need to clean them more frequently, perhaps every three months. A good way to tell if your coils need cleaning is to check them visually. If they are visibly covered in dust and debris, it’s time to clean them. You might also notice your fridge running more frequently or feeling warmer than usual, which could indicate that the coils are clogged.
What tools do I need to clean my fridge coils?
The tools you’ll need are quite simple and readily available. A vacuum cleaner with a hose attachment is essential for removing the bulk of the dust and debris. A soft-bristled brush attachment can be helpful for dislodging stubborn dirt. A long, flexible duster can reach coils in tight or hard-to-access areas. You may also want to have a screwdriver on hand to remove any access panels that are blocking the coils. Finally, a damp cloth can be used to wipe down the surrounding area after cleaning. Remember to always unplug your refrigerator before starting the cleaning process.
Can I use compressed air to clean my fridge coils?
Yes, compressed air can be used to clean your fridge coils, but it’s important to exercise caution. While compressed air can effectively blow away dust and debris, it can also damage the delicate coils if used improperly. Use short bursts of air and maintain a safe distance between the nozzle and the coils. Avoid using excessive pressure, as this can bend or break the coils. It’s also a good idea to wear eye protection to prevent dust and debris from getting into your eyes. Vacuuming the coils is generally a safer and more controlled method, but compressed air can be useful for reaching tight spots.
What if I can’t reach the fridge coils?
Some refrigerators have coils that are difficult to access, either because they are located behind a panel or in a tight space. In these cases, a long, flexible duster or a vacuum cleaner with a long hose attachment can be helpful. You may also need to remove any access panels to gain better access to the coils. Consult your refrigerator’s owner’s manual for instructions on how to remove these panels safely. If you are still unable to reach the coils, you may want to consider hiring a professional appliance repair technician to clean them for you.
Is it safe to clean fridge coils myself?
Yes, it is generally safe to clean fridge coils yourself, as long as you take the necessary precautions. Always unplug your refrigerator before starting the cleaning process to avoid the risk of electric shock. Be careful not to damage the coils while cleaning them. Avoid using excessive force or sharp objects that could puncture or bend the coils. Wear eye protection to prevent dust and debris from getting into your eyes. If you are uncomfortable working with electrical appliances, or if you are unsure about any part of the cleaning process, it’s best to hire a professional appliance repair technician.
Will cleaning my fridge coils really save me money?
Yes, cleaning your fridge coils can definitely save you money on your energy bills. When the coils are covered in dust and debris, your refrigerator has to work harder to maintain the desired temperature. This increased workload translates directly to higher energy consumption. By cleaning the coils, you allow your fridge to cool more efficiently, reducing its energy consumption and lowering your electricity bill. The amount of money you save will depend on the size and efficiency of your refrigerator, as well as the frequency of cleaning. However, even a small reduction in energy consumption can add up over time.
What are the signs that my fridge coils need cleaning?
There are several signs that indicate your fridge coils need cleaning. One of the most obvious signs is a visible build-up of dust and debris on the coils. You may also notice your fridge running more frequently or for longer periods of time. The interior of your fridge may feel warmer than usual, or you may experience food spoilage more quickly. Your electricity bill may also be higher than normal. If you notice any of these signs, it’s a good idea to check your fridge coils and clean them if necessary.


Leave a Comment