

Clean Keyboard Safely DIY: Is your keyboard a sticky, crumb-filled landscape of forgotten lunches and spilled coffee? Don’t worry, you’re not alone! We’ve all been there. But before you resign yourself to a lifetime of typing on a grimy surface, let me tell you about a simple, effective, and surprisingly satisfying DIY project: cleaning your keyboard safely.
Keyboards, in their modern form, have been around since the invention of the typewriter in the late 19th century. They’ve evolved from purely mechanical marvels to sophisticated electronic devices, but one thing has remained constant: their tendency to accumulate dirt and debris. Think about it – your keyboard is constantly exposed to your hands, the air, and whatever might be lurking on your desk. It’s a breeding ground for germs and a magnet for dust bunnies!
Why is it so important to clean your keyboard safely? Well, for starters, a clean keyboard is a more hygienic keyboard. Reducing the amount of bacteria on your keyboard can help prevent the spread of germs. But beyond hygiene, a clean keyboard simply functions better. Sticky keys can slow you down and lead to frustration. Plus, let’s be honest, a sparkling clean keyboard just looks and feels better. In this article, I’m going to walk you through some easy and effective DIY methods to get your keyboard looking and functioning like new, without damaging it in the process. Get ready to say goodbye to grime and hello to a cleaner, happier typing experience!

DIY: Revive Your Grimy Keyboard – A Deep Clean Guide
Okay, let’s face it, our keyboards are germ magnets. Crumbs, dust, and who-knows-what-else accumulate between the keys, turning our trusty typing tools into miniature biohazards. But fear not! I’m going to walk you through a safe and effective DIY cleaning process that will leave your keyboard sparkling and feeling brand new. This isn’t just a quick wipe-down; we’re going deep!
What You’ll Need: The Arsenal of Clean
Before we dive in, let’s gather our supplies. Having everything ready will make the process smooth and efficient.
* Screwdriver (Phillips head): For removing keycaps (if applicable and desired). Make sure it’s the right size to avoid stripping the screws.
* Keycap Puller (Optional, but highly recommended): This little tool makes removing keycaps much easier and safer than using a screwdriver. You can find them online for a few bucks.
* Small Container or Bowl: For soaking the keycaps.
* Compressed Air: This is your best friend for blasting away loose debris.
* Small Brush (Soft Bristled): An old toothbrush or a small paint brush works perfectly for scrubbing away stubborn dirt.
* Microfiber Cloths: These are essential for wiping down surfaces without leaving lint.
* Isopropyl Alcohol (70% or higher): This is our disinfectant and cleaning agent. Avoid using anything stronger than 70% on plastic, as it can cause damage.
* Cotton Swabs: For cleaning hard-to-reach areas.
* Dish Soap (Mild): For cleaning the keycaps.
* Vacuum Cleaner with Brush Attachment (Optional): For sucking up larger debris.
* Small Tray or Towel: To lay out your keycaps in an organized fashion. This will save you a headache when putting them back on!
Phase 1: Prepping for the Deep Clean
This phase is all about getting the keyboard ready for its spa day.
1. Unplug Your Keyboard: This is the most important step! Never, ever clean an electronic device while it’s plugged in. Safety first!
2. Take a Photo: Before you remove any keycaps, take a clear photo of your keyboard layout. This will be a lifesaver when you’re putting everything back together. Trust me on this one.
3. Vacuum (Optional): If your keyboard is particularly dusty or has a lot of crumbs, use a vacuum cleaner with a brush attachment to gently suck up the loose debris. Be careful not to dislodge any keycaps.
4. Compressed Air Blast: Hold the can of compressed air upright and use short bursts to blow out any remaining loose particles from between the keys. Tilt the keyboard at different angles to ensure you get everything.
Phase 2: Keycap Removal and Cleaning
Now for the fun part – getting those keycaps squeaky clean!
1. Remove the Keycaps: This is where the keycap puller comes in handy. Gently press the puller down onto the keycap, making sure the wires are securely gripping the sides. Then, pull straight up with a firm, even motion. If you don’t have a keycap puller, you can carefully use a small, flat-head screwdriver. Wrap the tip of the screwdriver with a microfiber cloth to prevent scratching the keycaps. Gently pry up one side of the keycap, then the other, until it comes loose.
Important Note: Some keyboards have stabilizers under larger keys like the spacebar, shift keys, and enter key. These stabilizers can be tricky to remove and reattach. Pay close attention to how they are connected before removing the keycaps. You might want to take a separate photo of these keys.
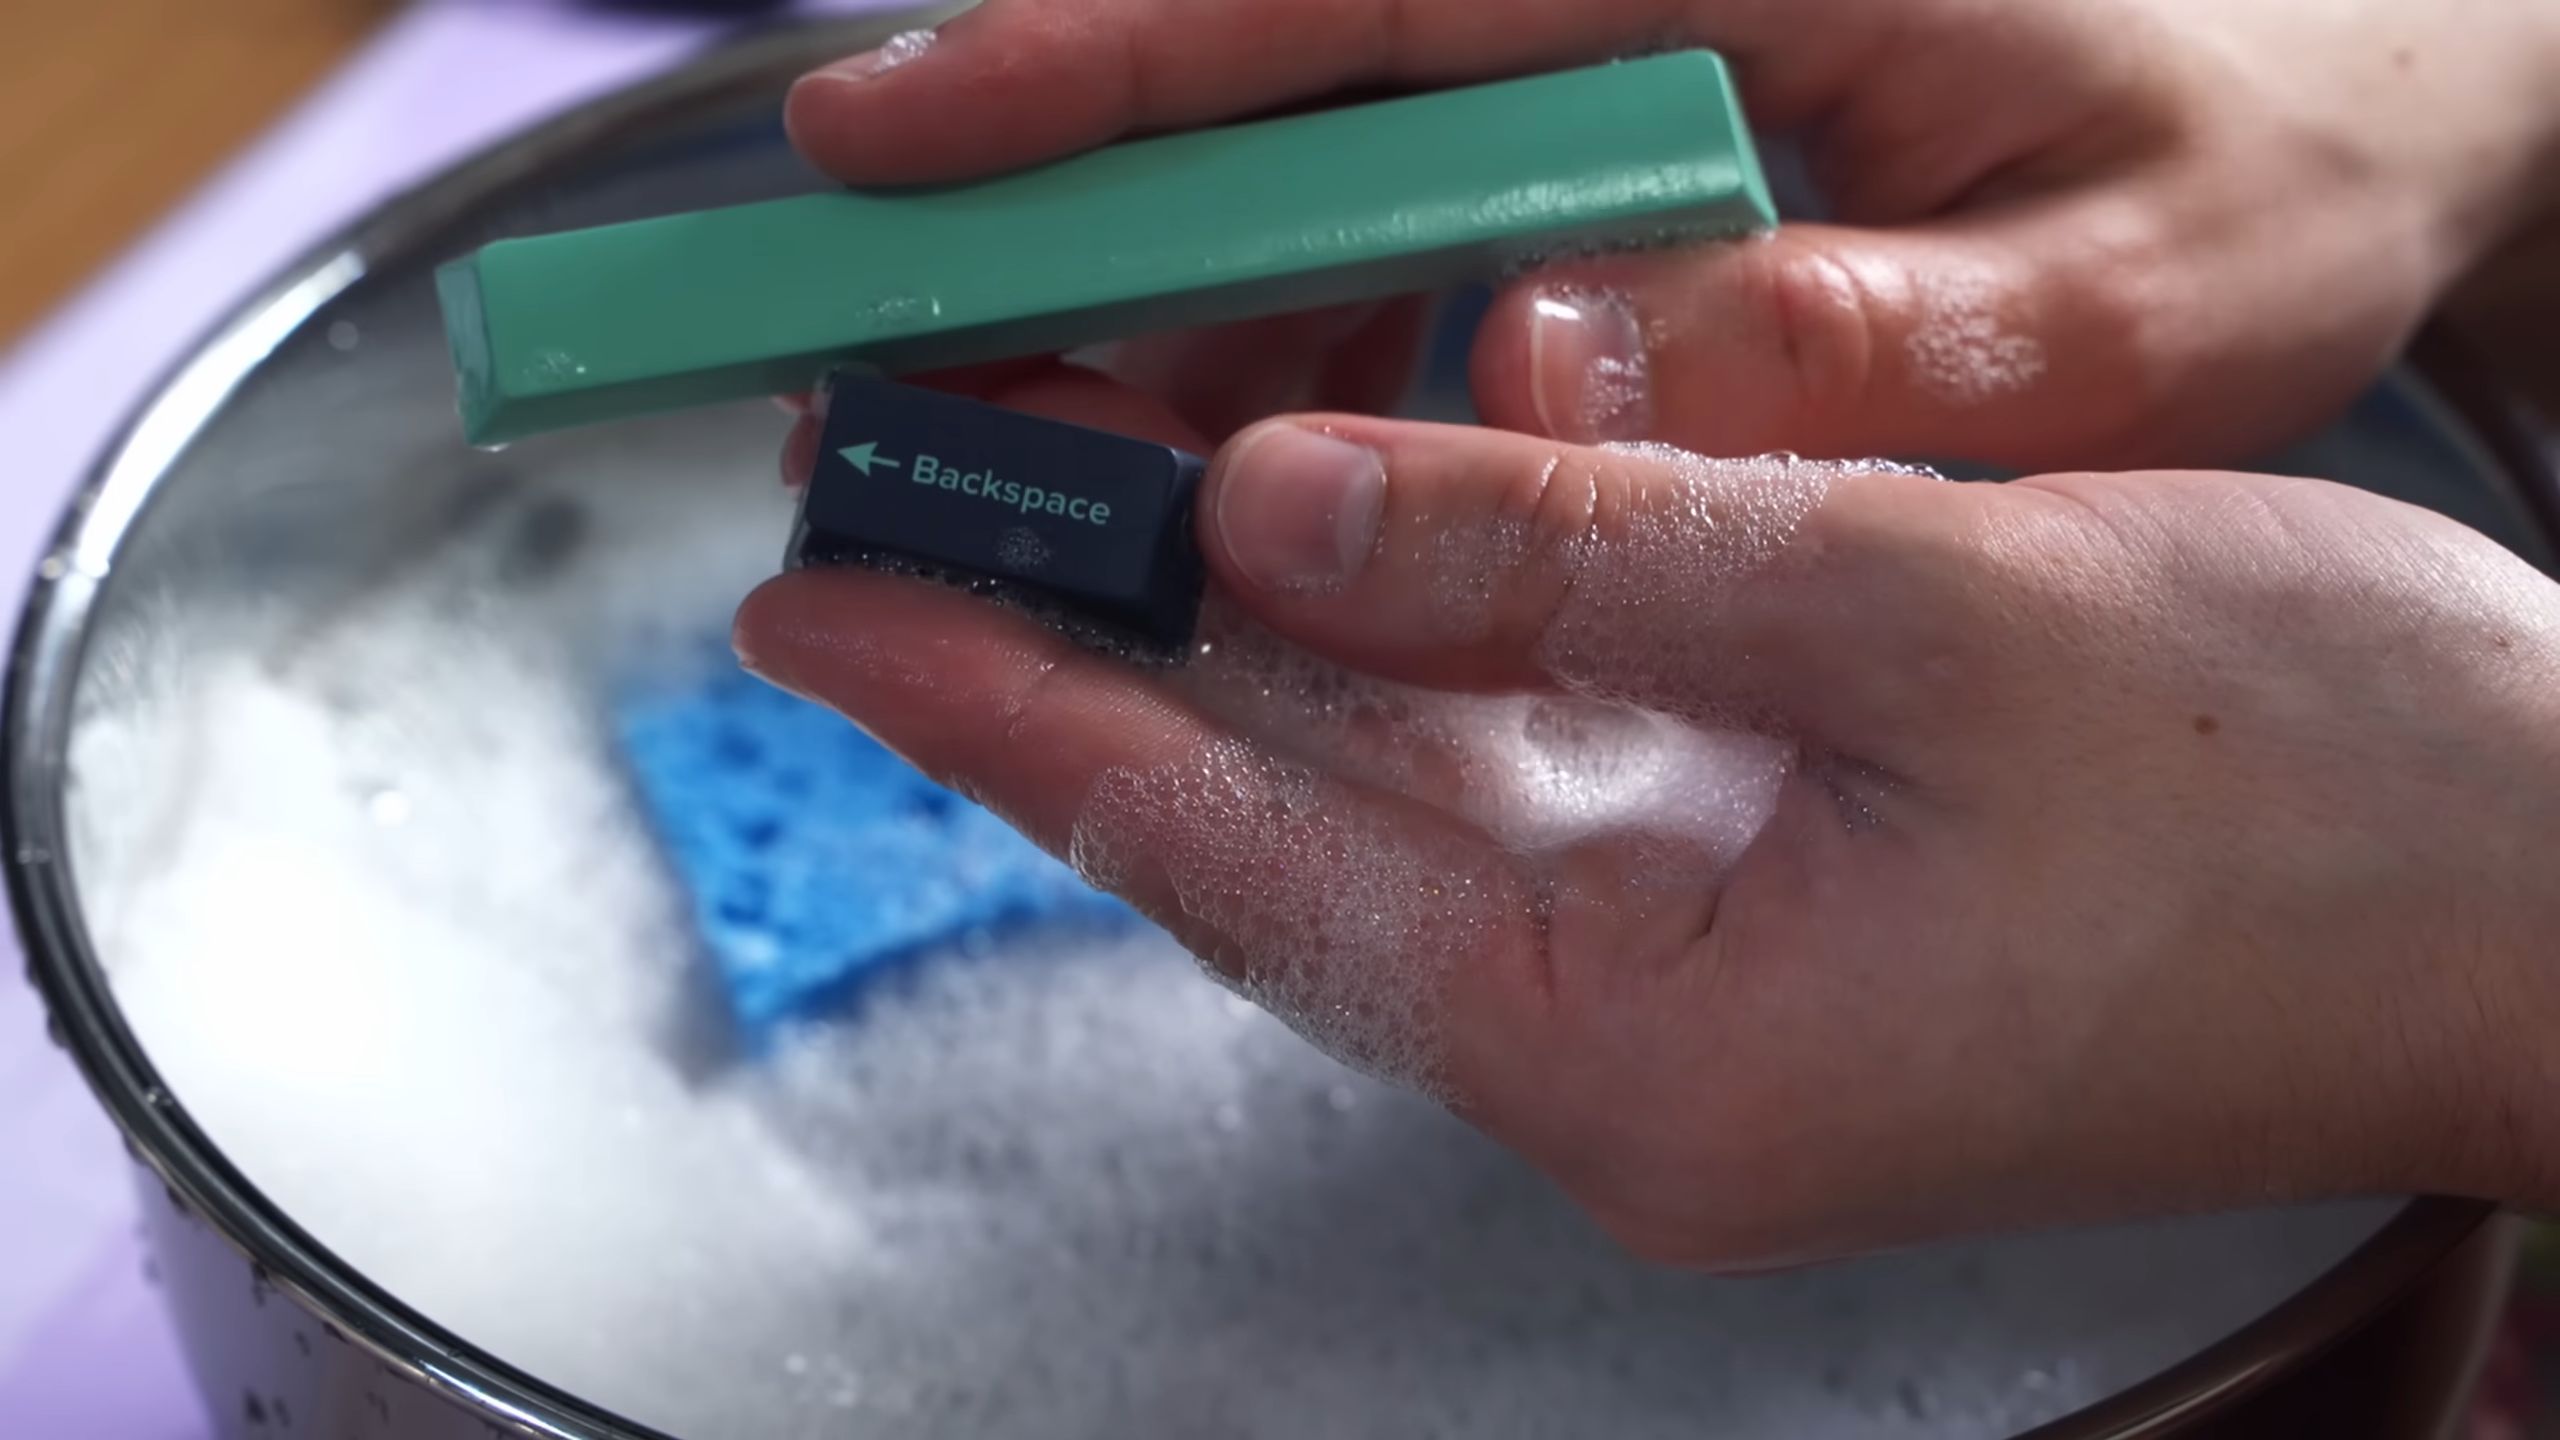
2. Soak the Keycaps: Fill your small container or bowl with warm water and a few drops of mild dish soap. Place the keycaps in the soapy water and let them soak for about 15-20 minutes. This will help loosen any grime and dirt.
3. Scrub the Keycaps: After soaking, use your small brush to gently scrub each keycap, paying attention to any stubborn dirt or grime.
4. Rinse the Keycaps: Rinse the keycaps thoroughly with clean water to remove all traces of soap.
5. Dry the Keycaps: Spread the keycaps out on a clean towel or tray to air dry completely. Make sure they are completely dry before reattaching them to the keyboard. You can speed up the drying process by using a hairdryer on a low, cool setting.
Phase 3: Cleaning the Keyboard Base
While the keycaps are drying, let’s tackle the keyboard base.
1. Compressed Air Again: Give the keyboard base another blast with compressed air to remove any debris that may have been dislodged during the keycap removal process.
2. Isopropyl Alcohol Wipe-Down: Dampen a microfiber cloth with isopropyl alcohol. Wring out any excess liquid – you don’t want to soak the keyboard. Gently wipe down the entire keyboard base, paying attention to the areas around the key switches.
3. Cotton Swab Detail Work: Use cotton swabs dipped in isopropyl alcohol to clean hard-to-reach areas, such as the corners and crevices around the key switches.
4. Stubborn Stain Removal: For any stubborn stains or sticky residue, apply a small amount of isopropyl alcohol directly to the stain and let it sit for a few seconds. Then, gently scrub with a microfiber cloth or cotton swab.
5. Final Wipe-Down: Once you’ve cleaned the entire keyboard base, use a clean, dry microfiber cloth to wipe away any remaining alcohol residue.
Phase 4: Reassembly and Final Touches
The home stretch! Let’s put everything back together and admire our sparkling clean keyboard.
1. Ensure Everything is Dry: Before reattaching the keycaps, make absolutely sure that both the keycaps and the keyboard base are completely dry. Any moisture can damage the keyboard.
2. Reattach the Keycaps: Using your photo as a guide, carefully reattach the keycaps to the keyboard. Press down firmly on each keycap until it clicks into place.
Stabilizer Keys: If your keyboard has stabilizers, make sure to reattach them correctly before pressing the keycaps down. This can be a bit tricky, so take your time and refer to the photos you took earlier.
3. Final Wipe-Down: Once all the keycaps are reattached, give the entire keyboard one last wipe-down with a clean microfiber cloth to remove any fingerprints or smudges.
4. Plug It In and Test: Plug your keyboard back in and test all the keys to make sure they are working properly. If any keys are sticking or not working, double-check that the keycaps are properly attached and that the stabilizers are correctly positioned.
Extra Tips and Tricks
* Frequency: How often you clean your keyboard depends on how often you use it and how clean you want to keep it. A deep clean every few months is generally a good idea.
* Preventative Measures: To keep your keyboard cleaner for longer, avoid eating or drinking near your keyboard. Wash your hands regularly before using your keyboard.
* Specialty Keyboards: If you have a mechanical keyboard with custom keycaps, be extra careful when removing and reattaching the keycaps. Some keycaps are more delicate than others.
* Keyboard Covers: Consider using a keyboard cover to protect your keyboard from dust, spills, and other debris.
And there you have it! A sparkling clean keyboard that’s ready for action. Enjoy the satisfying feeling of typing on a clean and refreshed keyboard. Happy typing!
Conclusion
So, there you have it! Cleaning your keyboard doesn’t have to be a daunting task involving expensive gadgets or potentially damaging liquids. This simple, effective, and surprisingly satisfying DIY trick for how to clean keyboard safely is a game-changer for anyone who spends significant time at their computer. Think about it: a cleaner keyboard not only looks better, but it also harbors fewer germs, contributing to a healthier workspace.
This method is a must-try because it’s incredibly accessible. You likely already have everything you need right in your home – a soft brush, some cotton swabs, isopropyl alcohol, and a can of compressed air. No special skills are required, and the process is straightforward, minimizing the risk of damaging your precious keyboard. Plus, the satisfaction of seeing all that accumulated dust and grime disappear is surprisingly rewarding!
But the best part? This DIY approach is adaptable. Feel free to experiment with variations to suit your specific needs and preferences. For example, if you’re dealing with particularly stubborn grime, you can slightly dampen the cotton swabs with a diluted solution of mild dish soap and water (remember to wring them out thoroughly!). You could also use a small vacuum cleaner with a brush attachment for a more powerful initial dust removal. For those hard-to-reach crevices, try using a toothpick wrapped in a microfiber cloth.
Beyond the basic cleaning, consider incorporating preventative measures to keep your keyboard cleaner for longer. Avoid eating over your keyboard, wash your hands regularly, and consider using a keyboard cover when not in use. These simple habits can significantly reduce the amount of debris that accumulates in the first place.
We truly believe that this DIY keyboard cleaning trick will transform your workspace and improve your overall computing experience. It’s a small change that can make a big difference in terms of hygiene, aesthetics, and even the longevity of your keyboard.
So, what are you waiting for? Give it a try! We’re confident that you’ll be amazed by the results. And more importantly, we want to hear about your experience! Share your before-and-after photos, your tips and tricks, and any variations you’ve discovered in the comments below. Let’s create a community of clean keyboard enthusiasts and help each other maintain a healthier and more enjoyable workspace. Your feedback will not only help others but also inspire us to continue sharing valuable DIY solutions. Let us know if you found a particularly effective method for cleaning between the keys, or if you discovered a specific type of brush that works wonders. Your insights are invaluable!
Frequently Asked Questions (FAQ)
Q: How often should I clean my keyboard using this DIY method?
A: The frequency of cleaning depends on your usage habits and environment. If you use your keyboard heavily and/or work in a dusty environment, you should aim to clean it at least once a month. If your usage is lighter, you can probably get away with cleaning it every two to three months. However, if you notice visible dirt or grime, it’s always a good idea to clean it sooner rather than later. Regular cleaning prevents the buildup of stubborn debris and keeps your keyboard functioning optimally. Consider establishing a cleaning schedule to ensure consistent maintenance.
Q: What type of isopropyl alcohol should I use?
A: We recommend using 70% isopropyl alcohol. While 90% or higher concentrations are available, they evaporate more quickly, which can make them less effective at dissolving grime. 70% isopropyl alcohol has a slightly higher water content, which helps to break down dirt and grease more effectively. However, it’s crucial to use it sparingly and ensure that the alcohol evaporates completely before using your keyboard again. Never pour alcohol directly onto your keyboard; always apply it to a cotton swab or cloth first.
Q: Can I use this method on a laptop keyboard?
A: Yes, you can use this method on a laptop keyboard, but with extra caution. Laptop keyboards are generally more sensitive than desktop keyboards, so it’s even more important to avoid using excessive liquid. Use a very lightly dampened cotton swab and be extremely careful not to let any liquid seep into the internal components. Compressed air is particularly useful for removing dust and debris from between the keys of a laptop keyboard. If you’re unsure, consult your laptop’s user manual for specific cleaning instructions.
Q: What if I spill liquid on my keyboard?
A: If you spill liquid on your keyboard, act quickly! Immediately unplug the keyboard (or turn off your laptop). Turn the keyboard upside down to allow the liquid to drain out. Use a clean, absorbent cloth to blot up as much of the liquid as possible. Do not use a hairdryer or other heat source to dry the keyboard, as this can damage the internal components. Allow the keyboard to air dry completely for at least 24 hours before using it again. If the liquid was sugary or sticky, you may need to disassemble the keyboard to clean the individual keys and components thoroughly. If you’re not comfortable disassembling your keyboard, consider taking it to a professional repair shop.
Q: What are some signs that my keyboard needs cleaning?
A: There are several signs that indicate your keyboard needs cleaning. These include visible dirt, dust, or grime on the keys or between them; sticky or unresponsive keys; a buildup of crumbs or other debris; and an unpleasant odor. You may also notice that your keyboard is attracting more dust than usual. If you experience any of these signs, it’s time to give your keyboard a good cleaning. Regular cleaning not only improves the appearance and functionality of your keyboard but also helps to prevent the spread of germs and bacteria.
Q: Can I use a vacuum cleaner to clean my keyboard?
A: Yes, you can use a vacuum cleaner to clean your keyboard, but only with a brush attachment. Avoid using a vacuum cleaner without an attachment, as the strong suction can damage the keys or pull them off. Use the brush attachment to gently loosen and remove dust and debris from the surface of the keyboard and between the keys. Be careful not to apply too much pressure, as this can also damage the keys. A handheld vacuum cleaner is ideal for this task, as it’s lightweight and easy to maneuver.
Q: Is it safe to remove the keycaps for cleaning?
A: Yes, it is generally safe to remove the keycaps for cleaning, but proceed with caution. Some keycaps are easier to remove than others, and some keyboards have keycaps that are not designed to be removed. Before removing any keycaps, research your specific keyboard model to determine the best method for removal. You can usually find instructions online or in your keyboard’s user manual. Use a keycap puller to avoid damaging the keycaps or the keyboard. Once the keycaps are removed, you can clean them with soap and water. Allow them to dry completely before reattaching them to the keyboard. Be sure to align the keycaps correctly when reattaching them.
Q: What if I don’t have compressed air?
A: If you don’t have compressed air, you can try using a can of computer duster, which is specifically designed for cleaning electronics. Alternatively, you can use a small, soft brush to dislodge dust and debris from between the keys. You can also try using a vacuum cleaner with a brush attachment, as mentioned above. However, compressed air is generally the most effective method for removing dust and debris from hard-to-reach areas. You can purchase compressed air at most electronics stores or online retailers.
Q: How can I prevent my keyboard from getting dirty in the first place?
A: There are several things you can do to prevent your keyboard from getting dirty in the first place. Avoid eating or drinking near your keyboard. Wash your hands regularly, especially before using your keyboard. Consider using a keyboard cover when you’re not using your keyboard. Regularly dust your keyboard with a soft cloth. These simple habits can significantly reduce the amount of dirt and debris that accumulates on your keyboard.


Leave a Comment