

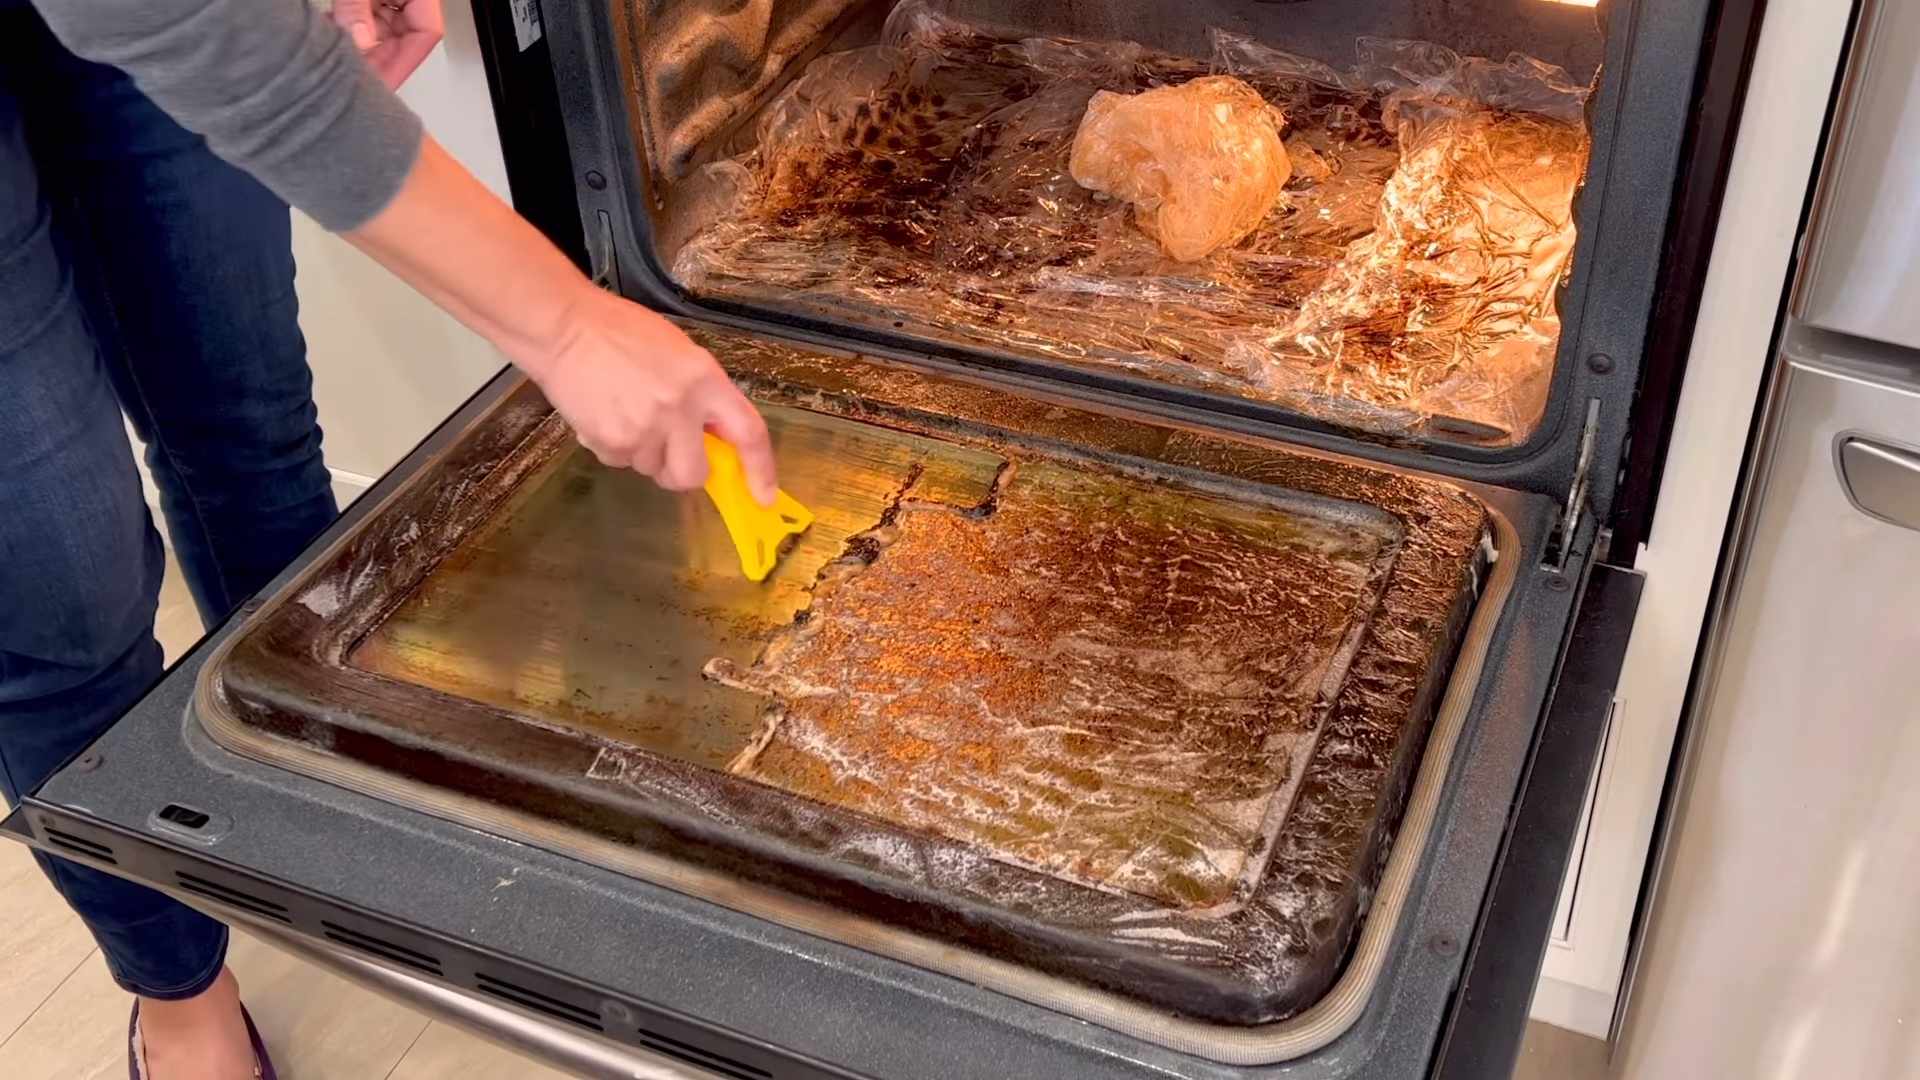
Easy way to clean oven, that’s right, I’m about to let you in on a little secret that will save you time, elbow grease, and maybe even a few tears! How many times have you stared into the abyss of your oven, a landscape of burnt-on food and greasy splatters, and thought, “Ugh, I’ll deal with that later”? We’ve all been there. Cleaning the oven is one of those chores that always seems to get pushed to the bottom of the list.
But what if I told you there’s an easy way to clean oven without harsh chemicals or hours of scrubbing? Ovens have been a central part of our kitchens for centuries, evolving from brick structures heated by wood fires to the sophisticated, self-cleaning appliances we know today. While the technology has advanced, the fundamental problem of keeping them clean remains. In the past, people relied on natural abrasives and a whole lot of elbow grease.
Let’s be honest, nobody enjoys spending their precious weekend scrubbing away at baked-on grime. This DIY trick is a game-changer because it’s not only effective but also uses ingredients you probably already have in your pantry. It’s a safer, more eco-friendly alternative to harsh chemical cleaners, and it’s incredibly satisfying to see your oven sparkling clean with minimal effort. So, ditch the rubber gloves and prepare to be amazed by this simple yet powerful cleaning hack. I promise, you’ll thank me later!
DIY Oven Cleaning: The Baking Soda & Vinegar Powerhouse!
Okay, let’s be honest, cleaning the oven is *the worst*. But it doesn’t have to be a toxic, fume-filled nightmare. I’m going to show you my favorite, super-effective, and totally natural method for getting your oven sparkling clean using just baking soda and vinegar. Trust me, it’s a game-changer!
What You’ll Need:
* Baking Soda
* White Vinegar
* Water
* Spray Bottle
* Rubber Gloves (optional, but recommended!)
* Spatula or Scraper
* Sponge or Cloth
* Old Towels or Rags
Step-by-Step Instructions:
1. Prep Your Oven: First things first, make sure your oven is completely cool. Safety first! Remove the oven racks, pizza stone, or anything else you have inside. I usually give the racks a quick soak in hot, soapy water while I’m working on the oven itself. This makes them easier to scrub later.
2. Make the Baking Soda Paste: In a bowl, mix about ½ cup of baking soda with enough water to form a spreadable paste. You want it to be thick enough to stick to the oven walls, but not so thick that it’s hard to apply. I usually start with a few tablespoons of water and add more gradually until I get the right consistency.
3. Coat the Oven: Now comes the fun part (sort of!). Using your hands (with gloves on, if you prefer – baking soda can be a bit drying), spread the baking soda paste all over the inside of your oven. This includes the back, sides, top, bottom, and even the door. Avoid the heating elements! I usually try to make the layer about ¼ inch thick. Don’t be shy – really slather it on there!
4. Let it Sit (and Work its Magic!): This is the most important step: patience! Let the baking soda paste sit in your oven for at least 12 hours, or even overnight. The longer it sits, the better it will work at loosening up all that baked-on grime. I usually do this before I go to bed so it can work its magic while I sleep.
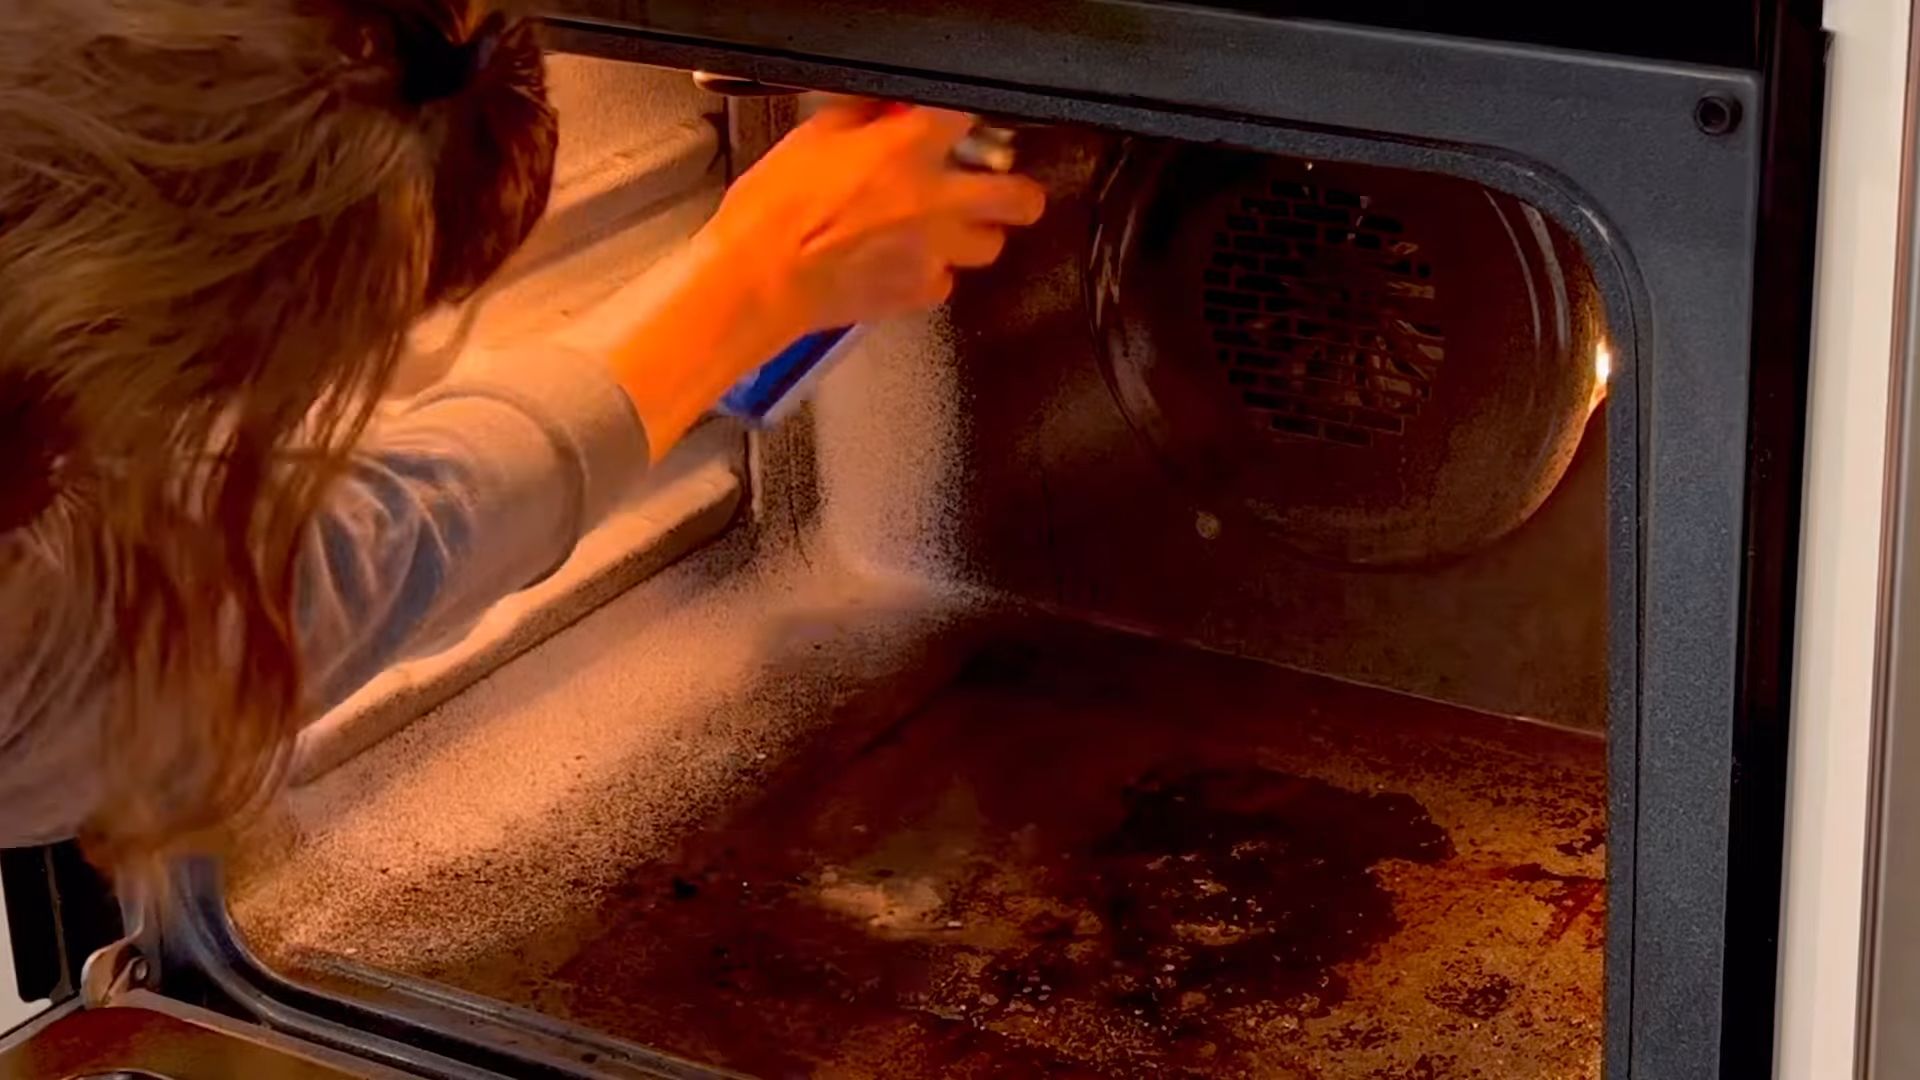
5. Wipe Away the Baking Soda: After the baking soda has had its time to work, grab a damp sponge or cloth and start wiping away as much of the dried paste as you can. This might take a little elbow grease, but the baking soda should have loosened up most of the gunk. Use your spatula or scraper to help remove any stubborn spots. I find that a plastic scraper works best to avoid scratching the oven surface.
6. Vinegar Time! Pour some white vinegar into your spray bottle. Now, spray the inside of your oven with vinegar, focusing on any areas where you still see baking soda residue. The vinegar will react with the baking soda, creating a foamy, bubbly action. This is a good thing! It helps to lift away any remaining grime.
7. Final Wipe Down: Once the fizzing has subsided, grab your damp sponge or cloth again and give the entire oven a final wipe down. Make sure to remove all traces of baking soda and vinegar. You might need to rinse your sponge or cloth frequently to keep it clean.
8. Dry and Replace: Use a clean, dry towel or rag to dry the inside of your oven completely. This will help prevent any water spots or streaks. Once it’s dry, replace the oven racks and anything else you removed earlier.
9. Admire Your Sparkling Oven! Step back and admire your sparkling clean oven! You did it! No harsh chemicals, no nasty fumes, just a little baking soda, vinegar, and elbow grease.
Cleaning the Oven Racks:
While the baking soda paste is working its magic inside the oven, let’s tackle those greasy oven racks. Here’s how I do it:
1. Soak the Racks: Fill your bathtub (or a large utility sink) with hot, soapy water. Add a cup of baking soda to the water for extra cleaning power. Submerge the oven racks in the water and let them soak for at least a few hours, or even overnight. The longer they soak, the easier they will be to clean.
2. Scrub Away the Grime: After soaking, use a scrub brush or steel wool to scrub away any remaining grease and grime. You might need to use a little elbow grease, but the soaking should have loosened up most of the baked-on food.
3. Rinse and Dry: Rinse the oven racks thoroughly with clean water to remove any soap residue. Then, dry them completely with a clean towel before placing them back in the oven.
Dealing with Stubborn Stains:
Sometimes, you might encounter some really stubborn stains that just won’t budge with the baking soda and vinegar method alone. Here are a few tips for dealing with those tough spots:
* More Baking Soda Paste: For particularly stubborn stains, try applying a thicker layer of baking soda paste and letting it sit for even longer – up to 24 hours.
* Lemon Juice: Lemon juice is a natural degreaser and can help to break down tough stains. Cut a lemon in half and rub it directly onto the stain. Let it sit for a few minutes, then wipe it away with a damp cloth.
* Salt Scrub: For really tough, baked-on food, try making a salt scrub. Mix equal parts salt and water to form a paste. Apply the paste to the stain and scrub gently with a sponge or cloth. Be careful not to scratch the oven surface.
* Commercial Oven Cleaner (as a Last Resort): If all else fails, you can use a commercial oven cleaner. However, I always try to avoid using these harsh chemicals if possible. If you do use a commercial oven cleaner, be sure to follow the instructions carefully and wear gloves and eye protection. Make sure to ventilate the area well.
Tips and Tricks for a Sparkling Clean Oven:
* Clean Regularly: The best way to keep your oven clean is to clean it regularly. I try to give mine a quick cleaning every few months, or whenever I notice it starting to get dirty.
* Use Oven Liners: Oven liners can help to catch spills and splatters, making cleanup much easier. You can buy disposable oven liners or reusable silicone oven liners.
* Don’t Forget the Door: The oven door can often be overlooked, but it’s just as important to clean as the inside of the oven. Use the same baking soda and vinegar method to clean the oven door, both inside and out.
* Clean the Heating Elements Carefully: Avoid getting the heating elements wet. If they need to be cleaned, gently wipe them down with a dry cloth.
* Ventilate the Area: Whether you’re using the baking soda and vinegar method or a commercial oven cleaner, it’s always a good idea to ventilate the area well. Open a window or turn on the exhaust fan to help remove any fumes.
* Prevention is Key: Try to prevent spills and splatters in the first place by using oven-safe dishes with lids or covering food with foil.
Why This Method Works:
You might be wondering why this simple baking soda and vinegar method is so effective. Here’s the science behind it:
* Baking Soda: Baking soda is a mild alkali, which means it can help to neutralize acids and break down grease and grime. It also has a gentle abrasive action, which helps to scrub away stubborn stains.
* Vinegar: Vinegar is a mild acid, which helps to dissolve mineral deposits and cut through grease. When vinegar reacts with baking soda, it creates carbon dioxide gas, which helps to lift away dirt and grime.
The combination of baking soda and vinegar creates a powerful cleaning action that is both effective and safe for your oven. Plus, it’s a much more environmentally friendly option than using harsh chemical cleaners.
Safety First!
While this method is generally safe, it’s always a good idea to take a few precautions:
* Wear Gloves: Baking soda can be drying to the skin, so it’s a good idea to wear rubber gloves when applying the paste.
* Avoid Contact with Eyes: Avoid getting baking soda or vinegar in your eyes. If you do, rinse them thoroughly with water.
* Don’t Mix with Other Cleaners: Never mix baking soda and vinegar with other cleaning products, as this could create harmful fumes.
* Unplug the Oven (Optional but Recommended): While not strictly necessary, unplugging the oven before cleaning adds an extra layer of safety.
So there you have it! My foolproof method for cleaning your oven with baking soda and vinegar. It might take a little time and effort, but the results are well worth it. You’ll have a sparkling clean oven without any harsh chemicals or nasty fumes. Happy cleaning!
Conclusion
So, there you have it! This simple, effective, and surprisingly satisfying DIY oven cleaning trick is a game-changer for anyone who dreads tackling that baked-on grime. Forget harsh chemicals, expensive cleaners, and hours of scrubbing. This method harnesses the power of readily available ingredients and a little bit of time to deliver sparkling results.
Why is this a must-try? Because it’s not just about cleaning; it’s about reclaiming your time and energy. Imagine spending less time wrestling with a dirty oven and more time creating delicious meals for yourself and your loved ones. It’s about breathing easier, knowing you’re not exposing yourself or your family to potentially harmful fumes. And it’s about the sheer satisfaction of seeing that stubborn grease and grime simply melt away.
But don’t just take our word for it. The beauty of this DIY oven cleaning method lies in its adaptability. Feel free to experiment with variations to suit your specific needs and preferences. For instance, if you have particularly stubborn stains, you can create a paste of baking soda and water and apply it directly to the affected areas before the overnight soak. Some people swear by adding a few drops of essential oils, like lemon or tea tree, to the water for an extra boost of freshness and antibacterial properties. Just be sure to use oven-safe essential oils and avoid applying them directly to heating elements.
Another variation involves using vinegar instead of water in the initial steaming process. The acidity of the vinegar can help to loosen even the most stubborn baked-on messes. However, be mindful of the strong smell and ensure proper ventilation while using vinegar.
This DIY oven cleaning method is truly a revelation. It’s a testament to the fact that sometimes the simplest solutions are the most effective. It’s a cost-effective, eco-friendly, and surprisingly enjoyable way to keep your oven looking its best.
We wholeheartedly encourage you to give this DIY oven cleaning trick a try. You’ll be amazed at the results. And once you’ve experienced the joy of a sparkling clean oven without the hassle, we’d love to hear about it! Share your experiences, tips, and variations in the comments below. Let’s build a community of clean oven enthusiasts and make oven cleaning a chore we no longer dread! Let us know if you found an even easier way to clean oven!
Frequently Asked Questions (FAQ)
Q: Is this DIY oven cleaning method safe for all types of ovens?
A: Generally, yes, this method is safe for most standard ovens, including electric and gas ovens. However, it’s always a good idea to consult your oven’s manual before trying any new cleaning method. Pay particular attention to any specific warnings or recommendations regarding cleaning products or techniques. If you have a self-cleaning oven, it’s generally best to use the self-cleaning function as directed by the manufacturer, unless you’re specifically trying to avoid the high heat and potential fumes associated with that process. For convection ovens, ensure that all removable parts, like the convection fan, are safe to be exposed to moisture and cleaning solutions. If you’re unsure, it’s best to err on the side of caution and test the method on a small, inconspicuous area first.
Q: How often should I use this DIY oven cleaning method?
A: The frequency of cleaning depends on how often you use your oven and how messy it gets. For most households, cleaning the oven every 1-3 months is sufficient. However, if you frequently bake or cook dishes that tend to splatter, you may need to clean it more often. A good rule of thumb is to clean your oven whenever you notice a significant buildup of grease or grime. Regular cleaning will prevent the buildup from becoming too stubborn and will make the cleaning process easier in the long run.
Q: What if I have a self-cleaning oven? Should I still use this method?
A: Self-cleaning ovens are designed to burn off food residue at extremely high temperatures. While convenient, this process can produce unpleasant odors and potentially harmful fumes. Some people also worry about the energy consumption and the potential for damage to the oven’s components. If you’re concerned about these issues, this DIY method offers a gentler alternative. You can use it instead of the self-cleaning function or as a way to maintain a cleaner oven between self-cleaning cycles. However, if your oven is heavily soiled, the self-cleaning function may be necessary for a more thorough clean.
Q: Can I use this method on the oven door glass?
A: Absolutely! This method works wonders on oven door glass. The steam and baking soda solution help to loosen baked-on grease and grime, making it easier to wipe away. For particularly stubborn stains, you can create a paste of baking soda and water and apply it directly to the glass. Let it sit for a few minutes before wiping it away with a damp cloth. You can also use a non-abrasive scrub pad to gently scrub the glass if needed. Be careful not to scratch the glass.
Q: What if I don’t have baking soda? Can I use something else?
A: While baking soda is the key ingredient in this method, you can try using washing soda (sodium carbonate) as a substitute. Washing soda is a stronger alkali than baking soda, so it may be even more effective at cutting through grease and grime. However, it’s also more caustic, so be sure to wear gloves when handling it and avoid getting it on your skin or in your eyes. You can find washing soda in the laundry aisle of most grocery stores.
Q: How do I get rid of the baking soda residue after cleaning?
A: After wiping down the oven with a damp cloth, you may notice a slight baking soda residue. To remove this, simply wipe the oven down again with a clean, damp cloth. You can also add a small amount of vinegar to the water to help neutralize the baking soda and remove any lingering residue. Be sure to dry the oven thoroughly after cleaning to prevent rust or corrosion.
Q: The grime is really stubborn. What can I do?
A: For extremely stubborn grime, you can try a few things. First, make sure the baking soda paste is thick enough and that it’s applied generously to the affected areas. Let it sit for a longer period of time, even overnight, before wiping it away. You can also try using a non-abrasive scrub pad or a plastic scraper to gently scrub the grime. Avoid using steel wool or abrasive cleaners, as these can scratch the oven’s surface. Another option is to repeat the steaming process a second time to further loosen the grime.
Q: Is this method safe for people with allergies or sensitivities?
A: This DIY oven cleaning method is generally considered safe for people with allergies or sensitivities, as it uses only natural ingredients like baking soda and water. However, if you have known allergies to baking soda or other cleaning products, it’s always best to exercise caution and test the method on a small, inconspicuous area first. If you experience any adverse reactions, discontinue use immediately. If you are adding essential oils, be sure to check for any potential allergens in the oil’s composition.
Q: Can I use this method to clean the racks and other removable parts of the oven?
A: Yes, absolutely! This method is perfect for cleaning oven racks, broiler pans, and other removable parts. Simply soak them in a solution of hot water and baking soda for several hours or overnight. The baking soda will help to loosen the baked-on grease and grime, making it easier to scrub away. For particularly stubborn stains, you can create a paste of baking soda and water and apply it directly to the affected areas. Rinse the parts thoroughly with clean water and dry them before putting them back in the oven.


Leave a Comment