

Clean Sterling Silver with Baking Soda: Is your beautiful sterling silver losing its luster? Don’t despair! I know the frustration of seeing those cherished pieces become dull and tarnished. Before you reach for harsh chemicals or expensive cleaning services, let me share a simple, effective, and surprisingly gentle DIY trick that will restore your silver’s sparkle using something you probably already have in your pantry: baking soda!
Silver has been prized for centuries, not just for its beauty but also for its antimicrobial properties. From ancient Roman tableware to elegant Victorian tea sets, silver has always held a special place in our homes and hearts. But tarnish, that pesky dark coating, is a natural process that occurs when silver reacts with sulfur compounds in the air.
Why is this DIY trick so essential? Because maintaining your sterling silver doesn’t have to be a chore! This method is not only cost-effective but also avoids the harsh chemicals found in many commercial silver cleaners. Plus, it’s incredibly satisfying to watch the tarnish disappear and your silver regain its original shine. I’m excited to show you how to clean sterling silver with baking soda and keep your treasured pieces looking their best for years to come!
DIY: Sparkling Sterling Silver with Baking Soda – A Simple Guide
Hey everyone! I’m so excited to share this super easy and effective method for cleaning your sterling silver jewelry and other items using just baking soda and a few other household items. I’ve tried countless silver cleaners over the years, and honestly, this DIY method is my absolute favorite. It’s gentle, inexpensive, and gives amazing results. Plus, it’s a fun little science experiment!
What You’ll Need
Before we dive in, let’s gather everything we need. This is a pretty low-key project, so you probably already have most of these things on hand.
* Baking Soda: The star of the show! This acts as a mild abrasive and helps to lift tarnish.
* Aluminum Foil: This is crucial for the chemical reaction that removes the tarnish.
* Boiling Water: The hot water helps to activate the baking soda and aluminum foil.
* A Glass or Ceramic Bowl: Avoid using metal bowls, as they can interfere with the cleaning process.
* Tongs or Chopsticks: To safely handle the hot silver items.
* Soft Cloth: For polishing your silver after cleaning.
* Dish Soap (Optional): For pre-cleaning heavily soiled items.
Understanding the Science Behind It
Okay, so here’s the cool part. The tarnish on silver is actually silver sulfide, a black coating that forms when silver reacts with sulfur in the air. The baking soda and aluminum foil create an electrolytic reaction. The aluminum is more reactive than the silver, so it attracts the sulfur away from the silver sulfide, effectively reversing the tarnishing process. The sulfur transfers from the silver to the aluminum foil, leaving your silver sparkling clean! Pretty neat, right?
Step-by-Step Instructions: Let’s Get Cleaning!
Alright, let’s get down to business. Follow these steps carefully, and you’ll have your silver looking brand new in no time.
1. Prepare Your Silver:
* If your silver is particularly dirty or greasy, give it a quick wash with warm water and a mild dish soap. This will remove any surface grime and allow the baking soda solution to work more effectively.
* Rinse the silver thoroughly and pat it dry with a soft cloth.
2. Line the Bowl with Aluminum Foil:
* Tear off a piece of aluminum foil large enough to line the entire inside of your bowl. Make sure the shiny side of the foil is facing up, as this is the side that will come into contact with the silver.
* Press the foil firmly against the bottom and sides of the bowl, ensuring there are no gaps or exposed areas.
3. Add Baking Soda:
* Pour about 1-2 tablespoons of baking soda into the bowl. The amount you need will depend on the size of your bowl and the amount of silver you’re cleaning. A good rule of thumb is to use enough baking soda to create a noticeable layer on the bottom of the bowl.
4. Pour in the Boiling Water:
* Carefully pour boiling water into the bowl, enough to completely submerge the silver items you’re cleaning. Be extremely cautious when handling boiling water to avoid burns.
* The water will start to fizz and bubble as it reacts with the baking soda. This is perfectly normal!
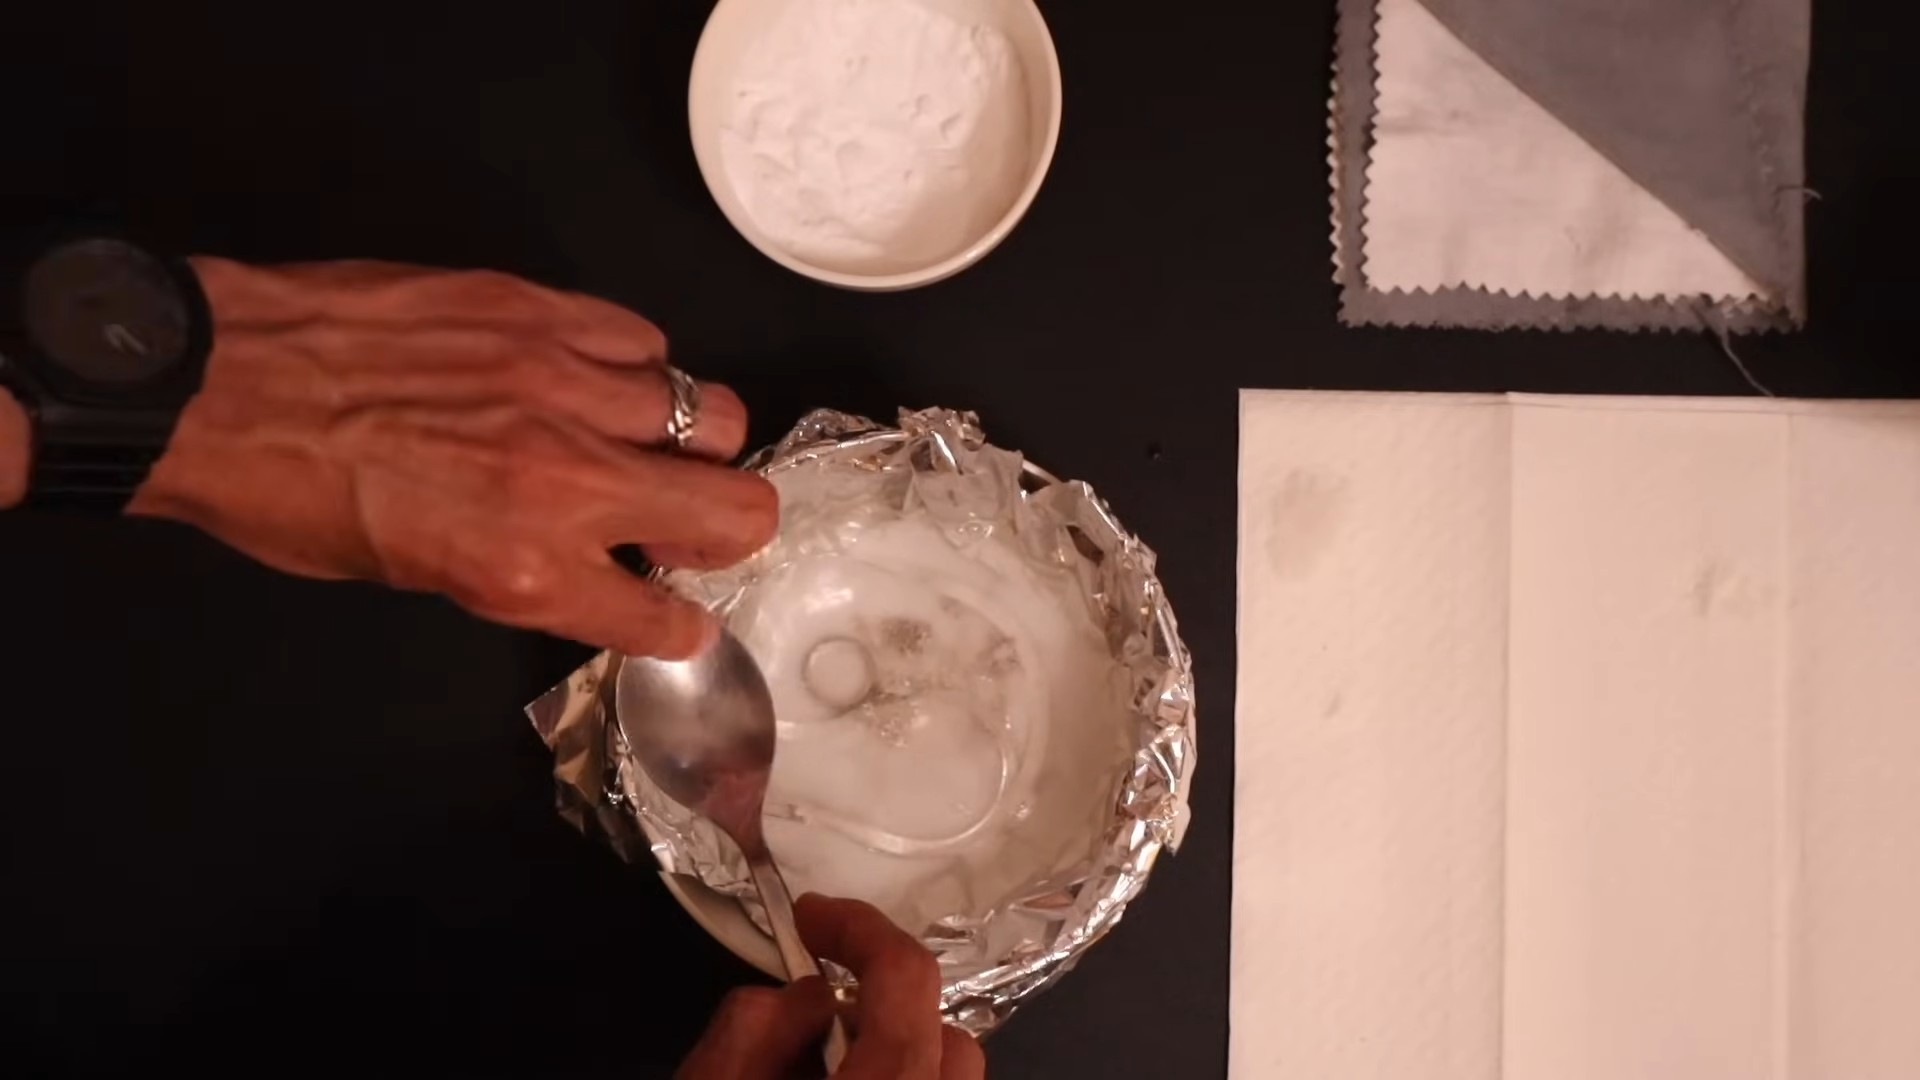
5. Submerge the Silver:
* Using tongs or chopsticks, gently place your silver items into the bowl, making sure they are touching the aluminum foil. This is essential for the electrolytic reaction to occur.
* If you have multiple items, try to arrange them so that each piece has good contact with the foil.
6. Wait and Watch the Magic Happen:
* Now comes the waiting game! Let the silver soak in the baking soda solution for 5-10 minutes, or even longer if the tarnish is particularly stubborn.
* You’ll likely see the tarnish starting to disappear from the silver and transfer onto the aluminum foil. The water may also turn a yellowish or brownish color as the tarnish is removed.
* Keep an eye on the process. If you don’t see any improvement after 5 minutes, try adding a bit more baking soda or using hotter water.
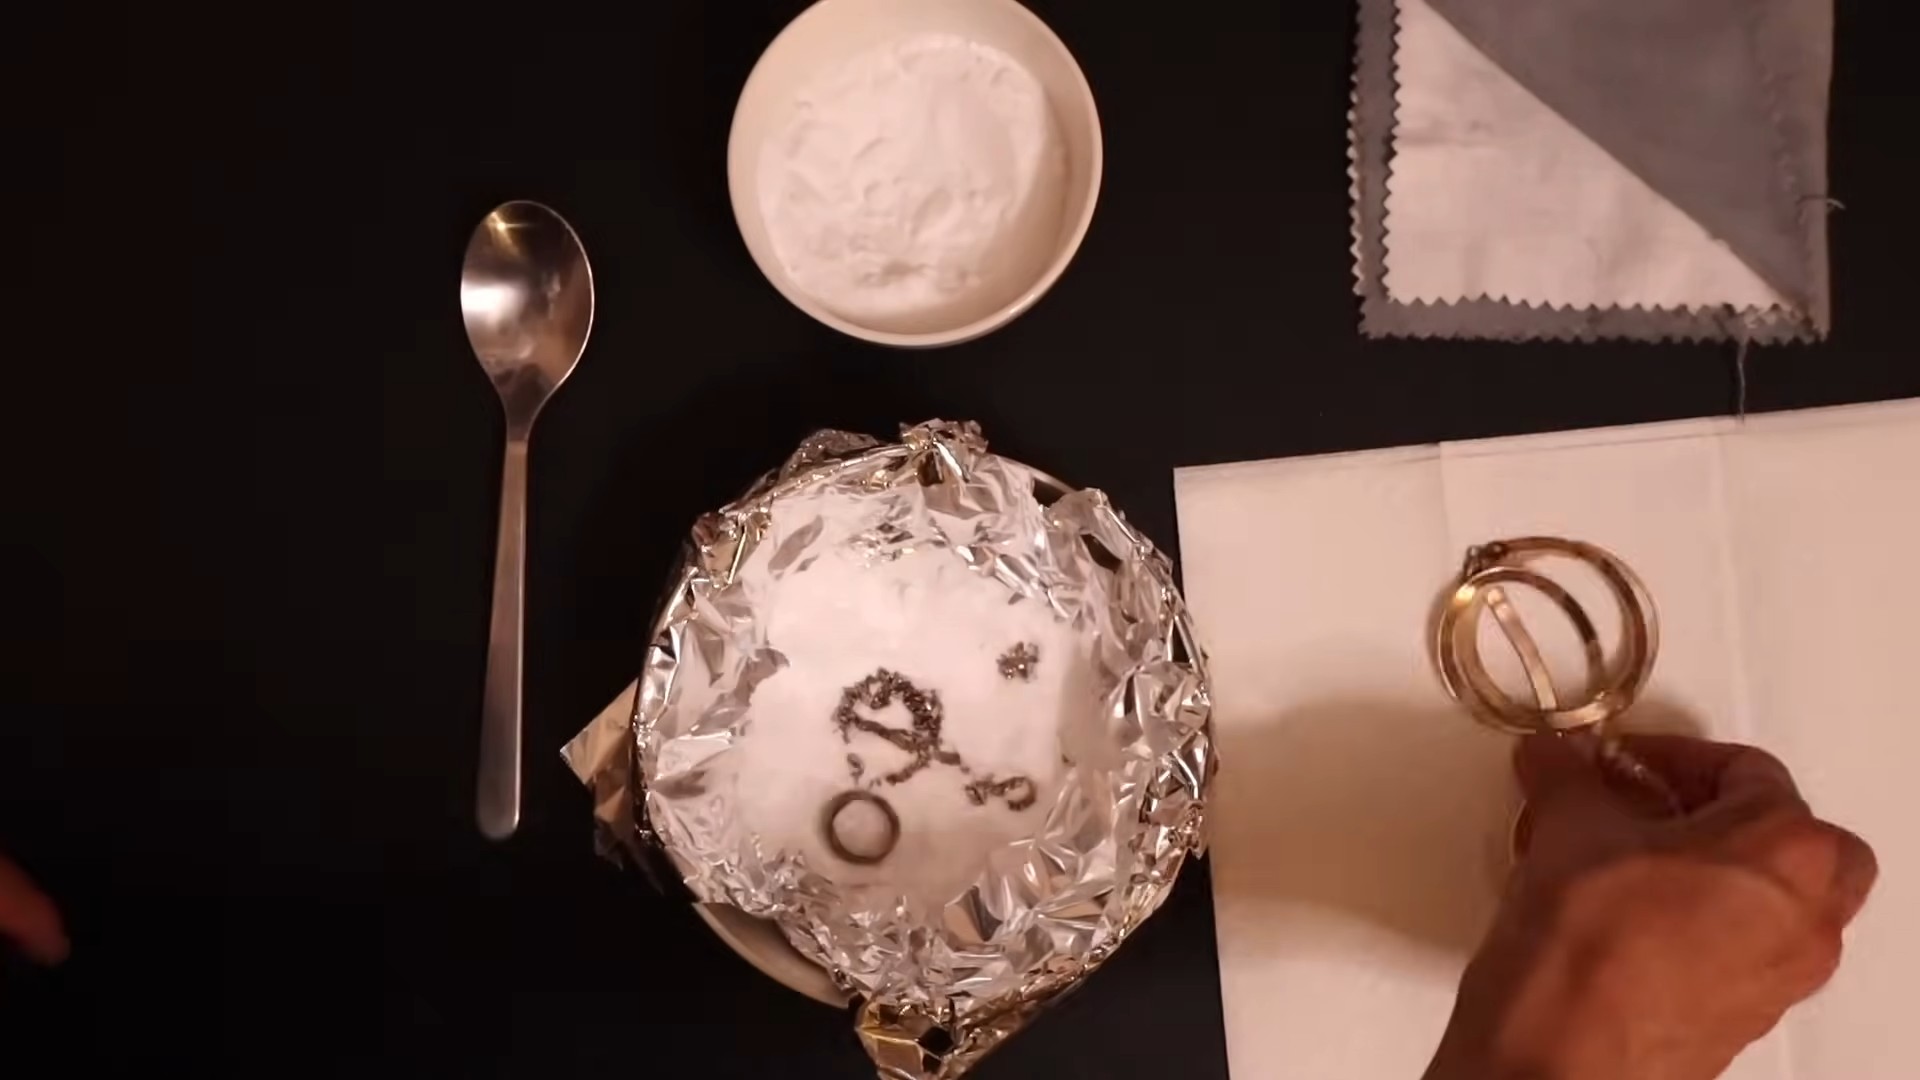
7. Remove and Rinse:
* Once the tarnish has been removed to your satisfaction, carefully remove the silver items from the bowl using tongs or chopsticks.
* Rinse the silver thoroughly under warm running water to remove any remaining baking soda residue.
8. Dry and Polish:
* Pat the silver dry with a soft, clean cloth.
* For an extra shine, you can polish the silver with a silver polishing cloth. This will remove any lingering water spots and bring out the silver’s natural luster.
Cleaning Different Types of Silver Items
This method works great for a variety of sterling silver items, but here are a few things to keep in mind for specific types of pieces:
* Jewelry: Be extra gentle when cleaning delicate jewelry items. Avoid using excessive force or abrasive cloths that could scratch the surface.
* Hollowware (Teapots, Bowls, etc.): For larger items, you may need to use a larger bowl or even a sink lined with aluminum foil. Make sure the entire surface of the silver is in contact with the foil.
* Items with Stones or Pearls: This method is generally safe for silver items with stones or pearls, but it’s always a good idea to test a small, inconspicuous area first. Avoid prolonged soaking, as some stones and pearls can be damaged by prolonged exposure to water and baking soda.
* Oxidized Silver: If you have silver items with intentional oxidation (darkened areas), be careful not to over-clean them, as this can remove the oxidation and alter the piece’s appearance.
Troubleshooting Tips
Sometimes, things don’t go exactly as planned. Here are a few common issues and how to fix them:
* Tarnish Not Removing: If the tarnish isn’t coming off, try these:
* Make sure the silver is in direct contact with the aluminum foil.
* Use hotter water.
* Add more baking soda.
* Soak the silver for a longer period of time.
* Water Turning Brown But Silver Not Cleaning: This usually means the solution is working, but the tarnish is very heavy. Be patient and let it soak longer. You may also need to replace the aluminum foil if it becomes heavily tarnished.
* White Residue on Silver: This is likely baking soda residue. Simply rinse the silver thoroughly under warm water and dry it with a soft cloth.
* Dull Finish After Cleaning: This can happen if the silver is heavily tarnished or if the water is hard. Polishing the silver with a silver polishing cloth will restore its shine.
Preventing Future Tarnish
Once you’ve cleaned your silver, you’ll want to keep it looking its best for as long as possible. Here are a few tips for preventing future tarnish:
* Store Silver Properly: Store your silver in airtight containers or bags to prevent exposure to air and moisture. You can also add anti-tarnish strips to the containers to absorb sulfur and prevent tarnishing.
* Avoid Contact with Harsh Chemicals: Keep your silver away from harsh chemicals like chlorine bleach, hairspray, and perfumes, as these can accelerate tarnishing.
* Regularly Use Your Silver: Believe it or not, using your silver regularly can actually help to prevent tarnishing. The friction from handling and washing the silver can help to remove surface tarnish before it becomes too severe.
* Clean Regularly: Even if you’re careful, your silver will eventually tarnish. Cleaning it regularly with the baking soda method or a commercial silver cleaner will help to keep it looking its best.
A Few Extra Notes
* Safety First: Always be careful when handling boiling water. Use tongs or chopsticks to avoid burns.
* Don’t Mix Metals: Avoid cleaning different types of metals together in the same solution, as this can cause discoloration or damage.
* Test on a Small Area: If you’re unsure about cleaning a particular item, test the method on a small, inconspicuous area first to make sure it doesn’t cause any damage.
* Dispose of the Solution Properly: Once you’re finished cleaning, dispose of the baking soda solution down the drain with plenty of water.
I hope you found this guide helpful! This baking soda method has been a lifesaver for me, and I’m confident it will work wonders for you too. Happy cleaning!
Conclusion
So, there you have it! A simple, effective, and surprisingly satisfying method for cleaning your sterling silver using baking soda. Forget harsh chemicals and expensive silver polishes. This DIY trick is a game-changer for anyone who wants to restore the luster to their cherished silver pieces without breaking the bank or exposing themselves to potentially harmful substances.
Why is this a must-try? Because it’s gentle yet powerful. The baking soda and aluminum foil create a chemical reaction that lifts the tarnish right off the silver, leaving it sparkling clean. It’s also incredibly convenient, using items you likely already have in your kitchen. No special trips to the store are required! Plus, it’s a fantastic way to avoid the abrasive nature of some commercial silver cleaners, which can actually scratch and damage delicate silver items over time.
But the benefits don’t stop there. This method is also environmentally friendly. You’re reducing your reliance on chemical-laden products and minimizing waste. It’s a win-win for your silver and the planet!
Looking to experiment? Consider these variations:
* Adding Salt: For particularly stubborn tarnish, try adding a tablespoon of salt to the baking soda and water mixture. The salt can help to accelerate the cleaning process.
* Using Different Containers: While a glass or plastic bowl works perfectly well, you can also use a baking dish lined with aluminum foil for larger items. Just ensure the silver is fully submerged in the solution.
* Pre-Soaking: For heavily tarnished items, a pre-soak in warm water can help to loosen the tarnish before you introduce the baking soda solution.
* Gentle Polishing: After the baking soda treatment, a gentle buff with a soft, lint-free cloth can enhance the shine and remove any remaining residue.
This DIY silver cleaning method using baking soda is more than just a cleaning hack; it’s a way to connect with your treasured possessions and care for them in a sustainable and effective way. It’s about taking pride in your belongings and preserving their beauty for years to come.
We wholeheartedly encourage you to give this method a try. You’ll be amazed at the results! And once you’ve experienced the magic of baking soda and aluminum foil, we’d love to hear about it. Share your before-and-after photos, your tips and tricks, and your overall experience in the comments below. Let’s build a community of silver-cleaning enthusiasts who are passionate about preserving the beauty of their silver using simple, natural methods. Don’t forget to share this article with your friends and family who might also benefit from this amazing DIY trick!
Frequently Asked Questions
Q: What kind of aluminum foil should I use?
A: Regular aluminum foil works perfectly fine. There’s no need to use heavy-duty foil. The key is that the aluminum foil needs to be in contact with the silver and the baking soda solution to create the necessary chemical reaction. Make sure the shiny side of the foil is facing up, as this is the more reactive side.
Q: Can I use this method on all types of silver?
A: This method is generally safe for sterling silver and silver-plated items. However, it’s not recommended for antique silver pieces, especially those with delicate details or embellishments. The chemical reaction could potentially damage the patina or other features that contribute to the antique’s value. If you’re unsure, it’s always best to consult with a professional silver restorer. Also, avoid using this method on items with gemstones or other delicate materials, as the baking soda solution could potentially damage them.
Q: How long should I leave the silver in the baking soda solution?
A: The amount of time needed will depend on the severity of the tarnish. For lightly tarnished items, a few minutes may be sufficient. For heavily tarnished items, you may need to leave them in the solution for up to 30 minutes. Check the silver periodically to see if the tarnish is lifting. You’ll notice the tarnish transferring from the silver to the aluminum foil. Once the tarnish is gone, remove the silver from the solution and rinse it thoroughly with water.
Q: The tarnish isn’t coming off completely. What should I do?
A: If the tarnish is particularly stubborn, there are a few things you can try. First, make sure the silver is in direct contact with the aluminum foil. Second, try adding a tablespoon of salt to the baking soda and water mixture. The salt can help to accelerate the cleaning process. Third, you can try gently rubbing the tarnished areas with a soft cloth or sponge while the silver is submerged in the solution. Finally, if the tarnish is still not coming off, you may need to repeat the process with a fresh batch of baking soda solution and aluminum foil.
Q: Is it safe to use boiling water?
A: While some recipes call for boiling water, it’s not strictly necessary and can potentially be dangerous. Hot water is sufficient for this method. Boiling water can also cause some plastics to warp or release harmful chemicals. Using hot water reduces the risk of burns and ensures the safety of your container.
Q: How do I prevent my silver from tarnishing again?
A: To prevent your silver from tarnishing again, store it in a cool, dry place away from direct sunlight and humidity. You can also store it in airtight bags or containers with anti-tarnish strips or cloths. These strips and cloths contain chemicals that absorb sulfur, which is the main cause of tarnish. Avoid exposing your silver to harsh chemicals, such as chlorine bleach, and always wipe it clean after use. Regular cleaning, even with a soft cloth, can also help to prevent tarnish from building up.
Q: Can I reuse the baking soda solution and aluminum foil?
A: No, it’s best to use a fresh batch of baking soda solution and aluminum foil for each cleaning session. The baking soda solution becomes less effective as it absorbs the tarnish, and the aluminum foil loses its reactivity after it has been used. Reusing the solution and foil will likely result in less effective cleaning.
Q: What if my silver has intricate details or crevices?
A: For silver items with intricate details or crevices, you may need to use a soft brush, such as an old toothbrush, to gently scrub the tarnished areas while the silver is submerged in the baking soda solution. Be careful not to apply too much pressure, as this could damage the silver. You can also use a cotton swab to reach into tight spaces. After cleaning, rinse the silver thoroughly with water and dry it completely.
Q: Will this method remove scratches from my silver?
A: No, this method will not remove scratches from your silver. It only removes tarnish. Scratches are physical imperfections in the silver and require professional polishing to remove. If your silver has scratches, you may want to consult with a professional silver restorer.
Q: Can I use this method on silver jewelry with pearls or other delicate stones?
A: It’s generally not recommended to use this method on silver jewelry with pearls or other delicate stones. The baking soda solution could potentially damage these materials. For jewelry with delicate stones, it’s best to use a specialized jewelry cleaner or consult with a professional jeweler. You can also gently wipe the silver parts of the jewelry with a soft, damp cloth.

Leave a Comment