

DIY wooden step stool projects are not just about adding a functional piece to your home; they’re about embracing a tradition of craftsmanship and resourcefulness that stretches back centuries. Think about it – for generations, people have been building their own furniture, not just out of necessity, but out of pride and a desire to create something unique and lasting. I believe that’s something special!
Have you ever reached for something on a high shelf and thought, “If only I had a little boost!”? Or perhaps you’re tired of lugging around that bulky, unattractive plastic step stool? That’s where the magic of a DIY wooden step stool comes in. This isn’t just another piece of furniture; it’s a practical solution that you can customize to perfectly match your style and needs. Plus, there’s a real sense of accomplishment that comes from building something with your own two hands.
In this article, I’m going to guide you through the process of creating your very own DIY wooden step stool. We’ll cover everything from choosing the right wood and tools to step-by-step instructions and finishing touches. Get ready to unleash your inner carpenter and create a beautiful, functional piece that you’ll be proud to use for years to come!

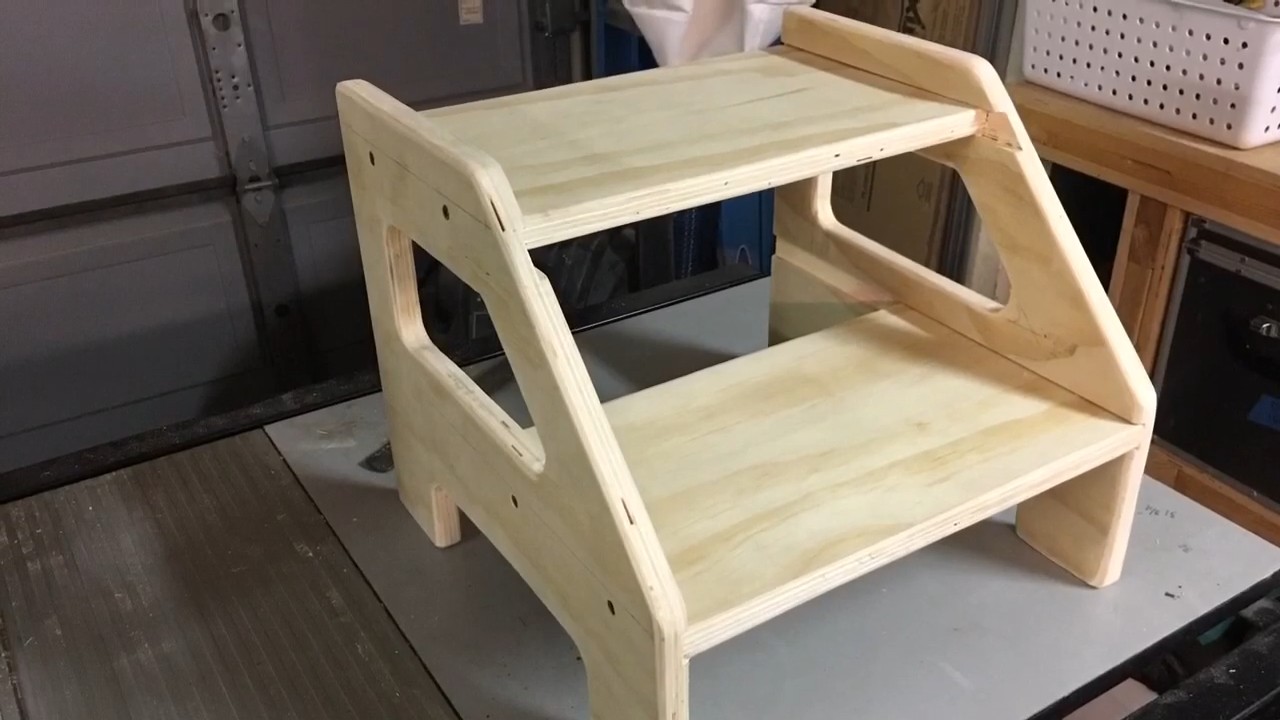
Build Your Own Rustic Wooden Step Stool: A Weekend Project!
Hey there, fellow DIY enthusiasts! I’m so excited to share this project with you – building your own sturdy and stylish wooden step stool. This isn’t just any step stool; it’s a chance to add a touch of handmade charm to your home, and trust me, the satisfaction of using something you built yourself is unbeatable. Plus, it’s a great way to save some money and customize the design to perfectly fit your needs and aesthetic. Let’s get started!
Materials You’ll Need:
Before we dive in, let’s gather our supplies. I’ve tried to keep this list as straightforward as possible, but feel free to adjust it based on your preferences and what you have on hand.
* Wood: This is the most important part! I recommend using pine or poplar for this project, as they’re relatively inexpensive and easy to work with. You’ll need:
* Two pieces of wood for the legs: 2″ x 4″ x 18″ (approximately)
* Two pieces of wood for the side supports: 1″ x 4″ x 12″ (approximately)
* One piece of wood for the top: 1″ x 12″ x 16″ (approximately)
* Note: These dimensions are just suggestions. Feel free to adjust them to create a step stool of your desired height and size. Just make sure the top is wide enough to stand on comfortably and the legs are sturdy enough to support your weight.
* Wood Screws: I suggest using 1 1/4″ wood screws for assembling the frame and 2″ wood screws for attaching the top.
* Wood Glue: This will add extra strength and stability to your step stool.
* Sandpaper: You’ll need various grits, from coarse (80-grit) to fine (220-grit), to smooth out the wood and prepare it for finishing.
* Wood Stain or Paint: Choose a color that complements your home decor. I personally love the look of a natural stain, but paint can add a pop of color.
* Polyurethane or Varnish: This will protect the wood from scratches and moisture.
* Wood Filler (Optional): If you want to hide any imperfections in the wood, wood filler is your friend.
* Safety Glasses: Always protect your eyes when working with power tools.
* Hearing Protection: Especially important when using a saw or sander.
* Work Gloves: To protect your hands.
Tools You’ll Need:
Having the right tools makes all the difference in a DIY project. Here’s what I recommend:
* Saw: A circular saw, miter saw, or hand saw will work for cutting the wood. A miter saw will give you the most precise cuts, but a hand saw is perfectly fine if you’re on a budget.
* Drill: You’ll need a drill to pre-drill holes for the screws and to drive the screws in.
* Screwdriver: If you don’t have a drill, you can use a screwdriver to drive the screws in, but it will take a lot more effort.
* Sander: An orbital sander will make sanding much faster and easier, but you can also sand by hand.
* Measuring Tape: For accurate measurements.
* Pencil: For marking the wood.
* Clamps: To hold the wood pieces together while the glue dries.
* Square: To ensure that the corners are square.
* Paintbrushes or Rags: For applying stain, paint, and polyurethane.
Building the Frame:
This is where the magic happens! We’ll start by assembling the legs and side supports to create the sturdy frame of our step stool.
1. Cut the Wood: Using your saw, carefully cut the wood according to the dimensions listed in the “Materials You’ll Need” section. Double-check your measurements before cutting to avoid mistakes. I always measure twice and cut once!
2. Sand the Wood: Use coarse sandpaper (80-grit) to smooth out any rough edges or splinters. Then, switch to medium sandpaper (120-grit) and finally fine sandpaper (220-grit) for a smooth finish. This step is crucial for a professional-looking result.
3. Assemble the Legs and Side Supports: Apply wood glue to the ends of the side supports where they will connect to the legs. Position the side supports between the legs, ensuring they are flush with the top and bottom edges. Use clamps to hold the pieces together while the glue dries.
4. Pre-Drill Holes: Before driving in the screws, pre-drill pilot holes through the side supports and into the legs. This will prevent the wood from splitting. Use a drill bit that is slightly smaller than the diameter of the screws.
5. Drive in the Screws: Drive the 1 1/4″ wood screws through the pre-drilled holes, securing the side supports to the legs. Make sure the screws are flush with the surface of the wood.
6. Check for Square: Use a square to ensure that the frame is square. If it’s not, gently adjust it until it is.
Attaching the Top:
Now, let’s add the top to our step stool. This is what you’ll actually be standing on, so it’s important to attach it securely.
1. Center the Top: Place the top piece of wood on top of the frame, centering it so that it overhangs the frame equally on all sides.
2. Pre-Drill Holes: Pre-drill pilot holes through the top and into the frame. Again, use a drill bit that is slightly smaller than the diameter of the screws. I usually drill four holes per side, spacing them evenly.
3. Apply Wood Glue: Apply wood glue to the top of the frame where it will contact the top piece of wood.
4. Drive in the Screws: Drive the 2″ wood screws through the pre-drilled holes, securing the top to the frame. Make sure the screws are flush with the surface of the wood.
5. Wipe Away Excess Glue: Use a damp cloth to wipe away any excess glue that squeezes out.
Finishing Touches:
This is where you can really personalize your step stool and make it your own!
1. Fill Holes (Optional): If you want to hide the screw holes, apply wood filler to them. Let the wood filler dry completely, then sand it smooth.
2. Sand Again: Give the entire step stool a final sanding with fine sandpaper (220-grit) to ensure a smooth surface.
3. Apply Stain or Paint: Choose your favorite stain or paint and apply it to the step stool according to the manufacturer’s instructions. I usually apply two coats for a richer color. Let the stain or paint dry completely between coats.
4. Apply Polyurethane or Varnish: Apply a coat of polyurethane or varnish to protect the wood from scratches and moisture. This will also give the step stool a nice sheen. Let the polyurethane or varnish dry completely, then sand it lightly with fine sandpaper (220-grit) and apply another coat. I recommend applying at least two coats for maximum protection.
5. Let it Dry: Allow the step stool to dry completely before using it. This usually takes 24-48 hours.
Adding Extra Flair (Optional):
Want to take your step stool to the next level? Here are a few ideas:
* Rounded Edges: Use a router or sandpaper to round over the edges of the top for a more comfortable and refined look.
* Decorative Cutouts: Use a jigsaw to cut out decorative shapes in the legs or side supports.
* Stencils: Use stencils to add patterns or designs to the top of the step stool.
* Upholstery: Add a padded cushion to the top for extra comfort.
* Non-Slip Feet: Attach rubber feet to the bottom of the legs to prevent the step stool from slipping.
Safety First!
Before you start using your new step stool, please keep these safety tips in mind:
* Inspect Regularly: Check the step stool regularly for any signs of damage, such as loose screws or cracks in the wood.
* Use on a Level Surface: Always use the step stool on a level surface to prevent it from tipping over.
* Don’t Overload: Do not exceed the weight capacity of the step stool.
* Be Careful: Use caution when climbing on and off the step stool.
* Supervise Children: Do not allow children to use the step stool unsupervised.
And there you have it! Your very own handmade wooden step stool. I hope
Conclusion
So, there you have it! Crafting your own DIY wooden step stool isn’t just about saving money; it’s about creating a functional and beautiful piece that reflects your personal style and woodworking skills. We’ve walked you through the process, from selecting the right wood to adding those finishing touches that make your stool truly unique.
But why is this DIY project a must-try? Because it empowers you to take control of your home environment. Instead of settling for mass-produced, often flimsy, step stools, you can build something sturdy, reliable, and perfectly sized for your needs. Imagine reaching those high shelves in your pantry with confidence, knowing that your handcrafted stool is up to the task. Think about the satisfaction of knowing you built something with your own two hands, a tangible representation of your creativity and resourcefulness.
Furthermore, this project offers endless opportunities for customization. Feeling adventurous? Experiment with different wood types. Walnut, cherry, or even reclaimed wood can add a touch of rustic charm. Consider painting or staining your stool to match your existing décor. Stencils, wood burning, or even adding decorative tiles can transform a simple step stool into a work of art. For added comfort, you could even upholster the top with a padded cushion. The possibilities are truly limitless!
Don’t be afraid to get creative with the design itself. While we’ve provided a basic template, feel free to adjust the dimensions to suit your specific needs. Perhaps you need a taller stool for reaching higher shelves, or a wider stool for added stability. You could even incorporate storage into the design, adding a small shelf beneath the seat for storing cleaning supplies or gardening tools.
This DIY wooden step stool project is more than just a weekend activity; it’s an investment in your home and your skills. It’s a chance to learn new techniques, express your creativity, and create something that you’ll use and appreciate for years to come.
We wholeheartedly encourage you to give this project a try. Gather your materials, dust off your tools, and embark on this rewarding DIY adventure. And most importantly, don’t forget to share your creations with us! We’d love to see your unique designs and hear about your experiences. Share photos of your finished step stools on social media using [Your Hashtag Here] and let us know what you learned along the way. Your feedback will not only inspire others but also help us improve our instructions for future DIY enthusiasts. So, get building and let your creativity shine!
Frequently Asked Questions (FAQ)
What type of wood is best for a DIY wooden step stool?
The best type of wood depends on your budget, desired aesthetic, and woodworking experience. Softwoods like pine are affordable and easy to work with, making them a good choice for beginners. However, they are more prone to dents and scratches. Hardwoods like maple, oak, and cherry are more durable and offer a more refined look, but they are also more expensive and require more skill to work with. Consider reclaimed wood for a rustic and eco-friendly option. Ultimately, choose a wood that you enjoy working with and that complements your home décor.
What tools do I need to build a wooden step stool?
The essential tools include:
* A saw (circular saw, hand saw, or jigsaw) for cutting the wood to size.
* A drill with various drill bits for creating pilot holes and driving screws.
* A measuring tape and pencil for accurate measurements and marking.
* A sander (orbital sander or sandpaper) for smoothing rough edges and surfaces.
* Clamps for holding the wood pieces together while the glue dries.
* Wood glue for creating strong and durable joints.
* Screws for added reinforcement.
* Safety glasses and ear protection for safety.
Optional but helpful tools include:
* A miter saw for precise angled cuts.
* A router for creating decorative edges.
* A wood planer for smoothing and flattening wood surfaces.
How can I make my step stool more stable?
Stability is crucial for a step stool. Here are some tips to enhance stability:
* Use thicker wood for the legs and top.
* Ensure all joints are strong and secure. Use wood glue and screws for maximum strength.
* Add cross braces between the legs for added support.
* Make sure the legs are evenly spaced and angled slightly outwards for a wider base.
* Consider adding rubber feet to the bottom of the legs to prevent slipping.
* Test the stool on a level surface before using it.
How do I finish my wooden step stool?
Finishing your step stool protects the wood and enhances its appearance. Here are some options:
* **Painting:** Choose a paint color that complements your décor. Apply a primer first for better adhesion and durability.
* **Staining:** Stain enhances the natural grain of the wood. Choose a stain color that you like and apply it evenly.
* **Sealing:** Apply a sealant (polyurethane, varnish, or lacquer) to protect the wood from moisture and wear.
* **Oil finish:** Oil finishes (like linseed oil or tung oil) penetrate the wood and provide a natural, matte finish.
Always follow the manufacturer’s instructions for the specific finish you choose.
How do I customize my wooden step stool?
The possibilities for customization are endless! Here are some ideas:
* **Add a padded seat:** Upholster the top of the stool with foam and fabric for added comfort.
* **Incorporate storage:** Add a small shelf beneath the seat for storing items.
* **Use decorative wood:** Choose wood with interesting grain patterns or knots.
* **Add stencils or wood burning:** Decorate the stool with stencils or wood burning designs.
* **Paint or stain it in a unique color:** Choose a bold or unexpected color to make your stool stand out.
* **Add decorative hardware:** Use decorative screws or knobs to add a touch of personality.
* **Incorporate mosaic tiles:** Add mosaic tiles to the top of the stool for a colorful and artistic touch.
What safety precautions should I take when building a wooden step stool?
Safety is paramount when working with power tools. Always wear safety glasses and ear protection. Use clamps to secure the wood pieces while cutting or drilling. Work in a well-ventilated area. Follow the manufacturer’s instructions for all tools and materials. If you are not comfortable using power tools, consider taking a woodworking class or asking for help from someone who is experienced.
How long will it take to build a wooden step stool?
The time it takes to build a wooden step stool depends on your skill level, the complexity of the design, and the tools you have available. A simple step stool can be completed in a weekend, while a more complex design may take longer. Plan ahead and allow yourself plenty of time to complete the project.
What if I make a mistake?
Mistakes happen! Don’t get discouraged. If you make a mistake, try to fix it. If you can’t fix it, you can always start over. Woodworking is a learning process, and every mistake is an opportunity to learn and improve. Remember to take your time, measure carefully, and double-check your work before cutting or drilling.
Where can I find inspiration for my DIY wooden step stool?
There are many sources of inspiration online and in print. Browse woodworking websites, magazines, and books for ideas. Look at photos of step stools online and in stores. Visit craft fairs and flea markets to see what other people are creating. Don’t be afraid to experiment and come up with your own unique design.

Leave a Comment