

DIY Origami Divider Box: Transform your cluttered spaces into havens of organization with this surprisingly simple and elegant craft! Have you ever felt overwhelmed by the chaos of your desk drawers or the jumble of small items scattered around your home? I know I have! That’s why I’m so excited to share this fantastic DIY project that not only declutters but also adds a touch of artistic flair to your surroundings.
Origami, the ancient Japanese art of paper folding, has been practiced for centuries, evolving from ceremonial traditions to a beloved form of creative expression. While often associated with intricate animal figures, origami’s principles can be applied to create practical and beautiful storage solutions. This DIY Origami Divider Box is a testament to that versatility, offering a unique and customizable way to organize everything from jewelry and craft supplies to office essentials.
In today’s fast-paced world, where minimalism and mindful living are gaining popularity, finding simple yet effective ways to declutter is more important than ever. This project is perfect for anyone looking to reduce waste, personalize their space, and embrace a more organized lifestyle. Plus, it’s a fun and rewarding activity that can be enjoyed by crafters of all skill levels. So, grab some paper, and let’s get folding! I’m confident you’ll love the results.

DIY Origami Divider Box: Organize Your Life with Paper!
Hey there, fellow crafters! Are you tired of messy drawers and cluttered desks? I know I am! That’s why I’m super excited to share this awesome DIY project with you: an origami divider box! It’s a fun, easy, and surprisingly sturdy way to organize small items like jewelry, office supplies, or even makeup. Plus, it’s a fantastic way to use up those pretty patterned papers you’ve been hoarding (guilty!).
This project is perfect for beginners, and the best part? You only need paper! Let’s get folding!
Materials You’ll Need:
* Square sheets of paper: The size will determine the final size of your box. I recommend starting with 6×6 inch or 8×8 inch paper for practice. You’ll need:
* One sheet for the base of the box. Choose a sturdy paper for this. Cardstock works great!
* Four sheets for the sides of the box. You can use the same paper as the base or mix and match for a fun look!
* As many sheets as you want dividers.
* Ruler (optional, but helpful for precise folds)
* Pencil (optional, for marking fold lines)
* Scissors (optional, for trimming excess paper)
* Bone folder or similar tool (optional, for crisp creases)
Making the Base of the Box
This is the foundation of our organizer, so let’s make it strong!
1. Start with your square sheet of paper for the base. Place it on a flat surface.
2. Fold in half diagonally, crease well, and unfold. You should now have a crease running from one corner to the opposite corner.
3. Repeat on the other diagonal. Now you have an “X” crease on your paper.
4. Fold in half horizontally, crease well, and unfold.
5. Fold in half vertically, crease well, and unfold. You should now have a grid of creases dividing your paper into eight equal triangles.
6. Collapse the paper into a “waterbomb base.” This is a bit tricky to describe, but here’s how I do it: Bring two opposite corners together along the horizontal crease. The paper will naturally start to fold inwards along the diagonal creases. Flatten the paper so that it forms a smaller square. You should have four flaps pointing upwards.
7. Fold the top layer of the top flap to the center line. Do this on both sides of the top flap. You’re essentially making a kite shape.
8. Repeat step 7 on the other side of the waterbomb base. You should now have a diamond shape with four “kite” flaps.
9. Fold the top point of each “kite” flap down to the bottom point. Crease well. This will create a smaller diamond shape.
10. Unfold the last fold you made in step 9.
11. Open the top flap of each “kite” and fold the top point inside. This creates a pocket. You’re essentially reversing the fold you just made. This step can be a little fiddly, but take your time.
12. Repeat step 11 on all four “kite” flaps. You should now have a square with four pockets.
13. Stand the box up. Gently push the sides of the square outwards to form the base of your box. The pockets you created will help to hold the sides in place.
Making the Sides of the Box
Now that we have the base, let’s create the sides to give our box some height!
1. Start with one of your square sheets of paper for the sides.
2. Fold in half diagonally, crease well, and unfold.
3. Repeat on the other diagonal.
4. Fold in half horizontally, crease well, and unfold.
5. Fold in half vertically, crease well, and unfold. Just like with the base, you’re creating a grid of creases.
6. Collapse the paper into a waterbomb base. (Refer to step 6 in the “Making the Base” section if you need a refresher.)
7. Fold the top layer of the top flap to the center line. Do this on both sides of the top flap, creating a kite shape.
8. Repeat step 7 on the other side of the waterbomb base.
9. Fold the top point of each “kite” flap down to the bottom point. Crease well.
10. Fold the top point of each “kite” flap down to the bottom point again. Crease well. This is different from the base, where we only folded it once.
11. Unfold the last fold you made in step 10.
12. Open the top flap of each “kite” and fold the top point inside. This creates a pocket.
13. Repeat step 12 on all four “kite” flaps.
14. Repeat steps 1-13 with the remaining three sheets of paper for the sides.
15. Attach the sides to the base. Carefully slide the pockets of each side piece onto the edges of the base. The fit should be snug. If it’s too loose, you can use a tiny bit of glue to secure them.
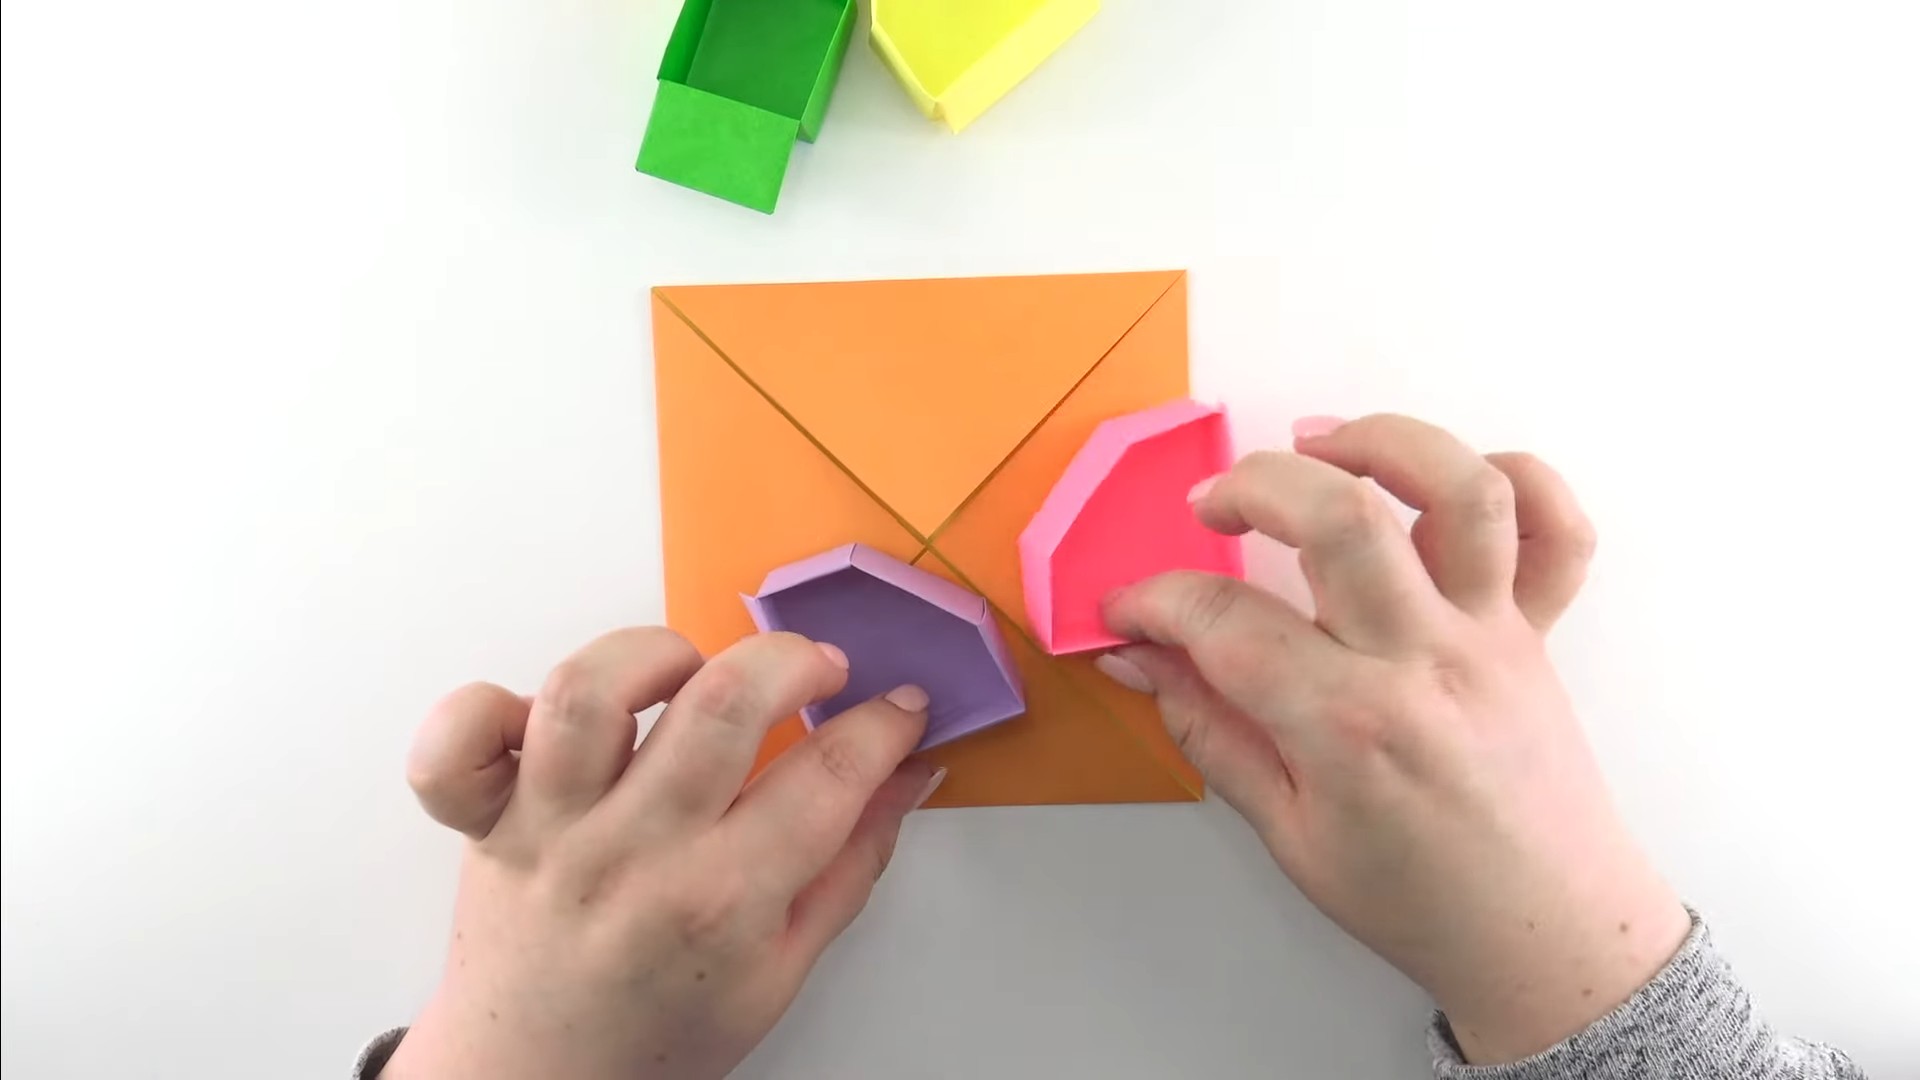
Making the Dividers
This is where you can really customize your box to fit your needs!
1. Start with a square sheet of paper for a divider.
2. Fold in half vertically, crease well, and unfold.
3. Fold in half horizontally, crease well, and unfold.
4. Fold the top edge to the center crease, crease well.
5. Fold the bottom edge to the center crease, crease well. You should now have a long, narrow rectangle.
6. Fold the rectangle in half, crease well. This will give your divider some extra strength.
7. Repeat steps 1-6 for each divider you want to create.
8. Insert the dividers into the box. You can arrange them however you like to create different sized compartments. The folded edges of the dividers should help them stand upright. You might need to trim the dividers slightly to fit perfectly within the box. Use scissors to trim if needed.
Tips and Tricks for Origami Success
* Practice makes perfect! Don’t get discouraged if your first attempt isn’t perfect. Keep practicing, and you’ll get the hang of it.
* Use crisp creases. A bone folder or even the edge of a ruler can help you create sharp, clean creases. This will make your box stronger and more visually appealing.
* Choose the right paper. Thicker paper like cardstock is ideal for the base of the box, as it will provide more support. You can use thinner paper for the sides and dividers if you prefer.
* Experiment with different sizes and colors. Try making boxes of different sizes to suit your needs. You can also use different colored and patterned papers to create a unique and personalized organizer.
* Don’t be afraid to get creative! This is just a basic template. Feel free to experiment with different folds and techniques to create your own unique origami divider box.
* If you are having trouble with the waterbomb base, search online for a video tutorial. Seeing it done visually can be very helpful!
* Consider using double-sided tape for extra security. If you find that the sides are slipping off the base, a small piece of double-sided tape can help to keep them in place.
Possible Uses for Your Origami Divider Box
* Jewelry organizer: Keep your earrings, rings, and necklaces neatly separated.
* Office supply organizer: Store paperclips, rubber bands, and other small office essentials.
* Makeup organizer: Organize your lipsticks, eyeshadows, and other makeup products.
* Craft supply organizer: Keep your beads, buttons, and other craft supplies neatly sorted.
* Desk organizer: Perfect for holding pens, pencils, and other desk accessories.
* Drawer organizer: Use multiple boxes to create a custom drawer organization system.
* Gift box: A beautiful and unique way to present a small gift.
I hope you enjoyed this DIY origami divider box tutorial! I know I’ll be making a bunch more to organize my own space. Happy folding!
Conclusion
So, there you have it! Crafting your own DIY Origami Divider Box is not just a fun afternoon project; it’s a practical and surprisingly elegant solution to a common organizational problem. Forget those flimsy, mass-produced plastic dividers that crack and break after a few uses. This origami method offers a durable, customizable, and aesthetically pleasing alternative that you can tailor to your exact needs.
Why is this a must-try? Because it’s incredibly versatile. Need to organize your desk drawers? Create smaller boxes for jewelry or makeup? Or perhaps you’re looking for a unique way to present small gifts? The possibilities are truly endless. Plus, it’s a fantastic way to repurpose old paper, giving it a new lease on life and contributing to a more sustainable lifestyle.
Beyond the basic design, there’s plenty of room for experimentation. Try using different types of paper to achieve different looks and levels of sturdiness. Cardstock will create a more robust box, perfect for heavier items, while decorative origami paper can add a touch of personality and flair. You could even line the inside of the box with felt or fabric for a softer touch, especially if you’re using it to store delicate items.
Consider these variations to truly personalize your DIY Origami Divider Box:
* Size Adjustments: Scale the dimensions of your starting paper to create boxes of varying sizes. A larger square will result in a larger box, and vice versa. This allows you to create a whole system of nested boxes for optimal organization.
* Color Coordination: Use different colored paper for the base and the dividers to create a visually appealing and easily identifiable system. This is especially helpful if you’re organizing items by category.
* Labeling: Add small labels to the sides of the boxes to clearly identify the contents. This is particularly useful for organizing craft supplies, office materials, or even pantry items.
* Patterned Paper: Experiment with patterned or textured paper to add visual interest. Geometric patterns, floral designs, or even maps can create a unique and eye-catching storage solution.
* Reinforcements: For boxes that will hold heavier items, consider reinforcing the corners with glue or tape for added stability.
We wholeheartedly encourage you to give this DIY Origami Divider Box a try. It’s a simple, satisfying, and incredibly useful project that you can complete in just a few minutes. Once you’ve mastered the basic technique, you’ll be amazed at the endless possibilities.
Don’t be afraid to get creative and experiment with different materials and designs. And most importantly, we want to hear about your experience! Share your creations with us on social media using [Your Hashtag Here] and let us know how you’re using your origami divider boxes to organize your life. We can’t wait to see what you come up with! Happy folding!
Frequently Asked Questions (FAQ)
What kind of paper is best for making an origami divider box?
The best paper for your DIY Origami Divider Box depends on what you plan to store in it. For lightweight items like jewelry or small office supplies, standard origami paper or even printer paper will work just fine. However, for heavier items like craft supplies or tools, we recommend using cardstock or thicker paper. You can also reinforce thinner paper with glue or tape for added durability. Experiment with different types of paper to find what works best for your needs. Remember that the thicker the paper, the more challenging it might be to fold, especially for beginners.
Is it difficult to make an origami divider box?
No, not at all! The basic origami divider box is a relatively simple project that even beginners can master with a little practice. The key is to follow the instructions carefully and make sure your folds are precise. There are many online tutorials and videos available that can guide you through the process step-by-step. Don’t be discouraged if your first attempt isn’t perfect. Just keep practicing, and you’ll be folding like a pro in no time!
How do I make the box bigger or smaller?
To adjust the size of your DIY Origami Divider Box, simply start with a larger or smaller square of paper. The dimensions of the finished box will be directly proportional to the size of the starting square. For example, if you want to double the size of the box, start with a square that is twice as large. Keep in mind that larger boxes may require thicker paper for added stability.
Can I use glue or tape to reinforce the box?
Absolutely! While the origami design is inherently sturdy, you can definitely use glue or tape to reinforce the box, especially if you’re planning to store heavier items. Apply a small amount of glue to the corners and edges of the box to strengthen the seams. You can also use tape to reinforce the bottom of the box for added support. Clear tape is a good option if you want to maintain the aesthetic appeal of the origami design.
How do I clean my origami divider box?
Cleaning your DIY Origami Divider Box depends on the type of paper you used. If you used standard paper, you can gently wipe it down with a slightly damp cloth. Avoid using excessive water, as this can damage the paper. For cardstock or coated paper, you can use a slightly more damp cloth. If you’ve lined the box with fabric, you can spot clean it with a mild detergent.
What are some other uses for origami divider boxes?
The possibilities are endless! Besides organizing drawers and shelves, origami divider boxes can be used for:
* Gift Packaging: Create unique and personalized gift boxes for small items.
* Party Favors: Fill them with treats or small toys for party guests.
* Desk Organizers: Keep your pens, pencils, and other desk supplies neatly organized.
* Travel Organizers: Use them to separate and organize items in your suitcase.
* Craft Storage: Store beads, buttons, and other small craft supplies.
* Seed Starters: Use them as biodegradable seed starting pots.
Can I make these with kids?
Yes! Making DIY Origami Divider Boxes is a great activity to do with kids. It’s a fun and educational way to teach them about origami and develop their fine motor skills. Just be sure to supervise them closely, especially when using scissors or glue. Choose simpler designs and use colorful paper to make it even more engaging for them.
Where can I find inspiration for different origami divider box designs?
The internet is a treasure trove of origami inspiration! Search for “origami box tutorials” on YouTube or Google to find a wide variety of designs and techniques. You can also find inspiration on Pinterest and other social media platforms. Don’t be afraid to experiment and try out different designs to find what you like best.
How long does it take to make one box?
Once you get the hang of it, you can make a basic origami divider box in just a few minutes. The first few attempts may take a little longer, but with practice, you’ll be able to fold them quickly and efficiently. The more complex designs may take a bit more time, but the results are well worth the effort.
What if my paper tears while I’m folding?
If your paper tears while you’re folding, don’t panic! You can try to repair the tear with a small piece of tape. However, if the tear is too large or in a critical area, it’s best to start with a new piece of paper. Using thicker paper can help prevent tearing, especially when folding more complex designs.


Leave a Comment