

DIY hydroponic vegetable garden: Ever dreamt of plucking fresh, vibrant vegetables right from your living room, regardless of the season? Imagine ditching those wilted grocery store greens for crisp, homegrown goodness. Well, stop dreaming and start doing! This article is your ultimate guide to creating your very own DIY hydroponic vegetable garden, a project that’s not only incredibly rewarding but also surprisingly simple.
Hydroponics, the art of growing plants without soil, has a rich history, dating back to ancient civilizations like the Hanging Gardens of Babylon and the floating gardens of the Aztecs. Today, it’s experiencing a modern renaissance as people seek sustainable and space-saving ways to cultivate their own food. I know I was tired of relying on store-bought produce that often lacked flavor and freshness. That’s why I dove headfirst into the world of hydroponics, and I’m excited to share my knowledge with you!
Why should you embark on this DIY adventure? Because a DIY hydroponic vegetable garden offers a multitude of benefits. It’s perfect for urban dwellers with limited space, allowing you to grow a surprising amount of produce in a small area. It’s also incredibly efficient, using less water and often resulting in faster growth rates compared to traditional soil-based gardening. Plus, there’s something deeply satisfying about nurturing plants from seed to harvest, knowing exactly what went into your food. So, let’s get our hands dirty (or rather, wet!) and explore the wonderful world of DIY hydroponics!
Building Your Own Thriving DIY Hydroponic Vegetable Garden
Hey there, fellow gardening enthusiasts! Are you ready to ditch the dirt and dive into the fascinating world of hydroponics? I’m so excited to share my experience building a simple yet effective hydroponic vegetable garden right at home. It’s easier than you think, and the rewards – fresh, delicious veggies – are totally worth it! This guide will walk you through every step, from gathering your materials to harvesting your first crop. Let’s get started!
What is Hydroponics, Anyway?
Before we get our hands dirty (well, not really dirty!), let’s quickly cover what hydroponics actually is. Simply put, it’s growing plants without soil, using nutrient-rich water solutions. Plants get everything they need directly from the water, leading to faster growth and higher yields. Plus, you can do it indoors or outdoors, making it perfect for any space.
Choosing Your Hydroponic System: The Kratky Method
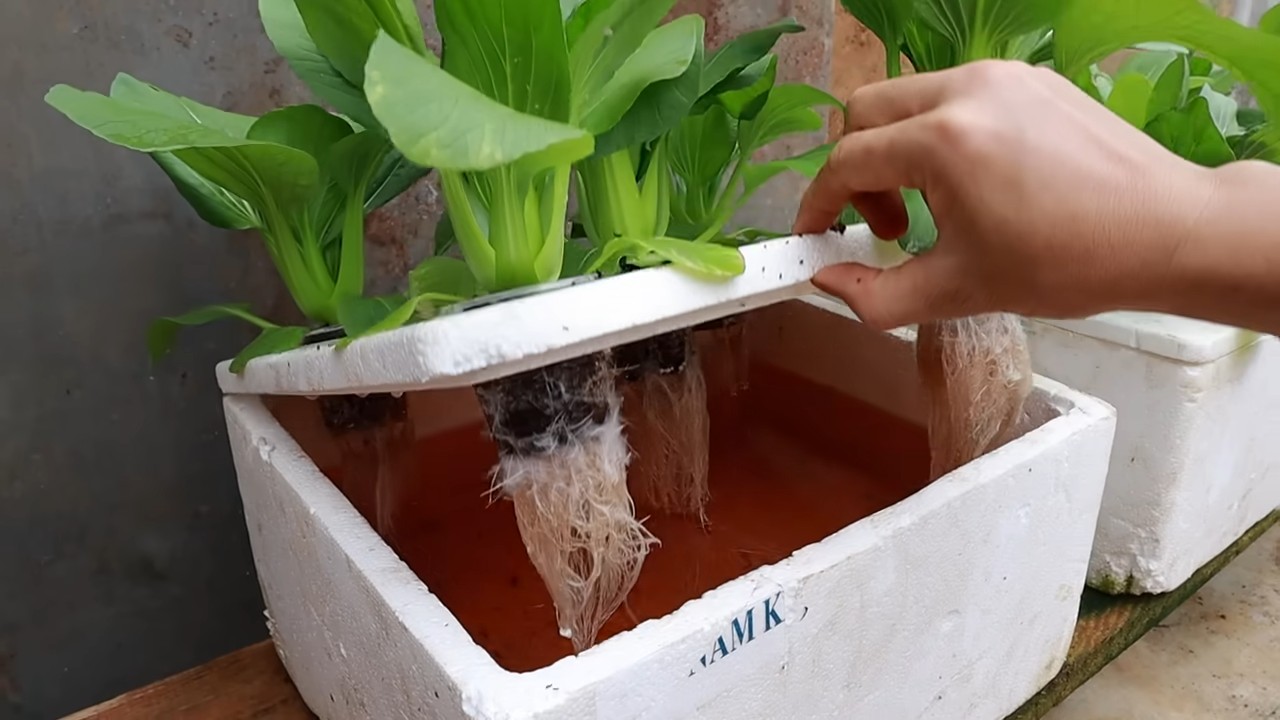
There are many different hydroponic systems, but for beginners, I highly recommend the Kratky method. It’s passive, meaning it doesn’t require pumps or electricity, making it super easy and cost-effective. In the Kratky method, the plant’s roots are partially submerged in the nutrient solution, with the upper roots exposed to air. As the plant grows and the water level drops, more roots are exposed to air, providing a constant supply of oxygen.
Materials You’ll Need
Here’s a list of everything you’ll need to build your Kratky hydroponic garden:
* Containers: Opaque plastic containers with lids (buckets, storage totes, or even repurposed containers work great). I used two 5-gallon buckets for my first setup. Opaque is important to prevent algae growth.
* Net Pots: These hold your plants and growing medium. 3-inch net pots are a good size for most vegetables.
* Growing Medium: Inert materials like coco coir, perlite, or rockwool cubes. I prefer coco coir for its water retention and aeration.
* Hydroponic Nutrients: A balanced nutrient solution specifically formulated for hydroponics. Look for a two-part nutrient solution (A and B) for optimal results.
* Seeds or Seedlings: Choose vegetables that thrive in hydroponic systems, such as lettuce, spinach, herbs, tomatoes, peppers, and strawberries.
* Drill with Hole Saw Attachment: To create holes in the lids for the net pots.
* Measuring Cups and Spoons: For accurately measuring nutrients.
* pH Meter or pH Test Kit: To monitor and adjust the pH of the nutrient solution.
* Water: Clean, dechlorinated water. Tap water is fine if it’s been left out for 24 hours to allow chlorine to evaporate.
* Optional:
* Grow lights (if growing indoors and lacking sufficient natural light)
* pH Up and pH Down solutions (to adjust pH)
* TDS meter (to measure the total dissolved solids in the nutrient solution)
Step-by-Step Instructions: Building Your Kratky System
Alright, let’s get building! Follow these steps carefully, and you’ll have your hydroponic garden up and running in no time.
1. Prepare the Containers
1. Clean the containers thoroughly: Wash the buckets or totes with soap and water to remove any dirt or residue. Rinse them well.
2. Drill holes in the lids: Use the hole saw attachment on your drill to create holes in the lids that are slightly smaller than the diameter of your net pots. The net pots should fit snugly in the holes. I usually space the holes about 6-8 inches apart, depending on the size of the plants I’m growing.
3. Consider painting the outside: While the inside needs to be opaque, you can paint the outside of your containers to make them more aesthetically pleasing.
2. Prepare the Growing Medium
1. Rinse the growing medium: If you’re using coco coir, rinse it thoroughly with water to remove any excess salts. This is important because coco coir can sometimes contain high levels of sodium.
2. Soak the growing medium: Soak the coco coir in water for a few hours before using it. This will help it retain moisture.
3. Prepare the Nutrient Solution
1. Add water to the container: Fill the container with the appropriate amount of water, leaving a few inches of space at the top.
2. Add nutrients: Carefully measure the hydroponic nutrients according to the manufacturer’s instructions. Typically, you’ll add part A first, stir well, and then add part B. Never mix the concentrated nutrient solutions directly together, as this can cause them to precipitate out of solution.
3. Check and adjust pH: Use a pH meter or pH test kit to check the pH of the nutrient solution. The ideal pH range for most hydroponic vegetables is between 5.5 and 6.5. If the pH is too high, add a small amount of pH Down solution. If it’s too low, add a small amount of pH Up solution. Always add pH adjusting solutions gradually and recheck the pH after each addition.
4. Plant Your Seeds or Seedlings
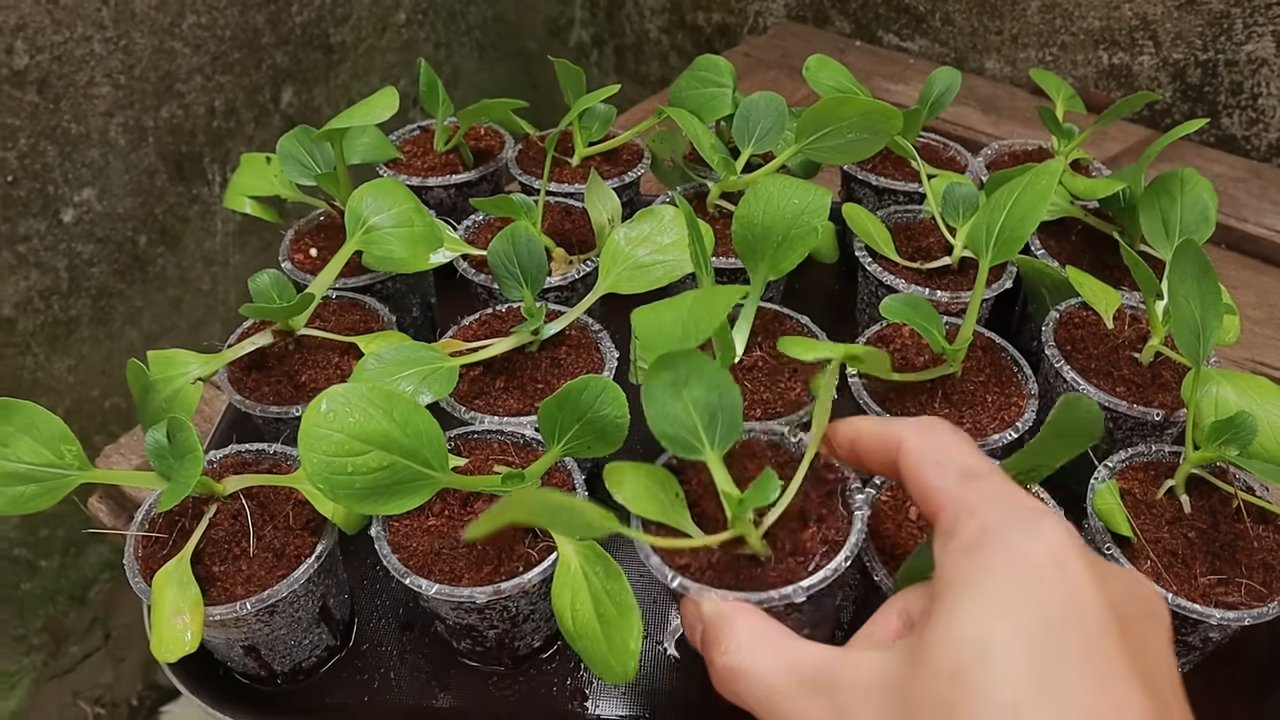
1. Start seeds (optional): If you’re starting from seeds, you can germinate them in a separate seed starting tray or directly in the net pots filled with the growing medium. Keep the growing medium moist until the seeds germinate.
2. Transplant seedlings: Gently remove the seedlings from their original containers and place them in the net pots. Fill the net pots with the growing medium, ensuring that the roots are covered.
3. Place net pots in the lids: Insert the net pots into the holes in the lids. The bottom of the net pots should be submerged in the nutrient solution.
5. Provide Light and Air Circulation
1. Provide adequate light: If you’re growing indoors, you’ll need to provide artificial light. LED grow lights are a great option because they’re energy-efficient and produce very little heat. Place the lights about 12-18 inches above the plants. If you’re growing outdoors, choose a location that receives at least 6 hours of sunlight per day.
2. Ensure air circulation: Good air circulation is important to prevent fungal diseases. If you’re growing indoors, you can use a small fan to circulate the air.
Maintaining Your Hydroponic Garden
Once your hydroponic garden is set up, it’s important to maintain it properly to ensure healthy plant growth.
1. Monitor the Nutrient Solution
1. Check the water level: The water level will gradually decrease as the plants absorb the nutrient solution. Replenish the water level as needed, using fresh nutrient solution.
2. Check the pH: Check the pH of the nutrient solution regularly (at least once a week) and adjust it as needed.
3. Change the nutrient solution: Change the entire nutrient solution every 2-3 weeks to prevent nutrient imbalances and the buildup of harmful bacteria.
2. Prune and Train Your Plants
1. Prune regularly: Prune your plants regularly to remove any dead or yellowing leaves. This will help to improve air circulation and prevent diseases.
2. Train your plants: If you’re growing vining vegetables like tomatoes or cucumbers, you’ll need to train them to grow up a trellis or stake.
3. Pest and Disease Control
1. Inspect plants regularly: Inspect your plants regularly for signs of pests or diseases.
2. Use organic pest control methods: If you find any pests, use organic pest control methods such as insecticidal soap or neem oil.
3. Prevent diseases: Prevent diseases by ensuring good air circulation and avoiding overwatering.
Troubleshooting Common Problems
Even with the best care, you might encounter some problems along the way. Here are a few common issues and how to address them:
* Yellowing Leaves: This could be a sign of nutrient deficiency. Check the nutrient solution and adjust it as needed. It could also be a pH imbalance, so check and adjust the pH.
* Slow Growth: This could be due to insufficient light. Make sure your plants are getting enough light, either from natural sunlight or grow lights.
* Algae Growth: Algae growth can occur if the nutrient solution is exposed to light. Make sure your containers are opaque and that the lids are tightly sealed.
* Root Rot: Root rot is a fungal disease that can occur if the roots are constantly submerged in water. Ensure that the upper roots are exposed to air.
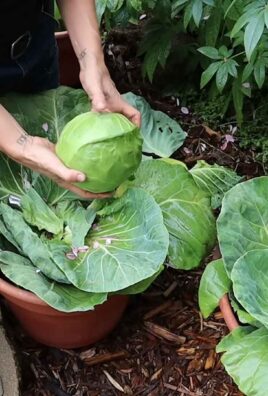
Harvesting Your Vegetables
The best part of hydroponic gardening is, of course, harvesting your fresh, delicious vegetables! Harvest your vegetables when they are ripe and ready to eat. Lettuce and spinach can be harvested by cutting off the outer leaves, allowing the plant to continue growing. Tomatoes and peppers should be harvested when they are fully colored and slightly soft to the touch
Conclusion
So, there you have it! Creating your own DIY hydroponic vegetable garden isn’t just a fun project; it’s a gateway to fresher, healthier, and more sustainable eating. We’ve walked you through the steps, demystified the process, and hopefully, ignited a spark of inspiration within you.
Why is this DIY trick a must-try? Because it puts you in control. You control the nutrients, you control the environment, and you control the quality of the food you’re putting on your table. Forget about questionable supermarket produce shipped from thousands of miles away. With a hydroponic garden, you can harvest crisp lettuce, juicy tomatoes, and vibrant herbs right from your own home, regardless of the season or your outdoor space limitations.
But the benefits extend beyond just fresh produce. A hydroponic garden is incredibly efficient. It uses significantly less water than traditional soil-based gardening, making it an environmentally conscious choice. It also eliminates the need for harmful pesticides and herbicides, ensuring that your vegetables are as pure and natural as possible. Plus, the rapid growth rates associated with hydroponics mean you’ll be enjoying the fruits (and vegetables!) of your labor much sooner than you would with conventional gardening.
Don’t be afraid to experiment! This guide provides a solid foundation, but the beauty of DIY is the opportunity to personalize and adapt. Try different nutrient solutions to see which works best for your chosen vegetables. Explore different growing mediums, from rockwool to coco coir. Consider adding a timer to your grow lights for optimal light cycles. You can even integrate a small pump and reservoir to automate the watering process further.
Variations to Consider:
* Vertical Hydroponics: If space is truly limited, consider building a vertical hydroponic system. This maximizes your growing area by stacking plants vertically, making it ideal for balconies or small apartments.
* Deep Water Culture (DWC): For beginners, DWC is an excellent starting point. It’s simple to set up and maintain, requiring minimal components.
* Nutrient Film Technique (NFT): For more advanced growers, NFT offers precise control over nutrient delivery, leading to potentially higher yields.
* Kratky Method: This passive hydroponic method requires no pumps or electricity, making it a low-maintenance option.
The possibilities are endless! The key is to start small, learn as you go, and don’t be discouraged by initial setbacks. Gardening, in any form, is a learning process.
We are confident that you will enjoy the process of creating your own DIY hydroponic vegetable garden. We encourage you to take the plunge and experience the satisfaction of growing your own food. And most importantly, we want to hear about your journey! Share your successes, your challenges, and your tips with us and the wider community. Post photos of your thriving hydroponic gardens on social media using #DIYHydroponics and tag us! Let’s inspire others to embrace this innovative and rewarding way to grow. We can’t wait to see what you create!
FAQ
What exactly is hydroponics, and is it difficult to learn?
Hydroponics is a method of growing plants without soil, using water-based nutrient solutions to deliver essential elements directly to the roots. While it might sound intimidating, the basic principles are quite simple. The difficulty level depends on the system you choose. A simple DWC (Deep Water Culture) setup is very beginner-friendly, while more complex systems like NFT (Nutrient Film Technique) require a bit more understanding of nutrient management and system maintenance. However, with readily available online resources and guides, anyone can learn the basics and successfully grow plants hydroponically. Don’t be afraid to start with a small, manageable project and gradually expand your knowledge and skills.
What kind of vegetables can I grow in a DIY hydroponic garden?
The beauty of hydroponics is its versatility. You can grow a wide variety of vegetables, herbs, and even some fruits. Some of the most popular and successful choices for hydroponic gardening include:
* Leafy greens: Lettuce, spinach, kale, arugula, chard
* Herbs: Basil, mint, parsley, cilantro, oregano, thyme
* Fruiting vegetables: Tomatoes, peppers, cucumbers, strawberries
* Root vegetables (with some modifications): Radishes, carrots, beets (choose shorter varieties and provide adequate support)
Consider the size and growth habits of the plants when choosing what to grow. Leafy greens and herbs are generally easier to manage in smaller hydroponic systems, while fruiting vegetables may require larger systems and more support.
What kind of lighting do I need for my hydroponic garden?
Lighting is crucial for plant growth in hydroponics, especially if you’re growing indoors. The type of lighting you need depends on the plants you’re growing and the size of your garden. Here are some common options:
* LED grow lights: These are energy-efficient, long-lasting, and produce minimal heat. They are a great choice for most hydroponic setups. Look for full-spectrum LEDs that provide the necessary wavelengths for both vegetative and flowering stages.
* Fluorescent grow lights: These are a more affordable option, but they are less energy-efficient than LEDs and produce more heat. T5 fluorescent lights are a popular choice for smaller hydroponic gardens.
* High-intensity discharge (HID) lights: These are the most powerful option, but they also produce the most heat and consume the most energy. They are typically used for larger hydroponic operations.
Ensure that your plants receive adequate light intensity and duration. Most vegetables require 12-16 hours of light per day.
How do I manage the nutrient solution in my hydroponic system?
Managing the nutrient solution is essential for healthy plant growth. You’ll need to monitor and adjust the pH and nutrient levels regularly.
* pH: The ideal pH range for most hydroponic vegetables is between 5.5 and 6.5. Use a pH meter or test kit to monitor the pH and adjust it as needed using pH up or pH down solutions.
* Nutrient levels: Use a TDS (Total Dissolved Solids) or EC (Electrical Conductivity) meter to measure the concentration of nutrients in the solution. Follow the manufacturer’s recommendations for the specific nutrient solution you’re using.
* Water changes: Regularly change the nutrient solution to prevent the buildup of salts and other impurities. The frequency of water changes depends on the size of your system and the type of plants you’re growing. A general rule of thumb is to change the solution every 1-2 weeks.
What are some common problems I might encounter, and how do I fix them?
Like any gardening endeavor, hydroponics can present its own set of challenges. Here are some common problems and their solutions:
* Nutrient deficiencies: Yellowing leaves, stunted growth, or other unusual symptoms can indicate nutrient deficiencies. Ensure that you’re using a balanced nutrient solution and that the pH is within the optimal range.
* Algae growth: Algae can compete with your plants for nutrients and oxygen. Keep your system clean and shielded from direct sunlight to prevent algae growth.
* Root rot: This is caused by anaerobic conditions in the root zone. Ensure that your roots are properly aerated and that the nutrient solution is not stagnant.
* Pests and diseases: While hydroponics reduces the risk of soilborne pests and diseases, plants can still be susceptible to infestations. Regularly inspect your plants for signs of pests or diseases and take appropriate action.
How much does it cost to set up a DIY hydroponic vegetable garden?
The cost of setting up a DIY hydroponic garden can vary widely depending on the size and complexity of the system, as well as the materials you choose. A small, basic DWC system can be set up for as little as $50-$100, while a larger, more sophisticated system can cost several hundred dollars or more. Consider starting with a small, affordable system and gradually expanding as you gain experience. You can also save money by using recycled materials and building your own components.
Is hydroponics really more efficient than traditional gardening?
Yes, hydroponics is generally more efficient than traditional soil-based gardening in several ways:
* Water usage: Hydroponics uses significantly less water than traditional gardening because the water is recirculated within the system.
* Space: Hydroponics allows you to grow more plants in a smaller space, especially with vertical systems.
* Growth rate: Plants typically grow faster in hydroponic systems because they have direct access to nutrients and optimal growing conditions.
* Pest and disease control: Hydroponics reduces the risk of soilborne pests and diseases, minimizing the need for pesticides and herbicides.
Leave a Comment