

DIY Gift Bag Wall Art: Transform Trash into Treasure!
Ever feel guilty tossing those beautiful gift bags after a celebration? I know I do! They’re often too pretty to simply discard, and that’s where this amazing DIY project comes in. We’re diving into the world of DIY Gift Bag Wall Art, turning something destined for the landfill into a stunning and personalized piece of home decor.
The concept of repurposing materials for art isn’t new. Throughout history, cultures have found creative ways to utilize what they have, from mosaics made of broken pottery to sculptures crafted from found objects. This project taps into that same resourceful spirit, giving you a chance to express your creativity while being eco-conscious.
Why do you need this DIY trick? Because it’s a fantastic way to add a personal touch to your space without breaking the bank! Store-bought art can be expensive and impersonal. With DIY Gift Bag Wall Art, you can create something truly unique that reflects your style and memories. Plus, it’s a fun and rewarding project that anyone can tackle, regardless of their artistic skills. So, let’s get started and turn those gift bags into masterpieces!
DIY Gift Bag Wall Art: From Trash to Treasure!
Hey there, fellow crafters! Ever find yourself drowning in a sea of beautiful gift bags after a birthday or holiday? I know I do! Instead of tossing them, I’ve discovered a super fun and surprisingly chic way to repurpose them into stunning wall art. This project is not only budget-friendly but also allows you to create personalized pieces that perfectly match your home decor. Plus, it’s a great way to reduce waste and give those gorgeous bags a new life. Let’s dive in!
Materials You’ll Need
Before we get started, gather these supplies. Don’t worry, most of them are probably already lying around your house!
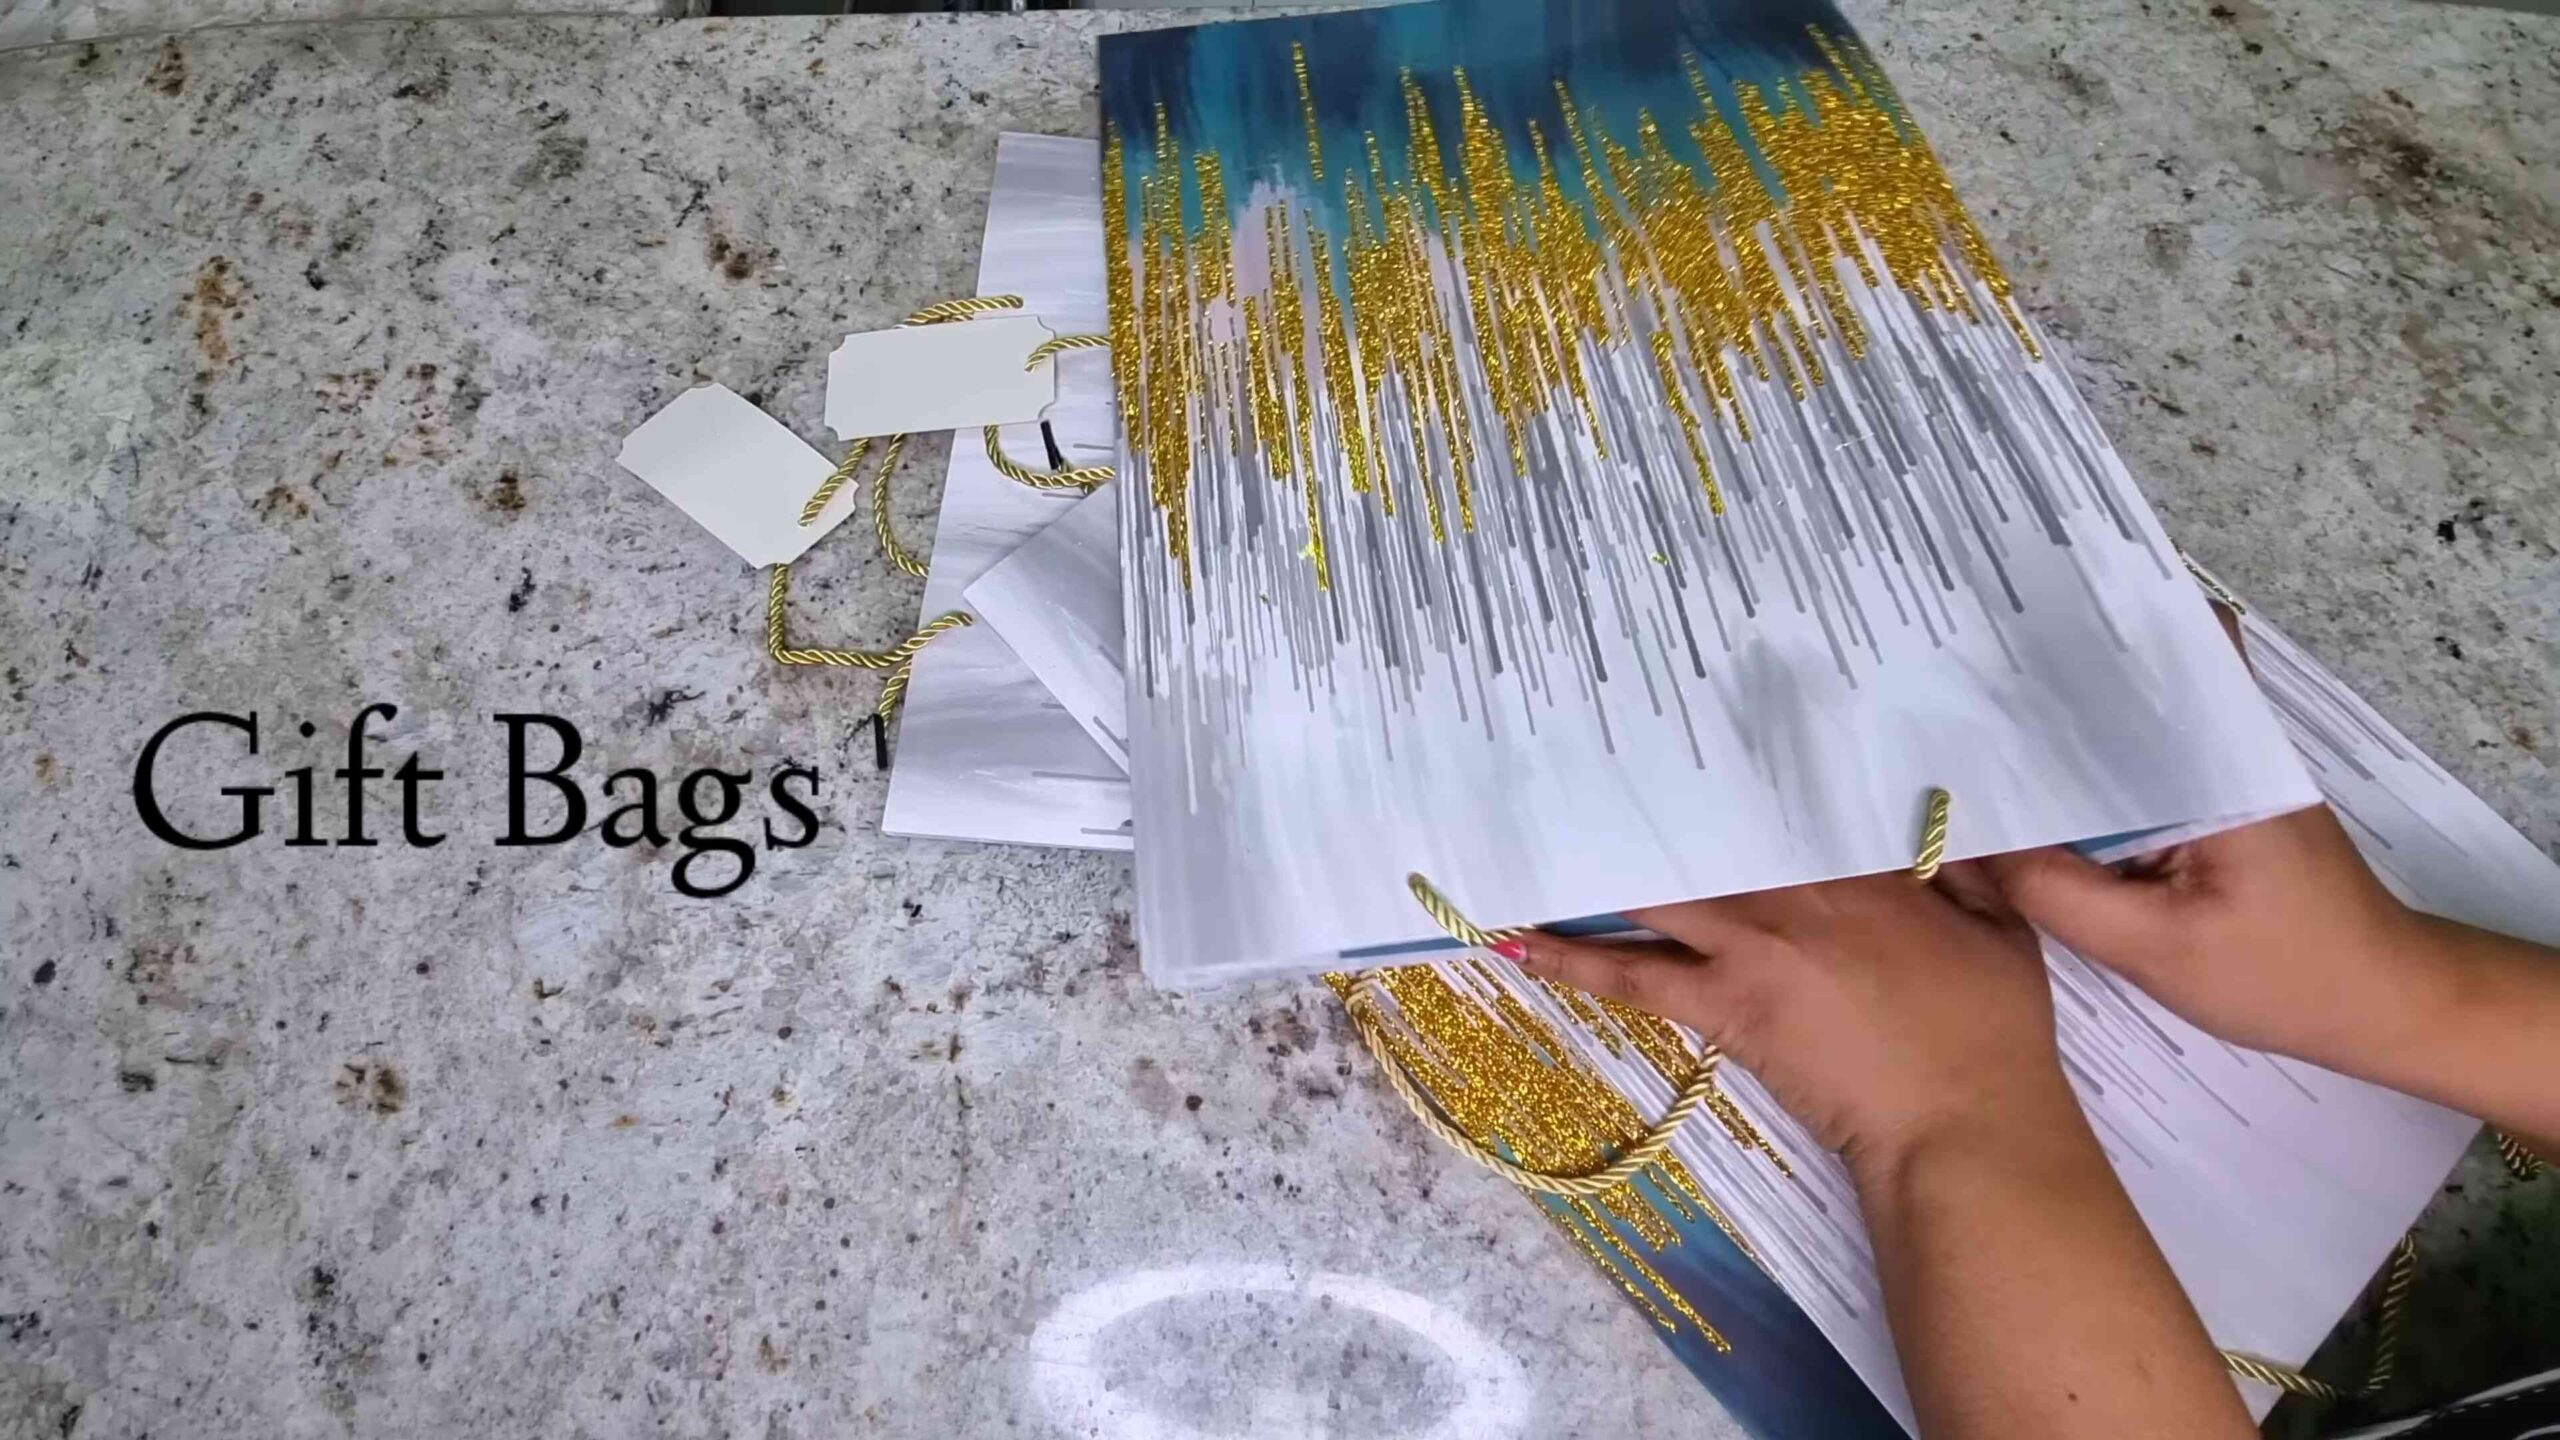
* Gift Bags: Choose bags with interesting patterns, colors, or textures. The more variety, the better! Aim for at least 3-5 bags, depending on the size of your desired artwork.
* Canvas or Wood Panel: Select a canvas or wood panel that suits your desired size and shape. I personally love using stretched canvases for a clean, modern look. You can find these at any craft store.
* Scissors or Craft Knife: For precise cutting. A rotary cutter and mat can also be helpful if you have them.
* Ruler or Measuring Tape: Essential for accurate measurements and straight lines.
* Pencil: For marking and sketching.
* Mod Podge or Decoupage Glue: This will adhere the gift bag pieces to the canvas.
* Foam Brush or Paintbrush: For applying the Mod Podge smoothly.
* Optional: Embellishments like glitter, beads, ribbon, or paint for adding extra flair.
* Optional: Sealer (like Mod Podge Acrylic Sealer) to protect your finished artwork.
* Optional: Cutting Mat: To protect your work surface when using a craft knife.
Planning Your Design
This is where the fun really begins! Before you start cutting and gluing, take some time to plan your design. This will help you visualize the final product and avoid any last-minute regrets.
* Consider Your Style: Think about the overall aesthetic of your room. Are you going for a modern, minimalist look, or something more eclectic and bohemian? Choose gift bags that complement your existing decor.
* Choose a Layout: There are countless ways to arrange the gift bag pieces on your canvas. Here are a few ideas to get you started:
* Abstract Collage: Simply cut the bags into various shapes and sizes and arrange them randomly on the canvas.
* Geometric Pattern: Create a more structured design using squares, triangles, or other geometric shapes.
* Stripes or Chevron: Cut the bags into strips and arrange them horizontally, vertically, or in a chevron pattern.
* Focal Point: Choose one particularly beautiful section of a gift bag and make it the focal point of your artwork. Surround it with smaller pieces of other bags.
* Sketch It Out: Once you have a general idea of your design, sketch it out on a piece of paper. This will help you visualize the placement of each piece and ensure that everything is balanced and visually appealing.
* Color Palette: Think about the colors in your gift bags and how they will work together. Do you want to create a monochromatic piece using different shades of the same color, or a more vibrant and colorful design?
Preparing the Gift Bags
Now it’s time to transform those gift bags into usable art materials!
1. Flatten the Bags: Carefully flatten each gift bag to remove any creases or wrinkles. You can use an iron on a low setting if necessary, but be sure to protect the bag with a cloth to prevent scorching.
2. Cut Out Desired Sections: Using your scissors or craft knife, cut out the sections of the gift bags that you want to use in your artwork. Focus on areas with interesting patterns, colors, or textures.
3. Cut into Shapes: Based on your planned design, cut the selected sections into the desired shapes. Remember to measure accurately and cut straight lines for a clean, professional look. I like to use a ruler and craft knife for this step, especially when cutting geometric shapes.
4. Organize Your Pieces: As you cut out the pieces, organize them by color, pattern, or shape. This will make it easier to find the right piece when you’re ready to start gluing.
Creating Your Wall Art
This is where the magic happens! Get ready to bring your design to life.
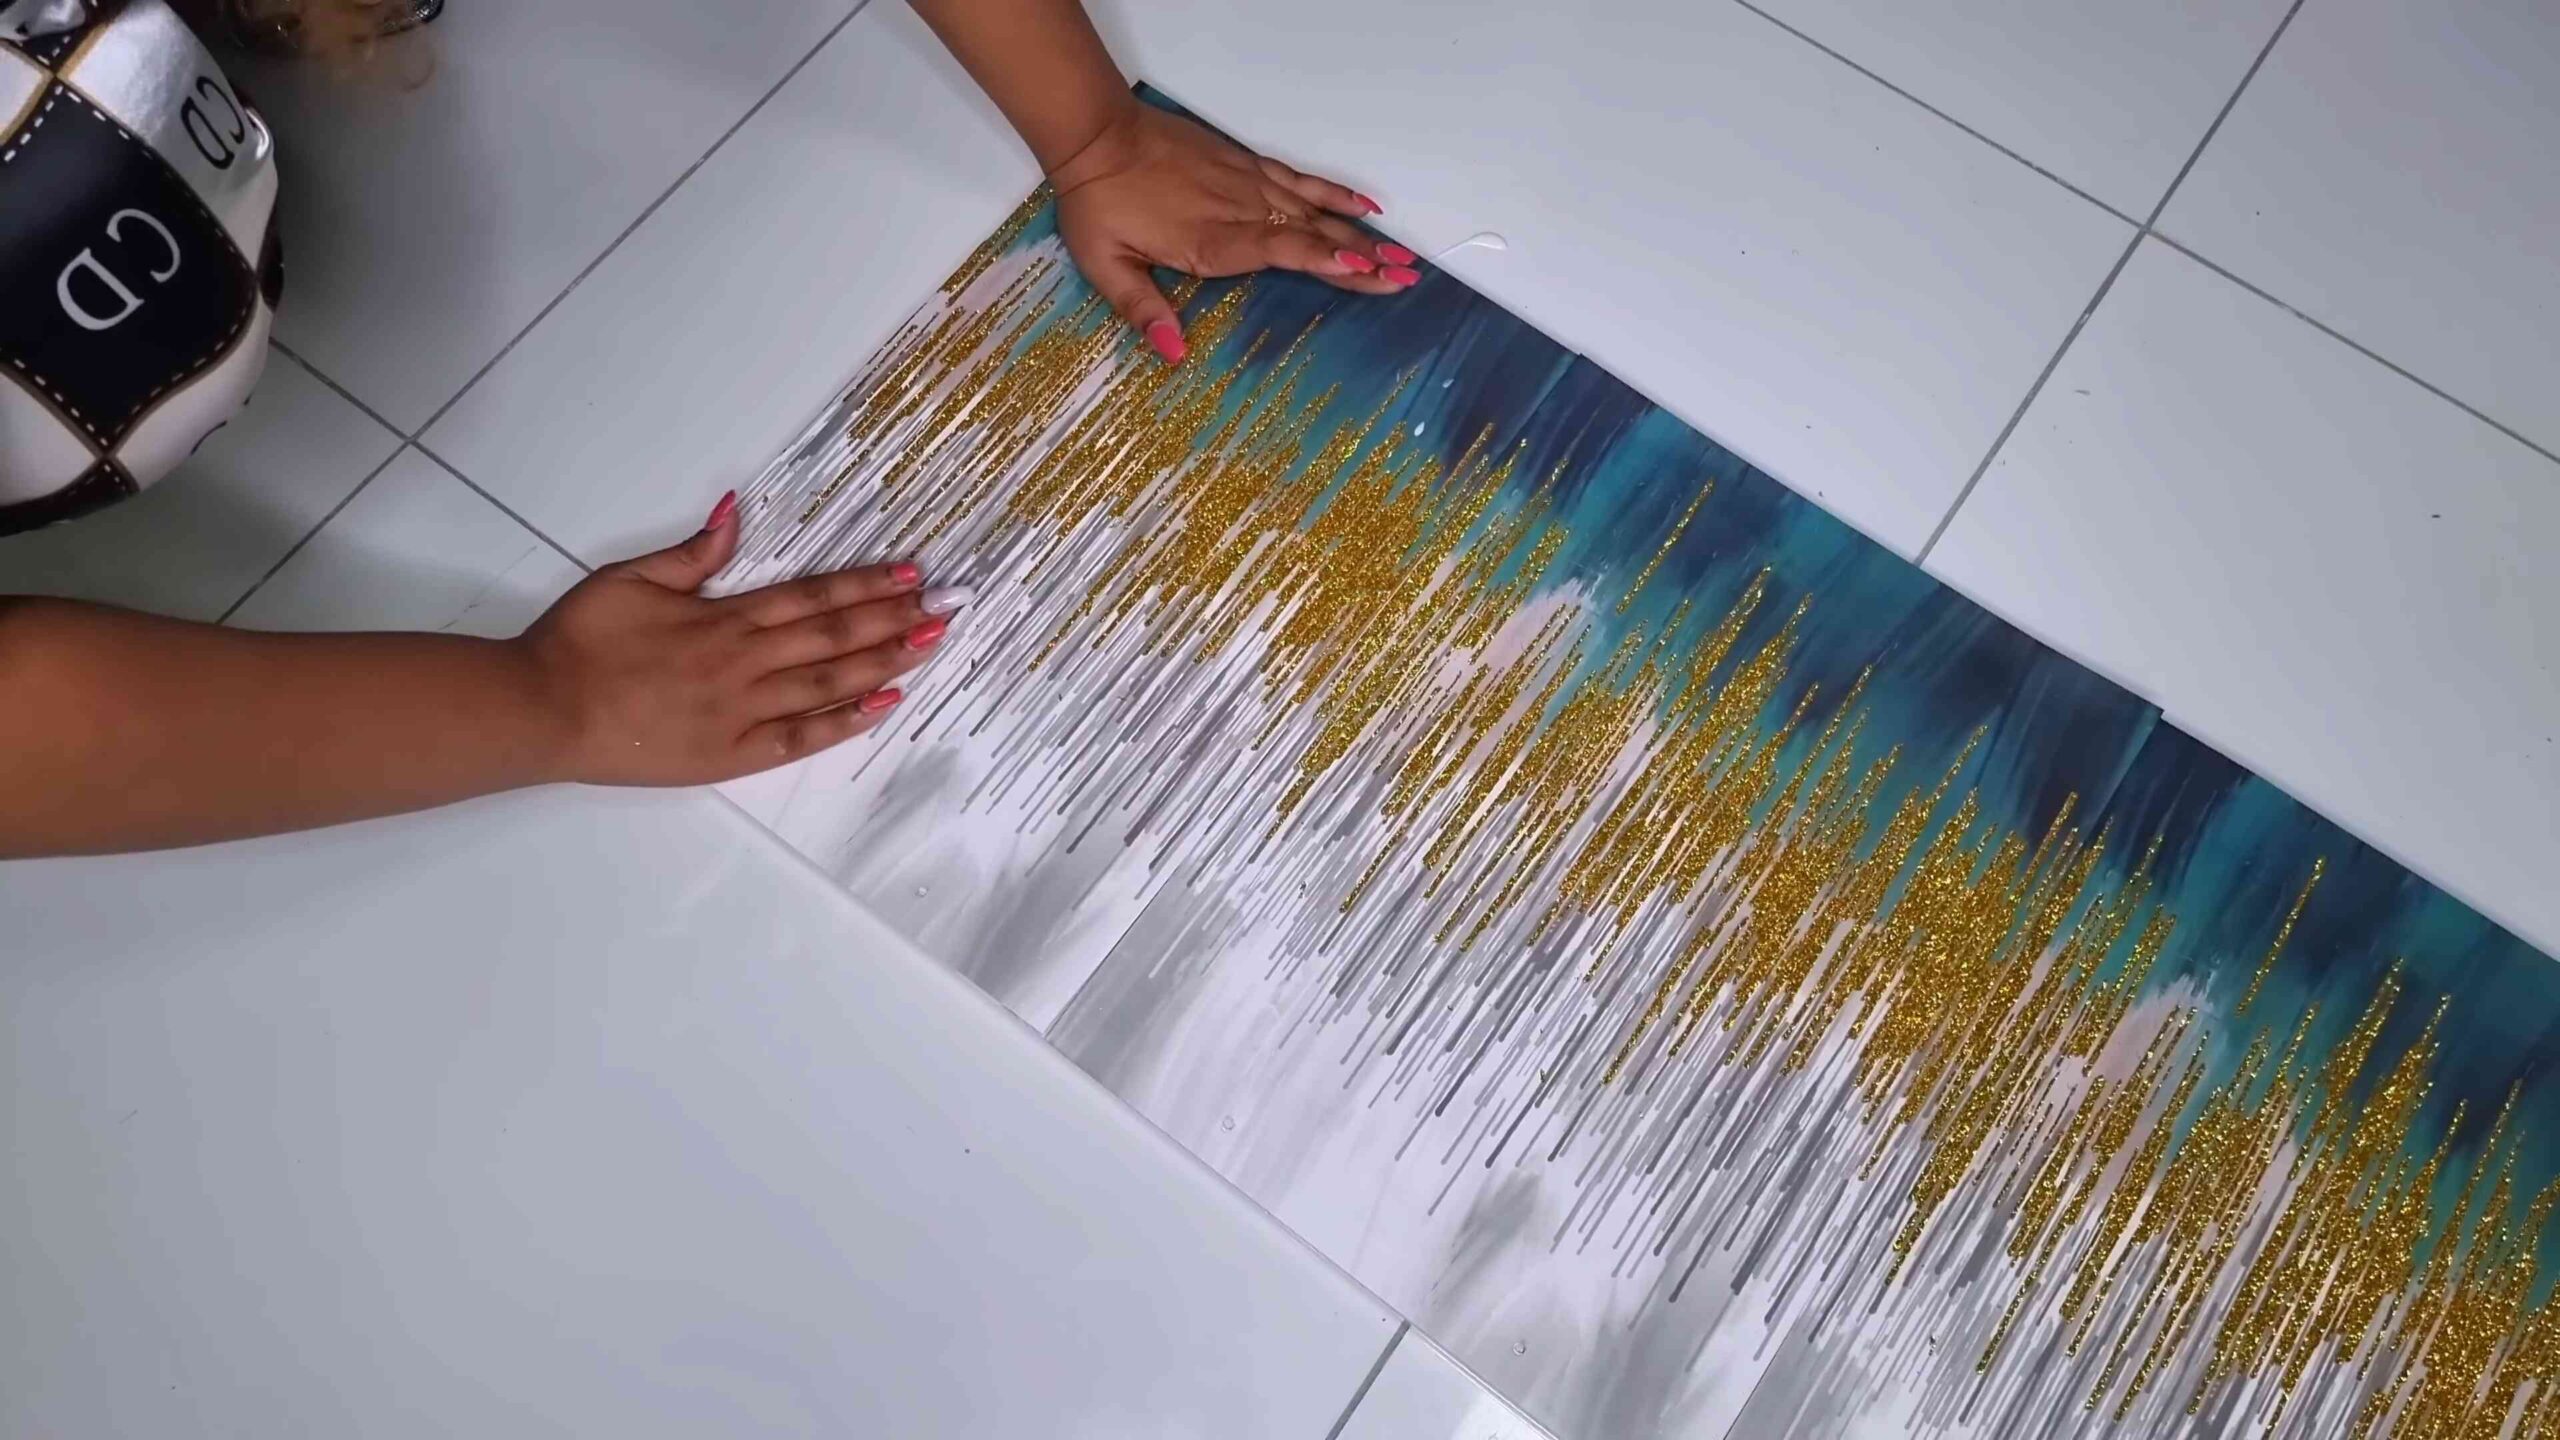
1. Apply Mod Podge to the Canvas: Using your foam brush or paintbrush, apply a thin, even layer of Mod Podge to a small section of the canvas. Work in small sections to prevent the Mod Podge from drying out before you can apply the gift bag pieces.
2. Place the Gift Bag Pieces: Carefully place the cut gift bag pieces onto the Mod Podge, pressing them down gently to ensure they adhere properly. Smooth out any wrinkles or bubbles with your fingers or a brayer.
3. Overlap Pieces (Optional): If you’re creating a collage or abstract design, you can overlap the gift bag pieces to add depth and texture.
4. Continue Applying Mod Podge and Placing Pieces: Repeat steps 1 and 2 until the entire canvas is covered with gift bag pieces.
5. Let it Dry: Once you’ve finished applying all the gift bag pieces, let the Mod Podge dry completely. This may take several hours, depending on the humidity and temperature. I usually leave it overnight to be sure.
6. Apply a Top Coat of Mod Podge: Once the first layer of Mod Podge is dry, apply a second thin, even layer over the entire surface of the artwork. This will seal the gift bag pieces and protect them from damage.
7. Let it Dry Again: Let the second layer of Mod Podge dry completely.
8. Add Embellishments (Optional): If you want to add extra flair to your artwork, now is the time to do it! You can add glitter, beads, ribbon, paint, or any other embellishments that you like.
9. Seal Your Artwork (Optional): To protect your finished artwork from dust, moisture, and UV damage, you can apply a sealer like Mod Podge Acrylic Sealer. Follow the instructions on the sealer can.
10. Hang and Enjoy! Once the sealer is dry, your DIY gift bag wall art is ready to hang and enjoy! Find the perfect spot on your wall and admire your handiwork.
Tips and Tricks for Success
Here are a few extra tips and tricks to help you create a truly stunning piece of wall art:
* Use a Variety of Gift Bags: The more variety you have in your gift bags, the more interesting and visually appealing your artwork will be.
* Don’t Be Afraid to Experiment: This is a DIY project, so don’t be afraid to experiment with different designs, colors, and textures.
* Work in Small Sections: Applying Mod Podge in small sections will prevent it from drying out before you can apply the gift bag pieces.
* Smooth Out Wrinkles and Bubbles: Use your fingers or a brayer to smooth out any wrinkles or bubbles in the gift bag pieces.
* Let it Dry Completely: Make sure to let the Mod Podge dry completely between coats to prevent the gift bag pieces from peeling or lifting.
* Protect Your Work Surface: Use a cutting mat to protect your work surface when using a craft knife.
* Clean Your Brushes: Clean your foam brush or paintbrush immediately after use to prevent the Mod Podge from drying and hardening.
* Have Fun! The most important thing is to have fun and enjoy the process of creating your own unique piece of wall art.
Troubleshooting
Sometimes, things don’t go exactly as planned. Here are a few common problems and how to fix them:
* Wrinkles and Bubbles: If you have wrinkles or bubbles in your gift bag pieces, try smoothing them out with your fingers or a brayer. If they’re still there after the Mod Podge dries, you can try gently sanding them down with fine-grit sandpaper.
* Peeling or Lifting: If the gift bag pieces are peeling or lifting, it means they didn’t adhere properly to the canvas. Apply another layer of Mod Podge to the affected area and press the pieces down firmly.
* Uneven Surface: If your artwork has an uneven surface, you can try applying a thicker layer of Mod Podge to even it out. You can also try sanding down any high spots with fine-grit sandpaper.
* Sticky Finish: If your artwork has a sticky finish, it means the Mod Podge hasn’t dried completely. Let it dry for a longer period of time, or try applying a thin layer of talcum powder to absorb the excess moisture.
Alternative Ideas and Variations
Want to take this project to the next level? Here are a few alternative ideas and variations to try:
* Use Different Materials: Instead of gift bags, you can use other materials like scrapbook
Conclusion
So, there you have it! Transforming those beautiful, often discarded, gift bags into stunning wall art is not just a craft project; it’s a statement. It’s a statement about sustainability, about creativity, and about personalizing your space with pieces that truly reflect your style and memories. This DIY Gift Bag Wall Art project is a must-try for several compelling reasons.
Firstly, it’s incredibly budget-friendly. You’re repurposing materials you likely already have on hand, saving you money while reducing waste. Think of all those gorgeous gift bags tucked away in closets, waiting for their next occasion. Now, they can take center stage, adding a touch of elegance and personality to your walls.
Secondly, it’s remarkably versatile. The possibilities are endless! You can create a gallery wall featuring a collection of coordinated designs, or opt for a single, impactful piece. Experiment with different framing options, from simple wooden frames to more ornate, vintage finds. Consider adding embellishments like glitter, beads, or even pressed flowers for an extra touch of flair.
Thirdly, it’s a fantastic way to showcase your personal style. Choose gift bags that resonate with your aesthetic, whether it’s minimalist, bohemian, or classic. The designs, colors, and patterns you select will tell a story about your personality and interests, making your wall art truly unique.
Beyond the aesthetic appeal, this DIY project offers a therapeutic and rewarding experience. It’s a chance to unplug from the digital world, engage your creativity, and create something beautiful with your own hands. The satisfaction of transforming something ordinary into something extraordinary is truly unparalleled.
Variations to Explore:
* Themed Collections: Create a themed gallery wall based on holidays, seasons, or specific color palettes. Imagine a collection of Christmas-themed gift bag art during the festive season, or a calming blue and green collection for a bedroom.
* Mixed Media: Incorporate other materials into your artwork, such as fabric scraps, buttons, or paint. This can add texture and dimension to your designs.
* Decoupage: Use Mod Podge to adhere smaller pieces of gift bag onto a canvas or wooden board, creating a layered and textured effect.
* Geometric Patterns: Cut the gift bags into geometric shapes and arrange them in a mosaic-like pattern. This is a great way to create a modern and abstract piece of art.
* Personalized Gifts: Create personalized gift bag wall art as a thoughtful and unique present for friends and family. Choose gift bags that reflect their interests and style.
We wholeheartedly encourage you to give this DIY Gift Bag Wall Art project a try. It’s a fun, affordable, and rewarding way to add personality and style to your home. Don’t be afraid to experiment, get creative, and let your imagination run wild.
Once you’ve created your masterpiece, we’d love to see it! Share your creations with us on social media using #DIYGiftBagWallArt. We can’t wait to see what you come up with! Let’s inspire each other and transform those forgotten gift bags into stunning works of art.
Frequently Asked Questions (FAQ)
What kind of gift bags work best for this project?
The best gift bags for this project are those made from thicker, higher-quality paper. Glossy or matte finishes both work well, but avoid bags that are too thin or flimsy, as they may tear easily. Look for bags with interesting designs, patterns, or colors that complement your home decor. Bags with metallic accents or embossed details can add a touch of elegance to your artwork. Also, consider the size of the bag in relation to the frame you plan to use. Larger bags will give you more material to work with, while smaller bags may be better suited for smaller frames or decoupage projects.
How do I prepare the gift bags before using them?
Before you start crafting, it’s essential to prepare the gift bags properly. First, carefully flatten the bag and remove any handles or embellishments. If the bag has any creases or wrinkles, you can iron it on a low setting to smooth it out. Place a thin cloth between the iron and the bag to protect the paper from scorching. Next, decide which parts of the bag you want to use for your artwork. You can cut out specific designs, patterns, or logos, or use the entire bag as a background. Use sharp scissors or a craft knife to make clean cuts.
What type of adhesive should I use to attach the gift bag to the frame or canvas?
The best adhesive for this project depends on the type of material you’re attaching the gift bag to. For attaching the gift bag to a frame backing or canvas, Mod Podge is an excellent choice. It’s a versatile adhesive, sealer, and finish all in one. Apply a thin, even layer of Mod Podge to the surface and carefully smooth the gift bag onto it. Use a brayer or a clean cloth to remove any air bubbles. For attaching smaller pieces of gift bag or embellishments, a glue stick or craft glue may be sufficient. Avoid using hot glue, as it can warp or damage the paper.
How do I protect the finished artwork?
To protect your finished DIY Gift Bag Wall Art from dust, moisture, and fading, it’s important to seal it properly. You can use a clear acrylic sealant or varnish to create a protective layer. Apply the sealant in thin, even coats, allowing each coat to dry completely before applying the next. Make sure to use a sealant that is specifically designed for paper or mixed media projects. Alternatively, you can frame your artwork behind glass or acrylic to protect it from the elements.
Can I use this technique to create other types of crafts?
Absolutely! The possibilities are endless. You can use this technique to create greeting cards, scrapbook pages, journal covers, and even furniture embellishments. Consider using gift bag scraps to create unique collages or mixed media art pieces. You can also use the gift bag paper to decoupage onto wooden boxes, trays, or other decorative items. The key is to experiment and let your creativity guide you.
What if I don’t have any gift bags on hand?
If you don’t have any gift bags readily available, don’t worry! You can easily find them at dollar stores, craft stores, or even online retailers. You can also ask friends and family to save their gift bags for you. Another option is to use wrapping paper or decorative paper instead of gift bags. Just make sure to choose paper that is thick enough to withstand the crafting process.
How do I prevent the gift bag paper from wrinkling or bubbling when I apply adhesive?
To prevent wrinkling or bubbling, it’s crucial to apply the adhesive in a thin, even layer. Avoid using too much adhesive, as this can saturate the paper and cause it to warp. Use a brayer or a clean cloth to smooth the gift bag onto the surface, working from the center outwards to remove any air bubbles. If you’re using Mod Podge, you can also try diluting it slightly with water to make it easier to apply.
How do I clean my DIY Gift Bag Wall Art?
To clean your DIY Gift Bag Wall Art, simply dust it with a soft, dry cloth. Avoid using water or harsh cleaning chemicals, as these can damage the paper and sealant. If your artwork is framed behind glass or acrylic, you can clean the glass or acrylic with a glass cleaner.
Leave a Comment