

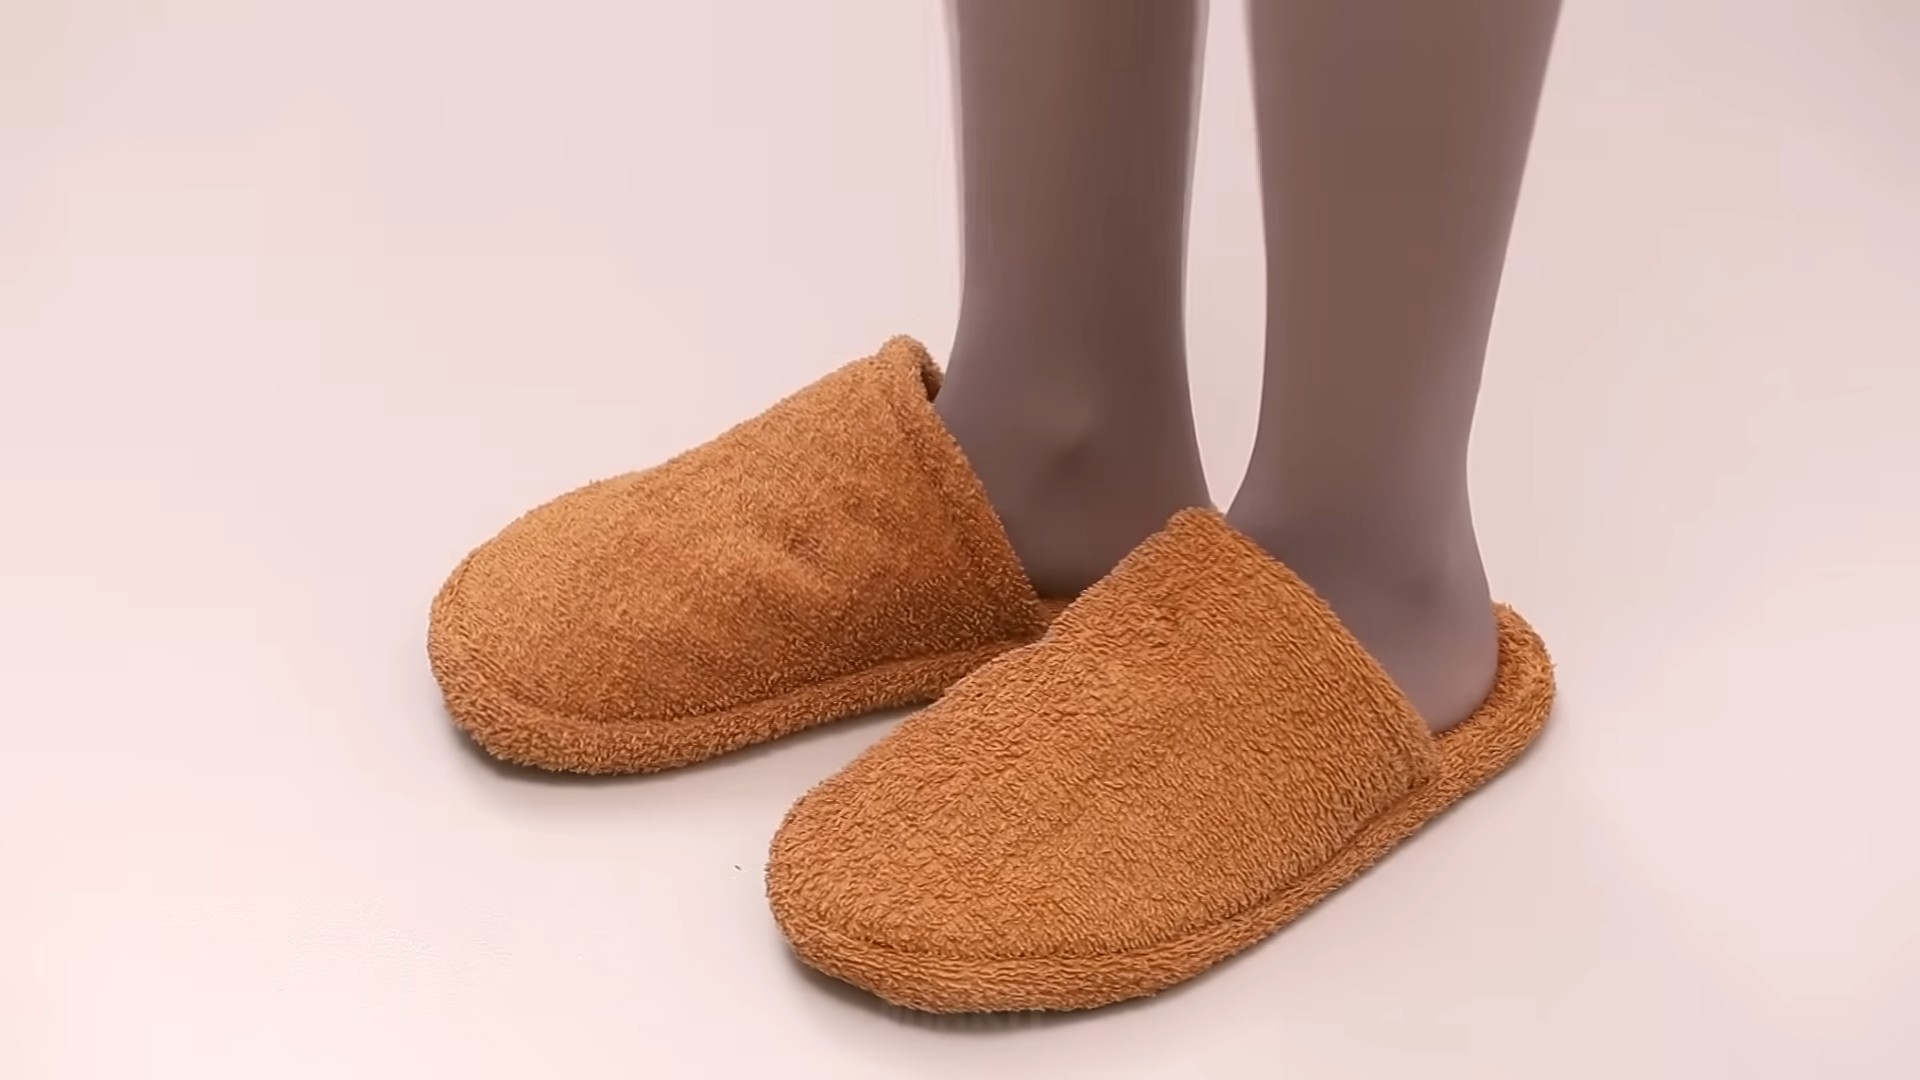
DIY Towel Slippers Tutorial: Who doesn’t love the feeling of plush, comfy slippers after a long day? But what if I told you that you could create that luxurious feeling yourself, using something you probably already have lying around – old towels! This isn’t just about saving money; it’s about embracing a sustainable and creative way to pamper your feet.
The concept of repurposing textiles has deep roots in many cultures. Historically, resourcefulness was a necessity, and turning old materials into new, useful items was a common practice. Think of the patchwork quilts passed down through generations, each piece telling a story. This DIY Towel Slippers Tutorial taps into that same spirit of ingenuity and resourcefulness.
Let’s be honest, buying new slippers can be expensive, and sometimes they just don’t fit quite right. Plus, who knows what chemicals might be lurking in those mass-produced materials? With this easy-to-follow guide, you’ll learn how to craft custom-fit slippers that are gentle on your feet and the environment. Imagine sinking your tired toes into soft, absorbent towel slippers after a shower or a long day in the garden. It’s a small luxury that makes a big difference. So, grab those old towels, and let’s get crafting! I promise, you’ll love the feeling of accomplishment (and the comfort!) that comes with making your own cozy slippers.
DIY Cozy Towel Slippers: A Step-by-Step Guide
Okay, friends, let’s get crafty! I’m so excited to share this super simple and incredibly comfy DIY project with you: towel slippers! These are perfect for padding around the house, keeping your feet warm after a shower, or even as a thoughtful handmade gift. Plus, they’re a fantastic way to repurpose old towels. Let’s dive in!
What You’ll Need
Before we start, gather your supplies. Trust me, having everything ready will make the process so much smoother.
* **Old Towels:** The thicker, the better! Bath towels work great, but even hand towels can be used for smaller sizes.
* **Scissors:** A good, sharp pair is essential for clean cuts.
* **Pencil or Fabric Marker:** For tracing your foot and marking measurements.
* **Ruler or Measuring Tape:** Accuracy is key for a good fit.
* **Sewing Machine (Optional):** While you can hand-sew these, a sewing machine will make the process much faster and more durable.
* **Needle and Thread:** If you’re hand-sewing, choose a strong thread that matches your towel color.
* **Pins:** To hold the fabric pieces together while sewing.
* **Cardboard or Thick Felt (Optional):** For adding extra support to the soles.
* **Non-Slip Fabric or Silicone Glue (Optional):** To prevent slipping on smooth floors.
* **Paper:** For creating a template.
Creating Your Template
This is a crucial step, so take your time and be precise. A well-made template will ensure your slippers fit perfectly!
1. **Trace Your Foot:** Place a piece of paper on a flat surface. Step onto the paper with your full weight. Carefully trace around your foot with a pencil or fabric marker. Make sure to keep the pencil perpendicular to the paper for an accurate outline.
2. **Add Seam Allowance:** Around the tracing, add a seam allowance of about 1/2 inch (1.25 cm). This extra space will allow for sewing the pieces together without making the slippers too small.
3. **Design the Upper Part:** Now, let’s design the upper part of the slipper. This is the part that will cover the top of your foot. You can create a simple, rounded shape or get creative with a more elaborate design. A good starting point is to draw a curve that starts about 2 inches (5 cm) from the front of your foot tracing and extends back towards your ankle. The height of the curve will determine how much of your foot is covered. I usually aim for about 3-4 inches (7.5-10 cm) at the highest point.
4. **Cut Out the Template:** Carefully cut out both the sole template (the foot tracing with seam allowance) and the upper part template. You now have your master patterns!
Cutting the Towel Pieces
Now for the fun part – transforming those old towels into slipper components!
1. **Cut the Soles:** Fold your towel in half, right sides together (if there is a right and wrong side). Place the sole template on the folded towel and pin it in place to prevent shifting. Cut out two sole pieces for each slipper (four pieces total). This will give your soles extra cushioning.
2. **Cut the Uppers:** Fold the towel again, right sides together. Place the upper part template on the folded towel and pin it in place. Cut out two upper pieces for each slipper (four pieces total).
3. **Cut the Optional Insole (Cardboard or Felt):** If you’re using cardboard or felt for extra support, place the sole template on the material and cut out one piece for each slipper (two pieces total). These will be inserted between the towel layers of the sole.
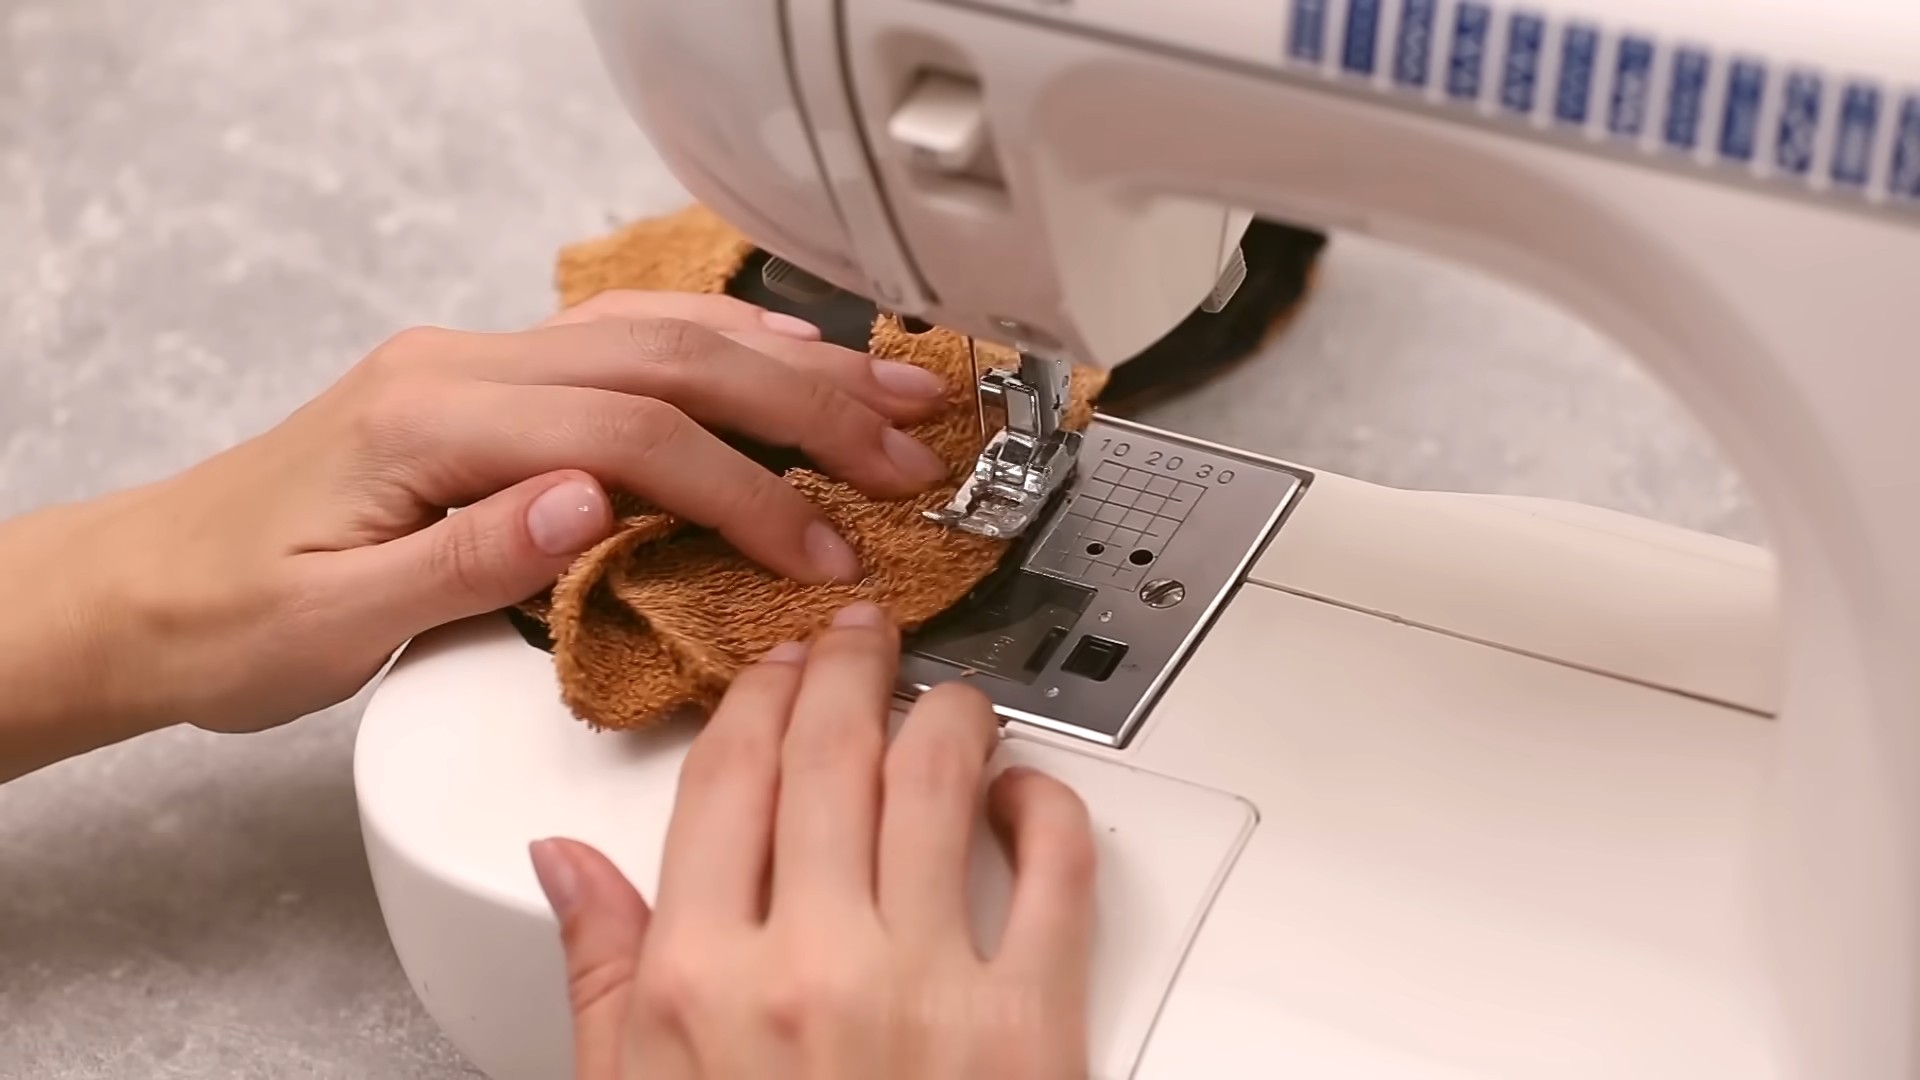
Sewing the Slippers
This is where the magic happens! Whether you’re using a sewing machine or hand-sewing, take your time and focus on creating strong, even seams.
Sewing the Soles
1. **Layer the Sole Pieces:** Place two sole pieces together, right sides facing out. If you’re using cardboard or felt insoles, insert them between the two towel layers. Pin the layers together to keep them from shifting.
2. **Sew Around the Edge:** Using a sewing machine or hand-sewing with a backstitch, sew around the entire edge of the sole, leaving a small opening (about 2 inches or 5 cm) at the heel. This opening will allow you to turn the sole right side out and add extra padding if needed.
3. **Turn Right Side Out:** Carefully turn the sole right side out through the opening. Use a pencil or chopstick to gently push out the edges and corners.
4. **Add Extra Padding (Optional):** If you want even more cushioning, you can add extra padding like cotton batting or scraps of towel through the opening.
5. **Close the Opening:** Fold the edges of the opening inward and pin them together. Sew the opening closed using a blind stitch or a simple running stitch.
Sewing the Uppers
1. **Hem the Edges (Optional):** If you want a cleaner finish, you can hem the edges of the upper pieces before attaching them to the soles. Fold the edge over about 1/4 inch (0.6 cm) and press with an iron. Fold it over again and sew along the folded edge.
2. **Attach the Uppers to the Soles:** Position the upper piece on top of the sole, aligning the front edge of the upper with the front edge of the sole. Pin the upper to the sole, working your way around the curve. Make sure the upper is centered and evenly distributed.
3. **Sew the Upper to the Sole:** Using a sewing machine or hand-sewing with a whip stitch or blanket stitch, sew the upper to the sole. Start at one side of the upper and sew all the way around to the other side. Reinforce the stitching at the beginning and end to prevent unraveling.
Adding Non-Slip Protection (Optional)
If you have hardwood or tile floors, adding a non-slip surface to the soles is a great idea to prevent accidents.
1. **Apply Non-Slip Fabric or Silicone Glue:** You can either cut out pieces of non-slip fabric and sew them onto the soles, or you can apply silicone glue in a pattern (dots, lines, or a grid) to the bottom of the soles.
2. **Let it Dry:** If you’re using silicone glue, allow it to dry completely according to the manufacturer’s instructions. This usually takes several hours.
Finishing Touches
Congratulations! You’ve made your own cozy towel slippers! Now, let’s add a few finishing touches to make them even more special.
* **Trim Any Loose Threads:** Use scissors to trim any loose threads or uneven edges.
* **Add Embellishments (Optional):** Get creative and add embellishments like buttons, ribbons, lace, or embroidery to personalize your slippers.
* Enjoy Your New Slippers! Put on your new towel slippers and enjoy the comfort and warmth!
Important Considerations:
* Sizing: Remember to account for sock thickness when tracing your foot. If you plan to wear thick socks with your slippers, trace your foot while wearing them.
* Fabric Choice: While towels are ideal, you can also use other absorbent fabrics like fleece or flannel.
* Durability: For added durability, consider using a stronger thread and reinforcing the seams with multiple rows of stitching.
* Washing: To clean your towel slippers, machine wash them on a gentle cycle and tumble dry on low.
I hope you enjoyed this tutorial! These towel slippers are a fun and rewarding project that you can customize to your own style and preferences. Happy crafting!
Conclusion
So, there you have it! Transforming old towels into cozy, comfortable, and surprisingly stylish slippers is not just a fun craft project; it’s a practical way to reduce waste, save money, and treat your feet to some well-deserved comfort. This DIY towel slippers tutorial offers a simple yet effective solution for keeping your feet warm and protected, especially on chilly mornings or after a long day.
Why is this DIY trick a must-try? Because it’s incredibly versatile. You’re not limited to a single design or size. Feel free to experiment with different towel thicknesses, colors, and patterns to create slippers that perfectly match your personal style and needs. Imagine fluffy white slippers for a spa-like experience, or vibrant, patterned slippers to add a pop of color to your loungewear. The possibilities are truly endless.
Beyond the aesthetic appeal, these DIY towel slippers are incredibly practical. They’re perfect for padding around the house, keeping your feet clean and warm. They’re also a fantastic option for guests, providing a comfortable and hygienic alternative to walking barefoot. Plus, think of the satisfaction of knowing you created something useful and beautiful from materials you already had on hand!
Looking for variations? Consider adding non-slip soles to your slippers for added safety. You can purchase pre-made non-slip fabric or use silicone sealant to create a textured surface on the bottom of the slippers. Another variation is to add a layer of batting or fleece between the towel layers for extra cushioning. You could even embroider or appliqué designs onto the slippers to personalize them further. For a more structured slipper, consider adding a cardboard or felt insole for extra support. If you have some scrap leather or suede, you can use that for the soles for a more durable and water-resistant option.
Don’t be intimidated by the thought of sewing. This project is beginner-friendly, and even if you’re new to sewing, you’ll find the instructions easy to follow. The sense of accomplishment you’ll feel after completing your first pair of DIY towel slippers is truly rewarding.
We wholeheartedly encourage you to give this DIY project a try. It’s a fantastic way to unleash your creativity, reduce waste, and create something both beautiful and functional. Once you’ve made your own pair of DIY towel slippers, we’d love to hear about your experience! Share your photos and tips in the comments below. Let us know what variations you tried, what challenges you faced, and what you learned along the way. Your feedback will not only inspire others but also help us improve the tutorial for future crafters. So, grab your old towels, dust off your sewing machine (or needle and thread), and get ready to create your own cozy and sustainable footwear! Happy crafting!
Frequently Asked Questions (FAQ)
What kind of towels are best for making DIY towel slippers?
The best towels for making DIY towel slippers are those that are absorbent, durable, and relatively thick. Old bath towels are an excellent choice, as they typically meet these criteria. However, you can also use hand towels or even beach towels, depending on the size and style of slippers you want to create. Thicker towels will provide more cushioning and warmth, while thinner towels may be easier to sew. Avoid using towels that are heavily worn or have significant holes, as these may not hold up well during the sewing process. Consider the texture of the towel as well. Softer towels will be more comfortable against your skin. Experiment with different types of towels to find what works best for you.
How do I determine the right size for my DIY towel slippers?
Determining the right size for your DIY towel slippers is crucial for ensuring a comfortable fit. The easiest way to do this is to trace your foot onto a piece of paper. Stand with your full weight on the paper and trace around your foot with a pen or pencil. Add about half an inch to the tracing to allow for seam allowance and wiggle room. You can then use this tracing as a template for cutting out the towel pieces for your slippers. If you’re making slippers as a gift, you can use a standard shoe size chart as a guide, but it’s always best to err on the side of caution and make them slightly larger rather than too small. Remember to account for the thickness of the towel when determining the size.
Can I make these DIY towel slippers without a sewing machine?
Yes, absolutely! While a sewing machine can speed up the process, you can definitely make these DIY towel slippers by hand. Hand sewing is a perfectly viable option, especially for smaller projects like slippers. Use a sturdy needle and strong thread, such as cotton or polyester thread. A backstitch or running stitch will work well for securing the seams. Just be sure to take your time and make your stitches close together to ensure the slippers are durable. Hand sewing can be a relaxing and meditative activity, so don’t be afraid to give it a try!
How do I make the slippers non-slip?
Making your DIY towel slippers non-slip is essential for safety, especially if you have hardwood floors or tile. There are several ways to achieve this. One option is to purchase pre-made non-slip fabric and attach it to the bottom of the slippers. Another option is to use silicone sealant. Apply small dots or lines of silicone sealant to the bottom of the slippers and let it dry completely. This will create a textured surface that provides traction. You can also use puffy paint to create a non-slip design on the soles. Another method is to glue pieces of suede or leather to the bottom of the slippers, as these materials naturally provide good grip.
How do I wash and care for my DIY towel slippers?
Washing and caring for your DIY towel slippers is important for keeping them clean and fresh. Before washing, remove any embellishments that might be damaged in the washing machine. Machine wash the slippers in cold water on a gentle cycle. Use a mild detergent and avoid using bleach, as this can damage the fabric. Tumble dry on low heat or air dry the slippers to prevent shrinking. If you’ve added non-slip soles, be sure to check the manufacturer’s instructions for washing. For hand-sewn slippers, hand washing is recommended to prevent the seams from coming undone. With proper care, your DIY towel slippers will last for a long time.
Can I add embellishments to my DIY towel slippers?
Yes, absolutely! Adding embellishments is a great way to personalize your DIY towel slippers and make them unique. You can use buttons, beads, ribbons, embroidery, or appliqués to add a touch of style. Consider adding a pom-pom or tassel to the toe of the slippers for a playful look. You can also use fabric markers to draw designs or write messages on the slippers. Be creative and have fun with it! Just be sure to use embellishments that are securely attached and won’t come off easily.
What if I don’t have a pattern?
If you don’t have a pattern, don’t worry! Creating your own pattern for DIY towel slippers is easy. Simply trace your foot onto a piece of paper, as described earlier. Add about half an inch to the tracing for seam allowance and wiggle room. This will be the basic shape of your slipper. You can then adjust the shape to create different styles of slippers. For example, you can make a closed-toe slipper by extending the tracing over the toes, or you can make an open-toe slipper by leaving the toes exposed. You can also create a pattern for the upper part of the slipper by tracing around the top of your foot. Experiment with different shapes and sizes until you find a pattern that you like.
Leave a Comment