

Grow Cauliflower at Home? Absolutely! Imagine strolling into your backyard, not to a grocery store aisle, and harvesting a crisp, creamy head of cauliflower you nurtured yourself. Sounds pretty rewarding, right? For centuries, cauliflower has been a culinary staple, gracing tables from royal feasts to humble family dinners. Originating in the Mediterranean, this versatile vegetable has journeyed across continents, adapting to various climates and cultures.
But let’s be honest, the thought of cultivating this cruciferous beauty can seem a little daunting. Many gardeners shy away, fearing its reputation for being finicky. That’s where these DIY tricks and hacks come in! I’m here to demystify the process and show you that you don’t need a green thumb of steel to grow cauliflower at home successfully.
In this article, I’ll share my tried-and-true methods for nurturing healthy cauliflower plants, from seed to harvest. We’ll cover everything from soil preparation and pest control to choosing the right varieties for your region. So, ditch the store-bought stuff and get ready to enjoy the unparalleled satisfaction of homegrown cauliflower. Let’s get our hands dirty!
Growing Cauliflower at Home: A Beginner’s Guide
Hey there, fellow gardening enthusiasts! Ever dreamt of harvesting your own crisp, delicious cauliflower right from your backyard? It’s totally achievable, even if you’re a newbie like I once was. Cauliflower can seem a little intimidating, but trust me, with a little know-how and patience, you’ll be enjoying homegrown cauliflower in no time. This guide will walk you through everything you need to know, from choosing the right variety to dealing with common pests. Let’s get started!
Choosing Your Cauliflower Variety
First things first, you need to pick the right cauliflower variety for your climate and growing season. Different varieties mature at different rates, so consider your local weather patterns. Here are a few popular options:
* Snowball Y Improved: A classic, reliable variety that produces medium-sized, pure white heads. It’s relatively quick to mature, making it a good choice for shorter growing seasons.
* Cheddar: This variety produces beautiful orange heads, adding a pop of color to your garden and your plate! It’s also known for its mild flavor.
* Graffiti: If you’re looking for something truly unique, try Graffiti cauliflower. It boasts vibrant purple heads that are as stunning as they are delicious.
* Romanesco: Technically a broccoli relative, Romanesco cauliflower features a striking fractal pattern and a nutty flavor. It’s a bit more challenging to grow, but the visual reward is well worth it!
Getting Started: Planting Your Cauliflower
Cauliflower can be started from seed indoors or purchased as transplants from a local nursery. Starting from seed gives you more control over the process, but transplants are a great option if you’re short on time or space.
Starting from Seed Indoors:
1. Timing is Key: Start your seeds about 4-6 weeks before the last expected frost in your area. This will give them a head start before transplanting them outdoors.
2. Prepare Your Seed Starting Mix: Use a well-draining seed starting mix. You can find this at most garden centers, or you can make your own by combining equal parts peat moss, perlite, and vermiculite.
3. Sow the Seeds: Fill seed trays or small pots with the seed starting mix. Sow the seeds about 1/4 inch deep and gently water them.
4. Provide Warmth and Light: Cauliflower seeds need warmth to germinate. Place the seed trays in a warm location, such as on top of a refrigerator or on a heat mat. Once the seedlings emerge, provide them with plenty of light. A grow light is ideal, but a sunny windowsill can also work.
5. Water Regularly: Keep the seed starting mix consistently moist, but not soggy. Water from the bottom to avoid damping off, a fungal disease that can kill young seedlings.
6. Harden Off the Seedlings: Before transplanting your seedlings outdoors, you need to harden them off. This process gradually acclimates them to the outdoor environment. Start by placing the seedlings outdoors in a sheltered location for a few hours each day, gradually increasing the amount of time they spend outside over the course of a week.
Transplanting Cauliflower Seedlings:
1. Choose the Right Location: Cauliflower needs at least 6 hours of sunlight per day. Choose a location in your garden that receives plenty of sun.
2. Prepare the Soil: Cauliflower prefers well-drained, fertile soil with a pH of 6.0-7.0. Amend the soil with compost or well-rotted manure to improve its fertility and drainage.
3. Planting Time: Transplant your cauliflower seedlings outdoors after the last expected frost. Space the plants 18-24 inches apart in rows that are 24-36 inches apart.
4. Dig the Holes: Dig holes that are slightly larger than the root balls of the seedlings.
5. Gently Remove the Seedlings: Carefully remove the seedlings from their containers, being careful not to damage the roots.
6. Plant the Seedlings: Place the seedlings in the holes and gently backfill with soil. Water thoroughly.
Caring for Your Cauliflower Plants
Once your cauliflower plants are in the ground, it’s important to provide them with the care they need to thrive.
1. Watering: Cauliflower needs consistent moisture, especially during head formation. Water deeply and regularly, especially during dry spells. Aim for about 1-1.5 inches of water per week.
2. Fertilizing: Cauliflower is a heavy feeder, so it needs regular fertilization. Apply a balanced fertilizer every 2-3 weeks, following the instructions on the package. You can also side-dress the plants with compost or well-rotted manure.
3. Weeding: Keep the area around your cauliflower plants free of weeds. Weeds compete with the plants for nutrients and water.
4. Mulching: Apply a layer of mulch around your cauliflower plants to help retain moisture, suppress weeds, and regulate soil temperature. Straw, wood chips, or shredded leaves are all good options.
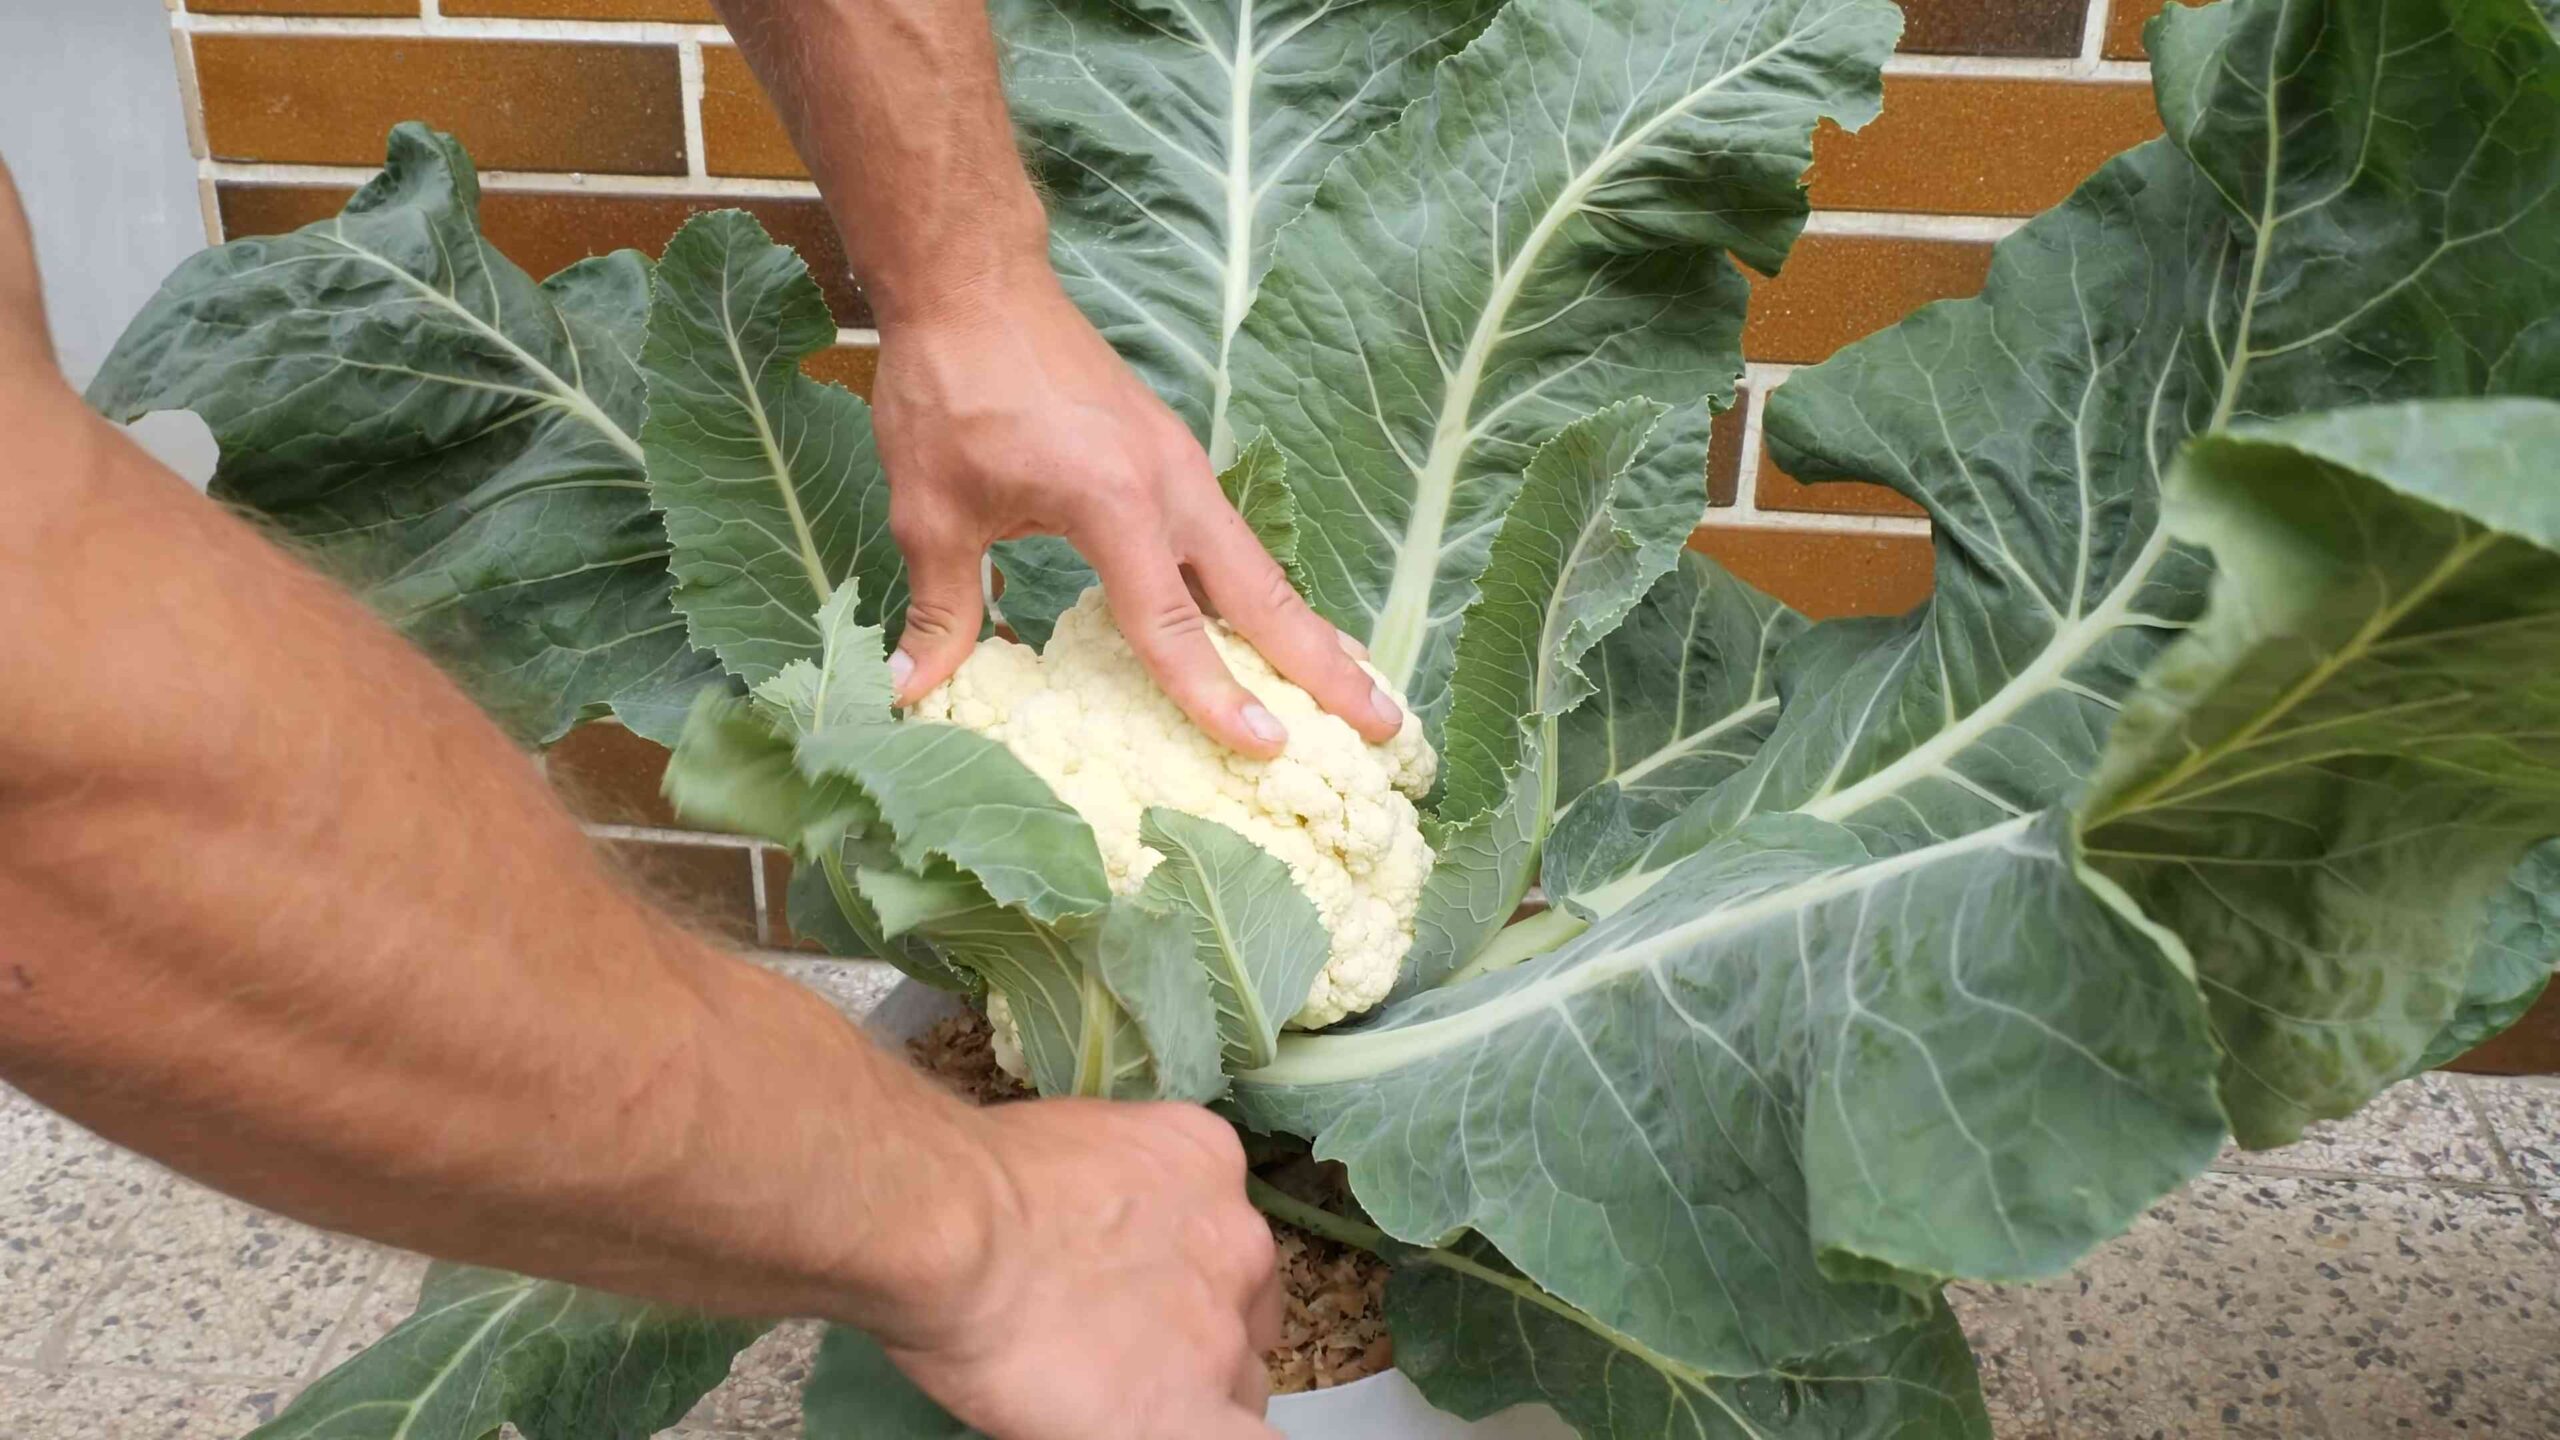
5. Blanching (for White Varieties): For white cauliflower varieties, blanching is necessary to prevent the heads from turning yellow or brown. When the head is about 2-3 inches in diameter, tie the outer leaves together over the head to protect it from the sun. Use twine or rubber bands to secure the leaves. Check the head regularly and harvest when it reaches the desired size.
Dealing with Pests and Diseases
Cauliflower is susceptible to a few common pests and diseases. Here’s how to deal with them:
* Cabbage Worms: These green caterpillars can quickly devour cauliflower leaves. Handpick them off the plants or use a biological insecticide like Bacillus thuringiensis (Bt).
* Cabbage Loopers: Similar to cabbage worms, cabbage loopers are another type of caterpillar that can damage cauliflower plants. Use the same control methods as for cabbage worms.
* Aphids: These small, sap-sucking insects can weaken cauliflower plants. Spray them off with a strong stream of water or use insecticidal soap.
* Clubroot: This fungal disease causes swollen, distorted roots and stunted growth. Prevent clubroot by planting cauliflower in well-drained soil and rotating your crops. If you have clubroot in your garden, amend the soil with lime to raise the pH.
* Black Rot: This bacterial disease causes dark, sunken lesions on the leaves and heads. Prevent black rot by planting disease-resistant varieties and avoiding overhead watering.
Harvesting Your Cauliflower
The time it takes for cauliflower to mature depends on the variety and growing conditions. Generally, cauliflower is ready to harvest 50-80 days after transplanting.
1. Check for Maturity: The head should be firm, compact, and the desired size. The florets should be tightly closed.
2. Harvesting: Use a sharp knife to cut the head from the plant, leaving a few leaves attached to protect the head.
3. Storage: Store cauliflower in the refrigerator for up to a week.
Troubleshooting Common Problems
* Small Heads: Small heads can be caused by a variety of factors, including insufficient sunlight, poor soil fertility, and inadequate watering. Make sure your cauliflower plants are getting enough sun, water, and nutrients.
* Loose Heads: Loose heads can be caused by hot weather or inconsistent watering. Try to provide consistent moisture and shade the plants during the hottest part of the day.
* Yellowing Heads: Yellowing heads are usually caused by sun exposure. Blanch the heads to protect them from the sun.
* Buttoning: Buttoning is when the cauliflower plant produces small, premature heads. This can be caused by stress, such as cold weather or nutrient deficiencies.
Extra Tips for Success
* Succession Planting: Plant cauliflower every few weeks to ensure a continuous harvest throughout the season.
* Companion Planting: Plant cauliflower with companion plants like rosemary, thyme, and sage to deter pests.
* Soil Testing: Test your soil before planting to determine its pH and nutrient levels. Amend the soil as needed to provide the ideal growing conditions for cauliflower.
* Record Keeping: Keep track of your planting dates, fertilizer applications, and pest control measures. This will help you learn from your mistakes and improve your results in future years.
Growing cauliflower at home can be a rewarding experience. With a little planning and effort, you can enjoy fresh, delicious cauliflower straight from your garden. Happy gardening!

Conclusion
So, there you have it! Growing cauliflower at home, while it might seem daunting at first, is an incredibly rewarding experience. It’s not just about saving money (although that’s a definite perk!), it’s about connecting with your food, understanding the process from seed to table, and enjoying the unparalleled freshness and flavor of a vegetable you nurtured yourself.
This DIY trick, focusing on [specific trick mentioned in the article, e.g., companion planting with marigolds, or using coffee grounds as fertilizer], is a must-try because it significantly increases your chances of success. It’s a simple, natural, and effective way to combat common cauliflower growing challenges like [mention specific challenges, e.g., pest infestations or nutrient deficiencies]. Imagine biting into a crisp, perfectly formed head of cauliflower, knowing you achieved that deliciousness without relying on harsh chemicals or complicated techniques. That’s the power of this method.
But don’t stop there! Experimentation is key to successful gardening. Consider these variations to tailor the process to your specific climate and preferences:
* Different Cauliflower Varieties: Try growing purple, orange, or Romanesco cauliflower for a visual and flavorful twist. Each variety has slightly different needs and maturation times, so do your research.
* Soil Amendments: While [specific trick mentioned in the article] is effective, consider adding other organic amendments like compost or well-rotted manure to further enrich your soil.
* Companion Planting Alternatives: If marigolds aren’t your thing, try other companion plants like nasturtiums or herbs like rosemary and thyme, which also deter pests.
* Succession Planting: Plant cauliflower seeds every few weeks to ensure a continuous harvest throughout the growing season.
Ultimately, the best way to learn is by doing. Don’t be afraid to get your hands dirty, make mistakes, and adapt the process to your unique garden environment. We are confident that this DIY trick will significantly improve your success rate when you grow cauliflower at home.
We encourage you to give this DIY trick a try and share your experiences with us! Let us know in the comments how it worked for you, what challenges you faced, and any tips you discovered along the way. Your feedback will help other gardeners learn and grow, too. Happy gardening!
Frequently Asked Questions (FAQ)
Q: What is the best time of year to start growing cauliflower at home?
A: The best time to start growing cauliflower depends on your climate. Cauliflower is a cool-season crop, meaning it thrives in temperatures between 60°F and 70°F (15°C and 21°C). In areas with mild winters, you can plant cauliflower in the fall for a winter or early spring harvest. In colder climates, start seeds indoors 6-8 weeks before the last expected frost and transplant them outdoors in the spring. Alternatively, you can start seeds directly outdoors after the last frost, but be sure to protect young seedlings from extreme temperatures. For a fall harvest in colder climates, start seeds indoors in mid-summer. Check your local extension office for specific planting dates in your area.
Q: How much sunlight does cauliflower need?
A: Cauliflower requires at least 6 hours of direct sunlight per day to thrive. Choose a sunny location in your garden where your cauliflower plants will receive ample sunlight throughout the day. If you live in a particularly hot climate, some afternoon shade can be beneficial to prevent the plants from bolting (going to seed prematurely).
Q: What kind of soil is best for growing cauliflower?
A: Cauliflower prefers well-drained, fertile soil that is rich in organic matter. The ideal soil pH is between 6.0 and 7.0. Before planting, amend your soil with compost, well-rotted manure, or other organic matter to improve drainage, fertility, and water retention. A soil test can help you determine if your soil is lacking any essential nutrients.
Q: How often should I water my cauliflower plants?
A: Cauliflower needs consistent moisture to grow properly. Water your plants deeply and regularly, especially during dry periods. Aim to keep the soil consistently moist but not waterlogged. Mulching around the plants can help retain moisture and suppress weeds. Check the soil moisture regularly by sticking your finger about an inch into the soil. If it feels dry, it’s time to water.
Q: What are some common pests and diseases that affect cauliflower, and how can I control them?
A: Cauliflower is susceptible to several pests and diseases, including cabbage worms, aphids, flea beetles, clubroot, and black rot. To control pests, you can use row covers to protect young plants, handpick pests off the plants, or use insecticidal soap or neem oil. To prevent diseases, choose disease-resistant varieties, practice crop rotation, and ensure good air circulation around the plants. If you suspect your plants have a disease, consult your local extension office for diagnosis and treatment recommendations.
Q: How do I know when my cauliflower is ready to harvest?
A: Cauliflower is ready to harvest when the head is firm, compact, and about 6-8 inches in diameter. The exact size will depend on the variety. The curds (the white part of the head) should be tightly packed together and free from blemishes. If the curds start to separate or the head becomes loose, it’s time to harvest. To harvest, cut the stem of the cauliflower just below the head, leaving a few leaves attached to protect the head.
Q: Can I grow cauliflower in containers?
A: Yes, you can grow cauliflower in containers, but you’ll need to choose a large container that is at least 12 inches in diameter and 12 inches deep. Use a high-quality potting mix and ensure the container has good drainage. Container-grown cauliflower may require more frequent watering and fertilization than plants grown in the ground. Choose a compact or dwarf variety for best results.
Q: What is “blanching” cauliflower, and why is it done?
A: Blanching cauliflower involves covering the developing head with its own leaves to prevent it from turning yellow or brown. This is done to maintain the white color of the curds, which is considered desirable by many. To blanch cauliflower, simply fold the large outer leaves over the head and secure them with clothespins or rubber bands. Blanching is typically done when the head is about 2-3 inches in diameter. Some varieties are self-blanching, meaning their leaves naturally curl inward to protect the head.
Q: Can I eat the leaves of the cauliflower plant?
A: Yes, the leaves of the cauliflower plant are edible and nutritious. They can be cooked like other leafy greens, such as kale or collard greens. They have a slightly stronger flavor than the curds but are a good source of vitamins and minerals.
Q: What are some ways to use cauliflower in cooking?
A: Cauliflower is a versatile vegetable that can be used in a variety of dishes. It can be steamed, roasted, boiled, mashed, or even eaten raw. It can be used as a substitute for rice, potatoes, or flour in low-carb recipes. Some popular cauliflower dishes include cauliflower cheese, roasted cauliflower with spices, cauliflower soup, and cauliflower pizza crust. The possibilities are endless!

Leave a Comment