

DIY Egg Carton Ottoman: Who knew your breakfast leftovers could transform into a stylish and functional piece of furniture? I’m always on the lookout for clever ways to repurpose everyday items, and this DIY project is a game-changer! Forget those expensive store-bought ottomans; we’re about to create a comfy and unique footrest using something you probably already have piling up in your recycling bin – egg cartons!
The concept of repurposing materials has deep roots in many cultures. Historically, resourcefulness was a necessity, with communities finding creative ways to extend the life of everyday objects. This DIY egg carton ottoman project taps into that same spirit of ingenuity and sustainability. It’s a fantastic way to reduce waste and add a personal touch to your home decor.
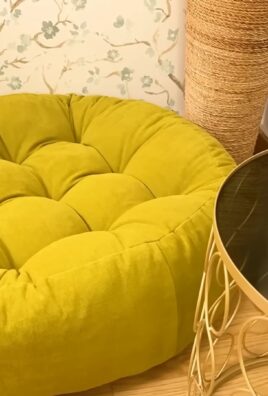
Let’s face it, furniture can be expensive! And sometimes, you just need a little something extra to kick your feet up after a long day. That’s where this DIY egg carton ottoman comes in. It’s an affordable, eco-friendly, and surprisingly comfortable solution. Plus, it’s a fun project that you can customize to match your personal style. I’ll guide you through each step, ensuring you create a sturdy and stylish ottoman that will be the envy of all your guests. Get ready to turn trash into treasure!
DIY Egg Carton Ottoman: Comfy Seating on a Budget!
Hey there, fellow DIY enthusiasts! Ever looked at a pile of egg cartons and thought, “There has to be a better use for these than just recycling?” Well, today’s your lucky day! I’m going to walk you through creating a surprisingly sturdy and comfortable ottoman using… you guessed it… egg cartons! This project is not only eco-friendly but also a fantastic way to add a unique and personalized touch to your living space. Plus, it’s a great conversation starter!
Materials You’ll Need
Before we dive in, let’s gather our supplies. Don’t worry, most of these are easily accessible and budget-friendly.
* A LOT of Egg Cartons: Seriously, you’ll need a bunch. The exact number depends on the size you want your ottoman to be, but I’d recommend aiming for at least 60-80 cardboard egg cartons. The more, the merrier (and the sturdier!). Make sure they are the cardboard kind, not styrofoam.
* Strong Packing Tape: This is crucial for holding everything together. Invest in a good quality, wide packing tape for maximum durability.
* Cardboard Sheets: You’ll need these for the top and bottom of the ottoman. You can repurpose large cardboard boxes, like those from appliances or furniture.
* Scissors or Utility Knife: For cutting the cardboard sheets. Be careful!
* Measuring Tape or Ruler: To ensure accurate measurements.
* Hot Glue Gun and Glue Sticks: For securing the fabric and adding extra reinforcement.
* Upholstery Fabric: Choose a fabric that complements your decor and is durable enough to withstand regular use. Consider heavier fabrics like canvas, denim, or upholstery-grade cotton. You’ll need enough to cover the entire ottoman with some extra for tucking and securing.
* Batting or Foam Padding: This will provide cushioning and make your ottoman super comfy. You can use batting scraps, old blankets, or purchase foam padding from a craft store.
* Staple Gun and Staples: For attaching the fabric to the cardboard base.
* Optional: Decorative Trim, Buttons, or Legs: To add a personal touch and elevate the look of your ottoman.
Preparing the Egg Cartons
This is probably the most time-consuming part, but trust me, it’s worth it! We need to transform those flimsy egg cartons into sturdy building blocks.
1. Flatten the Egg Cartons: Carefully flatten each egg carton. You can do this by gently pressing down on the top and sides. Try to avoid tearing the cardboard.
2. Stack and Tape: Stack the flattened egg cartons on top of each other, creating columns. I found that stacking them in columns of 4-5 cartons worked best for stability. Secure each column tightly with packing tape, wrapping it around several times. The tighter you tape them, the stronger your ottoman will be.
3. Repeat: Keep stacking and taping until you have enough columns to create the desired size and shape for your ottoman. Remember to consider the height, width, and depth.
Building the Ottoman Structure
Now comes the fun part – assembling our egg carton building blocks into a functional ottoman!
1. Arrange the Columns: Arrange the taped egg carton columns in the desired shape for your ottoman. You can create a square, rectangle, or even a circular ottoman. Play around with the arrangement until you’re happy with the size and shape.
2. Secure the Columns Together: Once you’ve arranged the columns, it’s time to secure them together. Use packing tape to tightly bind the columns to each other. Wrap the tape around the entire structure, both horizontally and vertically, to create a solid and stable base. Don’t be shy with the tape – the more, the better!
3. Create the Top and Bottom: Measure the top and bottom of your assembled egg carton structure. Cut two pieces of cardboard to these dimensions. These will serve as the top and bottom of your ottoman, providing a smooth and even surface.
4. Attach the Cardboard Top and Bottom: Place one cardboard sheet on the bottom of the egg carton structure and secure it with packing tape. Make sure the cardboard is firmly attached to the egg carton columns. Repeat this process for the top of the ottoman. You can also use hot glue for extra reinforcement.
Adding Padding and Upholstery
This is where your ottoman starts to look like an actual piece of furniture!
1. Add Padding: Place a layer of batting or foam padding on top of the cardboard top. This will provide cushioning and make your ottoman more comfortable to sit on. You can use multiple layers of batting for extra padding. Secure the padding to the cardboard with hot glue or spray adhesive.
2. Cut the Fabric: Measure the dimensions of your ottoman, including the top, sides, and bottom. Add several inches to each measurement to allow for tucking and securing the fabric. Cut the upholstery fabric to these dimensions.
3. Attach the Fabric: Center the fabric over the ottoman, ensuring that there is enough fabric to cover all sides. Starting on one side, pull the fabric taut and staple it to the cardboard base using a staple gun. Work your way around the ottoman, pulling the fabric tight and stapling it in place. Pay attention to the corners, folding and tucking the fabric neatly to create a clean and professional finish.
4. Secure the Bottom: Once you’ve covered the sides and top, fold the remaining fabric under the bottom of the ottoman and staple it to the cardboard base. Again, make sure the fabric is pulled tight and neatly tucked.
5. Trim Excess Fabric: Trim any excess fabric from the bottom of the ottoman, leaving a clean and finished edge.
Finishing Touches (Optional)
Now that your ottoman is upholstered, you can add some finishing touches to personalize it and make it even more stylish.
1. Add Decorative Trim: Attach decorative trim around the base of the ottoman using hot glue. This can add a touch of elegance and hide any staples.
2. Add Buttons: Sew buttons onto the top of the ottoman for a tufted look. This adds texture and visual interest.
3. Attach Legs: If you want to elevate your ottoman, you can attach legs to the bottom. You can purchase legs from a hardware store or repurpose legs from old furniture. Attach the legs using screws or bolts.
4. Add a Protective Layer to the Bottom: Cut a piece of felt or sturdy fabric slightly larger than the bottom of the ottoman. Glue or staple it to the bottom to protect your floors from scratches.
Tips and Tricks for Success
* Reinforce, Reinforce, Reinforce!: The key to a sturdy egg carton ottoman is reinforcement. Don’t skimp on the packing tape! The more you use, the stronger your ottoman will be.
* Choose the Right Fabric: Select a durable and stain-resistant fabric that can withstand regular use. Consider the color and pattern of the fabric to complement your decor.
* Take Your Time: This project takes time and patience. Don’t rush the process. Take your time to ensure that each step is done correctly.
* Get Creative: Don’t be afraid to experiment with different shapes, sizes, and fabrics. This is your chance to create a unique and personalized piece of furniture.
* Consider Weight Distribution: While surprisingly strong, an egg carton ottoman isn’t designed for extreme weight. Avoid jumping or placing excessively heavy objects on it.
* Safety First: Always use caution when using sharp tools like scissors or utility knives. Wear safety glasses to protect your eyes from flying debris.
Enjoy Your New Ottoman!
Congratulations! You’ve successfully created a comfy and stylish ottoman using egg cartons. Now, sit back, relax, and enjoy your new piece of furniture. You’ve not only saved money but also contributed to a more sustainable lifestyle. Plus, you have a fantastic story to tell whenever someone asks about your unique ottoman! I hope you enjoyed this DIY project as much as I did. Happy crafting!
Conclusion
So, there you have it! Transforming humble egg cartons into a stylish and surprisingly sturdy ottoman is not just a fun craft project; it’s a testament to the power of resourcefulness and creative upcycling. This DIY egg carton ottoman project offers a unique blend of sustainability, affordability, and personalized design, making it a must-try for anyone looking to add a touch of eco-chic to their home decor.
Why is this a must-try? Because it’s more than just furniture; it’s a conversation starter. Imagine the look on your guests’ faces when you tell them your ottoman is made from recycled egg cartons! It’s a fantastic way to reduce waste, save money, and express your individual style. Plus, the process itself is incredibly rewarding, offering a sense of accomplishment and creative satisfaction.
But the fun doesn’t stop there! Feel free to experiment with different fabrics and embellishments to truly make this ottoman your own. Consider using a vibrant, patterned fabric for a bold statement piece, or opt for a neutral tone for a more understated look. You could even add decorative buttons, tassels, or embroidery to further personalize your creation.
For a more luxurious feel, consider adding an extra layer of padding to the top of the ottoman before covering it with fabric. This will provide added comfort and support. You can also experiment with different shapes and sizes. Instead of a traditional square or rectangular ottoman, try creating a round or even an organically shaped one. The possibilities are endless!
Another variation is to create multiple smaller ottomans instead of one large one. These can be used as individual seating options or grouped together to create a larger seating area. This is a great option for smaller spaces or for those who prefer a more flexible seating arrangement.
Don’t be afraid to get creative with the base of the ottoman as well. While the instructions typically call for a wooden base, you could also use a sturdy cardboard box or even a repurposed tire. Just make sure the base is strong enough to support the weight of the ottoman and anyone who sits on it.
We encourage you to embrace the challenge and embark on this exciting DIY adventure. Not only will you end up with a unique and functional piece of furniture, but you’ll also be contributing to a more sustainable lifestyle.
Once you’ve completed your DIY egg carton ottoman, we’d love to see your creations! Share your photos and experiences with us on social media using #EggCartonOttomanDIY. We can’t wait to see what you come up with! Let’s inspire each other to create beautiful and sustainable homes, one egg carton at a time. This project is a testament to the fact that creativity and sustainability can go hand in hand, resulting in something truly special and unique. So, gather your egg cartons, unleash your inner artist, and get ready to transform trash into treasure!
FAQ
Frequently Asked Questions About Your DIY Egg Carton Ottoman
1. How many egg cartons do I need for this project?
The number of egg cartons required will depend on the desired size of your ottoman. A standard-sized ottoman (approximately 18 inches by 18 inches) typically requires around 50-75 egg cartons. It’s always a good idea to collect more than you think you’ll need, just in case some are damaged or you decide to make the ottoman larger. Remember to factor in the height you want as well, as this will determine how many layers of egg cartons you need to stack.
2. What kind of glue should I use to assemble the egg cartons?
A strong adhesive like construction adhesive or a high-quality wood glue is recommended for assembling the egg cartons. Hot glue can also be used, but it may not provide as strong of a bond, especially for larger ottomans. Ensure the glue is suitable for bonding cardboard or paper to itself and to the base material (wood, cardboard, etc.). Apply the glue liberally to ensure a secure and long-lasting bond. Allow ample drying time as per the glue manufacturer’s instructions.
3. How do I ensure the ottoman is sturdy enough to sit on?
The sturdiness of the ottoman depends on several factors: the quality of the egg cartons, the strength of the adhesive, and the structural integrity of the base. Use sturdy egg cartons made from thick cardboard. Ensure each egg carton is securely glued to its neighbors and to the base. Consider adding internal supports within the ottoman structure, such as cardboard tubes or wooden dowels, to provide additional reinforcement. Distribute weight evenly across the ottoman to avoid putting excessive stress on any one area. A well-constructed base is also crucial for stability.
4. What type of fabric is best for covering the ottoman?
Durable and upholstery-grade fabrics are ideal for covering the ottoman. Consider fabrics like canvas, denim, linen, or synthetic blends. These fabrics are typically more resistant to wear and tear and can withstand regular use. Avoid delicate or easily damaged fabrics like silk or lace. Choose a fabric that complements your home decor and personal style. Remember to pre-wash the fabric before using it to prevent shrinkage after it’s been applied to the ottoman.
5. Can I paint the egg cartons before assembling the ottoman?
Yes, you can paint the egg cartons before assembling the ottoman. This allows you to customize the color and appearance of the ottoman to match your decor. Use acrylic paint or spray paint specifically designed for cardboard or paper. Apply multiple thin coats of paint rather than one thick coat to prevent the cardboard from becoming soggy or warped. Allow the paint to dry completely before assembling the ottoman.
6. How do I clean the egg carton ottoman?
Spot cleaning is the best way to clean the egg carton ottoman. Use a damp cloth and mild detergent to gently wipe away any spills or stains. Avoid using harsh chemicals or abrasive cleaners, as these can damage the fabric or the egg cartons. For more stubborn stains, consider using a fabric stain remover specifically designed for the type of fabric you’ve used to cover the ottoman. Allow the ottoman to air dry completely after cleaning.
7. Is this project suitable for children?
While the project itself is relatively simple, adult supervision is required, especially when using sharp tools like scissors or craft knives and adhesives. Children can help with tasks like collecting egg cartons, painting them, or choosing the fabric. However, the actual assembly of the ottoman should be done by an adult to ensure safety and structural integrity.
8. Can I use a different type of base instead of wood?
Yes, you can use alternative base materials such as a sturdy cardboard box, a repurposed tire, or even a metal frame. Ensure the base is strong enough to support the weight of the ottoman and anyone who sits on it. The base should also be relatively flat and stable to prevent the ottoman from tipping over. Consider the aesthetic appeal of the base as well, as it will be visible from the bottom of the ottoman.
9. How long does it take to complete this project?
The time required to complete the project will vary depending on the size of the ottoman and your level of experience. Collecting the egg cartons may take some time, depending on how many you need. The assembly process itself typically takes a few hours, spread over a few days to allow the glue to dry completely. Painting the egg cartons or adding embellishments will also add to the overall project time. Plan accordingly and allow yourself ample time to complete the project without feeling rushed.
10. What if I don’t have enough egg cartons?
If you don’t have enough egg cartons, ask friends, family, and neighbors to save them for you. You can also check with local restaurants, cafes, or schools, as they often have a surplus of egg cartons. Alternatively, you can purchase egg cartons online or from craft stores. Consider using a combination of different sizes and shapes of egg cartons to add visual interest to the ottoman.
Leave a Comment