

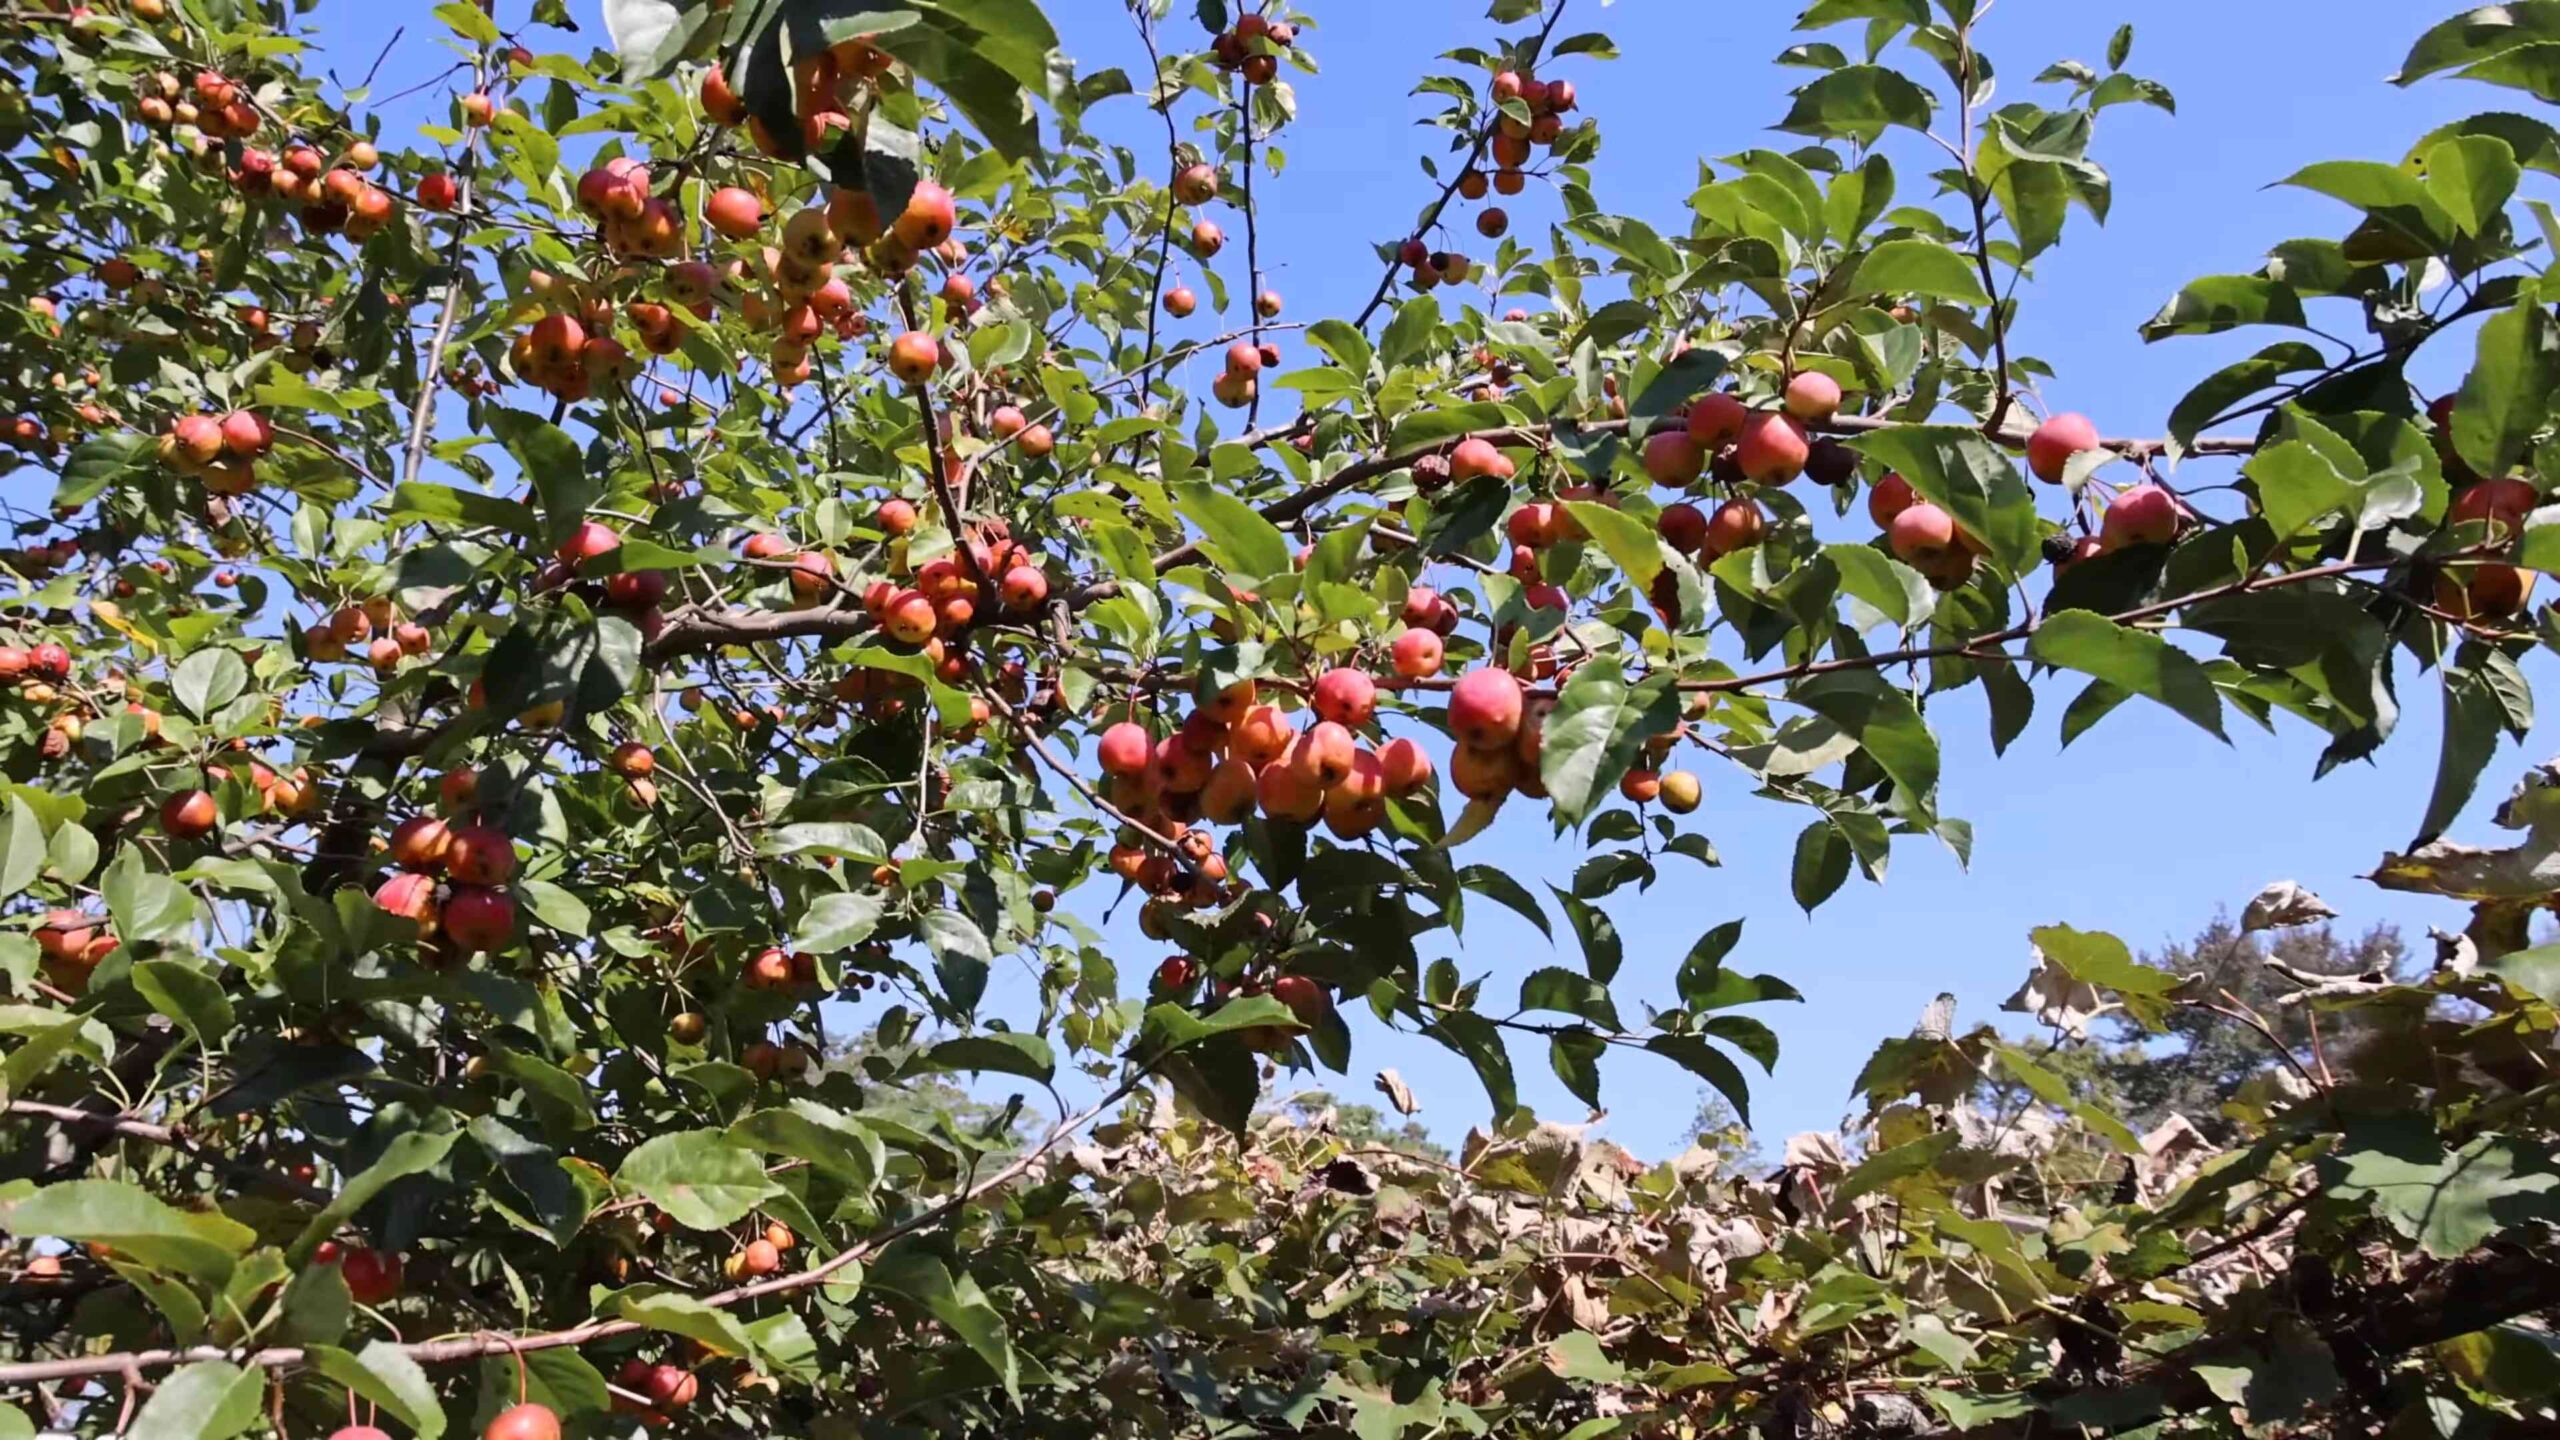
Grow apple tree from seed? Absolutely! Imagine biting into a crisp, juicy apple grown right in your own backyard, nurtured from a tiny seed by your very own hands. It sounds like something out of a fairytale, doesn’t it? But trust me, it’s entirely achievable, and this DIY guide will show you exactly how to make that dream a reality.
For centuries, the apple tree has held a special place in our hearts and cultures. From the mythical Garden of Eden to the folklore surrounding Johnny Appleseed, this fruit-bearing tree is steeped in history and symbolism. But beyond the stories, growing your own apple tree is incredibly rewarding. Not only do you get to enjoy delicious, homegrown apples, but you also contribute to a greener environment and experience the simple joy of nurturing life.
Why should you learn this DIY trick? Well, for starters, store-bought apples can be expensive and often lack the unique flavor of homegrown varieties. Plus, knowing exactly where your food comes from and how it was grown gives you peace of mind. And let’s be honest, there’s a certain satisfaction that comes with saying, “I grew this myself!” So, if you’re ready to embark on a rewarding gardening adventure, let’s dive into the secrets of how to grow apple tree from seed and cultivate your very own apple orchard, one seed at a time!

Growing Apple Trees From Seed: A Patient Gardener’s Guide
Okay, so you want to grow an apple tree from seed? That’s fantastic! It’s a rewarding, albeit lengthy, process. Be warned: you likely won’t get the exact same apple variety as the one you took the seeds from. Apple trees rarely “come true” from seed. Think of it like having kids – they inherit traits from both parents, and you might end up with something completely unique! But that’s part of the fun, right? You might discover the next Honeycrisp!
Here’s a comprehensive guide to get you started.
Understanding Apple Seed Germination
Before we dive in, let’s understand a crucial step: stratification. Apple seeds need a period of cold, moist conditions to break their dormancy. This mimics winter and tells the seed it’s time to wake up and grow when spring arrives. Without stratification, your seeds simply won’t germinate.
Materials You’ll Need
* Apples (organic is best, as they’re less likely to be treated with chemicals that could inhibit germination)
* Sharp knife
* Paper towels
* Sealable plastic bag (Ziploc works great)
* Refrigerator
* Seed starting mix (or a mix of peat moss, perlite, and vermiculite)
* Small pots or seedling trays
* Watering can or spray bottle
* Sunny windowsill or grow lights
Extracting and Preparing the Apple Seeds
1. Choose Your Apples: Select ripe, healthy apples. I usually go for organic ones because I want to avoid any potential chemicals that might hinder germination. The variety doesn’t matter too much, unless you have a specific type you’re hoping to get something similar to. Just remember, you’re likely to get a hybrid!
2. Extract the Seeds: Carefully cut open the apple and remove the seeds. You’ll usually find them in the core. I like to use a sharp knife to gently pry them out.
3. Clean the Seeds: Rinse the seeds under cool water to remove any remaining apple flesh. This is important to prevent mold growth during stratification.
4. Inspect the Seeds: Discard any seeds that are small, shriveled, or damaged. You want to use only the plump, healthy-looking seeds. These have the best chance of germinating.
Stratifying the Apple Seeds (The “Winter” Treatment)
1. Moisten the Paper Towels: Dampen a few paper towels with water. They should be moist but not soaking wet. You don’t want the seeds sitting in a puddle.
2. Wrap the Seeds: Place the apple seeds on the damp paper towels and fold the towels over them. Make sure the seeds are completely enclosed.
3. Seal in a Plastic Bag: Put the wrapped seeds in a sealable plastic bag. This will help maintain the moisture level and prevent the seeds from drying out.
4. Label the Bag: Label the bag with the date and the apple variety (if you know it). This will help you keep track of how long the seeds have been stratifying.
5. Refrigerate for 60-90 Days: Place the bag in the refrigerator. The ideal temperature is between 33°F and 41°F (0.5°C and 5°C). I usually put mine in the crisper drawer.
6. Check Periodically: Every couple of weeks, check the seeds to make sure the paper towels are still moist. If they’re drying out, lightly re-moisten them. Also, keep an eye out for any mold growth. If you see mold, gently rinse the seeds and replace the paper towels.
Planting the Stratified Apple Seeds
After the stratification period, it’s time to plant your seeds! This is where the real excitement begins.
1. Prepare Your Pots: Fill small pots or seedling trays with seed starting mix. Make sure the pots have drainage holes to prevent waterlogging.
2. Plant the Seeds: Make a small hole in the soil, about ½ inch deep. Place one or two seeds in each hole and gently cover them with soil.
3. Water Gently: Water the soil gently with a watering can or spray bottle. You want to moisten the soil without disturbing the seeds.
4. Provide Light: Place the pots in a sunny windowsill or under grow lights. Apple seedlings need plenty of light to grow. If you’re using a windowsill, rotate the pots regularly to ensure even growth.
5. Keep the Soil Moist: Keep the soil consistently moist, but not soggy. Check the soil moisture daily and water as needed.
Caring for Your Apple Seedlings
Once your seedlings emerge (usually within a week or two), it’s important to provide them with proper care to ensure they grow into healthy trees.
1. Thinning Seedlings: If you planted more than one seed per pot and both germinate, thin them out by snipping off the weaker seedling at the soil line. This will give the stronger seedling more room to grow.
2. Fertilizing: Once the seedlings have a few sets of true leaves (the leaves that look like miniature apple leaves), you can start fertilizing them with a diluted liquid fertilizer. Follow the instructions on the fertilizer label. I usually use a balanced fertilizer like 10-10-10.
3. Repotting: As the seedlings grow, they will eventually need to be repotted into larger containers. Choose pots that are a few inches larger in diameter than the current pots. Gently remove the seedlings from their pots and transplant them into the larger pots, being careful not to damage the roots.
4. Hardening Off: Before planting your apple seedlings outdoors, you’ll need to “harden them off.” This means gradually exposing them to outdoor conditions over a period of a week or two. Start by placing the seedlings outdoors in a sheltered location for a few hours each day, gradually increasing the amount of time they spend outdoors. This will help them acclimate to the sun, wind, and temperature changes.
Planting Your Apple Tree Seedling Outdoors
After hardening off, your apple seedling is ready to be planted in its permanent location.
1. Choose a Location: Select a sunny location with well-drained soil. Apple trees need at least 6-8 hours of sunlight per day.
2. Prepare the Soil: Dig a hole that is twice as wide and as deep as the root ball of the seedling. Amend the soil with compost or other organic matter to improve drainage and fertility.
3. Plant the Seedling: Gently remove the seedling from its pot and place it in the hole. Make sure the top of the root ball is level with the surrounding soil.
4. Backfill the Hole: Backfill the hole with soil, gently firming it around the roots.
5. Water Thoroughly: Water the newly planted seedling thoroughly.
6. Mulch: Apply a layer of mulch around the base of the tree to help retain moisture and suppress weeds.
7. Protect from Pests: Protect your young apple tree from pests such as deer and rabbits. You can use tree guards or fencing to keep them away.
Patience is Key!
Growing an apple tree from seed takes time and patience. It can take several years (5-10 years, sometimes longer!) for your tree to start producing fruit. But the satisfaction of growing your own apples from seed is well worth the wait.
Important Considerations:
* Rootstock: Apple trees grown from seed will often be less vigorous and take longer to fruit than grafted trees. Grafting onto a specific rootstock controls the size and fruiting time of the tree. If you want a faster-fruiting, more predictable tree, you might consider grafting a scion (a cutting from a known apple variety) onto your seedling once it’s established. This is a more advanced technique, but it’s worth researching if you’re serious about apple growing.
* Pollination: Most apple varieties are not self-pollinating, meaning they need another apple tree nearby to produce fruit. If you only have one apple tree, you may need to plant another one or rely on a neighbor’s tree for pollination.
* Pruning: Regular pruning is essential for maintaining the health and productivity of your apple tree. Learn about proper pruning techniques to ensure your tree grows strong and produces plenty of fruit.
Growing an apple tree from seed is a long-term project, but it’s a rewarding one. You’ll learn a lot about plant propagation and have the satisfaction of growing your own fruit from scratch. Good luck, and happy gardening!
Conclusion
So, there you have it! Growing an apple tree from seed is undoubtedly a journey, not a sprint. It demands patience, a dash of experimentation, and a genuine love for the process. But the rewards? They’re immeasurable. Imagine the satisfaction of nurturing a tiny seed into a thriving tree, laden with fruit that you can proudly say you cultivated from scratch. It’s a connection to nature, a testament to your dedication, and a conversation starter that will impress anyone who tastes your homegrown apples.
This isn’t just about saving money or having access to a specific apple variety. It’s about the experience. It’s about understanding the life cycle of a tree, the intricacies of germination, and the sheer wonder of watching something grow under your care. It’s a project that can involve the whole family, teaching valuable lessons about responsibility, patience, and the importance of sustainable practices.
While the process we’ve outlined provides a solid foundation, don’t be afraid to experiment! Try different apple varieties. Perhaps you want to try growing a heritage apple variety that’s difficult to find in stores. Or maybe you want to graft a branch from a known fruiting tree onto your seedling to speed up the fruiting process and ensure specific characteristics. Consider different soil mixes to see what works best in your local climate. You could even try different stratification methods to optimize germination rates.
Remember, every seed is unique, and every growing environment is different. What works for one person might not work for another. The key is to observe, learn, and adapt. Keep detailed notes of your progress, track your successes and failures, and use that information to refine your approach.
And speaking of sharing, we wholeheartedly encourage you to embark on this adventure and share your experiences with us! Post pictures of your seedlings, tell us about the challenges you faced, and celebrate your successes. Let’s create a community of apple tree enthusiasts who are passionate about growing their own fruit from seed. Your insights could be invaluable to others who are just starting out.
Ultimately, growing an apple tree from seed is a testament to the power of nature and the potential that lies within each tiny seed. It’s a project that requires dedication, but the rewards – both tangible and intangible – are well worth the effort. So, grab some apple seeds, prepare your potting mix, and get ready to embark on a rewarding journey. You might just surprise yourself with what you can achieve. This DIY project is a must-try for anyone with a green thumb and a love for fresh, homegrown fruit. Don’t hesitate to try this **grow apple tree from seed** method.
Frequently Asked Questions (FAQ)
Q: How long does it take to grow an apple tree from seed?
A: Growing an apple tree from seed is a long-term project. Unlike commercially grown apple trees that are often grafted onto established rootstock, trees grown from seed can take anywhere from 5 to 10 years to produce fruit. Grafting significantly reduces the time to fruiting because it utilizes a mature fruiting branch. Patience is key! The exact timeframe depends on the apple variety, the growing conditions, and the care you provide.
Q: What kind of apple seeds should I use?
A: You can use seeds from almost any apple, but keep in mind that the resulting tree will likely not produce fruit identical to the parent apple. This is because apple trees are typically hybrids. If you want a specific variety, grafting is the preferred method. However, for the fun of experimentation, try seeds from your favorite apples! Heirloom varieties often produce interesting results. Avoid using seeds from store-bought apples that may have been treated to prevent germination.
Q: Do I need to stratify the apple seeds?
A: Yes, stratification is crucial for successful germination. Apple seeds require a period of cold, moist storage to break dormancy. This mimics the natural winter conditions they would experience in the wild. Without stratification, the seeds are unlikely to germinate. Follow the stratification instructions outlined in the main article for best results.
Q: What kind of soil should I use for my apple seedlings?
A: A well-draining potting mix is essential. You can use a commercially available potting mix or create your own by combining equal parts of peat moss, perlite, and vermiculite. Avoid using garden soil, as it can be too heavy and may contain pests or diseases. Ensure the soil is slightly acidic to neutral (pH 6.0-7.0).
Q: How much sunlight do apple seedlings need?
A: Apple seedlings need plenty of sunlight to thrive. Aim for at least 6-8 hours of direct sunlight per day. If you’re growing your seedlings indoors, you may need to supplement with grow lights. Rotate the seedlings regularly to ensure even growth.
Q: How often should I water my apple seedlings?
A: Water your apple seedlings regularly, keeping the soil consistently moist but not waterlogged. Allow the top inch of soil to dry out slightly between waterings. Overwatering can lead to root rot, so be careful not to overdo it.
Q: When should I transplant my apple seedling into a larger pot or into the ground?
A: Once your apple seedling has developed several sets of true leaves and its root system has filled the initial pot, it’s time to transplant it. Choose a larger pot with good drainage or, if you live in a suitable climate, transplant it directly into the ground. Spring is generally the best time to transplant.
Q: What kind of fertilizer should I use for my apple tree?
A: Use a balanced fertilizer specifically formulated for fruit trees. Follow the instructions on the fertilizer packaging carefully. Avoid over-fertilizing, as this can damage the tree. Organic fertilizers, such as compost or well-rotted manure, are also excellent options.
Q: How do I protect my apple tree from pests and diseases?
A: Regularly inspect your apple tree for signs of pests or diseases. Common apple tree pests include aphids, codling moths, and apple scab. There are many organic and conventional methods for controlling these pests. Proper pruning and good air circulation can also help prevent diseases. Consider using dormant oil sprays in the late winter to control overwintering pests.
Q: Can I grow an apple tree from seed in a container?
A: Yes, you can grow an apple tree from seed in a container, especially if you choose a dwarf or semi-dwarf variety. However, container-grown apple trees require more frequent watering and fertilization than those grown in the ground. You’ll also need to repot the tree every few years as it grows.
Q: What if my apple seeds don’t germinate?
A: Several factors can contribute to poor germination rates. Ensure that your seeds have been properly stratified, that the soil is moist but not waterlogged, and that the temperature is within the optimal range for germination (around 65-75°F). If your seeds still don’t germinate, try a different batch of seeds or a different stratification method.
Q: Is it possible to graft my seedling later on?
A: Absolutely! In fact, grafting is highly recommended to ensure you get the desired apple variety and to potentially shorten the time to fruiting. Once your seedling is established, you can graft a scion (a cutting from a known fruiting tree) onto it. This combines the rootstock of your seedling with the fruiting characteristics of the grafted variety. There are many resources available online and in libraries that can teach you the basics of grafting.
Leave a Comment