

Propagate Banana Plants at Home: Ever dreamt of having a mini banana plantation right in your backyard? Or perhaps gifting a unique, homegrown plant to a friend? Well, you’re in luck! This isn’t just a pipe dream; it’s an achievable reality with a few simple tricks. For centuries, bananas have been a staple food and a symbol of tropical abundance, deeply woven into the cultures of Southeast Asia, Africa, and the Americas. Imagine carrying on that tradition, nurturing your own banana plants from the comfort of your home!
But why bother with propagating banana plants yourself? Let’s face it, buying mature banana plants can be expensive, and sometimes, you just want the satisfaction of creating something yourself. Plus, propagating from existing plants allows you to expand your collection without breaking the bank. This DIY guide will walk you through the easiest and most effective methods to propagate banana plants at home, ensuring you have a thriving banana family in no time. I’m excited to share these tips and tricks with you, so let’s get started and turn your green thumb dreams into a fruitful reality!
Propagating Banana Plants: A Beginner’s Guide
Hey plant lovers! Ever wished you could have more banana plants without spending a fortune? Well, you’re in luck! Propagating banana plants at home is totally doable, and I’m here to walk you through it. It’s a rewarding process, and before you know it, you’ll have a mini banana plantation in your backyard (or balcony!).
Understanding Banana Plant Propagation
Before we dive in, let’s quickly cover the basics. Banana plants are typically propagated through “pups,” which are baby plants that grow from the base of the mother plant. These pups are essentially clones of the parent, so you’ll get the same type of banana. There are a few different methods, but we’ll focus on the most reliable and beginner-friendly one: separating pups from the mother plant.
Here’s a quick rundown of what we’ll cover:
* Choosing the Right Pup: Identifying a healthy pup ready for separation.
* Gathering Your Supplies: Making sure you have everything you need before you start.
* Separating the Pup: The careful process of removing the pup from the mother plant.
* Planting the Pup: Giving your new banana baby a good start in its own pot.
* Caring for Your New Plant: Ensuring your pup thrives and grows into a healthy banana plant.
Choosing the Right Pup
This is crucial! Not all pups are created equal. You want to select a pup that’s strong and healthy enough to survive on its own.
Here’s what to look for:
* Size Matters: Aim for a pup that’s at least 1-3 feet tall. Smaller pups are less likely to survive the transplant.
* Healthy Leaves: The pup should have several healthy, green leaves. Avoid pups with yellowing, brown, or damaged leaves.
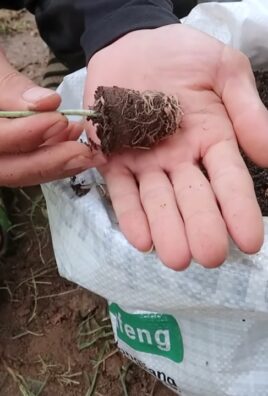
* Well-Developed Roots: This is harder to see, but if you can gently peek around the base of the pup, look for signs of root growth. A pup with a good root system will have a much better chance of survival.
* Attached to the Mother Plant: The pup should be firmly attached to the mother plant. This indicates that it’s receiving nutrients and is ready to be separated.
* Avoid Overcrowding: Don’t try to separate too many pups at once. Focus on the strongest one or two.
Gathering Your Supplies
Having everything ready before you start will make the process much smoother. Here’s what you’ll need:
* Sharp Knife or Pruning Saw: A clean, sharp blade is essential for making a clean cut. I prefer a pruning saw for larger pups. Make sure to sterilize it with rubbing alcohol to prevent the spread of disease.
* Gloves: Banana sap can be sticky and irritating to some people, so gloves are a good idea.
* Shovel or Garden Fork: You’ll need this to dig around the base of the plant and loosen the soil.
* Potting Mix: Use a well-draining potting mix specifically formulated for tropical plants. You can also make your own by mixing equal parts potting soil, perlite, and compost.
* Pot: Choose a pot that’s slightly larger than the root ball of the pup. Make sure it has drainage holes.
* Watering Can: For watering your newly planted pup.
* Rooting Hormone (Optional): While not essential, rooting hormone can help stimulate root growth and increase the chances of success.
* Rubbing Alcohol: For sterilizing your cutting tools.
Separating the Pup
Okay, this is where the fun begins! Take your time and be careful not to damage the mother plant or the pup.
1. Prepare the Area: Clear away any debris or mulch around the base of the mother plant. This will give you a better view of the pup and make it easier to work.
2. Dig Around the Pup: Using your shovel or garden fork, carefully dig around the base of the pup, loosening the soil. Try to expose as much of the root system as possible without damaging it.
3. Locate the Connection: Identify where the pup is connected to the mother plant. This is usually at the base of the pup, near the soil line.
4. Make the Cut: Using your sterilized knife or pruning saw, make a clean, swift cut to separate the pup from the mother plant. Try to cut as close to the mother plant as possible without damaging it.
5. Remove the Pup: Gently lift the pup out of the ground. Be careful not to break any roots. If the pup is heavily rooted, you may need to use your shovel or garden fork to loosen the soil further.
6. Inspect the Roots: Once you’ve removed the pup, inspect the roots. Trim away any damaged or dead roots with your sterilized knife or pruning shears.
7. Apply Rooting Hormone (Optional): If you’re using rooting hormone, dip the cut end of the pup’s roots into the powder or liquid. This will help stimulate root growth.
Planting the Pup
Now it’s time to give your new banana pup a home!
1. Prepare the Pot: Fill the pot with your well-draining potting mix. Leave a few inches of space at the top of the pot.
2. Create a Hole: Dig a hole in the center of the potting mix that’s large enough to accommodate the pup’s root ball.
3. Plant the Pup: Carefully place the pup in the hole, making sure the top of the root ball is level with the soil surface.
4. Fill the Pot: Fill in the remaining space around the pup with potting mix. Gently press down on the soil to secure the pup in place.
5. Water Thoroughly: Water the pup thoroughly until water drains out of the bottom of the pot. This will help settle the soil and hydrate the roots.
Caring for Your New Plant
Congratulations! You’ve successfully propagated a banana plant. Now, it’s important to provide the right care to ensure it thrives.
1. Location: Place the potted pup in a warm, sunny location. Banana plants need at least 6-8 hours of direct sunlight per day. If you’re growing it indoors, place it near a south-facing window.
2. Watering: Keep the soil consistently moist, but not soggy. Water when the top inch of soil feels dry to the touch. Avoid overwatering, as this can lead to root rot.
3. Humidity: Banana plants thrive in humid environments. If you live in a dry climate, you can increase humidity by misting the leaves regularly or placing the pot on a tray filled with pebbles and water.
4. Fertilizing: Feed your banana pup with a balanced fertilizer every 2-3 weeks during the growing season (spring and summer). Follow the instructions on the fertilizer label.
5. Temperature: Banana plants prefer warm temperatures between 65-95°F (18-35°C). Protect your plant from frost and cold temperatures.
6. Pest Control: Keep an eye out for pests such as aphids, spider mites, and mealybugs. If you notice any pests, treat them with an appropriate insecticide or insecticidal soap.
7. Repotting: As your banana plant grows, it will eventually need to be repotted into a larger container. Repot it when the roots start to circle the bottom of the pot.
8. Patience is Key: Don’t get discouraged if your pup doesn’t grow much at first. It takes time for the roots to establish themselves. With proper care, your banana pup will eventually grow into a healthy, productive plant.
Troubleshooting
Sometimes things don’t go exactly as planned. Here are a few common problems you might encounter and how to fix them:
* Pup Wilting: This could be due to transplant shock or underwatering. Make sure the soil is consistently moist and provide some shade for the first few days.
* Yellowing Leaves: This could be due to overwatering, underwatering, or nutrient deficiency. Check the soil moisture and adjust your watering accordingly. Fertilize regularly during the growing season.
* Root Rot: This is caused by overwatering. Make sure your pot has good drainage and allow the soil to dry out slightly between waterings. If the root rot is severe, you may need to repot the plant with fresh potting mix.
* Slow Growth: This could be due to insufficient sunlight, low temperatures, or nutrient deficiency. Make sure your plant is getting enough sunlight and warmth, and fertilize regularly.
Final Thoughts
Propagating banana plants is a fun and rewarding experience. With a little patience and care, you can easily create new banana plants from the pups of your existing plant. So, get out there, get your hands dirty, and start growing your own banana plantation! Happy

Conclusion
So, there you have it! Propagating banana plants at home isn’t just a fun gardening project; it’s a gateway to a thriving, tropical-inspired landscape right in your own backyard (or even on your balcony!). We’ve walked you through the simple steps, from identifying healthy pups to nurturing them into independent plants. But why is this DIY trick a must-try?
Firstly, it’s incredibly cost-effective. Instead of shelling out money for new banana plants at the nursery, you’re essentially creating new plants from the mother plant you already own. Think of it as a sustainable and budget-friendly way to expand your banana plantation. Secondly, it’s deeply rewarding. There’s something truly special about watching a tiny pup develop into a mature, fruit-bearing plant, knowing that you played an integral role in its growth. You’ll feel a sense of accomplishment that store-bought plants simply can’t provide.
Beyond the basic method we’ve outlined, there are a few variations you can explore to tailor the process to your specific needs and preferences. For example, if you live in a colder climate, consider starting the pups indoors in pots before transplanting them outdoors once the weather warms up. This will give them a head start and protect them from frost damage. You can also experiment with different potting mixes to find the one that works best for your banana plants. Some gardeners swear by a mix of peat moss, perlite, and vermiculite, while others prefer a more organic blend with compost and aged manure. Don’t be afraid to experiment and see what works best for you.
Furthermore, consider the variety of banana you’re propagating. Some varieties are more prolific in producing pups than others. Dwarf Cavendish, for instance, is known for its abundant pup production, making it an excellent choice for propagation. Experimenting with different banana varieties can lead to a diverse and exciting banana collection.
Propagating banana plants is also a fantastic way to share your love of gardening with others. Once you’ve successfully propagated a few pups, you can gift them to friends and family, spreading the joy of growing your own food. It’s a thoughtful and unique present that will be appreciated for years to come.
But the real magic happens when you start to see the fruits (literally!) of your labor. Imagine harvesting your own homegrown bananas, knowing that you nurtured them from tiny pups. The taste of a freshly picked, homegrown banana is unlike anything you’ll find in the supermarket. It’s sweeter, more flavorful, and bursting with sunshine.
So, what are you waiting for? Grab your gardening gloves, gather your tools, and get ready to embark on this exciting adventure. We encourage you to try this DIY trick and share your experience with us. Post photos of your banana pups on social media using #BananaPropagation and let us know how it goes. We’re eager to hear your success stories and learn from your experiences. Happy gardening!
Frequently Asked Questions (FAQ)
What is the best time of year to propagate banana plants?
The ideal time to propagate banana plants is during the warmer months, typically spring or early summer. This is when the plants are actively growing and will recover more quickly from being separated from the mother plant. The warmer temperatures and longer days provide optimal conditions for root development and overall growth. However, if you live in a tropical climate with consistently warm temperatures year-round, you can propagate banana plants at any time of the year. Just be sure to provide adequate water and protection from extreme weather conditions.
How do I know when a banana pup is ready to be separated from the mother plant?
A banana pup is ready to be separated when it is at least 1 to 3 feet tall and has developed its own root system. You should also look for pups that have several leaves and appear healthy and vigorous. Avoid separating pups that are too small or weak, as they may not survive the transplanting process. Gently dig around the base of the pup to check for roots before separating it from the mother plant. If the pup has a well-developed root system, it is ready to be transplanted.
What type of soil is best for propagating banana plants?
Banana plants thrive in well-draining soil that is rich in organic matter. A good potting mix for banana pups is a combination of peat moss, perlite, and vermiculite. You can also add compost or aged manure to the mix to provide additional nutrients. Avoid using heavy clay soils, as they can retain too much water and lead to root rot. The soil should be slightly acidic to neutral, with a pH of around 6.0 to 7.0. Ensure the pot you use has good drainage holes to prevent waterlogging.
How often should I water my banana pups after transplanting them?
After transplanting banana pups, water them thoroughly to help settle the soil around the roots. Then, water them regularly, keeping the soil consistently moist but not waterlogged. The frequency of watering will depend on the climate, the type of soil, and the size of the pot. In general, you should water your banana pups every few days, or when the top inch of soil feels dry to the touch. During hot, dry weather, you may need to water them more frequently. Avoid overwatering, as this can lead to root rot.
How much sunlight do banana pups need?
Banana plants need plenty of sunlight to thrive. They should receive at least 6 to 8 hours of direct sunlight per day. If you are growing your banana pups indoors, place them near a sunny window or provide them with supplemental lighting. Insufficient sunlight can lead to stunted growth and reduced fruit production. When transplanting your banana pups outdoors, choose a location that receives full sun throughout the day.
What kind of fertilizer should I use for my banana plants?
Banana plants are heavy feeders and require regular fertilization to support their growth and fruit production. Use a balanced fertilizer with a ratio of 10-10-10 or 15-15-15. You can also use a fertilizer specifically formulated for banana plants. Fertilize your banana plants every 2 to 3 months during the growing season, from spring to fall. Follow the instructions on the fertilizer package for the correct application rate. Avoid over-fertilizing, as this can damage the roots.
How long does it take for a banana pup to produce fruit?
The time it takes for a banana pup to produce fruit depends on the variety of banana, the growing conditions, and the size of the pup when it was transplanted. In general, it takes about 9 to 15 months for a banana plant to produce fruit after it has been transplanted. Dwarf varieties tend to fruit sooner than taller varieties. Providing optimal growing conditions, such as plenty of sunlight, water, and fertilizer, can help speed up the fruiting process.
What are some common problems that can affect banana plants?
Some common problems that can affect banana plants include pests, diseases, and nutrient deficiencies. Pests such as aphids, spider mites, and nematodes can damage the leaves and roots of banana plants. Diseases such as Panama disease and black Sigatoka can cause leaf spots and wilting. Nutrient deficiencies can lead to stunted growth and yellowing leaves. Regularly inspect your banana plants for signs of pests or diseases and take appropriate action to control them. Provide your banana plants with adequate nutrients to prevent deficiencies.
Can I propagate banana plants from seeds?
While it is possible to propagate banana plants from seeds, it is not the preferred method. Banana seeds are often difficult to germinate, and the resulting plants may not be true to type, meaning they may not produce the same type of fruit as the parent plant. Propagating banana plants from pups is a much easier and more reliable method.
What if my banana pup doesn’t seem to be growing after transplanting?
It’s not uncommon for banana pups to experience a bit of transplant shock after being separated from the mother plant. Be patient and continue to provide consistent care. Ensure the pup is receiving adequate sunlight, water, and nutrients. Check the soil drainage to make sure it’s not waterlogged. If the pup still doesn’t show signs of growth after a few weeks, gently check the roots to ensure they are healthy and not rotting. You can also try applying a root stimulator to encourage root growth. Sometimes, it simply takes time for the pup to adjust to its new environment.
Leave a Comment