

High Yield Tomatoes at Home – that’s the dream, isn’t it? Imagine baskets overflowing with juicy, sun-ripened tomatoes, all grown with your own two hands, right in your backyard! Forget those bland, store-bought imposters; we’re talking about flavor explosions that will elevate your salads, sauces, and sandwiches to a whole new level.
For centuries, cultivating tomatoes has been a cherished tradition. Originating in South America, these vibrant fruits (yes, they’re technically fruits!) have journeyed across continents, becoming a staple in cuisines worldwide. From the sun-drenched fields of Italy to the bustling markets of Mexico, the tomato’s versatility and deliciousness have captivated hearts and palates for generations. But you don’t need a sprawling farm to enjoy the bounty of a tomato harvest.
In today’s busy world, finding time for gardening can feel like a luxury. But what if I told you that achieving high yield tomatoes at home doesn’t require endless hours of back-breaking labor? That’s where these clever DIY tricks and hacks come in! We’re going to unlock the secrets to maximizing your tomato production, even in small spaces. Whether you’re a seasoned gardener or a complete beginner, these simple yet effective techniques will empower you to grow a thriving tomato patch and reap the rewards of a truly satisfying harvest. Get ready to transform your garden into a tomato paradise!
DIY: Unleash Tomato Abundance – A Guide to High-Yield Tomato Growing at Home
Hey there, fellow tomato enthusiast! Are you dreaming of a summer overflowing with juicy, sun-ripened tomatoes? I know I am! And guess what? You don’t need a sprawling farm to achieve tomato abundance. With a few simple DIY techniques, you can transform your backyard, patio, or even a sunny balcony into a tomato-producing powerhouse. Let’s dive in and unlock the secrets to high-yield tomato growing!
Choosing the Right Tomato Variety
Before we get our hands dirty, it’s crucial to pick the right tomato varieties. Not all tomatoes are created equal when it comes to yield. Some are naturally more prolific than others. Here are a few of my favorites for maximizing your harvest:
* ‘Early Girl’: As the name suggests, this variety is an early producer, giving you a head start on the tomato season. It’s also known for its consistent yields.
* ‘Celebrity’: A classic hybrid tomato that’s disease-resistant and produces a large number of medium-sized fruits.
* ‘Roma’: If you love making sauces and pastes, Roma tomatoes are a must-have. They’re incredibly productive and have a meaty texture.
* ‘Sungold’: These golden cherry tomatoes are bursting with sweetness and are incredibly prolific. Be prepared for a constant stream of delicious snacks!
* ‘Black Krim’: For a unique flavor and impressive yields, try Black Krim. These heirloom tomatoes are known for their rich, smoky taste.
Remember to check the specific growing conditions recommended for each variety in your area.
Preparing the Soil: The Foundation for Success
Tomatoes are heavy feeders, meaning they need nutrient-rich soil to thrive. Proper soil preparation is absolutely essential for high yields. Here’s how I get my soil ready:
* Soil Testing: Before you do anything, it’s a good idea to get your soil tested. This will tell you the pH level and nutrient content, allowing you to amend it accordingly. You can usually find soil testing kits at your local garden center or through your county extension office.
* Amending the Soil: Tomatoes prefer slightly acidic soil with a pH between 6.0 and 6.8. If your soil is too alkaline, you can lower the pH by adding sulfur or peat moss. If it’s too acidic, add lime.
* Adding Organic Matter: This is where the magic happens! Incorporate plenty of organic matter into your soil, such as compost, well-rotted manure, or leaf mold. Organic matter improves drainage, aeration, and water retention, all of which are crucial for healthy tomato growth. I usually aim for at least 4-6 inches of compost worked into the top 12 inches of soil.
* Fertilizing: While organic matter provides a good base, you’ll also want to add a balanced fertilizer specifically formulated for tomatoes. Look for a fertilizer with an NPK ratio (nitrogen, phosphorus, potassium) of around 5-10-5 or 10-10-10. Follow the instructions on the fertilizer package carefully.
Starting Your Tomato Plants: Seedlings vs. Transplants
You have two main options for starting your tomato plants: growing them from seed or buying transplants from a nursery. Both have their pros and cons.
* Starting from Seed: This gives you more control over the varieties you grow and can be more cost-effective. However, it requires more time and effort. You’ll need to start your seeds indoors about 6-8 weeks before the last expected frost.
* Buying Transplants: This is a quicker and easier option, especially if you’re short on time or space. Just make sure to choose healthy-looking plants with sturdy stems and no signs of disease.
Regardless of which method you choose, make sure to harden off your tomato plants before transplanting them outdoors. This involves gradually exposing them to outdoor conditions over a period of about a week.
Transplanting Your Tomato Plants: Giving Them the Best Start
Once your tomato plants are ready, it’s time to transplant them into your garden. Here’s how I do it:
1. Choose a Sunny Location: Tomatoes need at least 6-8 hours of direct sunlight per day. Choose a spot in your garden that gets plenty of sun.
2. Dig a Hole: Dig a hole that’s deep enough to bury the bottom third of the tomato plant’s stem. This encourages the plant to develop more roots along the buried stem, resulting in a stronger and more productive plant.
3. Add Fertilizer: Add a handful of slow-release tomato fertilizer to the bottom of the hole. This will provide the plant with a steady supply of nutrients as it grows.
4. Plant the Tomato: Gently remove the tomato plant from its container and loosen the roots. Place the plant in the hole and backfill with soil.
5. Water Thoroughly: Water the plant thoroughly after transplanting. This will help settle the soil and encourage root growth.
6. Mulch: Apply a layer of mulch around the base of the plant. Mulch helps retain moisture, suppress weeds, and regulate soil temperature. I like to use straw, wood chips, or shredded leaves.
Supporting Your Tomato Plants: Staking, Caging, or Trellising
As your tomato plants grow, they’ll need support to keep them upright and prevent the fruits from touching the ground. There are several options for supporting tomato plants:
* Staking: This involves driving a stake into the ground next to the plant and tying the stem to the stake with twine or plant ties. Staking is a good option for determinate tomato varieties, which grow to a fixed size.
* Caging: This involves placing a wire cage around the plant. Caging is a good option for indeterminate tomato varieties, which continue to grow throughout the season.
* Trellising: This involves training the tomato plant to grow along a trellis. Trellising is a good option for both determinate and indeterminate tomato varieties and can be a space-saving solution.
I personally prefer caging my indeterminate tomato plants. It’s easy to set up and provides excellent support.
Watering and Fertilizing: Keeping Your Plants Hydrated and Nourished
Consistent watering and fertilization are essential for high tomato yields. Here’s what I do:
* Watering: Water your tomato plants deeply and regularly, especially during hot, dry weather. Aim to water at the base of the plant to avoid wetting the foliage, which can lead to disease. I usually water my plants every 2-3 days, depending on the weather.
* Fertilizing: Fertilize your tomato plants every 2-3 weeks with a liquid tomato fertilizer. Follow the instructions on the fertilizer package carefully. You can also side-dress your plants with compost or well-rotted manure.
Pruning Your Tomato Plants: Encouraging Fruit Production
Pruning can help improve air circulation, reduce disease, and encourage fruit production. Here’s how I prune my tomato plants:
* Suckers: Remove the suckers that grow in the “V” between the main stem and the branches. These suckers will eventually develop into new stems, but they’ll also draw energy away from the main plant.
* Lower Leaves: Remove the lower leaves that touch the ground. These leaves are more susceptible to disease.
* Yellowing Leaves: Remove any yellowing or diseased leaves.
Pest and Disease Control: Protecting Your Precious Tomatoes
Tomatoes are susceptible to a variety of pests and diseases. Here are a few common problems and how to deal with them:
* Aphids: These tiny insects can suck the sap from tomato plants. You can control aphids by spraying them with a strong stream of water or by using insecticidal soap.
* Tomato Hornworms: These large caterpillars can quickly defoliate tomato plants. Handpick them off the plants or use Bacillus thuringiensis (Bt), a natural insecticide.
* Blossom End Rot: This condition is caused by a calcium deficiency and results in black, leathery spots on the bottom of the tomatoes. Prevent blossom end rot by ensuring your soil has adequate calcium and by watering consistently.
* Early Blight: This fungal disease causes brown spots on the leaves. Prevent early blight by providing good air circulation and by avoiding overhead watering. You can also treat early blight with a fungicide.
I prefer to use organic pest and disease control methods whenever possible. Neem oil is a great all-purpose insecticide and fungicide.
Harvesting Your Tomatoes: The Sweet Reward
The moment you’ve been waiting for! Harvesting your tomatoes is the most rewarding part of the process. Here are a few tips:
* Ripeness: Tomatoes are ripe when they’re fully colored and slightly soft to the touch.
* Harvesting Technique: Gently twist the tomato off the vine.
* Storage: Store ripe tomatoes at room temperature. Refrigerating them can affect their flavor and texture.
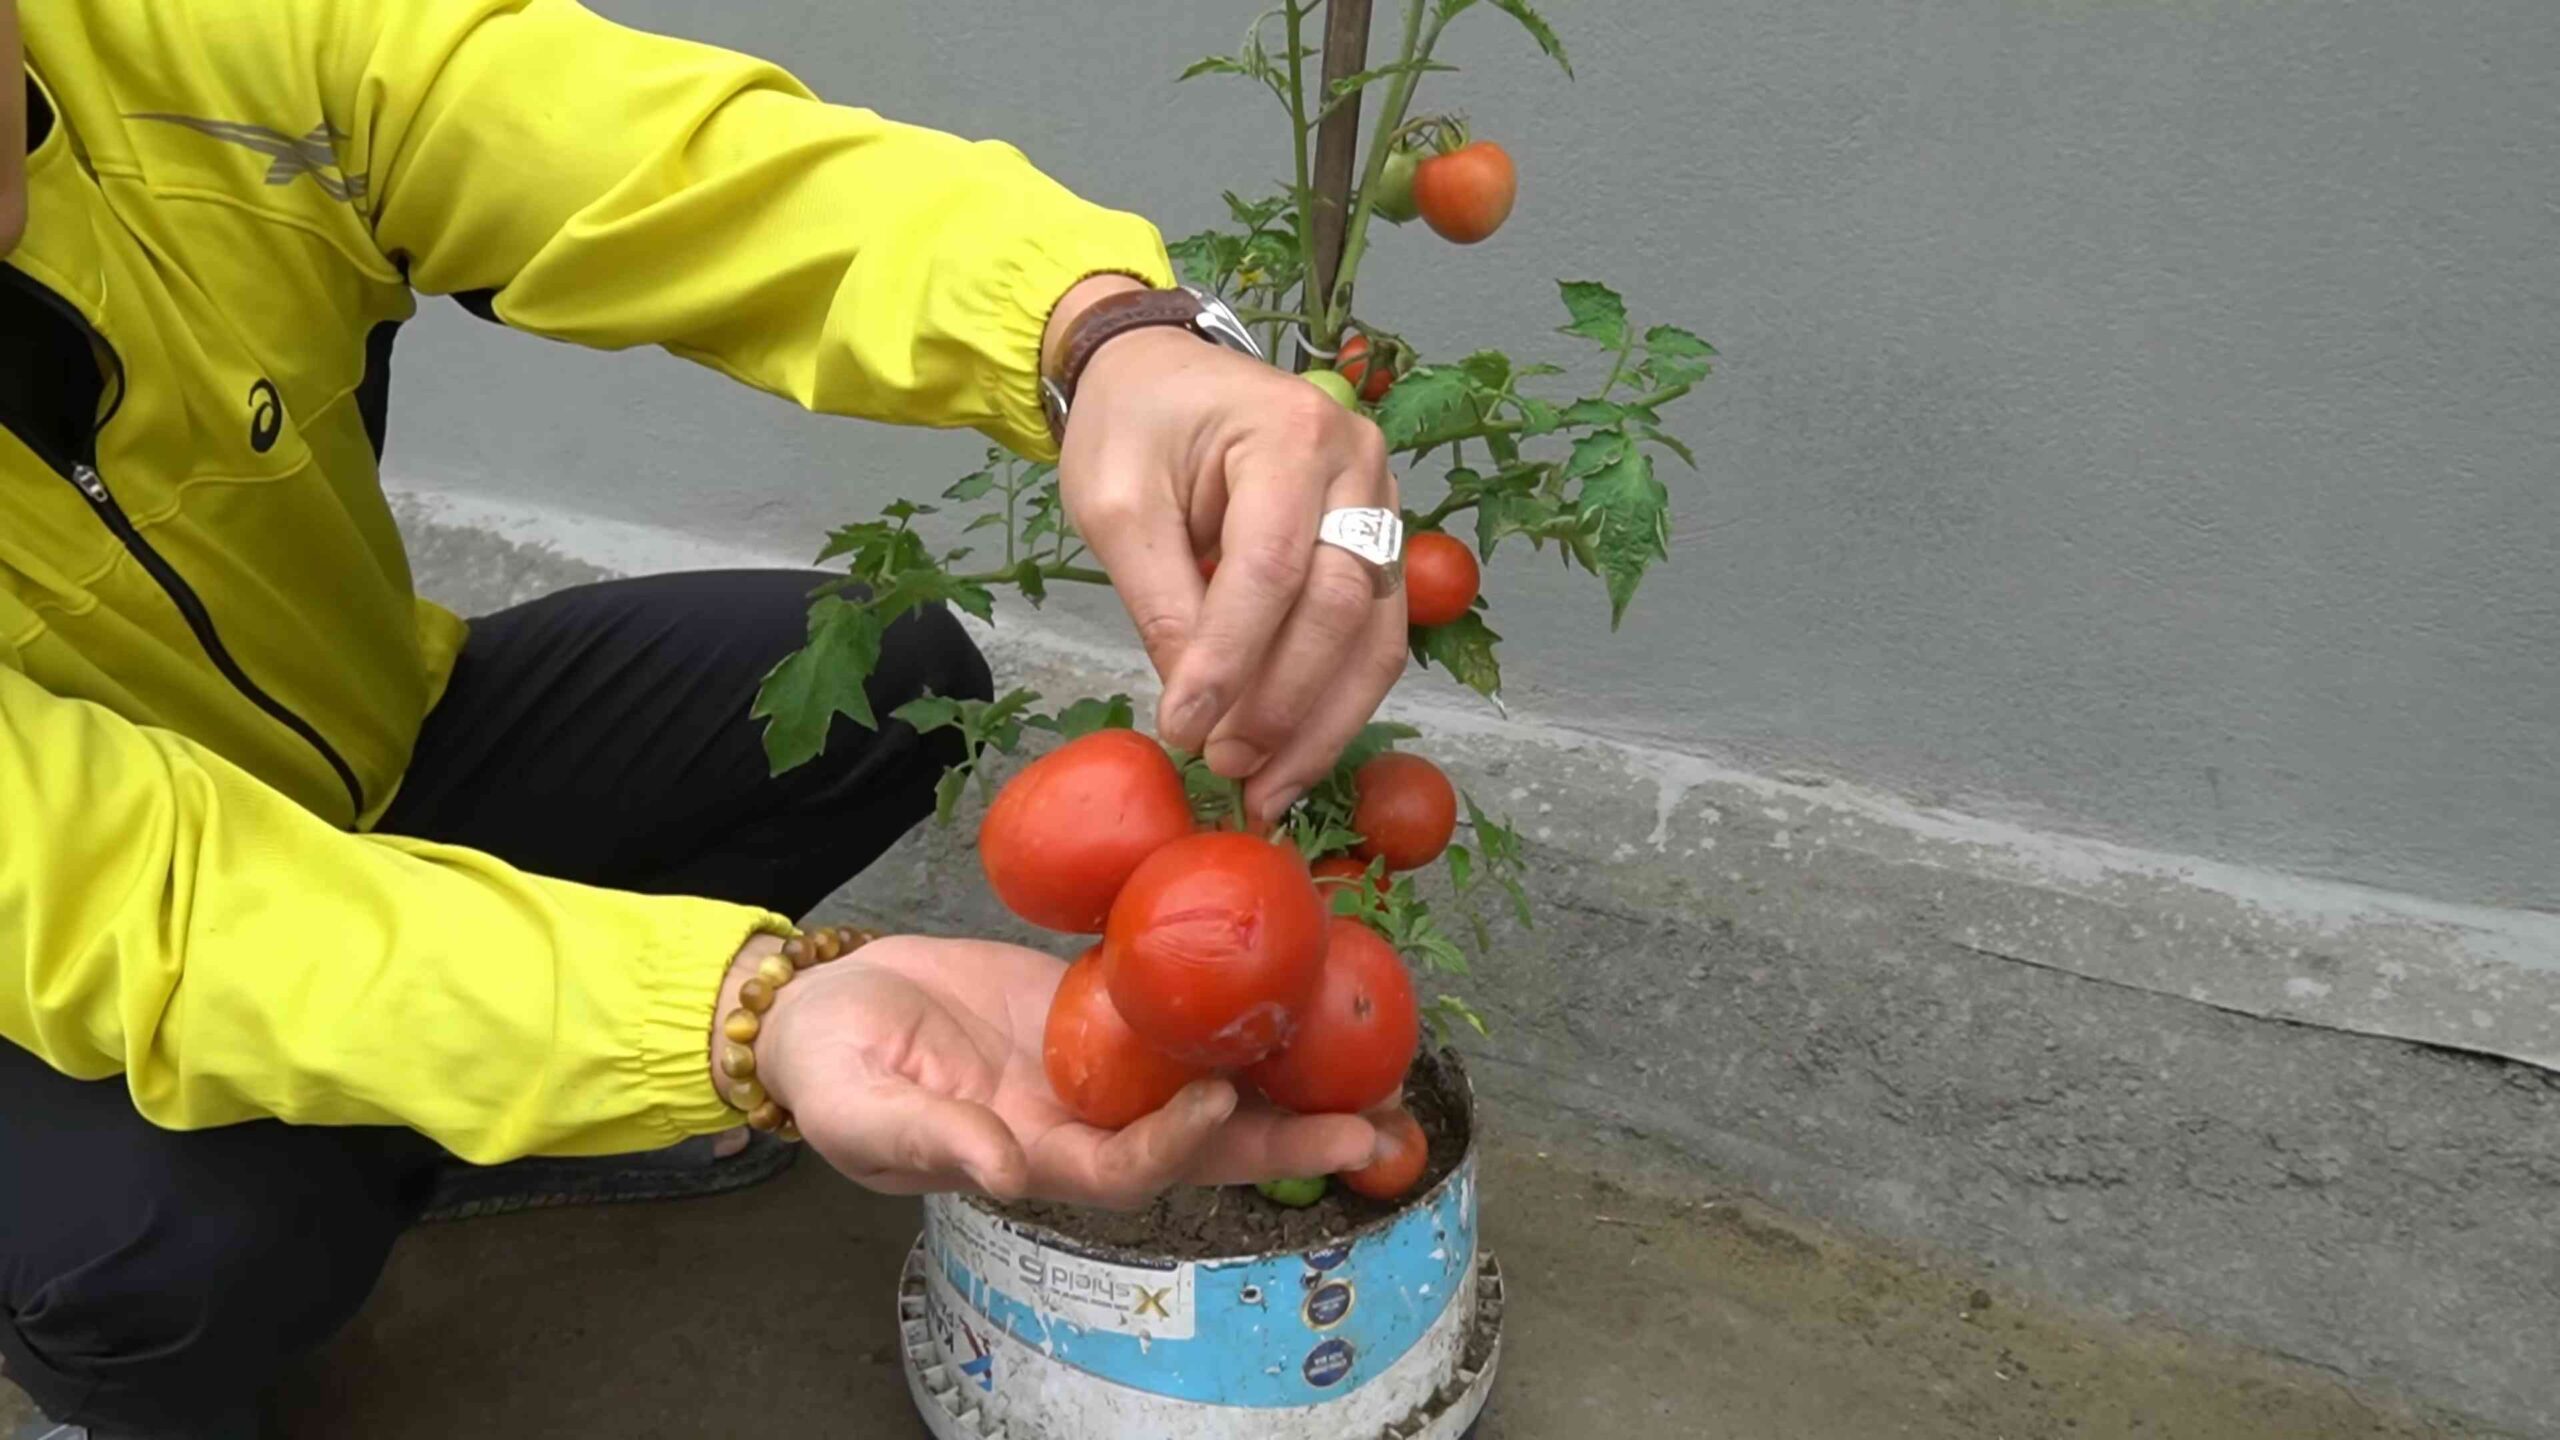
DIY Tomato Cage Extenders for Even Higher Yields
As your indeterminate tomato

Conclusion
So, there you have it! Transforming your tomato-growing game with this simple, yet incredibly effective DIY trick is not just about saving money; it’s about unlocking the potential for a truly bountiful harvest. We’ve shown you how to nurture your plants and maximize their yield, all from the comfort of your own home. This method is a game-changer, especially if you’ve struggled with lackluster tomato production in the past.
Why is this a must-try? Because it addresses the core needs of tomato plants in a way that encourages vigorous growth and abundant fruiting. By focusing on root development and providing consistent, targeted nutrients, you’re setting your plants up for success from the very beginning. Forget relying solely on expensive fertilizers or complicated gardening techniques. This DIY approach is accessible, sustainable, and, most importantly, it works!
But don’t just take our word for it. We encourage you to experiment and adapt this technique to your specific growing conditions. For instance, if you live in a particularly hot climate, consider adding a layer of mulch around your plants to help retain moisture and regulate soil temperature. You could also try different variations of the nutrient solution, incorporating ingredients like Epsom salts for added magnesium, which is crucial for chlorophyll production and overall plant health. Another variation is to use different types of containers. While we’ve focused on traditional pots, you could also try using grow bags or even repurposed containers like buckets or plastic bins. Just make sure they have adequate drainage.
Remember, gardening is a journey of learning and discovery. Don’t be afraid to tweak the process and find what works best for you and your plants. The key is to observe your tomatoes closely and adjust your approach as needed. Are the leaves turning yellow? Are the fruits developing slowly? These are all clues that can help you fine-tune your technique and achieve optimal results.
Ultimately, the goal is to achieve a high yield of delicious, homegrown tomatoes. And with this DIY trick, that goal is well within your reach. We’re confident that you’ll be amazed by the difference it makes. So, grab your supplies, get your hands dirty, and prepare to be rewarded with a tomato harvest that will make your neighbors envious.
We’re eager to hear about your experiences! Share your photos, tips, and success stories in the comments below. Let’s create a community of tomato enthusiasts who are passionate about growing their own food and maximizing their yields. Let us know what worked for you, what challenges you faced, and any modifications you made to the technique. Your feedback will help others learn and improve their own tomato-growing efforts. Let’s all achieve **high yield tomatoes at home** together!
Frequently Asked Questions (FAQ)
What exactly makes this DIY trick so effective for achieving high yield tomatoes at home?
This DIY trick is effective because it focuses on two key aspects of tomato plant growth: strong root development and consistent nutrient delivery. By burying a significant portion of the stem, you encourage the plant to develop a more extensive root system along the buried stem. More roots mean greater access to water and nutrients, leading to healthier, more vigorous plants. The nutrient solution provides a readily available source of essential elements that tomatoes need to thrive, ensuring they have everything they need to produce abundant fruit. This targeted approach bypasses the limitations of relying solely on soil nutrients, which can often be depleted or unevenly distributed.
How often should I apply the nutrient solution to my tomato plants?
The frequency of application depends on several factors, including the size of your plants, the type of soil you’re using, and the weather conditions. As a general guideline, start by applying the nutrient solution once a week. Observe your plants closely for any signs of nutrient deficiencies or excesses. If the leaves are turning yellow or the plant seems stunted, you may need to increase the frequency to twice a week. Conversely, if the leaves are dark green and the plant is growing very rapidly, you may be able to reduce the frequency to once every two weeks. Always water your plants thoroughly between applications of the nutrient solution to prevent salt buildup in the soil.
Can I use this DIY trick for other types of plants besides tomatoes?
While this trick is particularly well-suited for tomatoes, it can also be beneficial for other plants that benefit from deep planting and consistent nutrient delivery, such as peppers, eggplants, and even some herbs. The key is to adjust the nutrient solution to meet the specific needs of the plant you’re growing. For example, peppers may require a slightly different balance of nitrogen, phosphorus, and potassium than tomatoes. Research the specific nutrient requirements of the plant you’re interested in growing and adjust the recipe accordingly.
What if I don’t have access to all the ingredients for the nutrient solution? Are there any alternatives?
While the specific ingredients in the nutrient solution are ideal, you can substitute some of them if necessary. For example, if you don’t have access to a specific type of fertilizer, you can use a general-purpose fertilizer that is formulated for tomatoes. Just be sure to follow the instructions on the label carefully to avoid over-fertilizing. You can also use compost tea as a natural alternative to the nutrient solution. Compost tea is rich in beneficial microbes and nutrients that can help promote plant growth. To make compost tea, simply steep a bag of compost in water for a few days, then dilute the tea with water before applying it to your plants.
My tomato plants are already established. Is it too late to use this DIY trick?
While it’s best to implement this trick when transplanting seedlings, you can still use it on established plants, although the results may not be as dramatic. Gently dig around the base of the plant and carefully bury a portion of the stem, being careful not to damage the roots. Apply the nutrient solution as directed. Keep in mind that established plants may take longer to adjust to the new growing conditions, so be patient and observe them closely.
How do I know if I’m over-fertilizing my tomato plants?
Signs of over-fertilization include dark green leaves, rapid growth, and a buildup of salts on the soil surface. If you notice any of these signs, reduce the frequency of nutrient solution applications or flush the soil with water to remove excess salts. Over-fertilizing can actually harm your plants, so it’s important to be mindful of their needs and adjust your approach accordingly.
What type of soil is best for growing tomatoes using this DIY trick?
Well-draining soil that is rich in organic matter is ideal for growing tomatoes. Amend your soil with compost or other organic materials to improve its drainage and fertility. Avoid using heavy clay soils, as they can become waterlogged and suffocate the roots. A slightly acidic soil pH of around 6.0 to 6.8 is also optimal for tomato growth.
How much sunlight do my tomato plants need to thrive?
Tomatoes need at least 6-8 hours of direct sunlight per day to thrive. Choose a location in your garden that receives plenty of sunlight throughout the day. If you’re growing tomatoes in containers, you can move them around to ensure they get enough sunlight. Insufficient sunlight can lead to leggy growth, reduced fruit production, and increased susceptibility to diseases.
What are some common pests and diseases that affect tomato plants, and how can I prevent them?
Common pests that affect tomato plants include aphids, whiteflies, tomato hornworms, and spider mites. Common diseases include early blight, late blight, and blossom end rot. To prevent these problems, practice good garden hygiene, such as removing weeds and debris from around your plants. Use organic pest control methods, such as insecticidal soap or neem oil, to control pests. Ensure your plants have good air circulation to prevent fungal diseases. Blossom end rot is often caused by calcium deficiency, so make sure your soil is rich in calcium or supplement with calcium-rich fertilizer.
Can I use this method for growing tomatoes indoors?
Yes, you can use this method for growing tomatoes indoors, but you’ll need to provide adequate lighting. Use grow lights to supplement natural sunlight and ensure your plants get enough light to thrive. You’ll also need to pollinate the flowers manually, as there won’t be any bees or other pollinators indoors. You can do this by gently shaking the plants or using a small brush to transfer pollen from one flower to another.

Leave a Comment