

Grow white radish from seed and unlock a world of fresh, peppery goodness right in your backyard! Have you ever dreamed of plucking crisp, juicy radishes straight from the earth, knowing exactly where they came from and how they were grown? This isn’t just a dream; it’s an achievable reality with a few simple tricks and a little DIY spirit.
Radishes, though humble in appearance, boast a rich history. Originating in Asia, they’ve been cultivated for centuries, prized for their quick growth and vibrant flavor. In some cultures, they even symbolize good fortune and prosperity! But beyond their historical significance, growing your own radishes offers a practical solution to a common problem: store-bought radishes often lack the freshness and zing of homegrown varieties.
Let’s be honest, who wants limp, tasteless radishes? With our easy-to-follow DIY guide, you’ll learn how to grow white radish from seed successfully, even if you’re a complete beginner. We’ll cover everything from choosing the right seeds and preparing your soil to watering techniques and pest control. Imagine the satisfaction of adding your own freshly harvested radishes to salads, sandwiches, or even enjoying them as a crunchy, healthy snack. So, grab your gardening gloves, and let’s get started on this exciting journey to cultivate your own delicious white radishes!
Growing Radishes: From Seed to Snappy Harvest!
Hey there, fellow gardening enthusiasts! I’m so excited to share my guide on growing radishes from seed. These little root veggies are incredibly rewarding to grow – they’re fast, easy, and add a delightful peppery crunch to salads and snacks. Plus, they’re perfect for beginner gardeners! Let’s dive in and get our hands dirty!
Choosing Your Radish Variety
Before we even think about planting, let’s talk about radish varieties. There’s more to radishes than just the classic red globe!
* Cherry Belle: This is your quintessential red radish – round, crisp, and quick to mature. A great choice for beginners.
* French Breakfast: Oblong in shape with a red top and white bottom, these radishes have a milder flavor.
* Easter Egg: A colorful mix of red, pink, purple, and white radishes. Adds a fun visual element to your garden and plate!
* Black Spanish: A winter radish with black skin and a pungent flavor. Takes longer to mature but stores well.
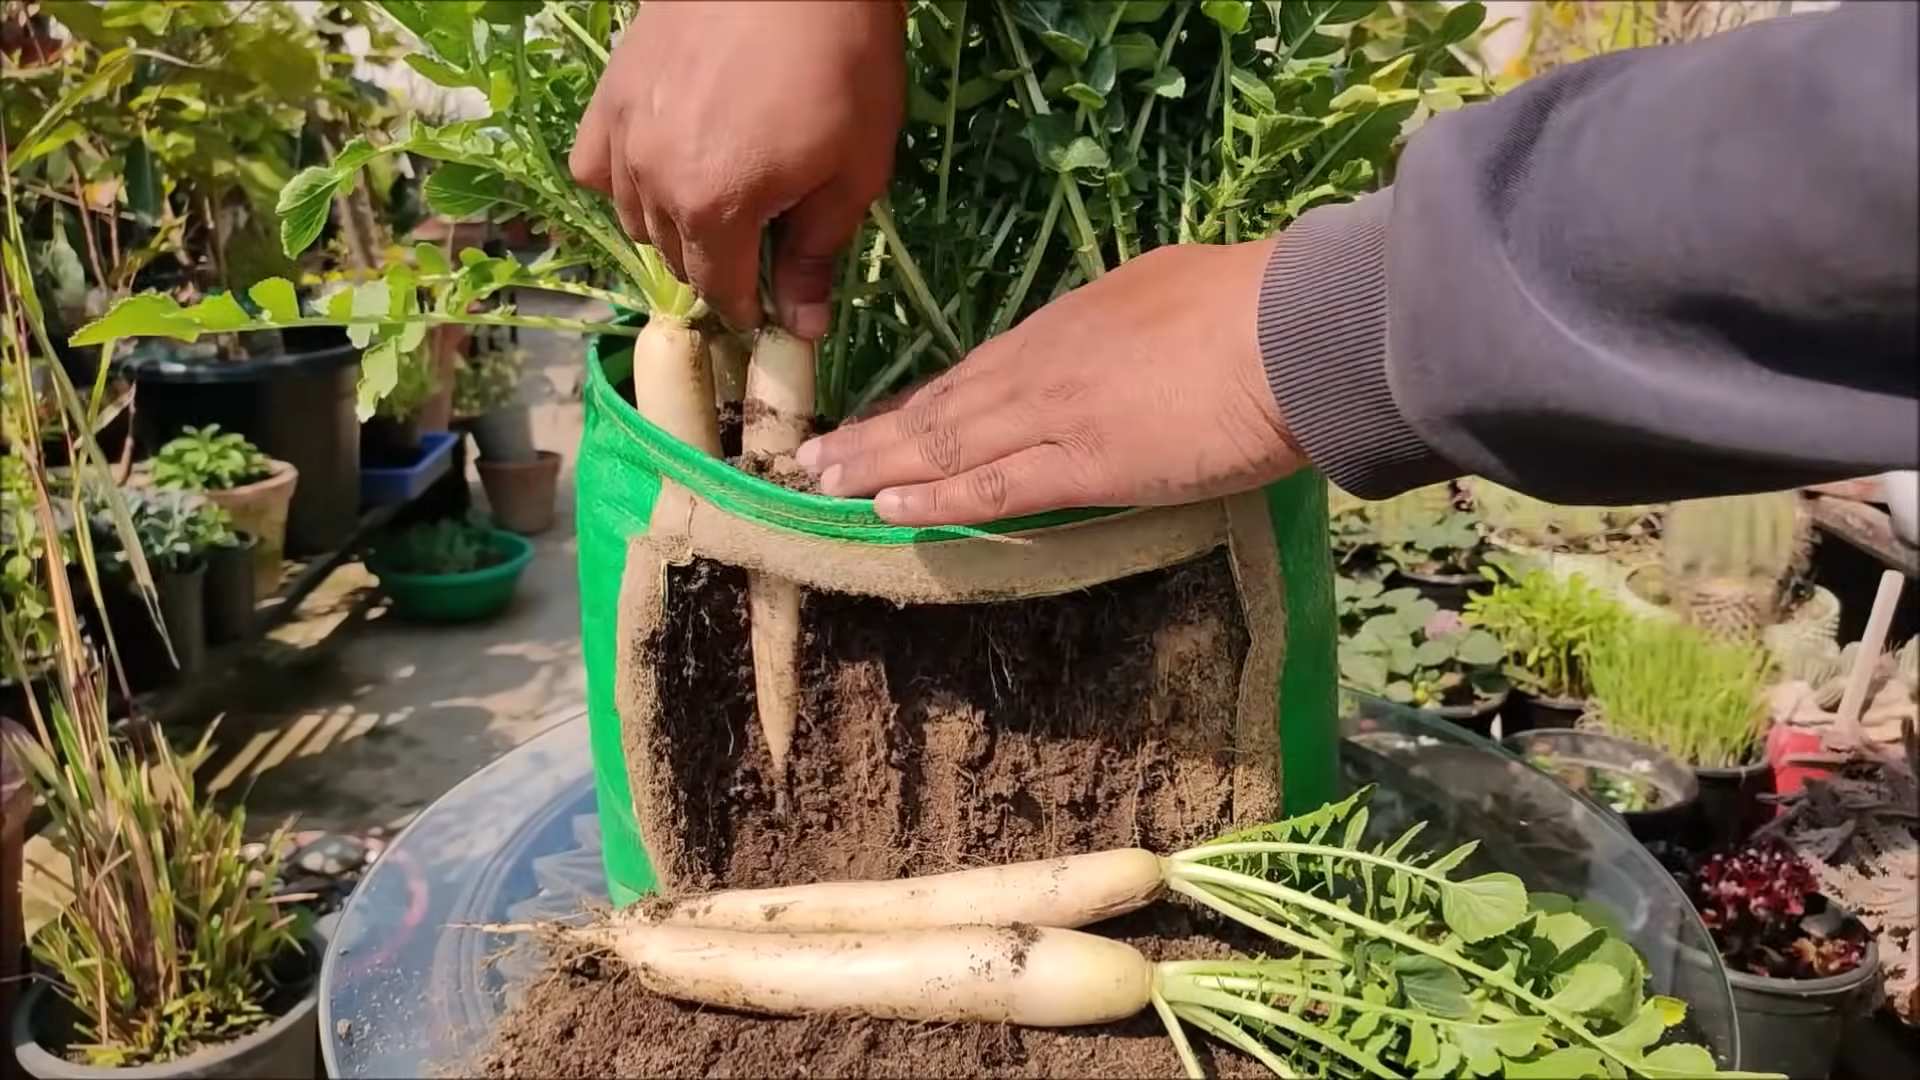
* Daikon: A long, white radish commonly used in Asian cuisine. Can grow quite large!
I personally love growing Cherry Belle and French Breakfast because they mature so quickly, but feel free to experiment and find your favorites!
Preparing Your Radish Bed
Radishes are pretty low-maintenance, but they do appreciate a well-prepared bed.
* Sunlight: Radishes need at least 6 hours of sunlight per day.
* Soil: Loose, well-draining soil is crucial. Radishes don’t like compacted soil, as it can hinder their growth and lead to misshapen roots.
* Soil pH: Aim for a soil pH between 6.0 and 7.0. You can test your soil with a kit from your local garden center.
* Fertilizer: Radishes don’t need a lot of fertilizer. In fact, too much nitrogen can lead to excessive leafy growth at the expense of root development. A light application of compost or a balanced fertilizer (like 10-10-10) before planting is usually sufficient.
Step-by-Step Planting Guide
Okay, let’s get to the fun part – planting those radish seeds!
1. Choose the Right Time: Radishes are a cool-season crop, meaning they thrive in cooler temperatures. The best time to plant them is in early spring or late summer/early fall. Avoid planting during the heat of summer, as the roots can become tough and bitter. I usually start planting my first batch about 4-6 weeks before the last expected frost. For a continuous harvest, sow seeds every 1-2 weeks.
2. Prepare the Soil: Rake the soil to create a smooth surface. Remove any rocks, clumps, or debris. This will help ensure even germination and root development.
3. Create Furrows: Use a hoe or your finger to create shallow furrows in the soil. The furrows should be about 1/2 inch deep and spaced about 1 inch apart.
4. Sow the Seeds: Sprinkle the radish seeds evenly into the furrows. Don’t overcrowd them! Overcrowding can lead to smaller radishes. I usually aim for about 1/2 inch spacing between seeds.
5. Cover the Seeds: Gently cover the seeds with a thin layer of soil.
6. Water Thoroughly: Water the soil gently but thoroughly. You want to moisten the soil without washing away the seeds. I like to use a watering can with a gentle rose attachment.
7. Mark Your Rows: Label your rows with the radish variety and planting date. This will help you keep track of your plantings and know when to expect your harvest.
Caring for Your Radishes
Radishes are relatively easy to care for, but here are a few tips to ensure a bountiful harvest:
* Watering: Keep the soil consistently moist, but not waterlogged. Radishes need consistent moisture to develop properly. Water deeply whenever the top inch of soil feels dry.
* Weeding: Keep the area around your radishes free of weeds. Weeds compete with radishes for water and nutrients. Gently hand-pull any weeds that pop up.
* Thinning: Once the seedlings emerge (usually within 4-7 days), thin them to about 1-2 inches apart. This will give the radishes enough space to grow. Don’t be afraid to pull out the extra seedlings – it’s better to have fewer, larger radishes than a bunch of small, crowded ones. You can even eat the thinnings – they have a mild radish flavor!
* Pest Control: Radishes are generally pest-resistant, but flea beetles can sometimes be a problem. These tiny beetles chew small holes in the leaves. To control flea beetles, you can cover your radishes with row covers or spray them with insecticidal soap.
Harvesting Your Radishes
This is the moment we’ve been waiting for! Radishes are one of the fastest-growing vegetables, so you’ll be harvesting them in no time.
* Harvest Time: Most radish varieties mature in 20-30 days. Check the seed packet for the specific maturity time of your variety.
* How to Harvest: Gently pull the radishes from the soil. If the soil is dry, you may need to loosen it with a garden fork first.
* Signs of Maturity: The tops of the radishes should be visible above the soil. You can also gently brush away some soil to check the size of the roots. They should be about 1 inch in diameter for most varieties.
* Don’t Wait Too Long: Radishes can become tough and bitter if left in the ground too long. Harvest them as soon as they reach maturity.
Storing Your Radishes
To keep your radishes fresh for as long as possible:
* Remove the Greens: Cut off the radish greens, leaving about 1/2 inch of stem attached. The greens will draw moisture from the roots, causing them to wilt.
* Wash and Dry: Wash the radishes thoroughly and pat them dry.
* Store in the Refrigerator: Place the radishes in a plastic bag or container lined with a damp paper towel. Store them in the refrigerator for up to 2 weeks.
Enjoying Your Radishes
Now for the best part – eating your homegrown radishes!
* Raw: Radishes are delicious eaten raw in salads, sandwiches, or as a snack.
* Roasted: Roasting radishes mellows their flavor and brings out their sweetness. Toss them with olive oil, salt, and pepper and roast them at 400°F (200°C) for 20-30 minutes.
* Pickled: Pickled radishes are a tangy and flavorful addition to tacos, sandwiches, and salads.
* Radish Greens: Don’t throw away the radish greens! They’re edible and nutritious. You can sauté them, add them to soups, or use them in salads.
Troubleshooting Common Radish Problems
Even with the best care, you might encounter a few problems when growing radishes. Here are some common issues and how to address them:
* Radishes are Small: This could be due to overcrowding, lack of water, or poor soil. Thin your seedlings, water regularly, and amend your soil with compost.
* Radishes are Tough and Bitter: This is usually caused by hot weather or letting the radishes stay in the ground too long. Plant radishes in the cool season and harvest them promptly.
* Radishes are Split: This can be caused by inconsistent watering. Water regularly and evenly.
* Radishes are Misshapen: This is often due to compacted soil. Amend your soil with compost to improve drainage and aeration.
Extra Tips for Radish Success
* Succession Planting: Plant radishes every 1-2 weeks for a continuous harvest.
* Companion Planting: Radishes are good companion plants for carrots, lettuce, and spinach. They help deter pests and improve soil health.
* Use Row Covers: Row covers can protect your radishes from pests and extend the growing season.
* Have Fun! Gardening should be enjoyable. Don’t be afraid to experiment and learn from your mistakes.
Growing radishes is a simple and satisfying way to get started with gardening. With a little bit of planning and care, you can enjoy a bountiful harvest of these peppery delights. Happy gardening!

Conclusion
So, there you have it! Growing white radish from seed is not only surprisingly simple, but it’s also incredibly rewarding. Imagine the satisfaction of pulling crisp, peppery radishes from your own garden, knowing you nurtured them from tiny seeds to delicious maturity. Forget those bland, store-bought radishes; homegrown white radishes offer a flavor explosion that will elevate your salads, crudités, and even cooked dishes.
This DIY trick is a must-try for several reasons. First, it’s cost-effective. A packet of radish seeds is inexpensive and yields a bountiful harvest. Second, it’s fast! Radishes are known for their quick growth, meaning you can enjoy fresh produce in just a few weeks. Third, it’s a fantastic way to connect with nature and learn about the growing process. Even if you’re a beginner gardener, you can successfully grow white radish from seed with just a little effort and attention.
But the best reason to try this is the unparalleled flavor and freshness. You control the growing conditions, ensuring your radishes are free from harmful pesticides and bursting with natural goodness. Plus, you can harvest them at their peak ripeness, maximizing their flavor and texture.
Looking for variations? Consider planting different varieties of white radish, such as the ‘French Breakfast’ or ‘Icicle’ radish, to experiment with different shapes and flavors. You can also try succession planting, sowing seeds every few weeks to ensure a continuous harvest throughout the growing season. For a spicier kick, let some of your radishes mature longer; the longer they grow, the more pungent they become. Another fun variation is to grow them in containers on your balcony or patio if you lack garden space. Just make sure the container is deep enough to accommodate the root growth. You can even companion plant them with carrots; the radishes help deter pests that might attack the carrots.
Don’t be intimidated by the thought of gardening. Growing white radish from seed is a perfect starting point for anyone interested in getting their hands dirty and enjoying the fruits (or rather, vegetables) of their labor. It’s a simple, satisfying, and delicious way to bring fresh, homegrown produce to your table.
We wholeheartedly encourage you to give this DIY trick a try. Plant those seeds, nurture your little radish plants, and prepare to be amazed by the results. And most importantly, share your experience with us! We’d love to hear about your successes, challenges, and creative ways you’re using your homegrown white radishes. Post pictures of your harvest, share your favorite radish recipes, and let us know what you’ve learned along the way. Happy gardening!
Frequently Asked Questions (FAQ)
What is the best time of year to plant white radish seeds?
The best time to plant white radish seeds is during the cooler months of spring and fall. Radishes thrive in temperatures between 50°F and 65°F (10°C and 18°C). Avoid planting during the heat of summer, as high temperatures can cause the radishes to become tough and bitter. In spring, plant as soon as the soil can be worked. In fall, plant about 4-6 weeks before the first expected frost. If you live in a region with mild winters, you may even be able to grow radishes throughout the winter.
How much sunlight do white radishes need?
White radishes need at least 6 hours of sunlight per day to grow properly. Choose a planting location that receives full sun for the majority of the day. If you’re growing radishes indoors, use grow lights to supplement natural sunlight. Insufficient sunlight can result in leggy plants and small, underdeveloped radishes.
What type of soil is best for growing white radishes?
White radishes prefer loose, well-drained soil that is rich in organic matter. Amend heavy clay soil with compost or other organic material to improve drainage and aeration. The ideal soil pH for radishes is between 6.0 and 7.0. Before planting, loosen the soil to a depth of at least 6 inches to allow the radish roots to grow easily. Avoid soils that are compacted or rocky, as these can hinder root development.
How often should I water my white radish plants?
White radishes need consistent moisture to grow quickly and develop a crisp texture. Water deeply and regularly, especially during dry periods. Aim to keep the soil consistently moist but not waterlogged. Overwatering can lead to root rot, while underwatering can cause the radishes to become tough and bitter. A good rule of thumb is to water when the top inch of soil feels dry to the touch.
How far apart should I plant white radish seeds?
Plant white radish seeds about 1/2 inch deep and 1 inch apart in rows that are 6-8 inches apart. Thin the seedlings to 2-3 inches apart once they emerge. This will give the radishes enough space to grow and prevent overcrowding. Overcrowding can result in smaller radishes and increased competition for nutrients and water.
How long does it take for white radishes to mature?
White radishes are known for their quick growth. Most varieties mature in just 3-4 weeks from planting. Check the seed packet for specific maturity times, as some varieties may take slightly longer. Harvest the radishes when they reach the desired size, typically about 1 inch in diameter.
How do I know when to harvest my white radishes?
The best way to determine when to harvest white radishes is to check their size and firmness. Gently brush away the soil around the top of the radish to check its diameter. Harvest when they reach the desired size, usually around 1 inch. The tops of the radishes should be visible above the soil surface. The radish should feel firm to the touch. If they are left in the ground too long, they can become woody and bitter.
What are some common pests and diseases that affect white radishes?
Some common pests that affect white radishes include flea beetles, root maggots, and aphids. Flea beetles can chew small holes in the leaves, while root maggots can damage the roots. Aphids can suck the sap from the plants, weakening them. Common diseases include damping-off and clubroot. Damping-off is a fungal disease that can kill seedlings, while clubroot causes swollen and distorted roots. Use row covers to protect plants from pests. Ensure good soil drainage to prevent fungal diseases.
Can I eat the radish greens?
Yes, radish greens are edible and nutritious! They have a peppery flavor similar to the radishes themselves. You can use them in salads, stir-fries, or soups. Wash the greens thoroughly before using them. Choose young, tender greens for the best flavor and texture.
How do I store harvested white radishes?
To store harvested white radishes, remove the greens and wash the radishes thoroughly. Store them in a plastic bag in the refrigerator. They will keep for several weeks. You can also store them in a container of water in the refrigerator, changing the water every few days. This will help keep them crisp and fresh.
Leave a Comment