

Grow corn in sacks? Absolutely! Forget sprawling fields and back-breaking labor. I’m about to let you in on a little secret that will revolutionize your home gardening game. Imagine harvesting plump, juicy corn right from your patio, balcony, or even a sunny corner of your kitchen. Sounds too good to be true? It’s not! This ingenious DIY method is perfect for urban dwellers, apartment gardeners, or anyone with limited space who dreams of fresh, homegrown corn.
The concept of container gardening, including growing grains like corn, has roots stretching back centuries. From the Hanging Gardens of Babylon to the resourceful farmers of ancient civilizations utilizing limited fertile land, people have always found ways to cultivate food in unconventional spaces. Today, with increasing urbanization and a growing desire for sustainable living, the need for accessible gardening solutions is greater than ever.
Let’s face it, traditional corn farming requires a significant amount of land, which most of us simply don’t have. But that shouldn’t stop you from enjoying the sweet taste of homegrown corn. This DIY trick allows you to bypass the limitations of space and soil quality, offering a simple, cost-effective, and incredibly rewarding way to grow corn in sacks. Plus, it’s a fantastic project for families, teaching kids about where their food comes from and fostering a love for gardening. Get ready to ditch the store-bought corn and embrace the joy of harvesting your own delicious crop!
Grow Corn in Sacks: A Bumper Crop in Small Spaces!
Hey there, fellow gardening enthusiasts! Ever dreamed of fresh, juicy corn on the cob, but thought you didn’t have the space? Well, I’m here to tell you that you absolutely can grow corn, even if you only have a balcony, patio, or small yard! The secret? Growing corn in sacks! It’s a fantastic way to maximize your yield in a limited area, and it’s surprisingly easy. I’ve been doing this for a few years now, and I’m always amazed at the results. Let me walk you through the process, step-by-step.
What You’ll Need: The Essential Supplies
Before we dive in, let’s gather our supplies. This is crucial for a smooth and successful corn-growing adventure.
* Sacks: Burlap sacks, heavy-duty plastic bags (like those used for animal feed), or even large grow bags will work. I personally prefer burlap sacks because they’re breathable and biodegradable, but any large, sturdy container will do. Aim for a size that’s at least 24 inches in diameter and 36 inches tall. The bigger, the better!
* Potting Mix: This is super important! Don’t use garden soil straight from your yard. It’s often too dense and doesn’t drain well in containers. Instead, opt for a high-quality potting mix that’s specifically formulated for container gardening. I like to mix in some compost for added nutrients.
* Corn Seeds: Choose a variety of corn that’s suitable for your climate and growing season. Sweet corn is the most popular choice, but you can also grow popcorn or ornamental corn. Make sure you get non-GMO seeds if that’s important to you.
* Fertilizer: Corn is a heavy feeder, so you’ll need to provide it with plenty of nutrients. A balanced fertilizer (like 10-10-10) or a fertilizer specifically formulated for vegetables will work well. I also like to use a slow-release fertilizer at planting time.
* Watering Can or Hose: Essential for keeping your corn plants hydrated.
* Trowel or Shovel: For filling the sacks with potting mix and planting the seeds.
* Stakes (Optional): If you live in a windy area, you might want to use stakes to support your corn plants as they grow taller. Bamboo stakes or wooden stakes work well.
* Mulch (Optional): Mulch helps to retain moisture in the soil and suppress weeds. Straw, wood chips, or shredded bark are all good options.
Getting Started: Preparing Your Sacks
This is where the magic begins! Getting your sacks ready is the first step towards a bountiful harvest.
1. Choose Your Location: Corn needs at least 6-8 hours of direct sunlight per day, so choose a sunny spot for your sacks. Make sure the location is also sheltered from strong winds, if possible.
2. Prepare the Sacks: If you’re using burlap sacks, you don’t need to do much preparation. If you’re using plastic bags, make sure to poke several drainage holes in the bottom to prevent waterlogging. This is absolutely crucial!
3. Position the Sacks: Place the sacks in their final location before filling them with potting mix. Once they’re full, they’ll be very heavy and difficult to move.
4. Add Potting Mix: Fill the sacks with potting mix, leaving about 4-6 inches of space at the top. This will make watering easier and prevent the soil from spilling out.
5. Water the Soil: Thoroughly water the potting mix until it’s evenly moist. This will help to settle the soil and prepare it for planting.
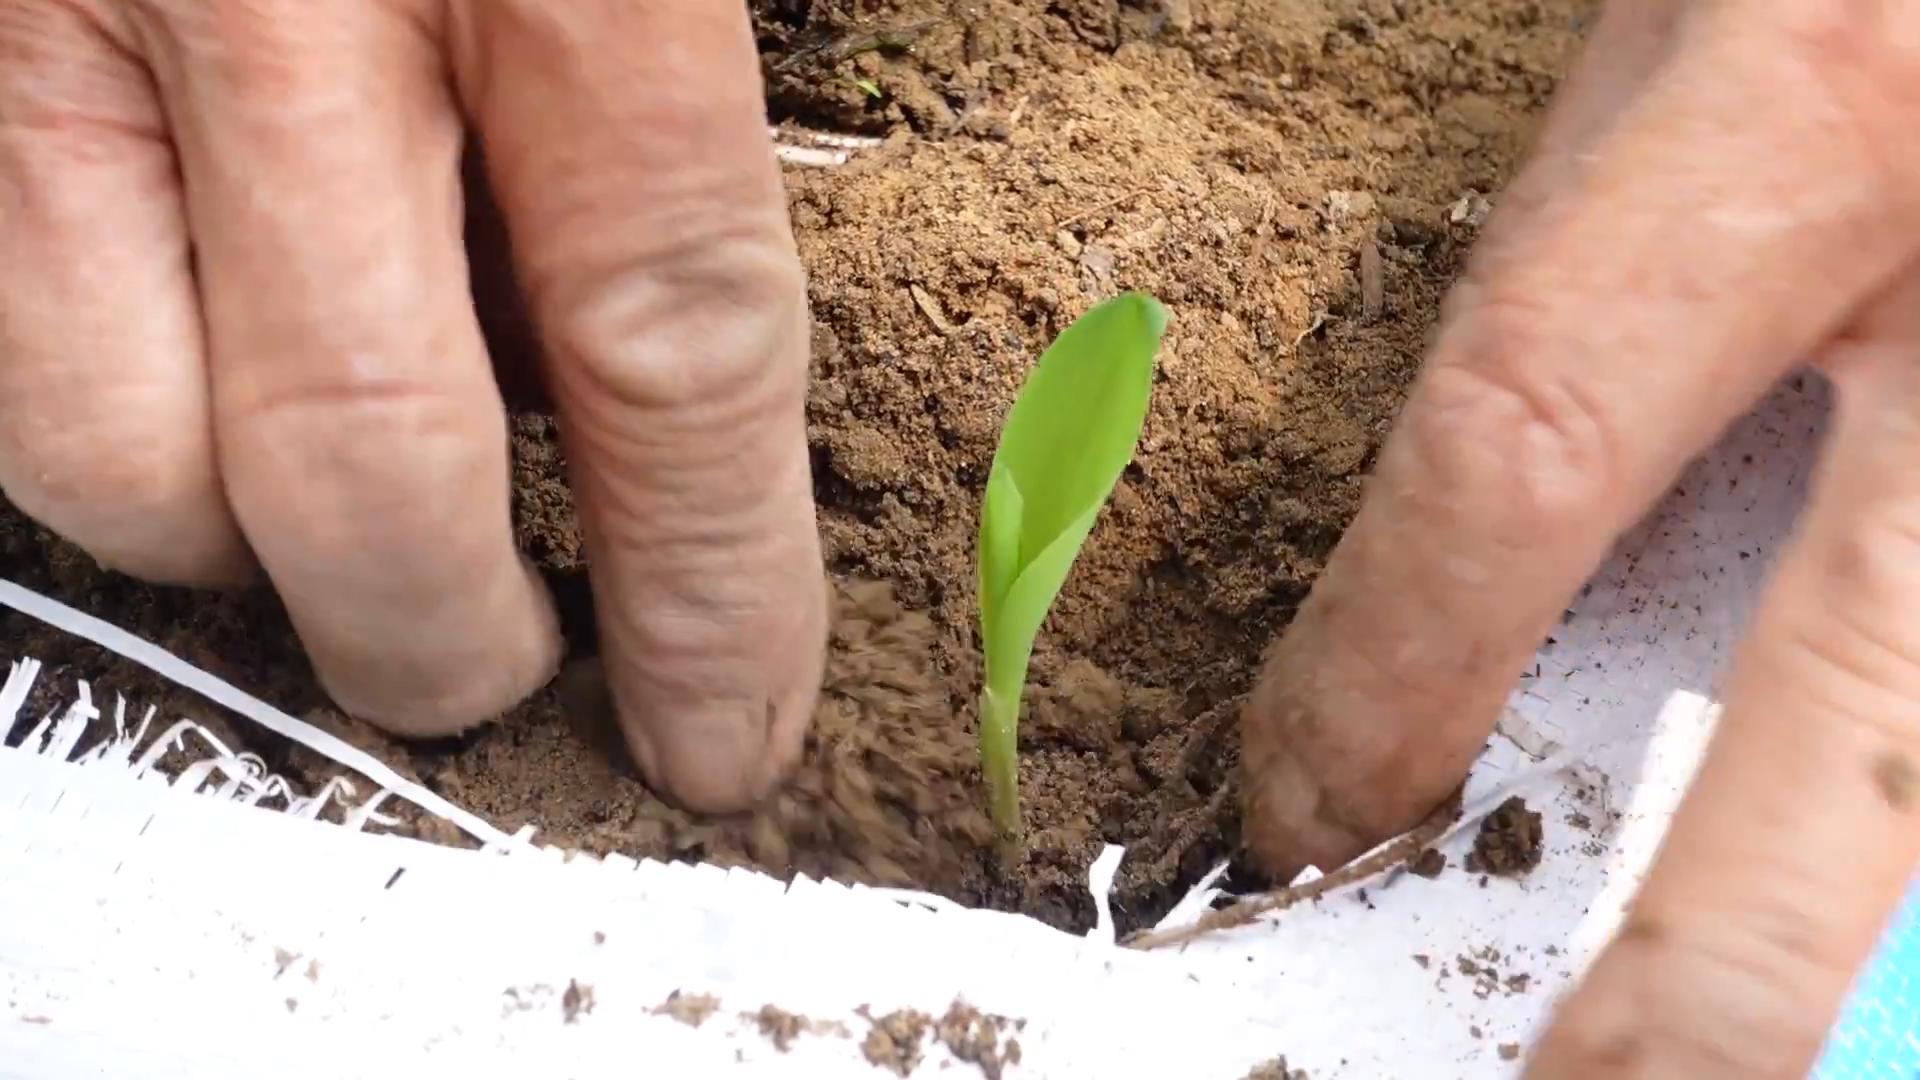
Planting the Seeds: The Heart of the Operation
Now for the exciting part – planting the corn seeds! This is where your future corn stalks begin their journey.
1. Spacing the Seeds: Corn needs to be planted in blocks or clusters to ensure proper pollination. Plant the seeds about 1-2 inches deep and 4-6 inches apart in a grid pattern within the sack. I usually plant about 6-8 seeds per sack, depending on the size of the sack.
2. Cover the Seeds: Gently cover the seeds with potting mix and lightly pat down the soil.
3. Water Again: Water the soil again to ensure good seed-to-soil contact.
4. Label Your Sacks: It’s always a good idea to label your sacks with the variety of corn you’re growing and the date you planted the seeds. This will help you keep track of your progress.
Caring for Your Corn: Nurturing Your Crop
Once your corn seeds are planted, it’s important to provide them with the care they need to thrive. This involves watering, fertilizing, and protecting them from pests and diseases.
1. Watering: Corn needs consistent moisture, especially during hot, dry weather. Water deeply whenever the top inch of soil feels dry to the touch. Avoid overwatering, as this can lead to root rot. I usually water my corn sacks every day or two during the summer months.
2. Fertilizing: As I mentioned earlier, corn is a heavy feeder. Fertilize your corn plants every 2-3 weeks with a balanced fertilizer or a fertilizer specifically formulated for vegetables. Follow the instructions on the fertilizer package. You can also side-dress your corn plants with compost or aged manure.
3. Thinning (If Necessary): Once the seedlings emerge, you may need to thin them out if they’re too crowded. Choose the strongest, healthiest seedlings and remove the weaker ones. Aim for a spacing of about 8-12 inches between plants.
4. Weeding: Keep the area around your corn plants free of weeds. Weeds compete with corn for water and nutrients. Hand-pull weeds regularly or use a hoe to cultivate the soil.
5. Pest Control: Corn is susceptible to a variety of pests, including corn earworms, aphids, and Japanese beetles. Inspect your plants regularly for signs of pests and take action if necessary. You can use organic pest control methods, such as insecticidal soap or neem oil.
6. Pollination Assistance (Optional): Corn is wind-pollinated, but if you live in an area with little wind, you may need to assist with pollination. When the tassels (the male flowers at the top of the plant) begin to shed pollen, gently shake the plants to distribute the pollen onto the silks (the female flowers that emerge from the ears of corn). You can also cut off a tassel and gently brush it against the silks.
7. Staking (If Necessary): If your corn plants are tall and top-heavy, you may need to stake them to prevent them from falling over. Insert stakes into the soil near the base of the plants and tie the stalks to the stakes with twine.
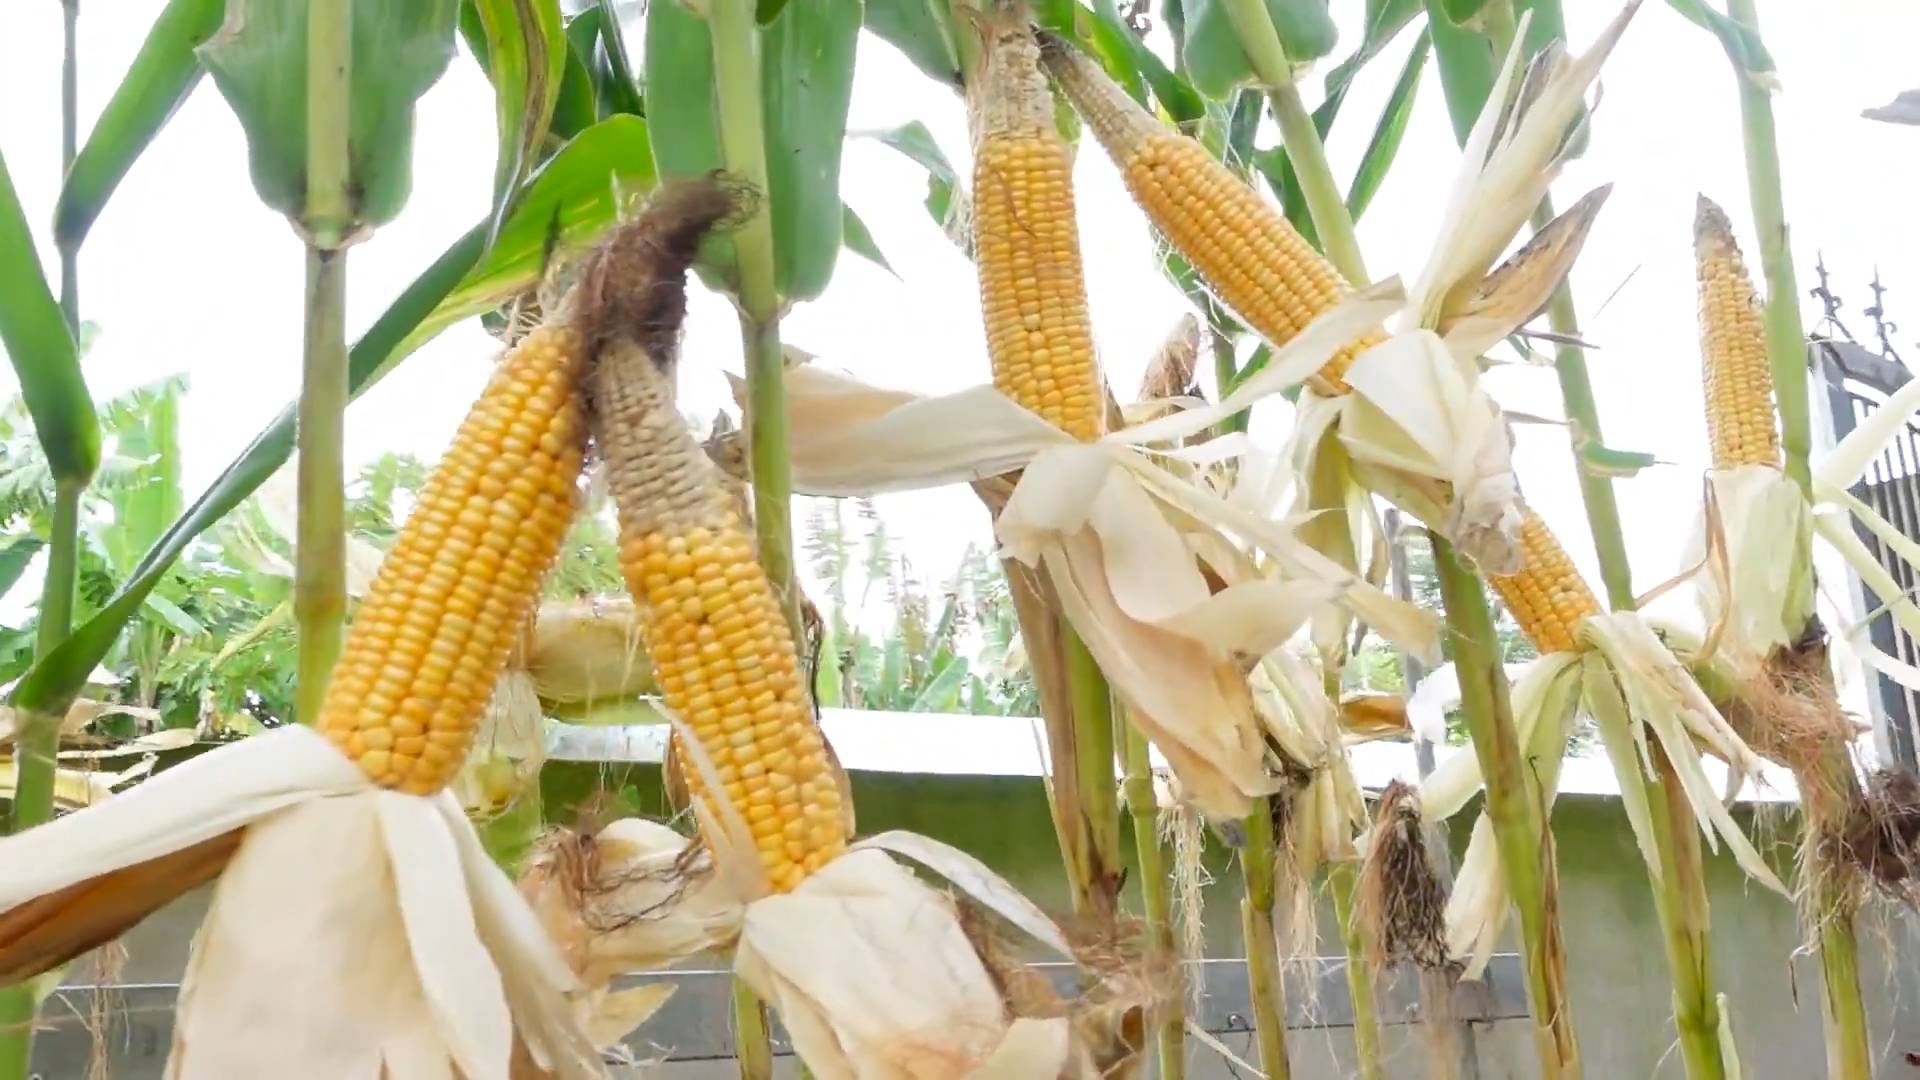
Harvesting Your Corn: The Sweet Reward
After all your hard work, it’s finally time to harvest your corn! This is the most rewarding part of the whole process.
1. Knowing When to Harvest: The key to harvesting sweet corn at its peak flavor is to pick it when the kernels are plump and juicy and the silks are brown and dry. You can also peel back a portion of the husk and puncture a kernel with your fingernail. If the liquid that comes out is milky, the corn is ready to harvest. If the liquid is clear, the corn is not yet ripe. If the liquid is doughy, the corn is overripe.
2. Harvesting the Ears: To harvest the ears of corn, grasp the ear firmly and twist it downward. The ear should snap off easily from the stalk.
3. Enjoying Your Harvest: Sweet corn is best enjoyed fresh, but you can also freeze it or can it for later use. I love to grill my corn on the cob, but you can also boil it, steam it, or roast it.
Troubleshooting: Addressing Common Issues
Even with the best planning, you might encounter some challenges along the way. Here are a few common issues and how to address them:
* Poor Germination: If your corn seeds aren’t germinating, it could be due to several factors, such as cold soil, poor-quality seeds, or overwatering. Make sure the soil temperature is at least 60 degrees Fahrenheit before planting. Use fresh, high-quality seeds and avoid overwatering.
* Yellowing Leaves: Yellowing leaves can be a sign of nutrient deficiency, especially nitrogen deficiency. Fertilize your corn plants with a nitrogen-rich fertilizer.
* Stunted Growth: Stunted growth can be caused by a variety of factors, such as poor soil, lack of sunlight, or pest infestation. Make sure your corn plants are getting enough sunlight and nutrients. Inspect them regularly for pests and take action if necessary.
* Poor Pollination: If your corn ears are not filling out properly, it could be due to poor pollination. Assist with pollination by shaking the
Conclusion
So, there you have it! Growing corn in sacks isn’t just a quirky gardening experiment; it’s a game-changer for anyone with limited space, challenging soil, or a desire for a more controlled growing environment. We’ve explored the ins and outs of this method, from choosing the right sack and soil to nurturing your corn plants to a bountiful harvest. But why is this DIY trick a must-try?
Firstly, the space-saving aspect is undeniable. Imagine enjoying fresh, homegrown corn even if you only have a balcony, patio, or small yard. Traditional cornfields require significant acreage, but sack gardening brings the farm to you, vertically optimizing your available space.
Secondly, it offers unparalleled control over the growing conditions. You dictate the soil composition, ensuring your corn receives the precise nutrients it needs. You can easily move the sacks to chase the sun or shelter them from harsh weather. This level of control translates to healthier plants and potentially higher yields.
Thirdly, it’s incredibly rewarding! There’s something deeply satisfying about nurturing a plant from seed to harvest, especially when you’ve overcome the limitations of traditional gardening. The sweet, juicy taste of homegrown corn, knowing you cultivated it yourself in a sack, is an experience you won’t soon forget.
But don’t stop there! Experiment with different varieties of corn. Try growing sweet corn, popcorn, or even ornamental corn in your sacks. Consider adding companion plants like beans or squash to the same sack to create a mini-ecosystem. You can also explore different sack materials, such as burlap or recycled plastic feed bags, to find what works best for you.
Ready to embark on your sack corn-growing adventure? We wholeheartedly encourage you to give it a try. It’s a fun, educational, and ultimately delicious experience. And most importantly, it’s a fantastic way to enjoy fresh, homegrown corn, regardless of your space constraints.
Once you’ve harvested your first batch of sack-grown corn, we want to hear all about it! Share your experiences, tips, and photos in the comments below. Let’s build a community of sack corn enthusiasts and learn from each other’s successes and challenges. Together, we can revolutionize the way we grow corn, one sack at a time. This method of growing corn in sacks is a simple and effective way to get a great harvest.
Frequently Asked Questions (FAQ)
What type of sack is best for growing corn?
The ideal sack should be durable, breathable, and large enough to accommodate the corn’s root system. Woven polypropylene sacks (like those used for animal feed) are a popular and cost-effective choice. Burlap sacks are another option, offering excellent breathability, but they may degrade faster. Avoid using plastic bags, as they can trap moisture and lead to root rot. Aim for a sack that is at least 2 feet in diameter and 3 feet tall. The size is important to give the corn roots enough space to grow.
What kind of soil should I use?
Corn thrives in well-draining, nutrient-rich soil. A good mix would be equal parts of garden soil, compost, and peat moss or coco coir. The compost provides essential nutrients, while the peat moss or coco coir improves drainage and aeration. You can also add a slow-release fertilizer to the soil mix to provide a steady supply of nutrients throughout the growing season. Avoid using heavy clay soil, as it can become waterlogged and suffocate the roots.
How many corn plants can I grow in one sack?
This depends on the size of the sack and the variety of corn you’re growing. For a sack that is 2 feet in diameter, we recommend planting 3-4 corn plants. Overcrowding can lead to stunted growth and reduced yields. Ensure that each plant has enough space to develop a strong root system and access sunlight.
How often should I water my sack-grown corn?
Watering frequency depends on the weather and the soil’s moisture level. Generally, you should water deeply whenever the top inch of soil feels dry to the touch. Corn needs consistent moisture, especially during the tasseling and silking stages. Avoid overwatering, as this can lead to root rot. Ensure the sack has adequate drainage holes to prevent water from pooling at the bottom.
What kind of fertilizer should I use?
Corn is a heavy feeder, so regular fertilization is essential. Use a balanced fertilizer (e.g., 10-10-10) or a fertilizer specifically formulated for corn. Apply fertilizer according to the package instructions, typically every 2-3 weeks. You can also supplement with organic fertilizers like compost tea or fish emulsion.
How much sunlight does sack-grown corn need?
Corn needs at least 6-8 hours of direct sunlight per day to thrive. Choose a location that receives ample sunlight throughout the growing season. If you live in a particularly hot climate, you may need to provide some afternoon shade to prevent the plants from overheating.
How do I prevent pests and diseases?
Monitor your corn plants regularly for signs of pests or diseases. Common corn pests include corn earworms, aphids, and spider mites. You can control these pests with insecticidal soap, neem oil, or by handpicking them off the plants. To prevent diseases, ensure good air circulation around the plants and avoid overwatering. You can also use a fungicide if necessary.
How long does it take to grow corn in sacks?
The time it takes to grow corn in sacks depends on the variety of corn and the growing conditions. Generally, it takes 60-100 days from planting to harvest. Sweet corn typically matures faster than popcorn or ornamental corn.
How do I know when my corn is ready to harvest?
The silks on the corn ear will turn brown and dry. The ear will feel plump and full. You can gently peel back the husk to check the kernels. The kernels should be plump and milky when punctured. If the liquid is clear, the corn is not ripe yet. If it’s pasty, it’s overripe.
Can I reuse the soil in the sacks?
Yes, you can reuse the soil in the sacks, but it’s important to replenish the nutrients. Amend the soil with fresh compost and fertilizer before planting again. You may also want to consider rotating crops to prevent the buildup of soilborne diseases.
What are some variations on growing corn in sacks?
You can try growing different varieties of corn, such as sweet corn, popcorn, or ornamental corn. You can also experiment with different sack materials, such as burlap or recycled plastic feed bags. Consider adding companion plants like beans or squash to the same sack to create a mini-ecosystem. Another variation is to use a self-watering sack system, which can help to conserve water and reduce the need for frequent watering.
Is growing corn in sacks organic?
Growing corn in sacks can be organic if you use organic soil, fertilizers, and pest control methods. Choose organic compost, fertilizers, and pest control products that are certified for organic gardening. Avoid using synthetic fertilizers and pesticides.
Can I grow corn in sacks indoors?
While it’s possible to grow corn in sacks indoors, it’s challenging due to the high light requirements. You would need to provide supplemental lighting with grow lights to ensure the plants receive enough light. Indoor growing may also require more attention to ventilation and humidity control.
What if my corn plants fall over?
Corn plants can sometimes fall over, especially in windy conditions or if the sacks are not stable. You can provide support by staking the plants or using a tomato cage. You can also try burying the sacks slightly in the ground to provide more stability.
How do I store my harvested corn?
Freshly harvested corn is best enjoyed immediately. However, you can store it in the refrigerator for a few days. To store corn for longer periods, you can freeze it or can it. Freezing is the easiest method. Simply blanch the corn for a few minutes, then cut the kernels off the cob and freeze them in freezer bags.
Leave a Comment