

Aloe vera leaf cutting propagation might sound intimidating, but trust me, it’s easier than you think! Have you ever admired the lush, spiky leaves of an aloe vera plant and wished you could have more without spending a fortune? Well, you’re in luck! This simple DIY guide will unlock the secrets to multiplying your aloe vera collection using just a single leaf.
Aloe vera has a rich history, dating back thousands of years. Ancient Egyptians revered it as the “plant of immortality,” using it for its medicinal properties and beauty treatments. Its soothing gel has been a staple in skincare for generations. But did you know you can easily propagate new plants from a single leaf?
Why bother with aloe vera leaf cutting propagation? Because it’s a cost-effective and rewarding way to expand your indoor garden! Instead of buying new plants, you can create them yourself. Plus, it’s a fantastic way to share the benefits of aloe vera with friends and family. Imagine gifting a little piece of this historical healing plant to someone you care about. This DIY trick is perfect for anyone who wants to save money, learn a new skill, and enjoy the beauty and benefits of aloe vera in abundance. Let’s get started!
Propagating Aloe Vera from Leaf Cuttings: A Comprehensive Guide
Hey plant lovers! Ever wondered if you could multiply your aloe vera plant just from a single leaf? Well, while it’s not the *most* reliable method, it’s definitely worth a try and a fun experiment! Let’s dive into how you can attempt to propagate aloe vera from leaf cuttings. I’ll walk you through each step, sharing tips and tricks I’ve learned along the way.
Understanding the Challenge
Before we get started, it’s important to understand that aloe vera propagation from leaf cuttings is *not* as straightforward as propagating other succulents. Aloe vera leaves don’t always readily root like, say, a succulent leaf. They often tend to rot before they root. However, with the right techniques and a little patience, you might just be successful! The key is to create the perfect environment and prevent rot.
Materials You’ll Need
* A healthy aloe vera plant with mature leaves
* A sharp, clean knife or pruning shears
* Rooting hormone powder (optional, but recommended)
* Well-draining potting mix (cactus or succulent mix is ideal)
* A small pot or container with drainage holes
* A spray bottle with water
* A warm, bright location (indirect sunlight)
* Patience!
Choosing the Right Leaf
Not all aloe leaves are created equal when it comes to propagation. Here’s what to look for:
* Maturity: Select a mature, healthy leaf from the bottom of the plant. These leaves are more likely to have the energy reserves needed for rooting.
* Size: Choose a leaf that’s at least 4-6 inches long. Smaller leaves may not have enough stored energy.
* Health: Avoid leaves that are damaged, discolored, or show signs of disease. A healthy leaf is your best bet for success.
Taking the Cutting
This is a crucial step, so pay close attention!
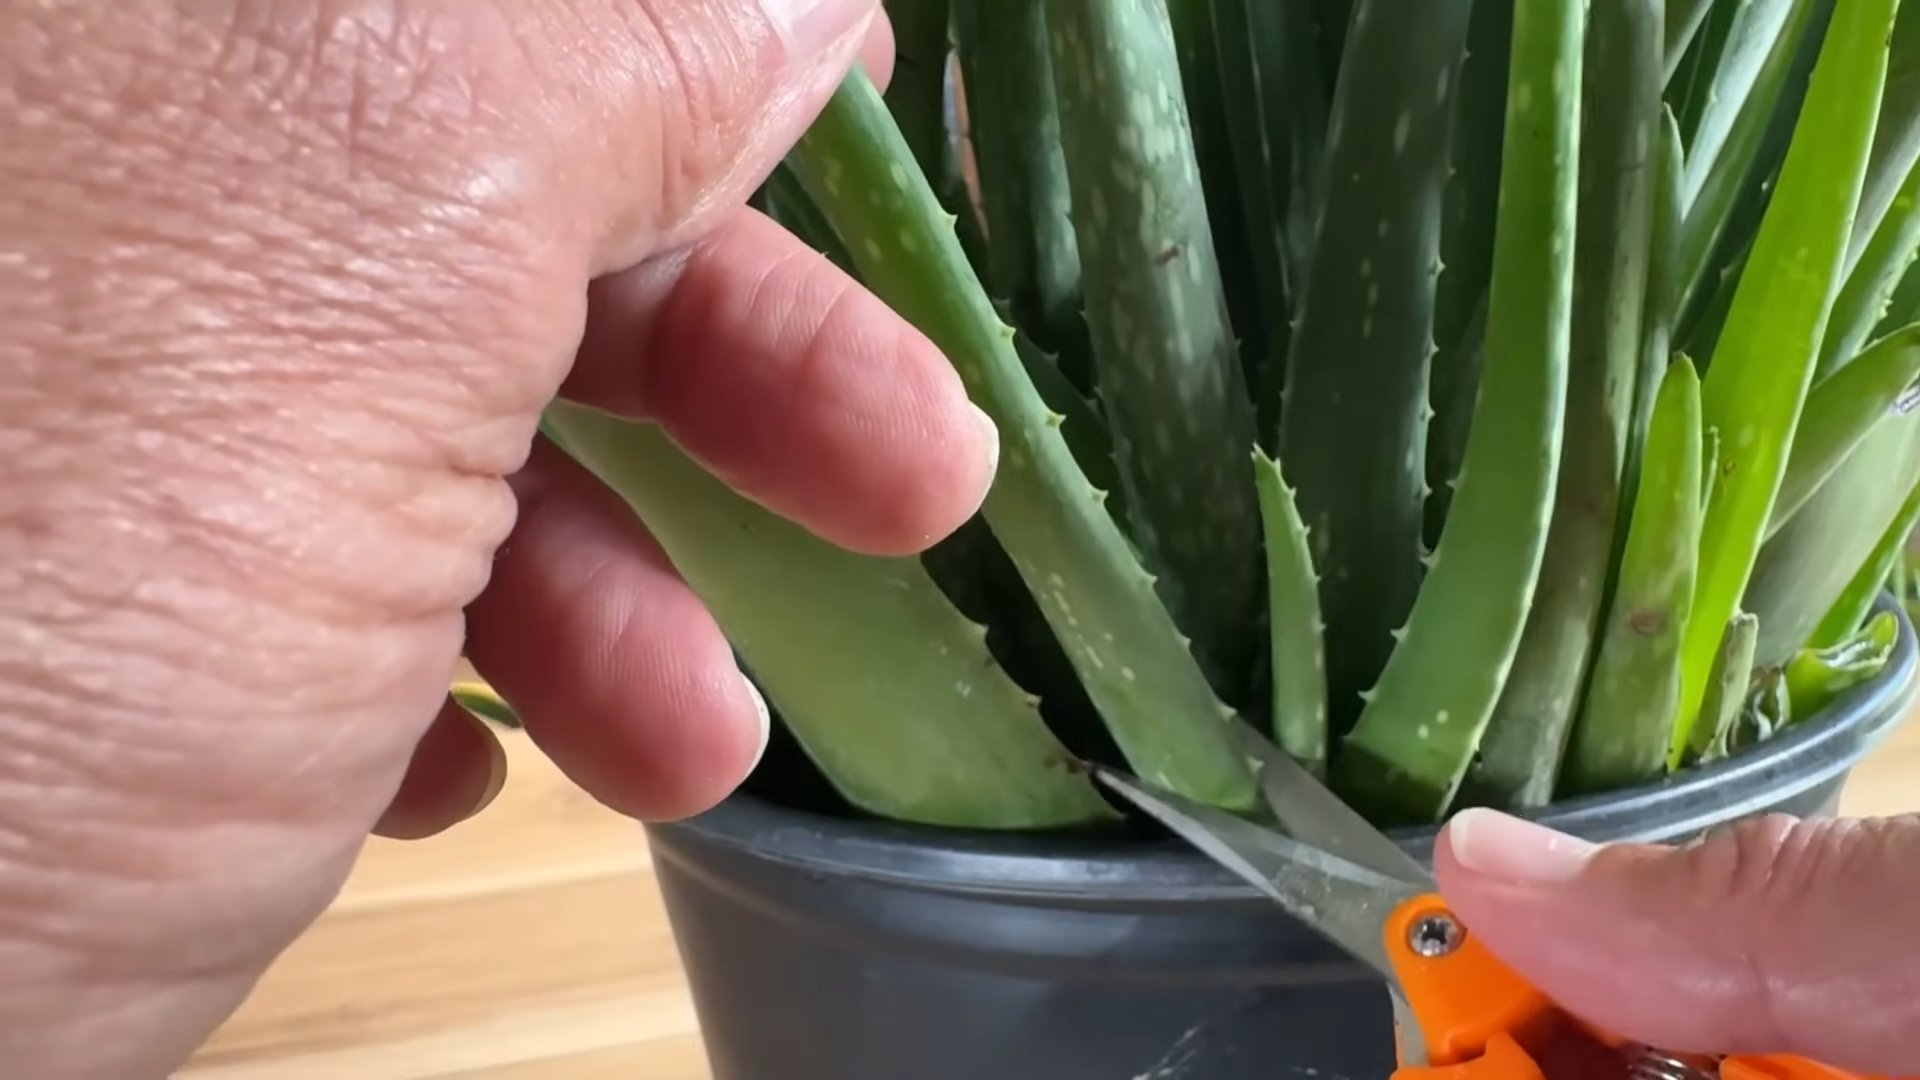
1. Clean Your Tools: Sterilize your knife or pruning shears with rubbing alcohol to prevent the spread of bacteria or fungus.
2. Make the Cut: Carefully cut the leaf from the base of the aloe vera plant, as close to the stem as possible. Make a clean, straight cut.
3. Allow the Cut End to Callus: This is *super* important! Place the cut leaf in a dry, shaded area for 3-7 days. This allows the cut end to dry out and form a callus, which helps prevent rot. You’ll notice the cut end becoming thicker and harder. Don’t skip this step!
Preparing the Potting Mix and Pot
While your leaf is callusing, let’s get the pot ready.
1. Choose the Right Pot: Select a small pot or container with drainage holes. Good drainage is essential to prevent root rot.
2. Use Well-Draining Soil: Fill the pot with a well-draining potting mix specifically formulated for cacti and succulents. This type of mix typically contains ingredients like perlite, sand, or pumice to improve drainage.
3. Moisten the Soil: Lightly moisten the potting mix with water. It should be damp, but not soggy.
Planting the Cutting
Now for the moment of truth!
1. Apply Rooting Hormone (Optional): If you’re using rooting hormone, dip the calloused end of the leaf cutting into the powder. This can help stimulate root growth.
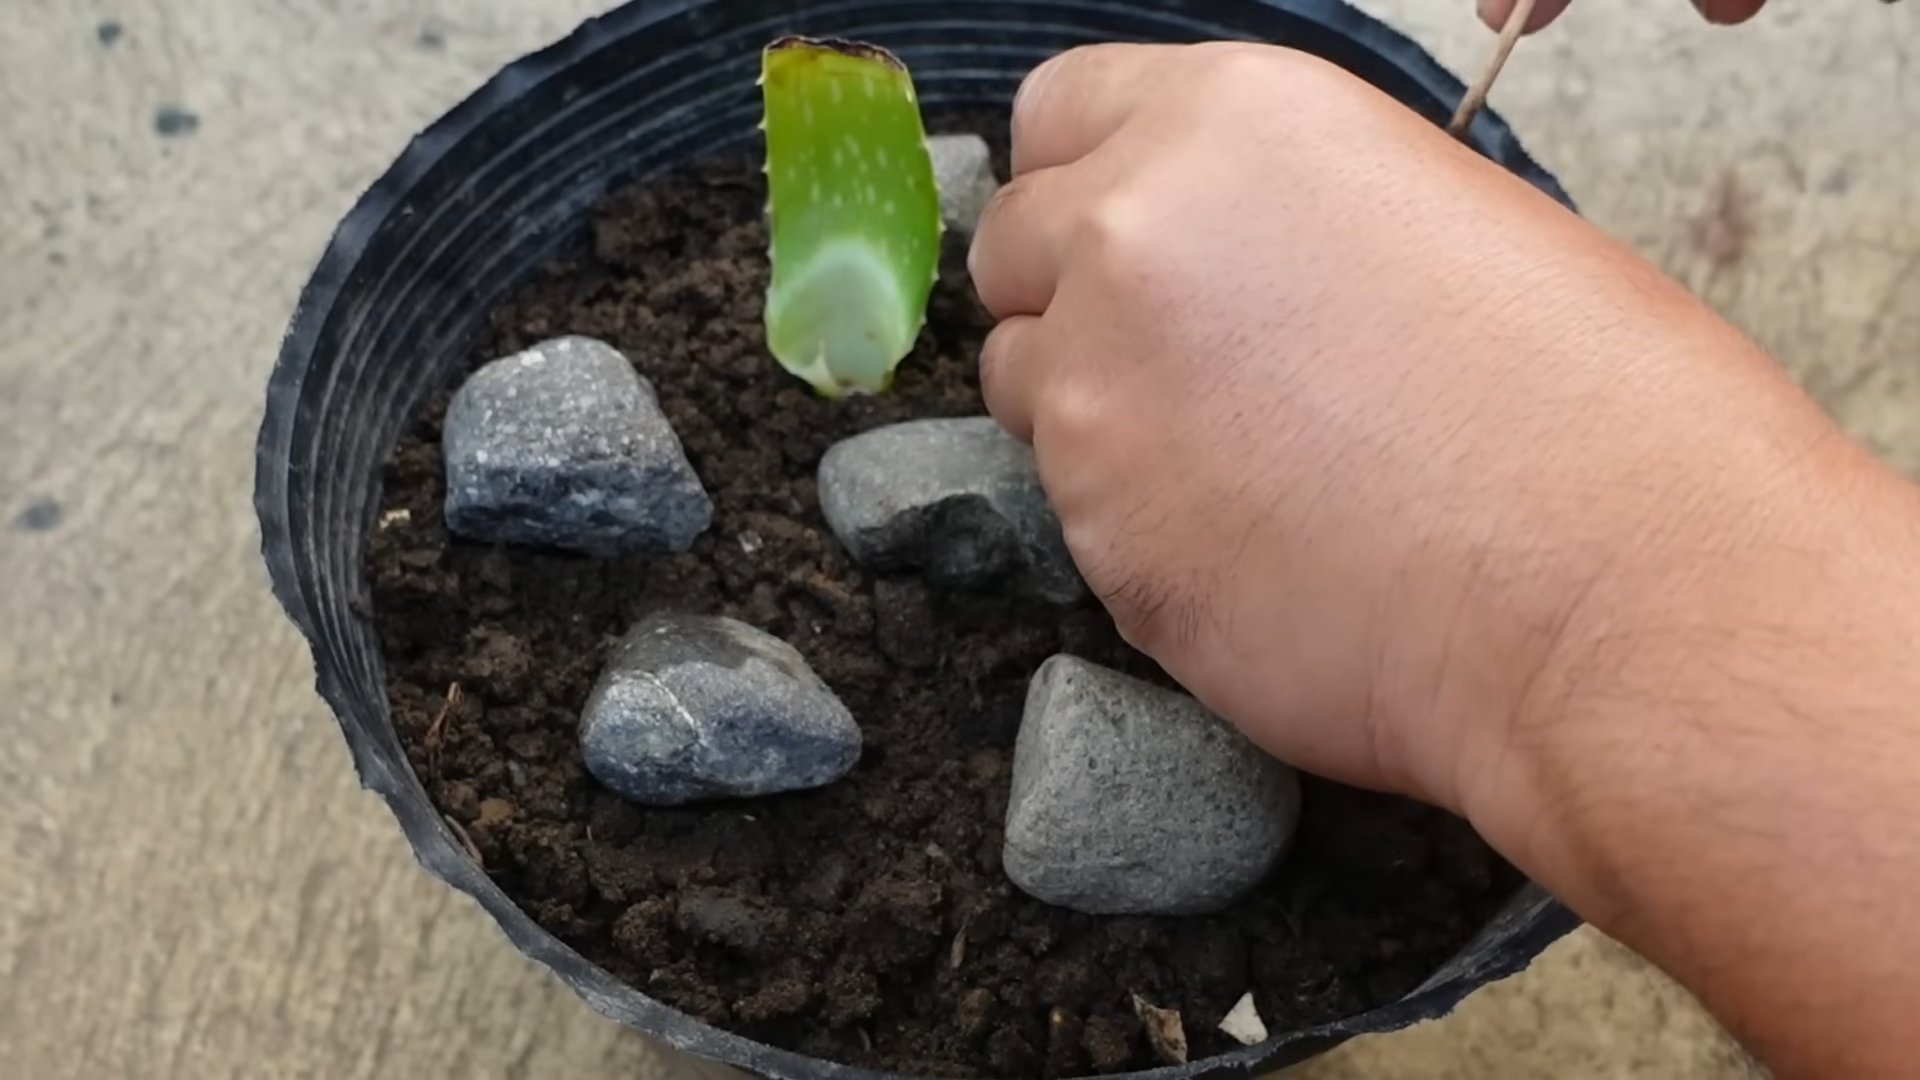
2. Plant the Cutting: Insert the calloused end of the leaf cutting into the potting mix, about 1-2 inches deep. Make sure the cut end is firmly planted.
3. Support the Cutting (If Needed): If the leaf is wobbly, you can use small pebbles or chopsticks to support it until roots develop.
4. Water Sparingly: Lightly mist the soil around the base of the cutting with water. Avoid overwatering, as this can lead to rot.
Caring for Your Cutting
This is where patience comes in!
1. Provide Indirect Sunlight: Place the pot in a warm, bright location that receives indirect sunlight. Avoid direct sunlight, as this can scorch the leaf.
2. Water Carefully: Water the cutting very sparingly, only when the soil is completely dry. Overwatering is the biggest enemy here. I usually wait at least a week or two between waterings, depending on the humidity and temperature.
3. Check for Rot: Keep a close eye on the cutting for any signs of rot, such as softening, discoloration, or a foul odor. If you notice rot, remove the affected area immediately and let the remaining portion callus again before replanting.
4. Be Patient: Rooting can take several weeks or even months. Don’t be discouraged if you don’t see results right away. Just keep providing the right conditions and hope for the best!
5. Gently Tug Test: After a few weeks, you can gently tug on the leaf to see if it has rooted. If you feel resistance, it means roots have started to develop.
What to Expect (and Not Expect)
It’s important to have realistic expectations. Aloe vera leaf cuttings don’t always root successfully. Here’s what you might encounter:
* Rotting: This is the most common problem. If the leaf rots, it’s game over.
* No Rooting: Sometimes, the leaf will simply sit there and do nothing. It won’t rot, but it won’t root either.
* Slow Rooting: Even if the leaf does root, it can take a very long time. Be prepared to wait several months.
* Pup Development: If you’re lucky, instead of rooting, the leaf might produce a small pup (baby aloe vera plant) at the base. This is a great sign!
Alternative Propagation Methods
If you’re having trouble propagating aloe vera from leaf cuttings, there are other, more reliable methods you can try:
* Offsets (Pups): This is the easiest and most common method. Aloe vera plants naturally produce offsets, or pups, around the base of the plant. You can simply separate these pups from the mother plant and pot them up individually.
* Seeds: You can also propagate aloe vera from seeds, but this is a much slower and more challenging process.
Troubleshooting
* Leaf Turning Yellow or Brown: This could be a sign of overwatering, underwatering, or sunburn. Adjust your watering schedule and move the plant to a location with indirect sunlight.
* Leaf Soft and Mushy: This is a sign of rot. Remove the affected area immediately.
* No Root Growth After Several Weeks: Be patient! It can take a long time for aloe vera cuttings to root. Make sure you’re providing the right conditions and avoid overwatering.
Final Thoughts
Propagating aloe vera from leaf cuttings can be a bit of a gamble, but it’s a fun experiment to try. Even if you’re not successful, you’ll learn a lot about plant propagation along the way. Remember to be patient, provide the right conditions, and don’t be afraid to try again! Good luck, and happy gardening!
Conclusion
So, there you have it! Transforming aloe vera leaf cuttings into thriving new plants might seem like a horticultural magic trick, but it’s actually a straightforward and incredibly rewarding process. We’ve walked you through each step, from selecting the right leaf to nurturing your tiny aloe babies. Why is this DIY trick a must-try? Because it’s an economical and sustainable way to expand your aloe vera collection, allowing you to enjoy the plant’s numerous benefits – from soothing sunburns to purifying the air – throughout your home. Plus, there’s an undeniable satisfaction in watching something you propagated yourself flourish.
But the journey doesn’t end here! Feel free to experiment with variations. For instance, try using different rooting mediums. While we recommended a well-draining cactus mix, some gardeners have success with perlite or vermiculite. Just be sure to maintain proper moisture levels and avoid overwatering. Another variation involves the size of the leaf cuttings. While smaller cuttings might take longer to root, they can be a good option if you’re working with limited resources or want to maximize the number of plants you propagate from a single leaf. You can also experiment with different types of aloe vera. While *Aloe barbadensis miller* is the most common and widely used, there are many other varieties that can be propagated using this method.
Don’t be afraid to get creative and adapt the process to suit your specific environment and preferences. The key is to provide the cuttings with the right conditions – warmth, indirect sunlight, and well-draining soil – and to be patient. Rooting can take several weeks, so don’t get discouraged if you don’t see results immediately.
We wholeheartedly encourage you to try this aloe vera leaf cutting propagation method. It’s a fantastic way to connect with nature, learn about plant propagation, and create a thriving indoor garden. And most importantly, it’s a sustainable way to enjoy the many benefits of aloe vera without having to constantly purchase new plants.
Once you’ve successfully propagated your aloe vera plants, we’d love to hear about your experience! Share your tips, tricks, and photos in the comments below. Let’s create a community of aloe vera enthusiasts and learn from each other. Happy propagating!
Frequently Asked Questions (FAQ)
Why should I propagate aloe vera from leaf cuttings instead of buying new plants?
Propagating aloe vera from leaf cuttings offers several advantages. Firstly, it’s significantly more cost-effective than purchasing new plants, especially if you already have a mature aloe vera plant. Secondly, it’s a sustainable way to expand your collection, reducing your reliance on commercial nurseries and promoting a more eco-friendly lifestyle. Thirdly, it’s a rewarding experience that allows you to connect with nature and learn about plant propagation. Finally, it allows you to clone your favorite aloe vera plant, ensuring you have a genetically identical copy.
What is the best time of year to propagate aloe vera from leaf cuttings?
The best time to propagate aloe vera from leaf cuttings is during the spring or summer months, when the plant is actively growing. Warmer temperatures and longer daylight hours promote faster rooting and growth. However, with proper care and attention, you can propagate aloe vera at other times of the year as well, although the process might take a bit longer.
How long does it take for aloe vera leaf cuttings to root?
The time it takes for aloe vera leaf cuttings to root can vary depending on several factors, including the temperature, humidity, and the specific variety of aloe vera. Generally, you can expect to see roots forming within 4-8 weeks. Be patient and avoid disturbing the cuttings during this time.
What type of soil is best for rooting aloe vera leaf cuttings?
Aloe vera requires well-draining soil to prevent root rot. A cactus or succulent potting mix is ideal, as it typically contains a blend of ingredients like perlite, sand, and peat moss that promote drainage. You can also create your own potting mix by combining equal parts of potting soil, perlite, and coarse sand.
How often should I water aloe vera leaf cuttings?
Water aloe vera leaf cuttings sparingly. Overwatering is a common cause of root rot. Allow the soil to dry out completely between waterings. When you do water, make sure to thoroughly moisten the soil, but avoid letting the cuttings sit in standing water. A good rule of thumb is to water only when the top inch of soil feels dry to the touch.
What kind of light do aloe vera leaf cuttings need?
Aloe vera leaf cuttings need bright, indirect sunlight. Avoid placing them in direct sunlight, as this can scorch the leaves. A location near an east- or west-facing window is ideal. If you don’t have access to natural light, you can supplement with artificial grow lights.
Can I use rooting hormone to propagate aloe vera leaf cuttings?
While not strictly necessary, using rooting hormone can help to speed up the rooting process and increase the success rate. Dip the cut end of the leaf cutting in rooting hormone powder before planting it in the potting mix. Follow the instructions on the rooting hormone package.
What are some common problems I might encounter when propagating aloe vera from leaf cuttings?
Some common problems include root rot (caused by overwatering), leaf rot (caused by excessive moisture), and lack of rooting (caused by insufficient light or improper soil). To prevent these problems, make sure to use well-draining soil, water sparingly, and provide bright, indirect sunlight.
How do I know when my aloe vera leaf cuttings are ready to be transplanted?
You’ll know your aloe vera leaf cuttings are ready to be transplanted when they have developed a healthy root system. Gently tug on the cutting; if you feel resistance, it means roots have formed. You should also be able to see roots emerging from the drainage holes in the pot.
Can I propagate aloe vera from a broken leaf?
Yes, you can propagate aloe vera from a broken leaf, as long as the leaf is healthy and not damaged by disease or pests. Follow the same steps as you would for propagating from a leaf cutting, allowing the cut end to callous over before planting it in the potting mix.
What do I do if my aloe vera leaf cutting starts to rot?
If your aloe vera leaf cutting starts to rot, remove it from the potting mix immediately. Cut away any rotted portions of the leaf with a clean, sharp knife. Allow the cut end to callous over for a few days before replanting it in fresh, well-draining potting mix. Be sure to water sparingly.
Is it possible to propagate aloe vera from a leaf that has been removed from the base of the plant?
Yes, it is possible to propagate aloe vera from a leaf that has been removed from the base of the plant. The success rate may be slightly lower compared to using a leaf cutting from the middle of the plant, but it is still worth trying. Follow the same steps as you would for propagating from a leaf cutting.
How big should the pot be when I transplant my rooted aloe vera leaf cutting?
Choose a pot that is slightly larger than the root ball of the aloe vera plant. A pot that is too large can lead to overwatering and root rot. Make sure the pot has drainage holes to allow excess water to escape.
Can I use tap water to water my aloe vera leaf cuttings?
It is best to use filtered or distilled water to water your aloe vera leaf cuttings. Tap water can contain chlorine and other chemicals that can be harmful to the plants. If you must use tap water, let it sit out for 24 hours to allow the chlorine to evaporate.

Leave a Comment