

Baking Soda Rust Removal: Are you tired of unsightly rust ruining your favorite garden tools, patio furniture, or even your vintage finds? I know I am! It’s frustrating to see those orange blemishes creeping across surfaces, making them look old and neglected. But don’t despair, because I’m here to share a simple, effective, and budget-friendly solution that will have you saying goodbye to rust in no time!
Rust, a form of iron oxide, has been a nemesis of metal objects for centuries. From ancient swords to modern machinery, its corrosive nature has posed a constant challenge. While industrial solutions exist, they often involve harsh chemicals and specialized equipment. But what if I told you that the answer to your rust woes is likely sitting right in your kitchen cabinet?
That’s right, baking soda! This humble household staple, known for its cleaning and deodorizing properties, is also a surprisingly powerful rust remover. In this DIY guide, I’ll walk you through the step-by-step process of using baking soda rust removal techniques to restore your metal items to their former glory. You’ll learn how to create the perfect paste, apply it effectively, and witness the magic unfold as the rust disappears. Not only will you save money on expensive rust removers, but you’ll also be using a safer, more environmentally friendly alternative. Let’s get started and reclaim those rusty treasures!
DIY Baking Soda Rust Removal: A Comprehensive Guide
Hey there, fellow DIY enthusiasts! Rust, that pesky orange menace, can ruin the look of your favorite tools, garden furniture, and even your car. But don’t despair! Before you toss those rusty items, let me show you a simple, effective, and budget-friendly way to banish rust using the magic of baking soda. Yes, that humble box in your pantry is a powerful rust-busting agent!
This guide will walk you through everything you need to know to remove rust using baking soda, from gathering your supplies to applying the final touches. Let’s get started!
What You’ll Need
Before we dive in, let’s gather our arsenal of rust-fighting tools. Here’s a list of everything you’ll need:
* Baking Soda: The star of the show! A fresh box is always a good idea.
* Water: Tap water works just fine.
* Mixing Bowl or Container: To create our baking soda paste.
* Spoon or Stirring Stick: For mixing the paste.
* Wire Brush: For scrubbing away the rust. Choose a brush appropriate for the surface you’re working on. A softer brush for delicate items, a tougher one for heavy rust.
* Scrubbing Pad or Sponge: For general cleaning and application.
* Gloves: To protect your hands from the rust and cleaning agents.
* Safety Glasses: To protect your eyes from flying rust particles.
* Clean Rags or Towels: For wiping and drying.
* Optional:
* Vinegar or Lemon Juice: For extra stubborn rust.
* Rust Converter/Primer: To prevent future rust.
* Protective Coating (Paint, Oil, Wax): To further protect the surface.
Preparing the Rusty Item
Before we unleash the baking soda power, we need to prep the rusty item. This step is crucial for ensuring the baking soda can effectively reach and break down the rust.
1. Assess the Rust: Take a good look at the rusty item. How severe is the rust? Is it just surface rust, or has it penetrated deeper? This will help you determine how much effort you’ll need to put in.
2. Clean the Surface: Remove any loose debris, dirt, or grease from the surface of the item. You can use a brush, rag, or even a vacuum cleaner for this. A clean surface allows the baking soda paste to adhere properly.
3. Rinse and Dry: If you used water to clean the surface, make sure to dry it thoroughly before proceeding. We don’t want to dilute our baking soda paste.
Creating the Baking Soda Paste
Now for the fun part: making our rust-busting paste!
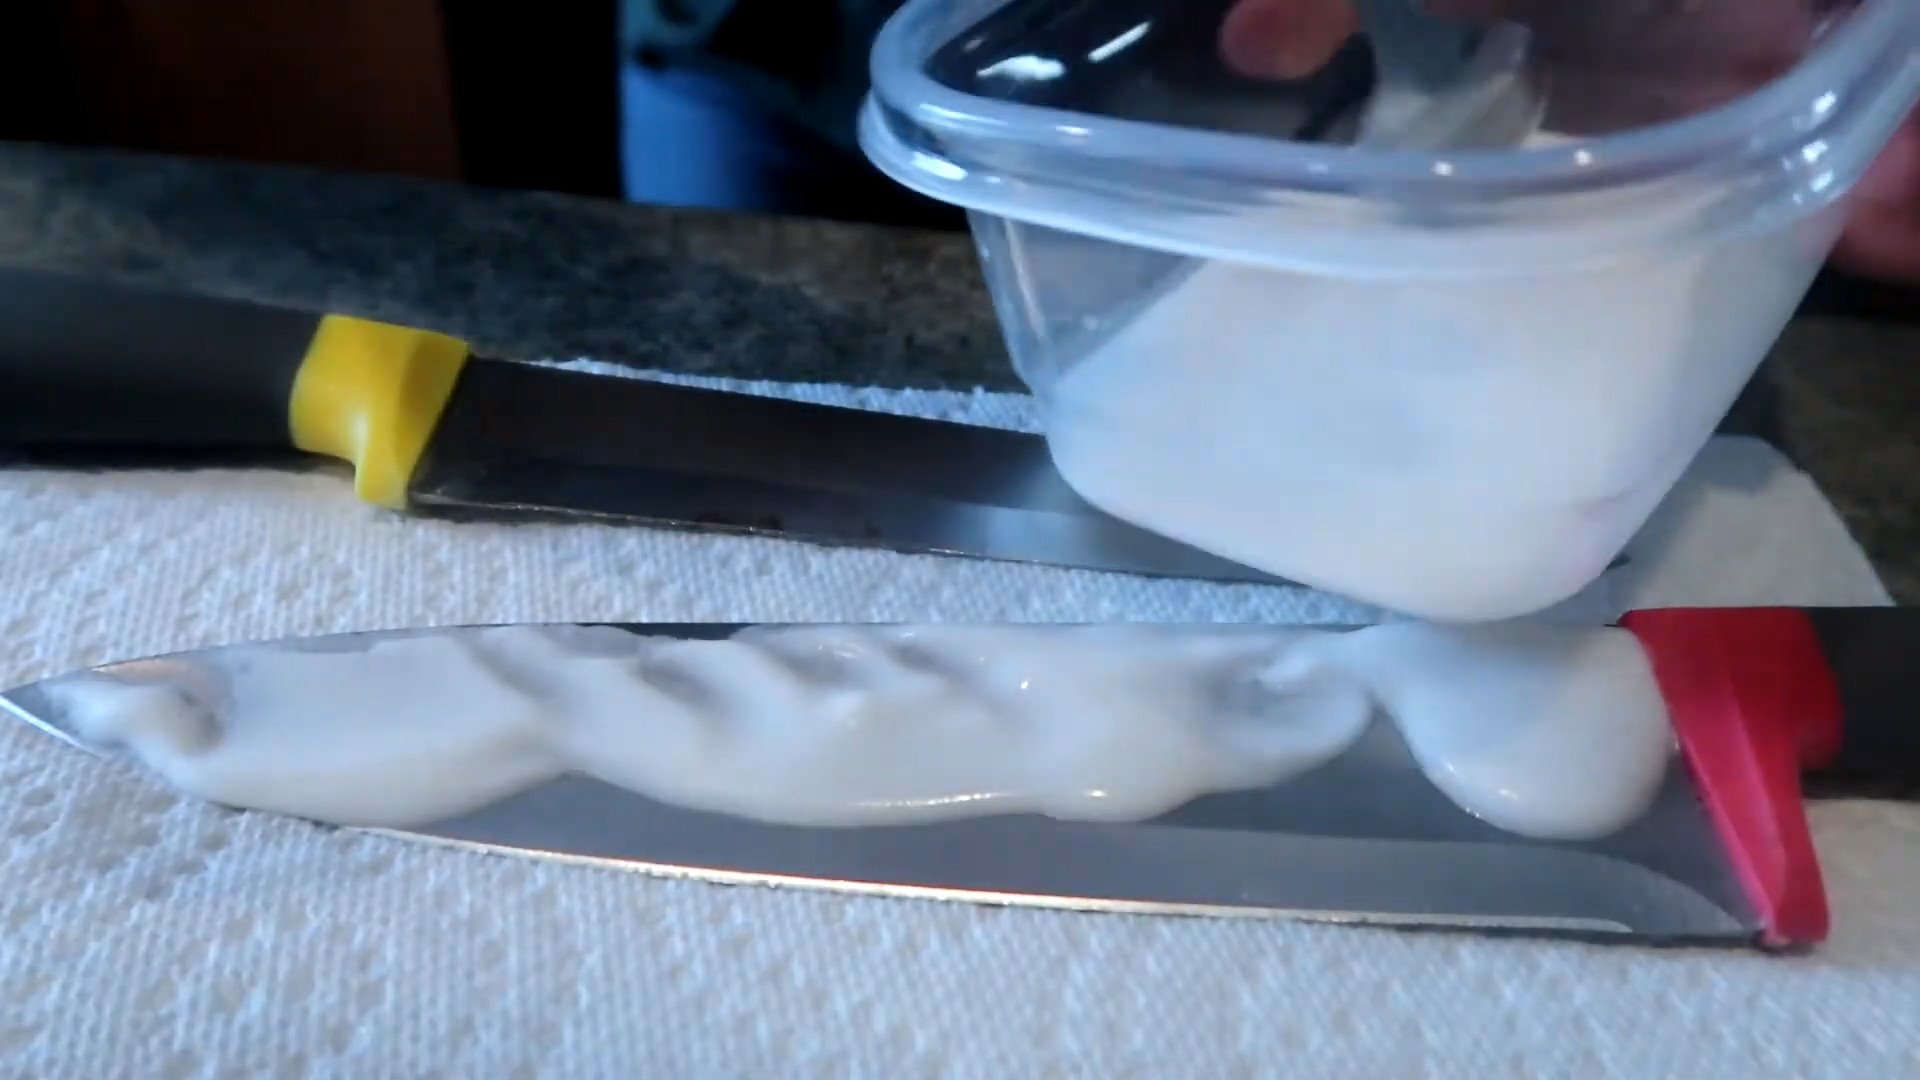
1. Combine Baking Soda and Water: In your mixing bowl, add baking soda and water. Start with a ratio of about 2 parts baking soda to 1 part water.
2. Mix Thoroughly: Stir the mixture until it forms a thick paste. You want a consistency similar to toothpaste. If it’s too runny, add more baking soda. If it’s too thick, add a little more water.
3. Adjust as Needed: The ideal consistency will depend on the surface you’re working on. For vertical surfaces, you’ll want a thicker paste that won’t drip. For flat surfaces, a slightly thinner paste might be easier to apply.
Applying the Baking Soda Paste
Time to put our paste to work!
1. Apply Generously: Using your fingers, a sponge, or a brush, apply a thick layer of the baking soda paste to the rusty areas. Make sure to cover all the rust completely.
2. Let it Sit: This is where the magic happens. Allow the baking soda paste to sit on the rust for at least 30 minutes. For heavier rust, you can let it sit for several hours, or even overnight. The longer it sits, the more time it has to break down the rust.
3. Optional: Enhance with Vinegar or Lemon Juice: For particularly stubborn rust, you can enhance the paste’s effectiveness by adding a splash of vinegar or lemon juice. The acidity will help to further dissolve the rust. Simply drizzle a small amount of vinegar or lemon juice over the paste after you’ve applied it.
Scrubbing Away the Rust
Now for the elbow grease!
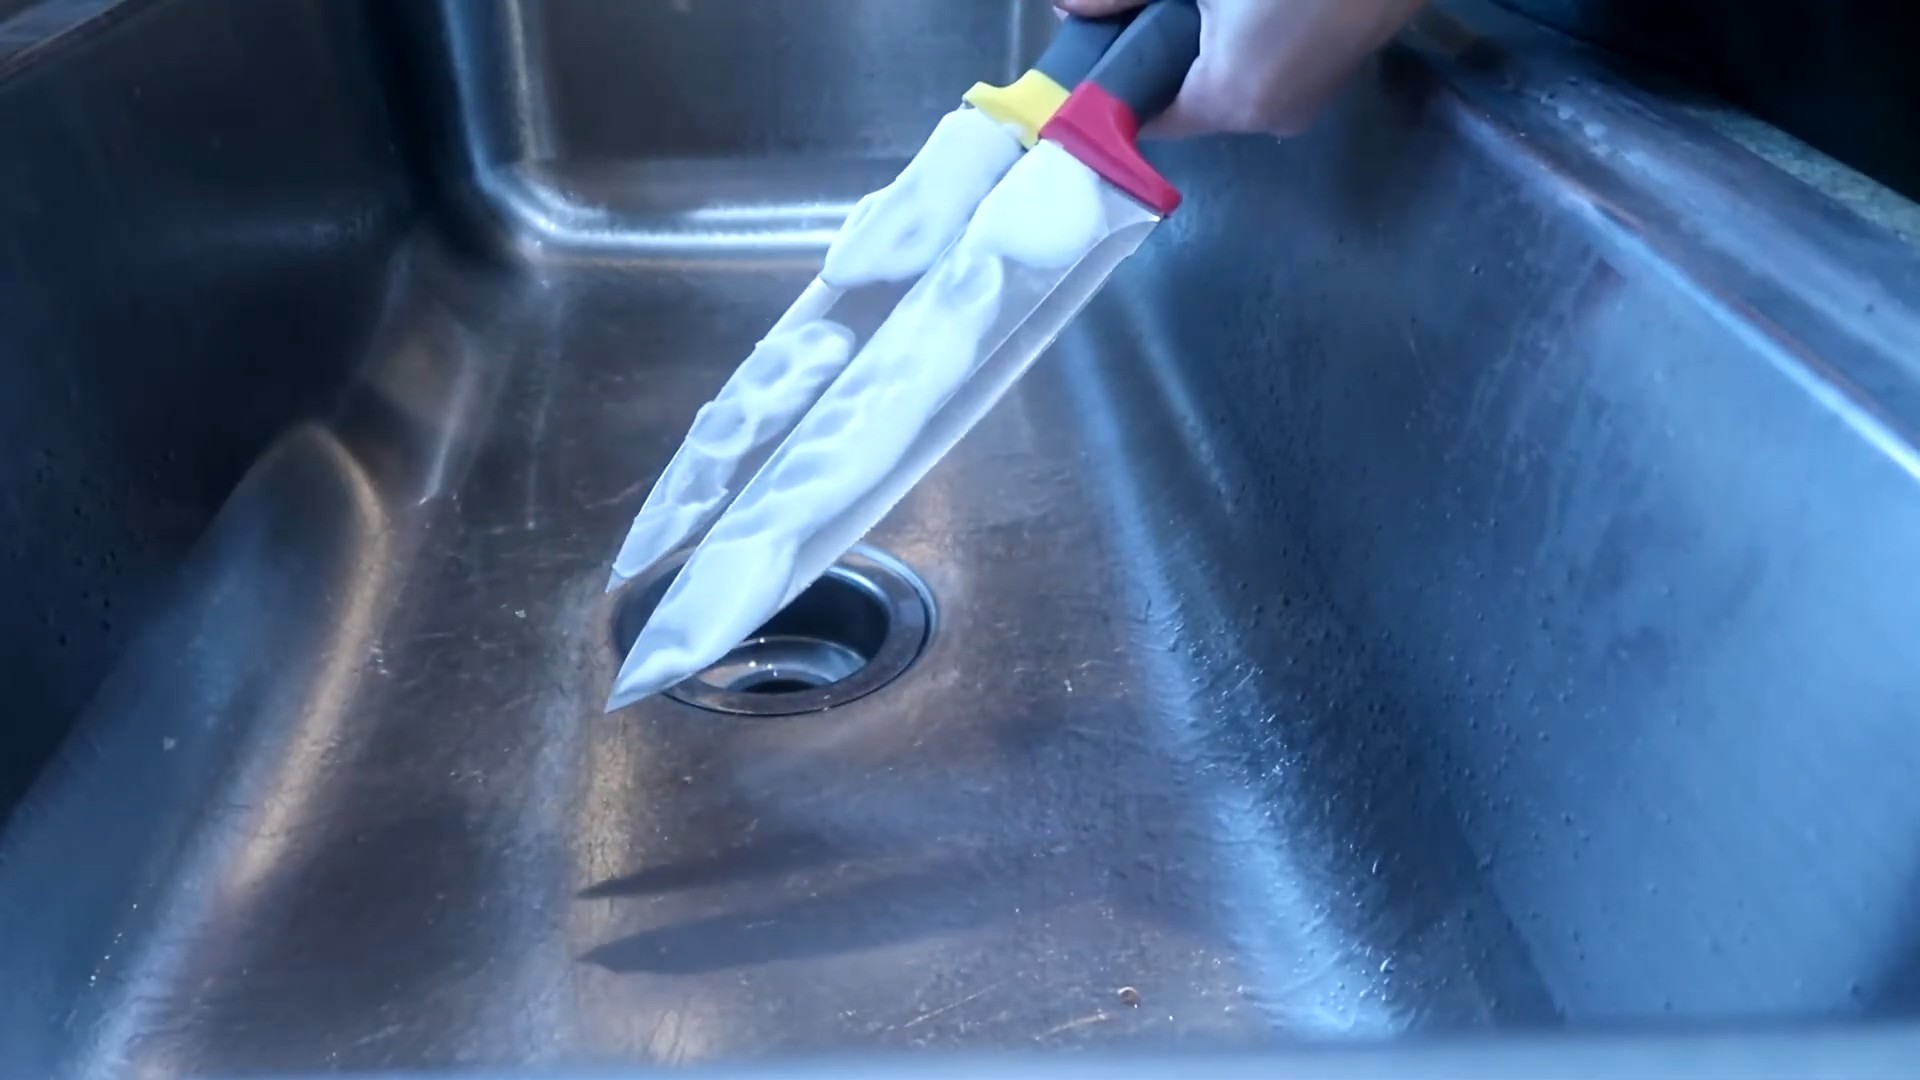
1. Grab Your Wire Brush: Put on your gloves and safety glasses. It’s time to scrub!
2. Scrub Vigorously: Using your wire brush, scrub the rusty areas with firm, even strokes. Apply enough pressure to remove the rust, but be careful not to damage the underlying metal.
3. Rinse and Repeat: As you scrub, you’ll see the rust start to loosen and flake off. Rinse the area with water to remove the loosened rust and baking soda paste. If the rust is particularly stubborn, you may need to repeat the application and scrubbing process.
4. Use a Scrubbing Pad for Delicate Surfaces: If you’re working on a delicate surface, such as chrome or painted metal, use a scrubbing pad or sponge instead of a wire brush. This will help to prevent scratches.
Final Touches and Protection
We’ve removed the rust, but our job isn’t quite finished. We need to protect the surface from future rust.
1. Rinse Thoroughly: Make sure to rinse the item thoroughly with water to remove all traces of baking soda paste. Any remaining baking soda can attract moisture and potentially lead to more rust.
2. Dry Completely: Use a clean rag or towel to dry the item completely. Moisture is the enemy of metal, so it’s crucial to remove all traces of water.
3. Inspect for Remaining Rust: Take a close look at the item to make sure you’ve removed all the rust. If you spot any remaining rust, repeat the application and scrubbing process.
4. Apply Rust Converter/Primer (Optional): For added protection, you can apply a rust converter or primer to the surface. Rust converters chemically convert any remaining rust into a stable compound, while primers provide a protective barrier against moisture. Follow the manufacturer’s instructions for application.
5. Apply Protective Coating (Optional): To further protect the surface, you can apply a protective coating such as paint, oil, or wax. Paint provides a durable and long-lasting barrier against moisture. Oil and wax create a water-repellent layer that helps to prevent rust. Choose a coating that is appropriate for the type of metal and the intended use of the item. For example, you might use a rust-inhibiting paint for outdoor furniture or a light coat of oil for tools.
Dealing with Stubborn Rust
Sometimes, rust is just plain stubborn. If you’re having trouble removing rust with baking soda alone, here are a few tips and tricks:
* Soak in Vinegar: For small items, you can soak them in vinegar for several hours or even overnight. The acidity of the vinegar will help to dissolve the rust. After soaking, scrub the item with a wire brush.
* Use a Rust Remover: If all else fails, you can try using a commercial rust remover. These products contain stronger chemicals that are designed to dissolve rust quickly and effectively. Be sure to follow the manufacturer’s instructions carefully and wear appropriate safety gear.
* Electrolysis: For very heavily rusted items, you can try using electrolysis. This process uses an electric current to remove rust. It’s a more complex method, but it can be very effective.
Safety Precautions
While baking soda is a relatively safe cleaning agent, it’s still important to take a few safety precautions:
* Wear Gloves: Protect your hands from the rust and cleaning agents by wearing gloves.
* Wear Safety Glasses: Protect your eyes from flying rust particles by wearing safety glasses.
* Work in a Well-Ventilated Area: If you’re using vinegar or a commercial rust remover, work in a well-ventilated area to avoid inhaling the fumes.
* Keep Out of Reach of Children and Pets: Store baking soda and other cleaning agents out of reach of children and pets.
Maintaining Your Rust-Free Items
Now that you’ve removed the rust, it’s important to take steps to prevent it from coming back. Here are a few tips:
* Keep Items Dry: Moisture is the main cause of rust, so keep your items as dry as possible. Store them in a dry place, and wipe them down after use.
* Apply a Protective Coating: As mentioned earlier, applying a protective coating such as paint, oil, or wax can help to prevent rust.
* Regularly Inspect for Rust: Check your items regularly for signs of rust. If you spot any rust, remove it immediately before it has a chance to spread.
* Use Rust Inhibitors: For items that are prone to rust, you can use rust inhibitors. These
Conclusion
So, there you have it! Baking soda rust removal isn’t just a clever hack; it’s a game-changer for anyone battling the relentless advance of rust. We’ve explored the simplicity, affordability, and effectiveness of this DIY method, and hopefully, you’re convinced it’s worth a try. Forget harsh chemicals and expensive rust removers – baking soda offers a gentle yet powerful solution that’s readily available in most homes.
The beauty of this method lies in its versatility. While we’ve focused on a general paste application, don’t be afraid to experiment. For heavily rusted items, consider letting the baking soda paste sit overnight for maximum impact. You can also enhance the cleaning power by adding a squeeze of lemon juice or white vinegar to the paste. The acidity will help break down the rust even further. Remember to always test a small, inconspicuous area first to ensure the mixture doesn’t damage the underlying material.
Beyond tools and household items, this baking soda rust removal technique can be adapted for various surfaces. Try it on chrome fixtures in your bathroom, metal garden furniture, or even small automotive parts. Just be mindful of the material you’re working with and adjust the consistency of the paste accordingly. For delicate surfaces, use a softer brush or cloth to avoid scratching.
We understand that every rust situation is unique, and results may vary depending on the severity of the corrosion and the type of metal involved. However, the overwhelming consensus is that baking soda rust removal is a reliable and effective first line of defense against rust.
But don’t just take our word for it! We wholeheartedly encourage you to give this DIY trick a try. Whether you’re restoring a cherished antique, reviving a rusty tool, or simply trying to keep your belongings in tip-top shape, baking soda can be your secret weapon.
Once you’ve experienced the magic of baking soda rust removal, we’d love to hear about your results. Share your before-and-after photos, tips, and variations in the comments below. Your experiences can help others discover the power of this simple yet effective solution and build a community of rust-busting enthusiasts. Let’s work together to keep rust at bay, one baking soda paste at a time!
Frequently Asked Questions (FAQs)
What types of metal can I use baking soda rust removal on?
Baking soda is generally safe for use on a wide variety of metals, including iron, steel, chrome, stainless steel, and even some types of aluminum. However, it’s always a good idea to test the paste on a small, inconspicuous area first, especially if you’re working with delicate or antique items. Avoid using baking soda on metals that are known to react negatively to alkaline substances, such as certain types of bronze or copper alloys. If you’re unsure, consult a professional before proceeding.
How long should I leave the baking soda paste on the rust?
The amount of time you leave the baking soda paste on the rust will depend on the severity of the corrosion. For light rust, 30 minutes to an hour may be sufficient. For heavier rust, you may need to leave the paste on for several hours, or even overnight. Check the paste periodically to see if it’s drying out. If it is, you can lightly dampen it with water to keep it active. Remember to always test a small area first to ensure the paste doesn’t damage the underlying metal.
What kind of brush or cloth should I use to scrub the rust off?
The type of brush or cloth you use will depend on the type of metal you’re working with and the severity of the rust. For most surfaces, a stiff-bristled brush or a scouring pad will work well. However, for delicate surfaces, such as chrome or polished metal, you’ll want to use a softer brush or a microfiber cloth to avoid scratching. You can also use an old toothbrush for hard-to-reach areas. Always scrub gently and avoid applying too much pressure, as this can damage the metal.
Can I add other ingredients to the baking soda paste to make it more effective?
Yes, you can definitely add other ingredients to the baking soda paste to boost its rust-removing power. A popular addition is lemon juice or white vinegar. The acidity in these ingredients helps to break down the rust more effectively. Simply add a small amount of lemon juice or vinegar to the baking soda paste until you achieve a smooth, creamy consistency. Another option is to add a few drops of dish soap to help loosen the rust and grime. Experiment with different combinations to find what works best for your specific situation.
Is baking soda rust removal safe for the environment?
Yes, baking soda is a natural and environmentally friendly cleaning agent. It’s non-toxic, biodegradable, and doesn’t contain any harsh chemicals that can harm the environment. This makes it a much safer alternative to many commercial rust removers, which often contain harmful chemicals that can pollute the air and water. When you’re finished using the baking soda paste, you can simply rinse it down the drain with water.
What should I do after removing the rust with baking soda?
After removing the rust with baking soda, it’s important to thoroughly rinse the metal with water to remove any remaining residue. Then, dry the metal completely with a clean cloth. To prevent future rust, you can apply a protective coating, such as a rust inhibitor, paint, or oil. This will help to seal the metal and protect it from moisture and oxygen, which are the main causes of rust. Regularly inspect the metal for any signs of rust and reapply the protective coating as needed.
Can I use baking soda rust removal on large items, like cars?
While baking soda can be used on cars, it’s important to proceed with caution. For small areas of rust, you can apply the baking soda paste as described above. However, for larger areas, it’s best to consult a professional auto detailer. Baking soda can be abrasive, and if used improperly, it can damage the car’s paint. Always test a small, inconspicuous area first and avoid scrubbing too hard. Consider using a clay bar or a specialized rust remover for larger areas of rust on your car.
How often should I repeat the baking soda rust removal process?
The frequency with which you need to repeat the baking soda rust removal process will depend on the environment and how well you protect the metal from future rust. If the metal is exposed to moisture, humidity, or salt, you may need to repeat the process more frequently. Regularly inspect the metal for any signs of rust and reapply the baking soda paste as needed. By taking preventative measures, such as applying a protective coating and keeping the metal dry, you can minimize the need for frequent rust removal.

Leave a Comment