

Balcony Bell Pepper Garden: Dreaming of fresh, crisp bell peppers right at your fingertips? You’re not alone! For centuries, humans have cultivated gardens in even the most unlikely of spaces, from ancient rooftop gardens in Babylon to modern-day urban farms. There’s something incredibly satisfying about growing your own food, and a balcony bell pepper garden is the perfect way to bring that joy to your own home, no matter how small your outdoor space might be.
But let’s be honest, starting a garden can feel overwhelming. Where do you even begin? That’s where this DIY guide comes in! I’m going to share my favorite tricks and hacks for creating a thriving balcony bell pepper garden, even if you’re a complete beginner. We’ll cover everything from choosing the right containers and soil to pest control and harvesting.
Why bell peppers, you ask? Well, they’re not only delicious and versatile in the kitchen, but they’re also relatively easy to grow in containers. Plus, imagine the satisfaction of adding your own homegrown peppers to your favorite dishes! This guide will empower you to create a beautiful and productive balcony garden, providing you with fresh, healthy produce and a rewarding connection to nature. So, grab your gardening gloves, and let’s get started!
Creating Your Own Bountiful Balcony Bell Pepper Garden
Hey there, fellow gardening enthusiasts! I’m so excited to share my experience with creating a thriving bell pepper garden right on my balcony. It’s easier than you might think, and the reward of fresh, homegrown peppers is absolutely worth it. Let’s dive in!
What You’ll Need: The Essential Supplies
Before we get our hands dirty, let’s gather everything we need. This will make the whole process smoother and more enjoyable.
* Bell Pepper Seeds or Seedlings: You can start from seeds (which is more budget-friendly but takes longer) or buy seedlings from a local nursery (for a quicker harvest). I personally love starting from seeds, it feels more rewarding! Choose varieties that are compact and well-suited for container gardening, like ‘Patio Bell’ or ‘Mini Bell’.
* Containers: Opt for pots that are at least 12 inches in diameter and depth. Bell peppers need room for their roots to grow. I prefer using fabric pots because they allow for better drainage and aeration.
* Potting Mix: Don’t use garden soil! It’s too heavy and doesn’t drain well in containers. Choose a high-quality potting mix specifically formulated for vegetables. I usually go for a mix that contains peat moss, perlite, and vermiculite.
* Fertilizer: Bell peppers are heavy feeders, so you’ll need to fertilize them regularly. A balanced fertilizer (like 10-10-10) or one specifically formulated for tomatoes and peppers will work great. I also like to supplement with compost tea every few weeks.
* Watering Can or Hose: Essential for keeping your peppers hydrated. A watering can with a gentle rose head is ideal for avoiding soil erosion.
* Trowel or Small Shovel: For transplanting seedlings or moving soil.
* Plant Markers: To label your different pepper varieties (if you’re growing more than one). Trust me, you’ll forget which is which otherwise!
* Optional: Stakes or Cages: Some bell pepper varieties can get quite tall and may need support to prevent them from toppling over.
* Optional: Gardening Gloves: To keep your hands clean and protected.
Starting from Seeds: A Patient Gardener’s Approach
If you’re starting from seeds, you’ll need to start them indoors about 6-8 weeks before the last expected frost.
1. Prepare Your Seed Starting Tray: Fill a seed starting tray or small pots with seed starting mix. This mix is finer and lighter than regular potting mix, making it easier for delicate seedlings to emerge.
2. Sow the Seeds: Make a small indentation (about 1/4 inch deep) in the soil and place 2-3 seeds in each indentation. Cover lightly with soil.
3. Water Gently: Water the soil gently using a spray bottle or a watering can with a fine rose head. The soil should be moist but not soggy.
4. Provide Warmth and Light: Cover the tray with a clear plastic dome or plastic wrap to create a humid environment. Place the tray in a warm location (around 70-75°F) or use a heat mat. Once the seeds germinate, remove the cover and place the tray under a grow light or in a sunny window.
5. Thin the Seedlings: Once the seedlings have their first true leaves (the second set of leaves), thin them out by snipping off the weaker seedlings at the soil line. Leave only one strong seedling per cell or pot.
6. Harden Off the Seedlings: Before transplanting the seedlings outdoors, you’ll need to harden them off. This means gradually exposing them to outdoor conditions over a period of 1-2 weeks. Start by placing them outdoors in a sheltered location for a few hours each day, gradually increasing the amount of time they spend outdoors.
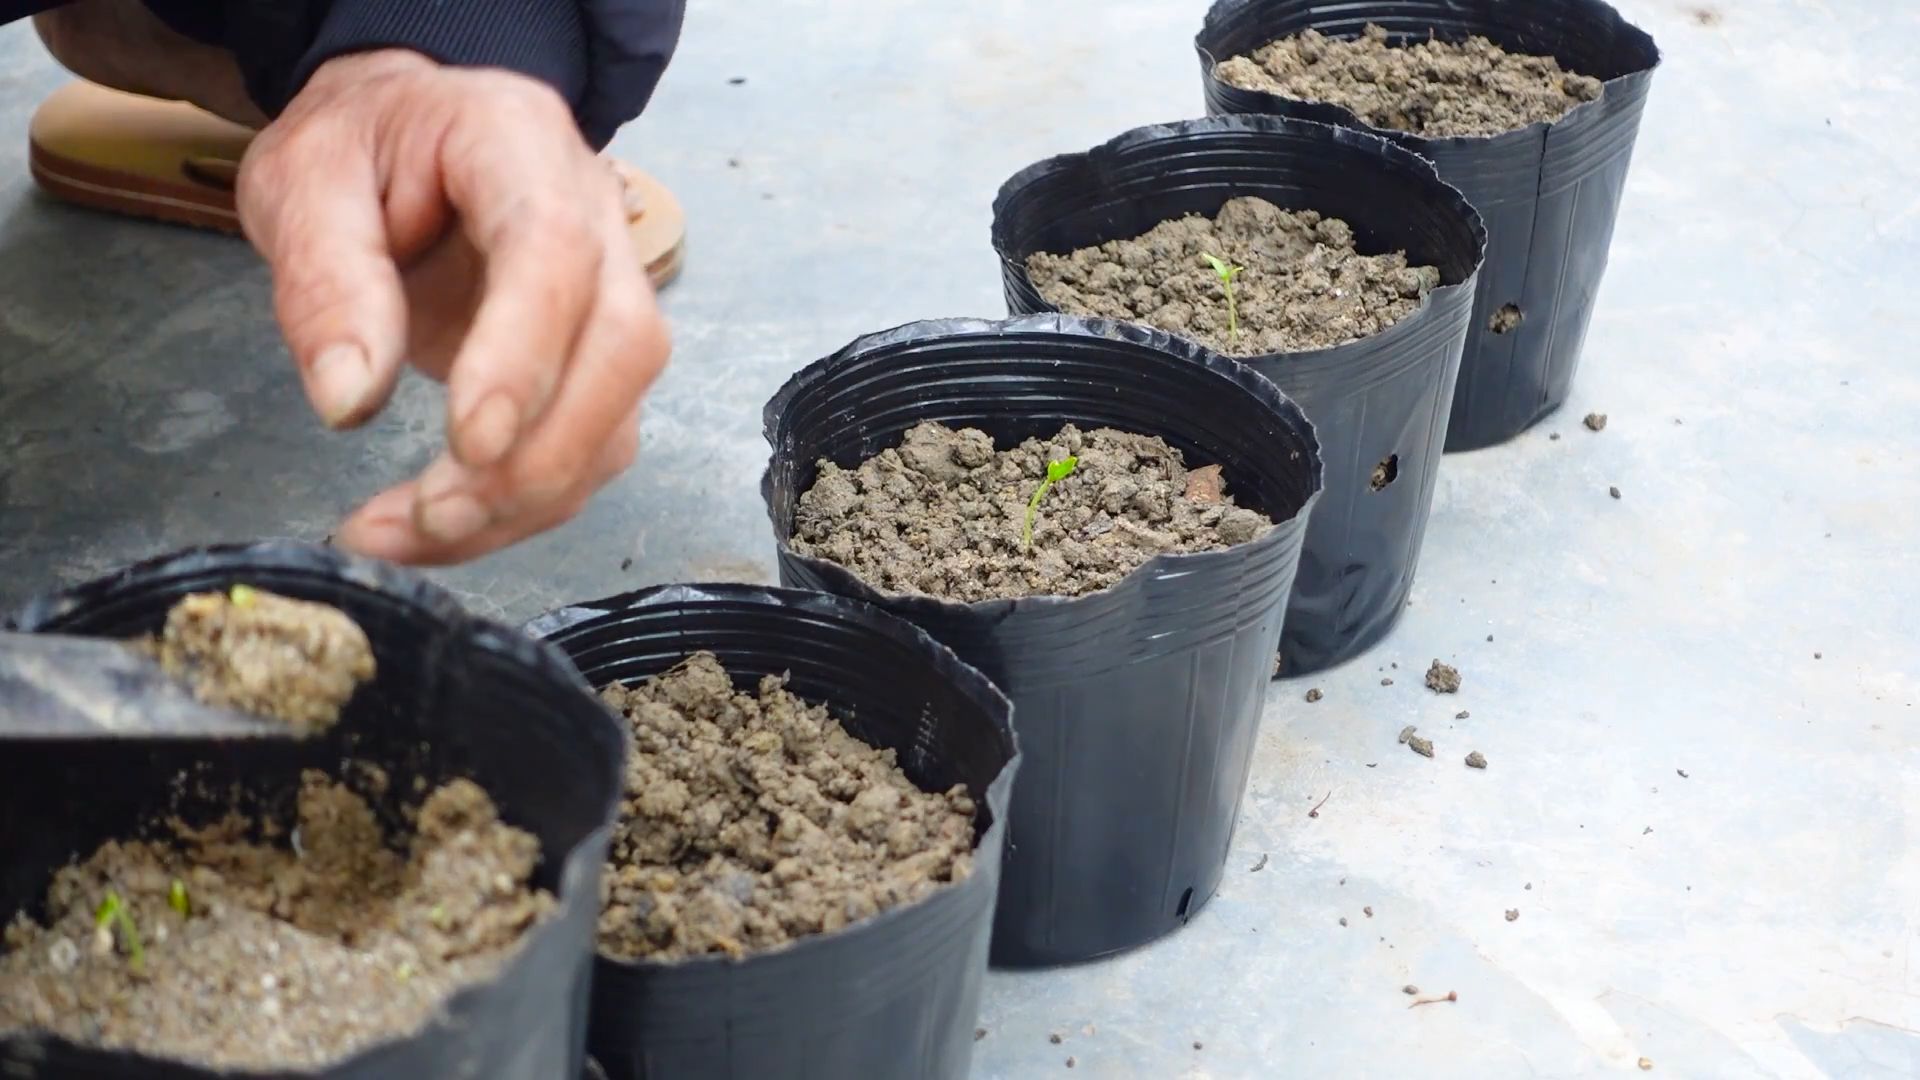
Transplanting Seedlings: Giving Them a New Home
Whether you started from seeds or bought seedlings, transplanting them into their final containers is a crucial step.
1. Prepare the Containers: Fill the containers with potting mix, leaving a few inches of space at the top.
2. Dig a Hole: Dig a hole in the center of each container that is large enough to accommodate the root ball of the seedling.
3. Gently Remove the Seedling: Carefully remove the seedling from its original container, being careful not to damage the roots. If the seedling is root-bound (the roots are tightly circling the pot), gently loosen the roots before planting.
4. Place the Seedling in the Hole: Place the seedling in the hole and backfill with potting mix. Gently firm the soil around the base of the plant.
5. Water Thoroughly: Water the newly transplanted seedlings thoroughly.
6. Add Support (Optional): If you’re growing a tall variety, insert a stake or cage into the container to provide support.
Caring for Your Bell Pepper Plants: Nurturing Your Garden
Now that your bell pepper plants are in their new homes, it’s time to provide them with the care they need to thrive.
1. Watering: Bell peppers need consistent moisture, but they don’t like to be waterlogged. Water deeply when the top inch of soil feels dry to the touch. Avoid overhead watering, as this can lead to fungal diseases. I usually water in the morning so the foliage has time to dry before nightfall.
2. Fertilizing: As I mentioned before, bell peppers are heavy feeders. Fertilize them every 2-3 weeks with a balanced fertilizer or one specifically formulated for tomatoes and peppers. Follow the instructions on the fertilizer package. I also like to add compost tea to the soil every few weeks to provide extra nutrients.
3. Sunlight: Bell peppers need at least 6-8 hours of sunlight per day. Place your containers in a sunny location on your balcony. If you don’t have enough sunlight, you can supplement with a grow light.
4. Pruning: Pruning isn’t strictly necessary, but it can help to improve air circulation and encourage fruit production. Remove any suckers (small shoots that grow from the base of the plant) and any yellowing or diseased leaves.
5. Pest and Disease Control: Keep an eye out for pests like aphids, whiteflies, and spider mites. You can control these pests with insecticidal soap or neem oil. Fungal diseases can also be a problem, especially in humid conditions. Prevent fungal diseases by providing good air circulation and avoiding overhead watering. If you notice any signs of disease, treat the plants with a fungicide.
6. Pollination: Bell peppers are self-pollinating, but they can benefit from a little help. Gently shake the plants or use a small paintbrush to transfer pollen from one flower to another. This is especially important if you’re growing your peppers indoors or in a sheltered location where there are few pollinators.
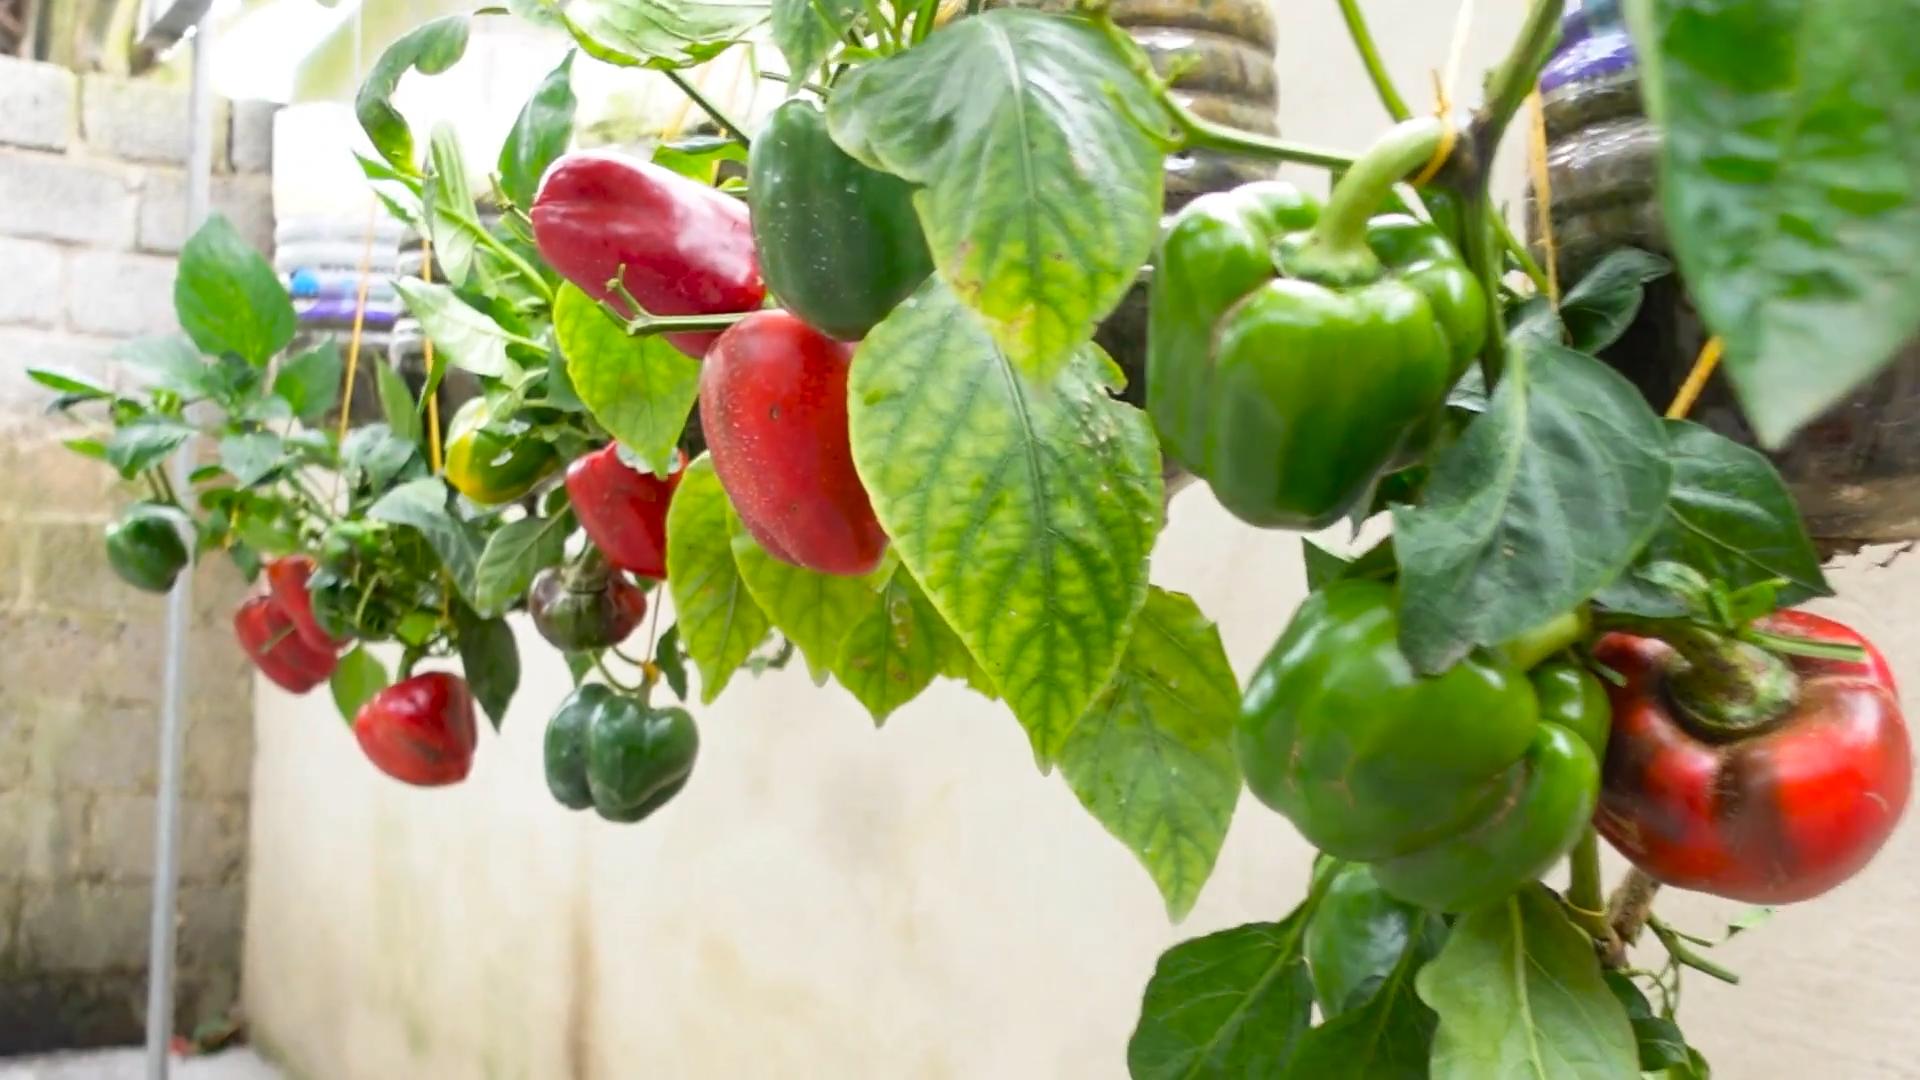
Harvesting Your Bell Peppers: The Sweet Reward
The moment you’ve been waiting for! Harvesting your own homegrown bell peppers is incredibly satisfying.
1. When to Harvest: Bell peppers are typically ready to harvest about 60-80 days after transplanting. The peppers should be firm, glossy, and fully colored. You can harvest them when they are green, yellow, orange, or red, depending on the variety and your preference.
2. How to Harvest: Use a sharp knife or pruning shears to cut the pepper from the plant, leaving a small stem attached.
3. Enjoy Your Harvest: Use your fresh bell peppers in salads, stir-fries, omelets, or any other dish you like. You can also roast them, grill them, or stuff them.
Troubleshooting: Common Problems and Solutions
Even with the best care, you might encounter some problems along the way. Here are a few common issues and how to address them:
* Blossom End Rot: This is a common problem in bell peppers, characterized by a dark, sunken spot on the bottom of the fruit. It’s caused by a calcium deficiency. To prevent blossom end rot, make sure your soil is well-drained and that you’re providing your plants with adequate calcium. You can add calcium to the soil by using bone meal or crushed eggshells.
* Leaf Drop: Leaf drop can be caused by a variety of factors, including overwatering, underwatering, nutrient deficiencies, and temperature stress. Make sure you’re watering your plants properly and fertilizing them regularly. Protect them from extreme temperatures.
* Lack of Fruit: If your bell pepper plants are flowering but not producing fruit, it could be due to a lack of pollination, high temperatures, or nutrient deficiencies. Try hand-pollinating the flowers and make sure your plants are getting enough sunlight and fertilizer.
Extending the Season: Keeping the Harvest Going
If you live in a climate with a short growing season, you can extend the season by starting your seeds indoors early and using row covers or a greenhouse to protect your plants from frost. You can also overwinter your
Conclusion
So, there you have it! Transforming your balcony into a thriving bell pepper garden is not only achievable, but also incredibly rewarding. We’ve walked you through the simple steps, from choosing the right containers and soil to providing the necessary sunlight and nutrients. But why is this DIY project a must-try?
Firstly, imagine stepping onto your balcony and harvesting fresh, vibrant bell peppers whenever you need them. No more trips to the grocery store for subpar produce that lacks flavor. You’ll have access to the freshest, most delicious bell peppers imaginable, grown with your own two hands. The taste difference alone is worth the effort.
Secondly, creating a balcony bell pepper garden is a fantastic way to connect with nature, even in the heart of the city. The act of nurturing plants, watching them grow, and eventually harvesting their fruits is incredibly therapeutic and satisfying. It’s a welcome escape from the stresses of daily life and a chance to reconnect with the natural world.
Thirdly, this project is incredibly versatile. Feel free to experiment with different varieties of bell peppers. Try growing sweet bell peppers like the classic California Wonder or the vibrant yellow and orange varieties. Or, if you’re feeling adventurous, try your hand at growing some mildly spicy peppers like poblano or Anaheim. You can also experiment with different container sizes and arrangements to create a visually appealing and functional garden space. Consider adding companion plants like basil or marigolds to deter pests and attract pollinators.
Furthermore, consider the environmental benefits. Growing your own food reduces your carbon footprint by eliminating the need for transportation and packaging. It also allows you to control the use of pesticides and herbicides, ensuring that your bell peppers are grown in a healthy and sustainable way.
This DIY bell pepper garden is more than just a gardening project; it’s an investment in your health, well-being, and the environment.
We encourage you to take the plunge and create your own balcony bell pepper paradise. Don’t be afraid to experiment, learn from your mistakes, and most importantly, have fun! Once you’ve harvested your first batch of homegrown bell peppers, we’d love to hear about your experience. Share your photos, tips, and tricks in the comments below. Let’s create a community of balcony gardeners and inspire others to grow their own food.
Remember, even a small balcony can become a productive and beautiful garden space. With a little effort and creativity, you can enjoy the taste of fresh, homegrown bell peppers all season long. So, what are you waiting for? Get started today and experience the joy of growing your own food!
Frequently Asked Questions (FAQ)
What is the best time of year to start a balcony bell pepper garden?
The best time to start your balcony bell pepper garden depends on your climate. Bell peppers are warm-season crops and require temperatures between 70°F and 85°F (21°C and 29°C) for optimal growth. In most regions, this means starting your seeds indoors 6-8 weeks before the last expected frost. Once the danger of frost has passed and the soil has warmed up, you can transplant your seedlings into containers on your balcony. If you live in a warmer climate with a longer growing season, you can start your seeds directly in the containers on your balcony after the last frost.
What size containers are best for growing bell peppers on a balcony?
The ideal container size for growing bell peppers on a balcony is at least 5 gallons. This provides enough space for the roots to grow and develop properly. Larger containers, such as 10-gallon pots, are even better, as they provide more room for the roots and help retain moisture. Make sure the containers have drainage holes to prevent waterlogging, which can lead to root rot. You can use plastic pots, terracotta pots, or even repurposed containers like buckets or tubs. Just make sure they are clean and have adequate drainage.
How much sunlight do bell peppers need on a balcony?
Bell peppers need at least 6-8 hours of direct sunlight per day to thrive. Choose a location on your balcony that receives plenty of sunlight throughout the day. If your balcony doesn’t get enough direct sunlight, you can supplement with grow lights. Position the grow lights about 6-12 inches above the plants and keep them on for 12-14 hours per day. Rotate the plants regularly to ensure that all sides receive adequate light.
What type of soil is best for growing bell peppers in containers?
The best type of soil for growing bell peppers in containers is a well-draining potting mix that is rich in organic matter. Avoid using garden soil, as it can be too heavy and compact for containers. Look for a potting mix that contains ingredients like peat moss, perlite, vermiculite, and compost. You can also amend your potting mix with additional compost or aged manure to provide extra nutrients. Make sure the soil is slightly acidic, with a pH between 6.0 and 6.8.
How often should I water my bell pepper plants on a balcony?
Water your bell pepper plants regularly, especially during hot and dry weather. The frequency of watering will depend on the size of the containers, the type of soil, and the weather conditions. Check the soil moisture regularly by sticking your finger about an inch into the soil. If the soil feels dry, it’s time to water. Water deeply, until the water drains out of the drainage holes. Avoid overwatering, as this can lead to root rot.
What type of fertilizer should I use for my balcony bell pepper garden?
Bell peppers are heavy feeders and require regular fertilization to produce a good crop. Use a balanced fertilizer with an NPK ratio of 5-10-10 or 10-10-10. Apply the fertilizer according to the package directions, usually every 2-3 weeks. You can also use organic fertilizers like compost tea or fish emulsion. Avoid using fertilizers that are high in nitrogen, as this can promote leafy growth at the expense of fruit production.
How do I prevent pests and diseases in my balcony bell pepper garden?
To prevent pests and diseases in your balcony bell pepper garden, start by choosing disease-resistant varieties. Inspect your plants regularly for signs of pests or diseases. Common pests that affect bell peppers include aphids, whiteflies, and spider mites. You can control these pests with insecticidal soap or neem oil. Diseases that can affect bell peppers include blossom end rot, fungal leaf spots, and viral diseases. Prevent blossom end rot by providing consistent watering and adding calcium to the soil. Treat fungal leaf spots with a fungicide. Remove and destroy any plants that are infected with viral diseases.
How long does it take for bell peppers to mature on a balcony?
Bell peppers typically take 60-90 days to mature, depending on the variety. The time to maturity is measured from the time of transplanting. Once the peppers have reached their mature size and color, they are ready to harvest. You can harvest bell peppers at any stage of maturity, but they will be sweetest and most flavorful when they are fully ripe.
Can I grow bell peppers in hanging baskets on my balcony?
Yes, you can grow bell peppers in hanging baskets on your balcony, but you will need to choose smaller varieties that are suitable for containers. Look for varieties that are labeled as “compact” or “bush” types. Use a well-draining potting mix and water regularly. Hanging baskets tend to dry out quickly, so you may need to water them more frequently than plants in larger containers.
What are some companion plants for bell peppers in a balcony garden?
Companion planting can help improve the health and productivity of your bell pepper plants. Some good companion plants for bell peppers include basil, marigolds, onions, garlic, and carrots. Basil helps repel pests and attract pollinators. Marigolds also repel pests and add color to your garden. Onions and garlic deter pests and improve the flavor of bell peppers. Carrots help loosen the soil and improve drainage. Avoid planting bell peppers near fennel or brassicas (cabbage, broccoli, cauliflower), as these plants can inhibit their growth.

Leave a Comment