

Clean Window Tracks Easily? Absolutely! Are you tired of looking at those grimy, dust-filled window tracks every time you glance outside? I know I was! It’s amazing how such a small, often overlooked area can detract from the overall cleanliness and beauty of your home. But fear not, because I’m about to share some incredibly simple and effective DIY tricks to get those tracks sparkling in no time.
For generations, keeping a clean and tidy home has been a symbol of pride and well-being. While the methods have evolved, the desire for a fresh and inviting living space remains constant. Think about it – our grandmothers likely used simple, natural ingredients like vinegar and baking soda to tackle household chores. We’re carrying on that tradition, but with a modern twist! These DIY solutions are not only budget-friendly but also environmentally conscious, allowing us to maintain a healthy home without harsh chemicals.
Why is it so important to clean window tracks easily? Beyond the aesthetic appeal, dirty window tracks can actually impact the functionality of your windows. Grime buildup can hinder smooth opening and closing, potentially leading to damage over time. Plus, those dusty tracks can contribute to indoor allergies. So, let’s dive into these easy-to-follow DIY hacks and reclaim those sparkling clean window tracks you deserve! I promise, you’ll be amazed at how simple it is!
Clean Window Tracks Easily: A DIY Guide
Okay, let’s face it, cleaning window tracks is one of those chores we all dread. They’re grimy, dusty, and just plain unpleasant. But fear not! I’m going to show you a super effective and surprisingly easy way to get those tracks sparkling clean. This method uses common household items, so you probably already have everything you need. Get ready to say goodbye to that stubborn dirt and hello to gleaming window tracks!
What You’ll Need
Before we dive in, let’s gather our supplies. Here’s what you’ll need for this window track cleaning adventure:
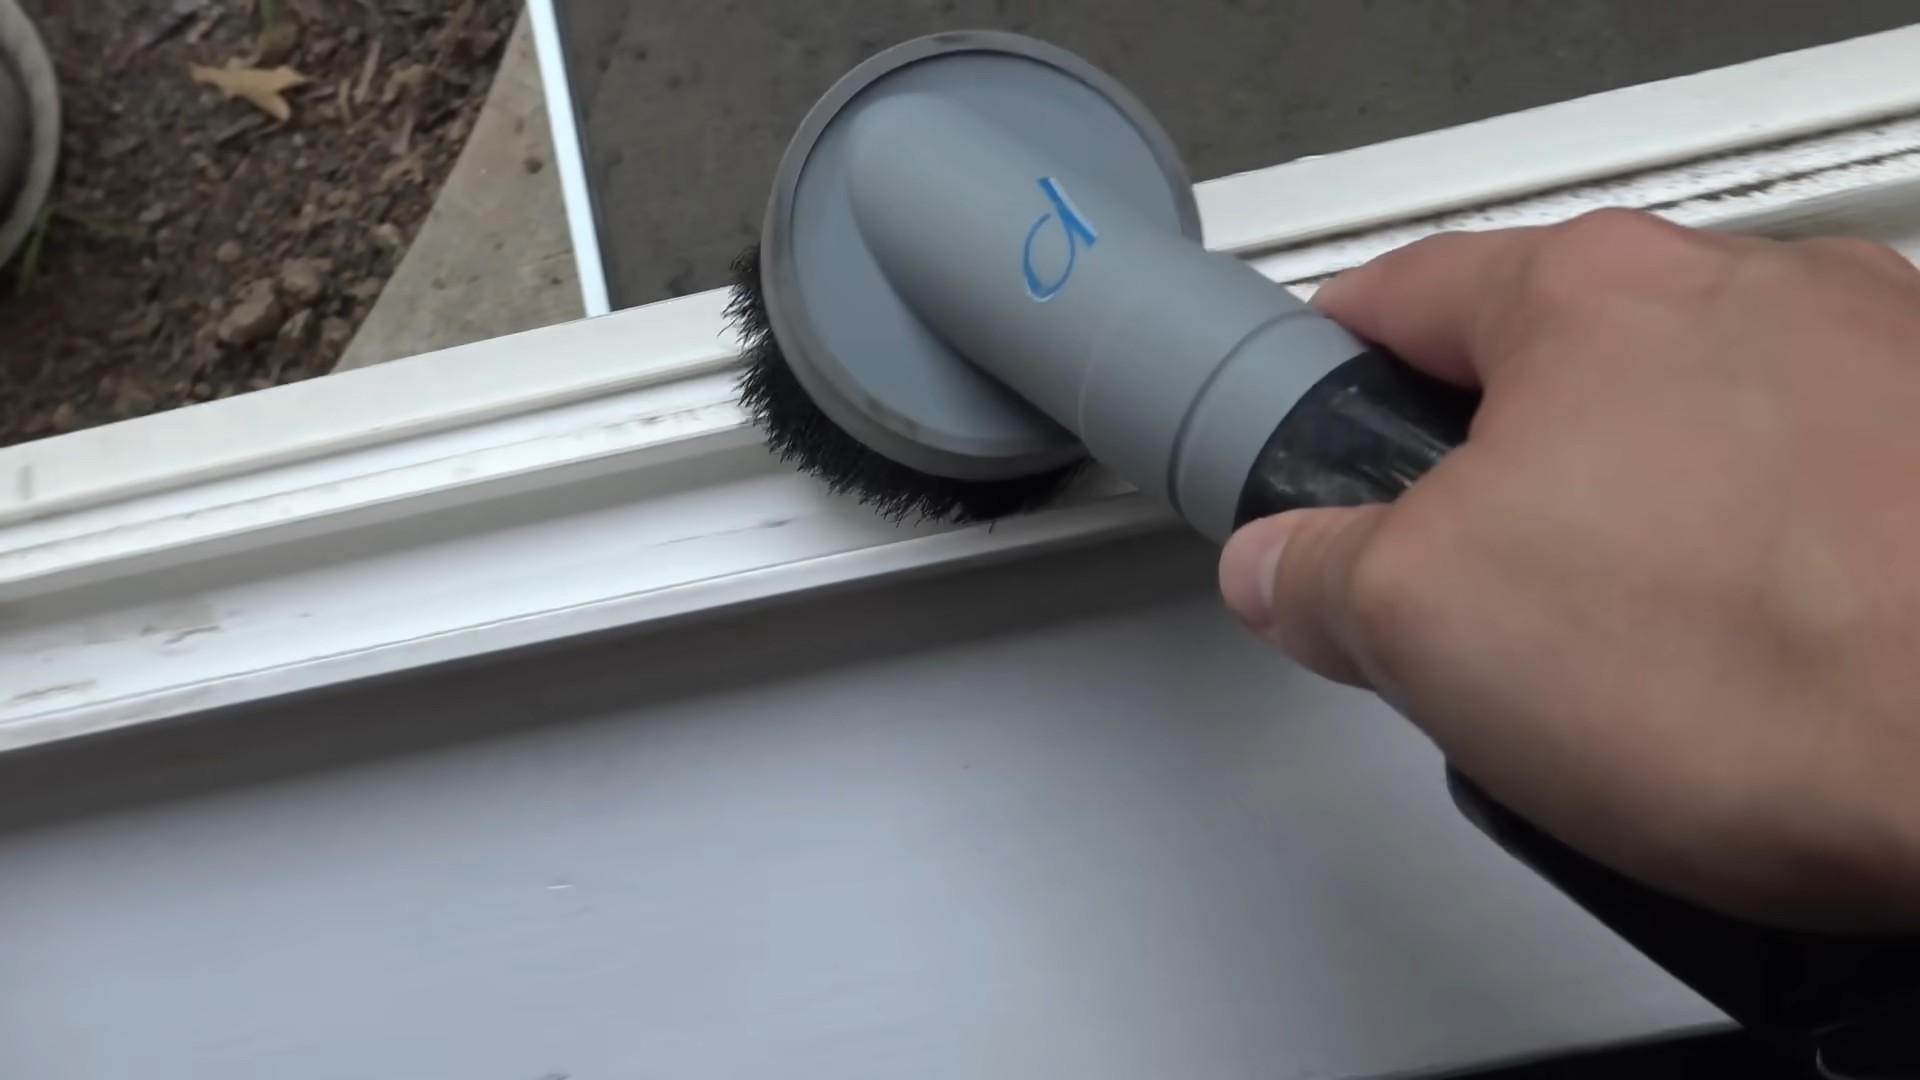
* Vacuum cleaner with a hose attachment: This is crucial for getting rid of loose debris.
* Small brush (old toothbrush or paintbrush): Perfect for scrubbing those hard-to-reach corners.
* Baking soda: Our natural cleaning powerhouse!
* White vinegar: The baking soda’s partner in crime, creating a fizzing action that loosens grime.
* Spray bottle: For easy vinegar application.
* Paper towels or cleaning cloths: For wiping away the mess.
* Cotton swabs: Ideal for cleaning tight spaces and corners.
* Putty knife or flathead screwdriver (optional): For scraping away stubborn buildup (be careful not to scratch the window frame!).
* Dish soap (optional): For extra cleaning power on particularly dirty tracks.
* Water: For rinsing.
* Safety glasses (optional): To protect your eyes from splashes.
Step-by-Step Cleaning Guide
Alright, let’s get down to business! Follow these steps, and you’ll have sparkling clean window tracks in no time.
1. Vacuum the Loose Debris:
* This is the first and most important step. Attach the hose attachment to your vacuum cleaner and thoroughly vacuum the entire window track.
* Pay close attention to the corners and any areas with visible dirt or debris.
* Make sure you get all the loose dirt, dust, and dead bugs out of there. This will make the rest of the cleaning process much easier.
* I like to go over each section a couple of times to make sure I’ve gotten everything.
2. Apply Baking Soda:
* Generously sprinkle baking soda all over the window track. Don’t be shy!
* Make sure you cover all the nooks and crannies.
* The baking soda will act as a mild abrasive and help to loosen the grime.
* I usually let the baking soda sit for a few minutes (around 5-10 minutes) to allow it to work its magic.
3. Spray with Vinegar:
* Fill your spray bottle with white vinegar.
* Carefully spray the vinegar onto the baking soda.
* You’ll notice a fizzing reaction – this is exactly what we want! The fizzing action helps to break down the dirt and grime.
* Spray enough vinegar to saturate the baking soda, but not so much that it overflows.
* Let the mixture fizz for about 5-10 minutes. This gives it time to really loosen the gunk.
4. Scrub with a Brush:
* Grab your small brush (old toothbrush or paintbrush).
* Use the brush to scrub the window track thoroughly.
* Pay special attention to the corners and any areas with stubborn buildup.
* The baking soda and vinegar mixture should have loosened the grime, making it easier to scrub away.
* Don’t be afraid to put some elbow grease into it!
* If you find any particularly stubborn spots, you can try using a putty knife or flathead screwdriver to gently scrape away the buildup. Be very careful not to scratch the window frame. I usually wrap the tip of the screwdriver with a cloth to prevent scratches.
5. Wipe Away the Mess:
* Using paper towels or cleaning cloths, wipe away the baking soda and vinegar mixture.
* You’ll likely need to use several paper towels or cloths to get everything clean.
* Make sure you wipe away all the residue.
* If the tracks are still dirty, repeat steps 2-5.
6. Clean Tight Spaces with Cotton Swabs:
* For those hard-to-reach corners and tight spaces, use cotton swabs.
* Dip the cotton swab in vinegar or water and use it to clean out any remaining dirt or grime.
* This is a great way to get into those tiny crevices that the brush can’t reach.
* I find that using a slightly damp cotton swab works best.
7. Rinse with Water (Optional):
* If you want to ensure that all the baking soda and vinegar residue is gone, you can rinse the window track with water.
* Use a spray bottle filled with water to lightly spray the track.
* Then, wipe away the water with a clean paper towel or cloth.
* This step is optional, but it can help to leave your window tracks feeling extra clean.
8. Dry the Tracks:
* Finally, use a clean, dry paper towel or cloth to dry the window tracks thoroughly.
* This will prevent water spots and help to keep the tracks clean for longer.
* Make sure you get into all the corners and crevices.
* I like to use a dry cotton swab to get into those really tight spots.
Dealing with Extra Stubborn Grime
Sometimes, you’ll encounter window tracks that are just incredibly dirty. If the baking soda and vinegar method isn’t quite cutting it, here are a few extra tips and tricks:
* Dish Soap Power: Add a few drops of dish soap to the baking soda and vinegar mixture for extra cleaning power. The dish soap will help to break down grease and grime.
* Paste Power: Create a paste of baking soda and water. Apply the paste to the stubborn areas and let it sit for a longer period of time (around 30 minutes) before scrubbing.
* Steam Cleaning: If you have a steam cleaner, you can use it to blast away the dirt and grime. Be careful not to use too much steam, as it could damage the window frame.
* Commercial Cleaners: As a last resort, you can use a commercial window track cleaner. Be sure to follow the instructions on the product label carefully. Always test the cleaner in an inconspicuous area first to make sure it doesn’t damage the window frame.
Maintaining Clean Window Tracks
Now that you’ve got your window tracks sparkling clean, you’ll want to keep them that way! Here are a few tips for maintaining clean window tracks:
* Regular Vacuuming: Vacuum the window tracks regularly (at least once a month) to remove loose dirt and debris.
* Wipe Down Regularly: Wipe down the window tracks with a damp cloth every few weeks to prevent buildup.
* Lubricate the Tracks: After cleaning, you can lubricate the window tracks with a silicone-based lubricant. This will help the windows to slide smoothly and prevent dirt from sticking to the tracks.
* Address Problems Quickly: If you notice any dirt or grime buildup, address it quickly before it becomes too difficult to remove.
Safety First!
While this DIY project is relatively safe, it’s always a good idea to take a few precautions:
* Protect Your Eyes: Wear safety glasses to protect your eyes from splashes of vinegar or cleaning solutions.
* Ventilation: Make sure the area is well-ventilated.
* Gloves: Wear gloves to protect your hands from harsh chemicals (especially if you’re using commercial cleaners).
* Test Cleaners: Always test any new cleaning products in an inconspicuous area first to make sure they don’t damage the window frame.
And there you have it! With a little bit of effort and these simple steps, you can easily clean your window tracks and keep them looking their best. Happy cleaning!

Conclusion
So, there you have it! Cleaning window tracks can often feel like a Herculean task, a chore we perpetually put off until the grime becomes unbearable. But with this simple, effective DIY trick, you can transform those neglected crevices from a source of frustration into a point of pride. No more cringing every time you open a window! This method is a game-changer because it utilizes readily available household items, saving you money and avoiding harsh chemicals that can damage your window frames or pose a risk to your health.
The beauty of this DIY approach lies in its adaptability. Feel free to experiment with variations to suit your specific needs and preferences. For instance, if you have particularly stubborn grime, consider letting the baking soda paste sit for a longer period, perhaps even overnight. You could also add a few drops of essential oil, like lemon or tea tree, to the vinegar solution for an extra boost of cleaning power and a pleasant scent. If you don’t have vinegar on hand, a diluted solution of dish soap can work as a substitute, though vinegar’s acidity provides a superior cleaning action. For those hard-to-reach corners, a toothbrush or cotton swabs can be invaluable tools.
Why is this DIY trick a must-try? Because it’s efficient, cost-effective, environmentally friendly, and, most importantly, it works! It tackles the problem at its source, loosening and lifting dirt and debris that traditional cleaning methods often miss. Plus, the satisfaction of seeing those grimy tracks transform into sparkling clean channels is incredibly rewarding.
We wholeheartedly encourage you to give this clean window tracks easily method a try. It’s a small investment of time that yields significant results, improving the overall appearance of your home and allowing you to enjoy fresh air without the visual distraction of dirty window tracks.
But don’t just take our word for it! We’re eager to hear about your experiences. Did you find this trick helpful? Did you discover any variations that worked particularly well for you? Share your tips, tricks, and before-and-after photos in the comments below. Let’s create a community of clean window enthusiasts and help each other conquer this common household challenge. Your feedback will not only inspire others but also help us refine and improve this method for everyone. So, grab your baking soda, vinegar, and a few simple tools, and get ready to transform your window tracks! We can’t wait to see your sparkling results!
Frequently Asked Questions (FAQ)
Q: What kind of baking soda should I use?
A: Regular baking soda, the kind you use for baking, is perfectly fine. There’s no need to buy anything special or expensive. The key is the chemical reaction it creates when combined with vinegar, which helps to loosen the grime.
Q: Can I use this method on all types of window tracks?
A: Yes, this method is generally safe for most types of window tracks, including aluminum, vinyl, and wood. However, it’s always a good idea to test a small, inconspicuous area first, especially if you have older or more delicate window frames. This will ensure that the cleaning solution doesn’t damage the finish. If you’re concerned about wood tracks, avoid prolonged exposure to moisture and dry them thoroughly after cleaning.
Q: What if I don’t have vinegar? What can I use instead?
A: While vinegar is the preferred option due to its acidity and cleaning power, you can substitute it with a diluted solution of dish soap and water. Mix a few drops of dish soap with warm water and use that instead of the vinegar solution. However, keep in mind that the results might not be as dramatic as with vinegar. Lemon juice, diluted with water, can also be used as a substitute for vinegar, offering a similar acidic cleaning action.
Q: How often should I clean my window tracks?
A: The frequency of cleaning depends on several factors, including your location, the amount of dust and pollen in the air, and whether you have pets. As a general guideline, cleaning your window tracks every 3-6 months is a good starting point. However, if you live in a dusty area or have pets that shed a lot, you might need to clean them more frequently. Regular cleaning will prevent the buildup of stubborn grime and make the task easier in the long run.
Q: The grime is really stubborn. What can I do?
A: For particularly stubborn grime, try these tips:
* Let the baking soda paste sit longer: Apply the baking soda paste and let it sit for several hours or even overnight. This will give it more time to loosen the grime.
* Use a stronger cleaning tool: Instead of a cloth, try using a stiff-bristled brush or an old toothbrush to scrub the tracks.
* Repeat the process: If the grime doesn’t come off completely after the first attempt, repeat the process. You might need to apply the baking soda paste and vinegar solution multiple times to fully remove the buildup.
* Use a steam cleaner: For extremely stubborn grime, a steam cleaner can be a powerful tool. The steam will help to loosen the dirt and debris, making it easier to wipe away. Be careful when using a steam cleaner around window seals and frames, as excessive heat can damage them.
Q: How can I prevent grime from building up in my window tracks?
A: Prevention is key! Here are a few tips to help prevent grime buildup:
* Vacuum regularly: Use a vacuum cleaner with a brush attachment to vacuum the window tracks regularly. This will remove loose dirt and debris before it has a chance to accumulate.
* Wipe down the tracks: Wipe down the window tracks with a damp cloth every few weeks to remove any surface dirt.
* Apply a lubricant: After cleaning the tracks, apply a small amount of silicone-based lubricant to the tracks. This will help the windows slide more smoothly and prevent dirt from sticking to the tracks.
* Seal any gaps: Check for any gaps or cracks around the window frames and seal them with caulk. This will prevent dust and debris from entering the tracks.
Q: Is this method safe for pets and children?
A: Yes, this method is generally safe for pets and children, as it uses natural ingredients like baking soda and vinegar. However, it’s always a good idea to keep pets and children away from the area while you’re cleaning. Also, ensure that the area is well-ventilated to avoid any irritation from the vinegar fumes. While baking soda and vinegar are generally safe, ingestion of large amounts can cause stomach upset.
Q: Can I use this method on sliding door tracks as well?
A: Absolutely! This method works equally well on sliding door tracks. The process is the same: apply the baking soda paste, spray with vinegar, scrub, and wipe clean. Sliding door tracks often accumulate even more dirt and debris than window tracks, so this method can be particularly effective for cleaning them.
Q: What if I have mold or mildew in my window tracks?
A: If you have mold or mildew in your window tracks, you’ll need to take extra precautions. First, wear gloves and a mask to protect yourself from the mold spores. Then, mix a solution of bleach and water (1 part bleach to 10 parts water) and apply it to the affected areas. Let it sit for 10-15 minutes, then scrub with a brush and rinse thoroughly with water. Be sure to ventilate the area well while using bleach. After cleaning, dry the tracks completely to prevent the mold from returning. You can also use a mold and mildew remover specifically designed for household use. Always follow the manufacturer’s instructions when using these products.

Leave a Comment