

DIY Bottle Cap Laundry Basket: Imagine transforming something as simple as discarded bottle caps into a functional and stylish laundry basket! It sounds unbelievable, right? But trust me, it’s not only possible, but also incredibly rewarding. For generations, resourceful individuals have found creative ways to repurpose everyday items, turning trash into treasure. This tradition, deeply rooted in cultures worldwide, speaks to our innate desire to conserve resources and express our creativity.
In a world increasingly aware of waste and environmental impact, learning how to create a DIY Bottle Cap Laundry Basket is more relevant than ever. Think about it: mountains of plastic bottle caps end up in landfills every year. By collecting and repurposing them, you’re not just crafting a unique laundry solution; you’re actively participating in a sustainable lifestyle. Plus, let’s be honest, who wouldn’t want a conversation-starting piece that adds a touch of quirky charm to their laundry room? I know I would!
This DIY project isn’t just about aesthetics; it’s about empowerment. It’s about proving that you can create something beautiful and useful from the most unexpected materials. So, are you ready to roll up your sleeves and embark on this exciting upcycling adventure? I’m here to guide you every step of the way, ensuring that you’ll have a stunning, eco-friendly laundry basket to be proud of. Let’s get started!
DIY Bottle Cap Laundry Basket: A Sustainable & Stylish Project
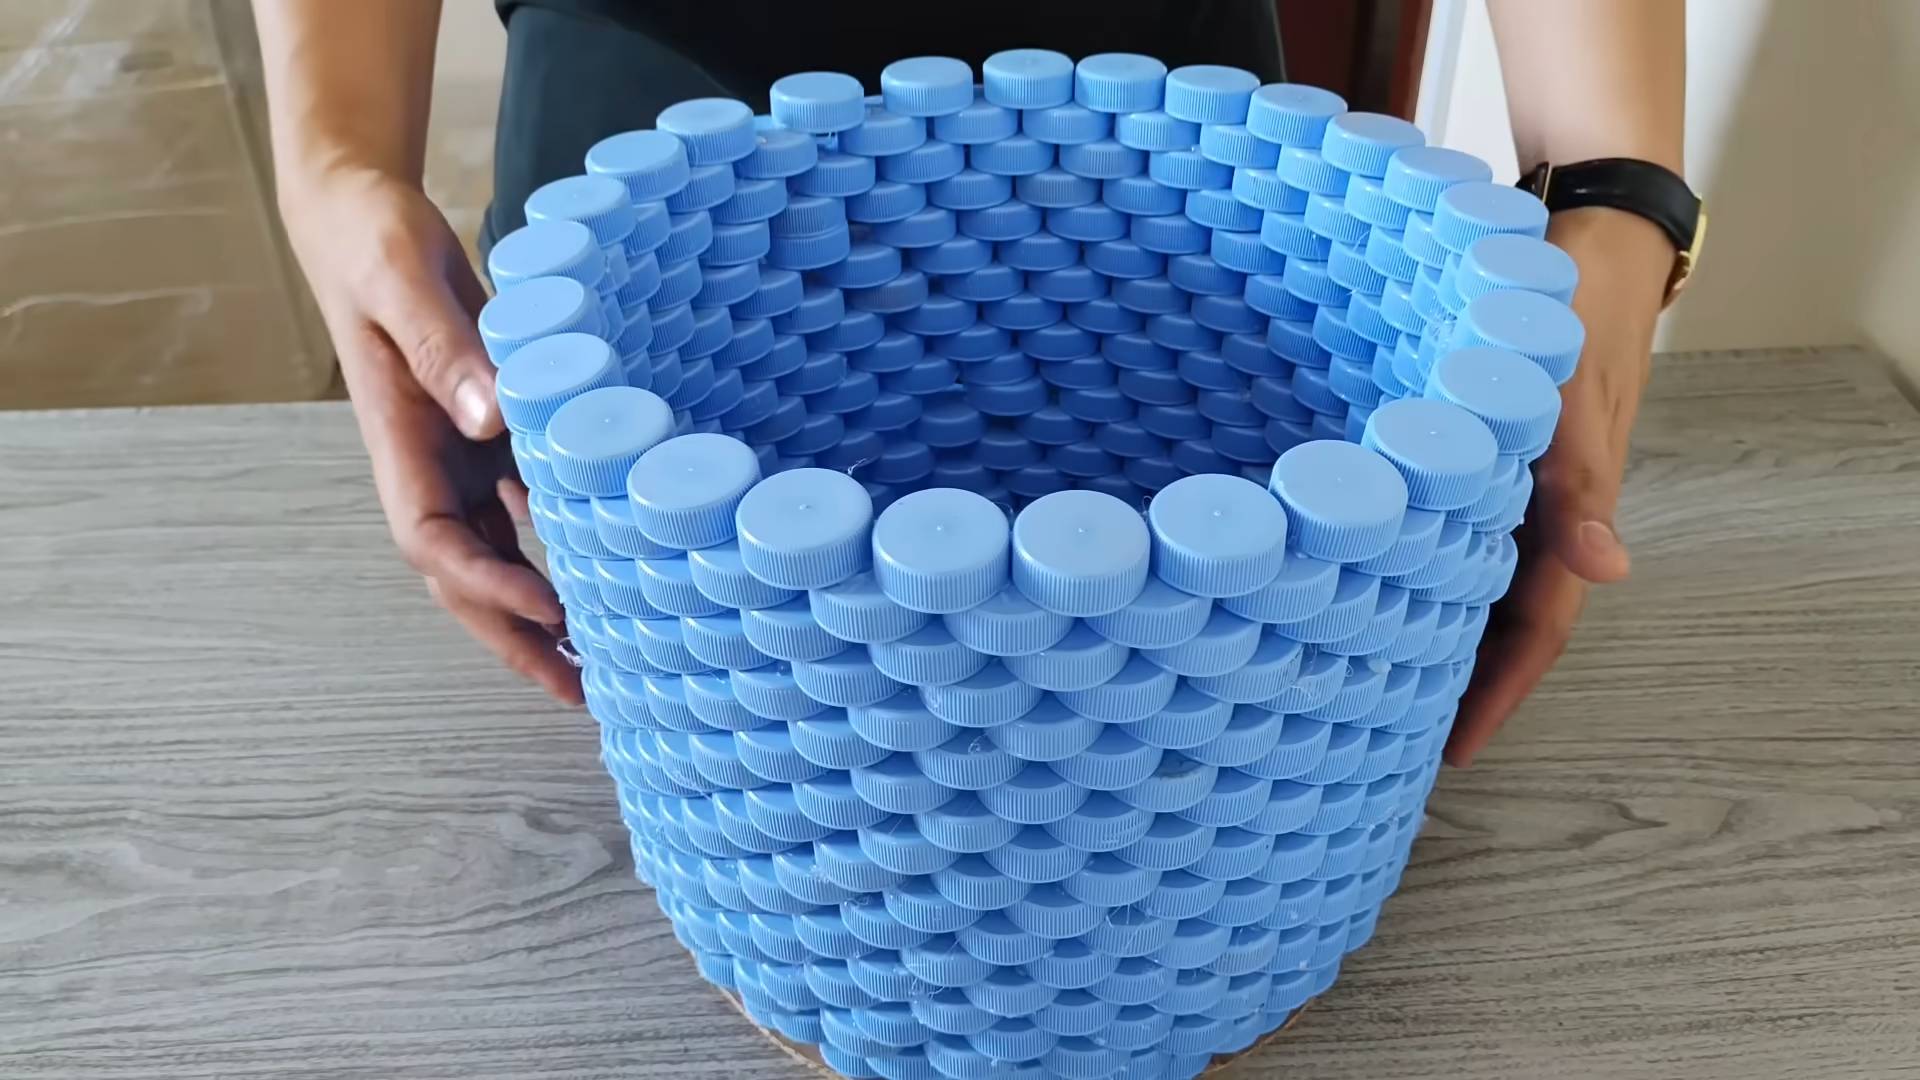
Hey there, fellow DIY enthusiasts! Today, I’m super excited to share a project that’s not only fun and creative but also incredibly eco-friendly: a laundry basket made entirely from bottle caps! Yes, you read that right. We’re turning trash into treasure, one bottle cap at a time. This project takes time and patience, but the result is a unique, durable, and conversation-starting piece that you’ll be proud to display in your home. So, gather your caps, put on some music, and let’s get started!
Materials You’ll Need:
Before we dive in, let’s make sure you have everything you need. This is crucial for a smooth and enjoyable crafting experience.
* A LOT of Bottle Caps: Seriously, a lot. The exact number depends on the size of your desired laundry basket. I’d recommend aiming for at least 1500-2000 caps for a decent-sized basket. Start collecting now, ask friends and family to save theirs, and even check with local bars or restaurants.
* Strong Adhesive: Epoxy resin is my go-to for this project. It provides a super strong and durable bond that can withstand the weight and use of a laundry basket. Make sure to get a clear epoxy resin for a cleaner look. You can also use a high-strength construction adhesive, but epoxy is generally more reliable.
* Gloves: Protect your hands from the adhesive. Trust me, you don’t want epoxy stuck to your skin.
* Mixing Cups and Stir Sticks: For mixing the epoxy resin. Use disposable ones for easy cleanup.
* A Sturdy Base (Optional): You can build the basket directly on the floor, but I prefer using a large piece of plywood or a plastic tray as a base. This makes it easier to move the basket around while you’re working on it.
* Clamps (Optional): Clamps can be helpful for holding sections together while the adhesive dries, especially when building the walls of the basket.
* Measuring Tape or Ruler: For ensuring your basket is the desired size and shape.
* Sandpaper (Optional): If your bottle caps have any sharp edges, you might want to lightly sand them down.
* Safety Glasses: Protect your eyes from splashes of epoxy resin.
* Well-Ventilated Area: Epoxy resin fumes can be strong, so work in a well-ventilated area or wear a respirator.
Preparing the Bottle Caps:
This is arguably the most tedious part, but it’s essential for a good-looking and functional laundry basket.
* Cleaning: Wash all the bottle caps thoroughly with soap and water to remove any dirt, grime, or residue. Let them dry completely before proceeding.
* Sorting (Optional): If you want a specific color pattern or design, sort the bottle caps by color. This will make the construction process much easier.
* Flattening (Optional): Some people prefer to flatten their bottle caps for a smoother surface. You can do this with a hammer and a flat surface, but be careful not to damage the caps. I personally like the slightly rounded look, so I skip this step.
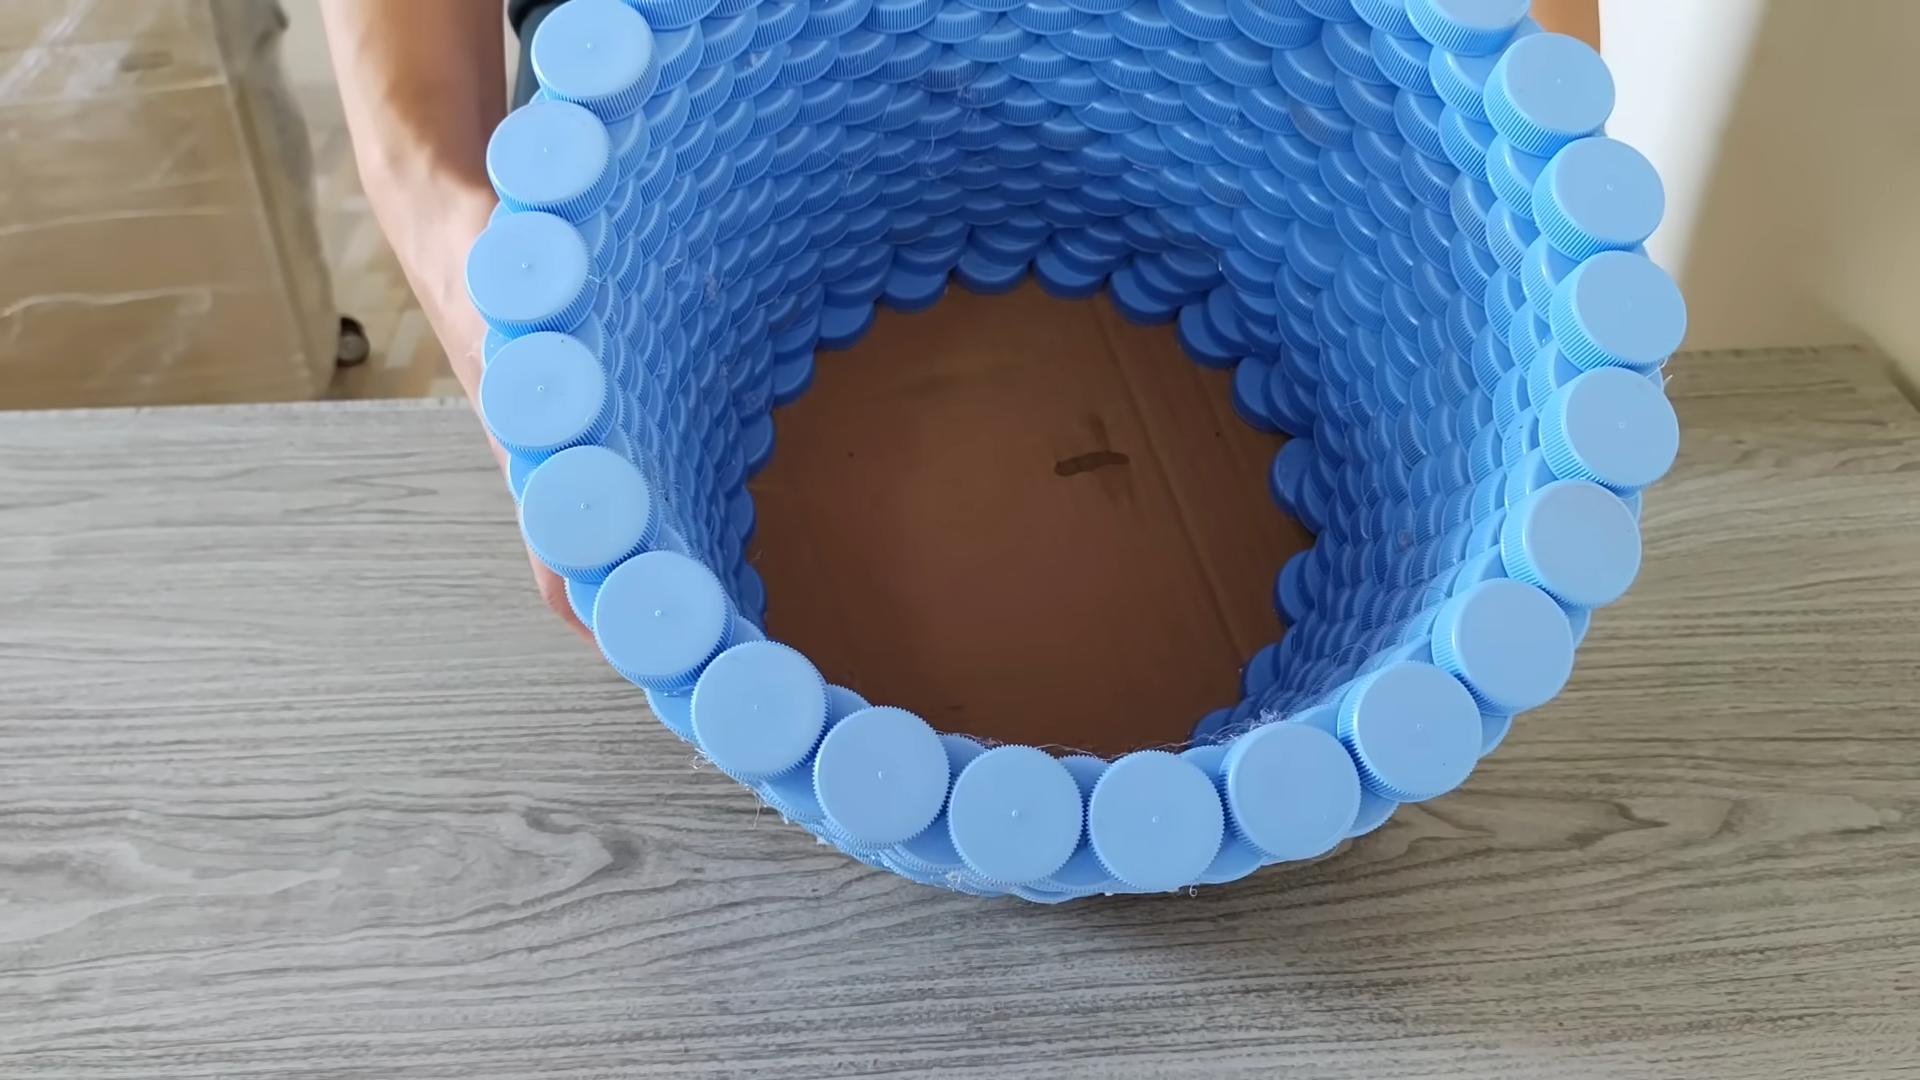
Building the Base:
This is where the magic begins! We’ll start by creating a solid foundation for our laundry basket.
1. Choose Your Shape: Decide on the shape of your laundry basket. A circle, square, or rectangle are the easiest to construct. I’m going with a square for this tutorial.
2. Mark the Outline: If you’re using a base, mark the outline of your desired shape on the plywood or plastic tray. This will serve as a guide for placing the bottle caps.
3. Apply Adhesive: Mix the epoxy resin according to the manufacturer’s instructions. Apply a generous amount of epoxy to the bottom of each bottle cap.
4. Place the Caps: Carefully place the bottle caps within the marked outline, ensuring they are tightly packed together. You can arrange them in any pattern you like. I prefer a random arrangement for a more organic look.
5. Let it Cure: Allow the epoxy to cure completely according to the manufacturer’s instructions. This usually takes 24-48 hours. Make sure the base is on a level surface during the curing process.
Constructing the Walls:
Now for the challenging but rewarding part: building the walls of the laundry basket.
1. First Layer: Once the base is cured, start building the first layer of the walls. Apply epoxy to the bottom of each bottle cap and attach it to the edge of the base, ensuring it’s securely bonded to both the base and the adjacent bottle caps.
2. Maintaining Alignment: Pay close attention to the alignment of the bottle caps. You want the walls to be as straight and even as possible. Use a ruler or measuring tape to check the height and alignment frequently.
3. Using Clamps (Optional): If you’re having trouble keeping the walls straight, use clamps to hold sections together while the epoxy dries. This is especially helpful for the corners.
4. Subsequent Layers: Continue adding layers of bottle caps, one at a time, until you reach your desired height. Remember to apply epoxy generously and ensure each cap is securely bonded to the layer below and the adjacent caps.
5. Staggering the Caps: To create a stronger and more stable wall, stagger the bottle caps in each layer. This means that the seams between the caps in one layer should not line up with the seams in the layer below. This will create a brick-like pattern that distributes the weight more evenly.
6. Patience is Key: This process takes time and patience. Don’t rush it. Work in small sections and allow the epoxy to cure completely between layers. This will prevent the walls from collapsing or becoming uneven.
7. Dealing with Gaps: You’ll inevitably encounter some gaps between the bottle caps. You can fill these gaps with smaller pieces of bottle caps or with epoxy resin. Just make sure to smooth out the epoxy to create a seamless finish.
Adding the Finishing Touches:
Almost there! Now it’s time to add the finishing touches that will make your laundry basket truly shine.
1. Reinforcing the Edges: To reinforce the top edge of the laundry basket, you can add an extra layer of bottle caps or use a strip of wood or metal. This will prevent the edge from fraying or becoming damaged over time.
2. Sanding (Optional): If there are any sharp edges or rough spots, lightly sand them down with sandpaper. This will make the laundry basket more comfortable to handle.
3. Sealing (Optional): To protect the bottle caps and epoxy from moisture and wear, you can apply a sealant. A clear polyurethane sealant is a good choice. Apply several thin coats, allowing each coat to dry completely before applying the next.
4. Cleaning: Once the sealant is dry, clean the laundry basket with a damp cloth to remove any dust or debris.
5. Enjoy Your Creation: Step back and admire your handiwork! You’ve created a unique and sustainable laundry basket that you can be proud of.
Tips and Tricks:
Here are a few extra tips and tricks that I’ve learned along the way:
* Color Coordination: If you’re going for a specific color scheme, collect bottle caps in those colors well in advance.
* Epoxy Safety: Always wear gloves and safety glasses when working with epoxy resin. Work in a well-ventilated area to avoid inhaling the fumes.
* Curing Time: Be patient and allow the epoxy to cure completely before moving on to the next step. This will ensure a strong and durable bond.
* Experiment with Patterns: Don’t be afraid to experiment with different patterns and designs. The possibilities are endless!
* Have Fun!: Most importantly, have fun with the process! This is a creative and rewarding project that you can enjoy for years to come.
This project might seem daunting at first, but trust me, it’s totally doable. Just break it down into smaller steps, be patient, and enjoy the process. And remember, even if it’s not perfect, it’s handmade and unique, and that’s what makes it special. Happy crafting!
Conclusion
So, there you have it! Transforming humble bottle caps into a sturdy and surprisingly stylish laundry basket is more than just a fun craft project; it’s a testament to the power of resourcefulness and creative recycling. We’ve walked you through the steps, highlighting the key techniques for ensuring a durable and aesthetically pleasing result. But why should you dedicate your time and effort to this unique endeavor?
First and foremost, this DIY bottle cap laundry basket is an incredibly effective way to reduce waste. Think about the sheer number of bottle caps that end up in landfills every year. By repurposing them into something functional and beautiful, you’re actively contributing to a more sustainable lifestyle. You’re not just throwing away plastic; you’re giving it a new life and purpose.
Beyond the environmental benefits, this project offers a fantastic opportunity for creative expression. The possibilities for customization are endless. You can sort your bottle caps by color to create intricate patterns, geometric designs, or even mosaic-like images on the sides of your basket. Consider using different colored wires or cords to add visual interest and texture. For a more rustic look, you could even incorporate natural elements like twigs or small branches into the frame.
Furthermore, building this laundry basket is a rewarding hands-on experience. It’s a project that can be enjoyed by individuals of all ages and skill levels. It’s a great way to bond with family members, teach children about recycling, and unleash your inner artist. The satisfaction of creating something useful and beautiful from discarded materials is truly unparalleled.
Don’t be afraid to experiment with different sizes and shapes. While we’ve focused on a standard laundry basket design, you could easily adapt the technique to create smaller storage containers for toys, books, or other household items. You could even make a set of nesting baskets in varying sizes.
Consider adding a fabric lining to your basket for a softer touch and to protect delicate items. You can choose a fabric that complements the colors of your bottle caps or opt for a contrasting pattern for a pop of visual interest.
Finally, remember that patience is key. This project requires time and dedication, but the end result is well worth the effort. You’ll have a unique, eco-friendly, and conversation-starting laundry basket that you can be proud of.
We strongly encourage you to give this DIY bottle cap laundry basket a try. Gather your bottle caps, gather your tools, and let your creativity flow. And most importantly, don’t forget to share your creations with us! We’d love to see your unique designs and hear about your experiences. Post photos of your finished baskets on social media using #BottleCapBasketDIY and tag us so we can admire your handiwork and share it with the world. Let’s inspire others to embrace sustainable crafting and transform waste into wonder!
Frequently Asked Questions
How many bottle caps do I need to make a laundry basket?
The number of bottle caps required will depend on the size of the laundry basket you intend to create. A standard-sized laundry basket typically requires several hundred bottle caps, potentially ranging from 500 to 1000 or even more. It’s best to start collecting well in advance and estimate based on the dimensions you have in mind. As you build, you’ll get a better sense of how many more you need. Remember, it’s always better to have more than you need, as you can always use the extras for other craft projects.
What kind of wire or cord is best to use for connecting the bottle caps?
The best type of wire or cord to use depends on your desired aesthetic and the level of durability you require. For a more industrial look, galvanized steel wire is a good option. It’s strong, rust-resistant, and relatively easy to work with. For a softer look, you can use craft cord, twine, or even yarn. However, keep in mind that these materials may not be as durable as wire and may require more frequent replacement. Consider the thickness of the wire or cord as well. A thicker material will provide more stability, but it may also be more difficult to work with. Experiment with different materials to see what works best for you.
How do I clean the bottle caps before using them?
Cleaning the bottle caps is an essential step to ensure a hygienic and aesthetically pleasing final product. The easiest way to clean them is to soak them in warm, soapy water for several hours. Use a mild dish soap and a scrub brush to remove any dirt, grime, or residue. For stubborn stains or sticky substances, you can try using a solution of baking soda and water. Rinse the bottle caps thoroughly with clean water and allow them to air dry completely before using them in your project. Make sure they are completely dry to prevent mold or mildew growth.
Is it possible to paint the bottle caps?
Yes, absolutely! Painting the bottle caps is a great way to customize your laundry basket and create a unique design. Use acrylic paints, as they adhere well to plastic and are available in a wide range of colors. Before painting, lightly sand the surface of the bottle caps to create a better grip for the paint. Apply a primer coat to ensure even coverage and prevent the paint from chipping. Once the primer is dry, you can apply your desired colors and designs. Seal the painted bottle caps with a clear coat of varnish or sealant to protect the paint and make them more durable.
How do I ensure the laundry basket is sturdy and won’t fall apart?
The sturdiness of your laundry basket depends on several factors, including the quality of the materials you use, the tightness of the connections, and the overall design. Use a strong and durable wire or cord to connect the bottle caps. Make sure the connections are tight and secure. Consider reinforcing the base of the basket with a layer of cardboard or plywood for added stability. You can also add a frame around the top of the basket to prevent it from collapsing. Distribute the weight evenly throughout the basket to avoid putting too much stress on any one area. Regularly inspect the basket for any signs of wear and tear and make repairs as needed.
Can I make other things besides a laundry basket using this technique?
Absolutely! The bottle cap construction technique can be adapted to create a wide variety of other items, limited only by your imagination. You can make storage containers, planters, coasters, trivets, wall art, and even furniture. The possibilities are endless. Experiment with different shapes, sizes, and designs to create unique and functional items for your home. The key is to understand the basic principles of the technique and then apply them to your specific project.
What if I don’t have enough bottle caps? Where can I get more?
Collecting enough bottle caps can take time, but there are several ways to speed up the process. Ask friends, family, and neighbors to save their bottle caps for you. Contact local restaurants, bars, and recycling centers to see if they are willing to donate bottle caps. You can also purchase bottle caps online from craft supply stores or online marketplaces. Consider using a combination of these methods to gather the number of bottle caps you need for your project. Remember to clean the bottle caps thoroughly before using them, regardless of where you obtain them.
How long does it take to make a bottle cap laundry basket?
The time it takes to make a bottle cap laundry basket will vary depending on your skill level, the size of the basket, and the complexity of the design. A simple basket may take a few days to complete, while a more elaborate design could take several weeks. Be patient and don’t rush the process. Enjoy the creative journey and take breaks when needed. The end result will be well worth the effort.
Leave a Comment