

DIY Canvas Art Ideas – ever feel like your walls are screaming for a splash of personality, but your wallet is whispering “no way”? I totally get it! We all crave a home that reflects our unique style, but art can be seriously expensive. That’s where the magic of DIY comes in!
For centuries, humans have adorned their living spaces with handcrafted creations. From ancient cave paintings to intricate tapestries, the desire to personalize our surroundings is deeply ingrained in our history. Today, we’re carrying on that tradition, but with a modern twist – and a whole lot less commitment than painting on cave walls!
This article is your ultimate guide to unlocking your inner artist and transforming blank canvases into stunning masterpieces. Forget those intimidating art galleries; we’re bringing the creativity home! I’ll share simple, budget-friendly DIY Canvas Art Ideas that anyone can master, regardless of artistic skill. Whether you’re looking to add a pop of color, create a calming abstract piece, or even personalize a gift, these hacks will empower you to create art you’ll be proud to display.
Why spend a fortune on generic artwork when you can create something truly unique and meaningful? Let’s dive in and unleash your creativity!

DIY Canvas Art: Unleash Your Inner Artist!
Hey there, fellow art enthusiasts! Ready to transform those blank canvases into stunning masterpieces without breaking the bank? I’m here to guide you through some super fun and creative DIY canvas art ideas that are perfect for beginners and seasoned artists alike. Let’s get started!
Idea 1: Abstract Acrylic Pouring
Acrylic pouring is seriously addictive, and the results are always unique and mesmerizing. It’s a fantastic way to create abstract art with minimal effort.
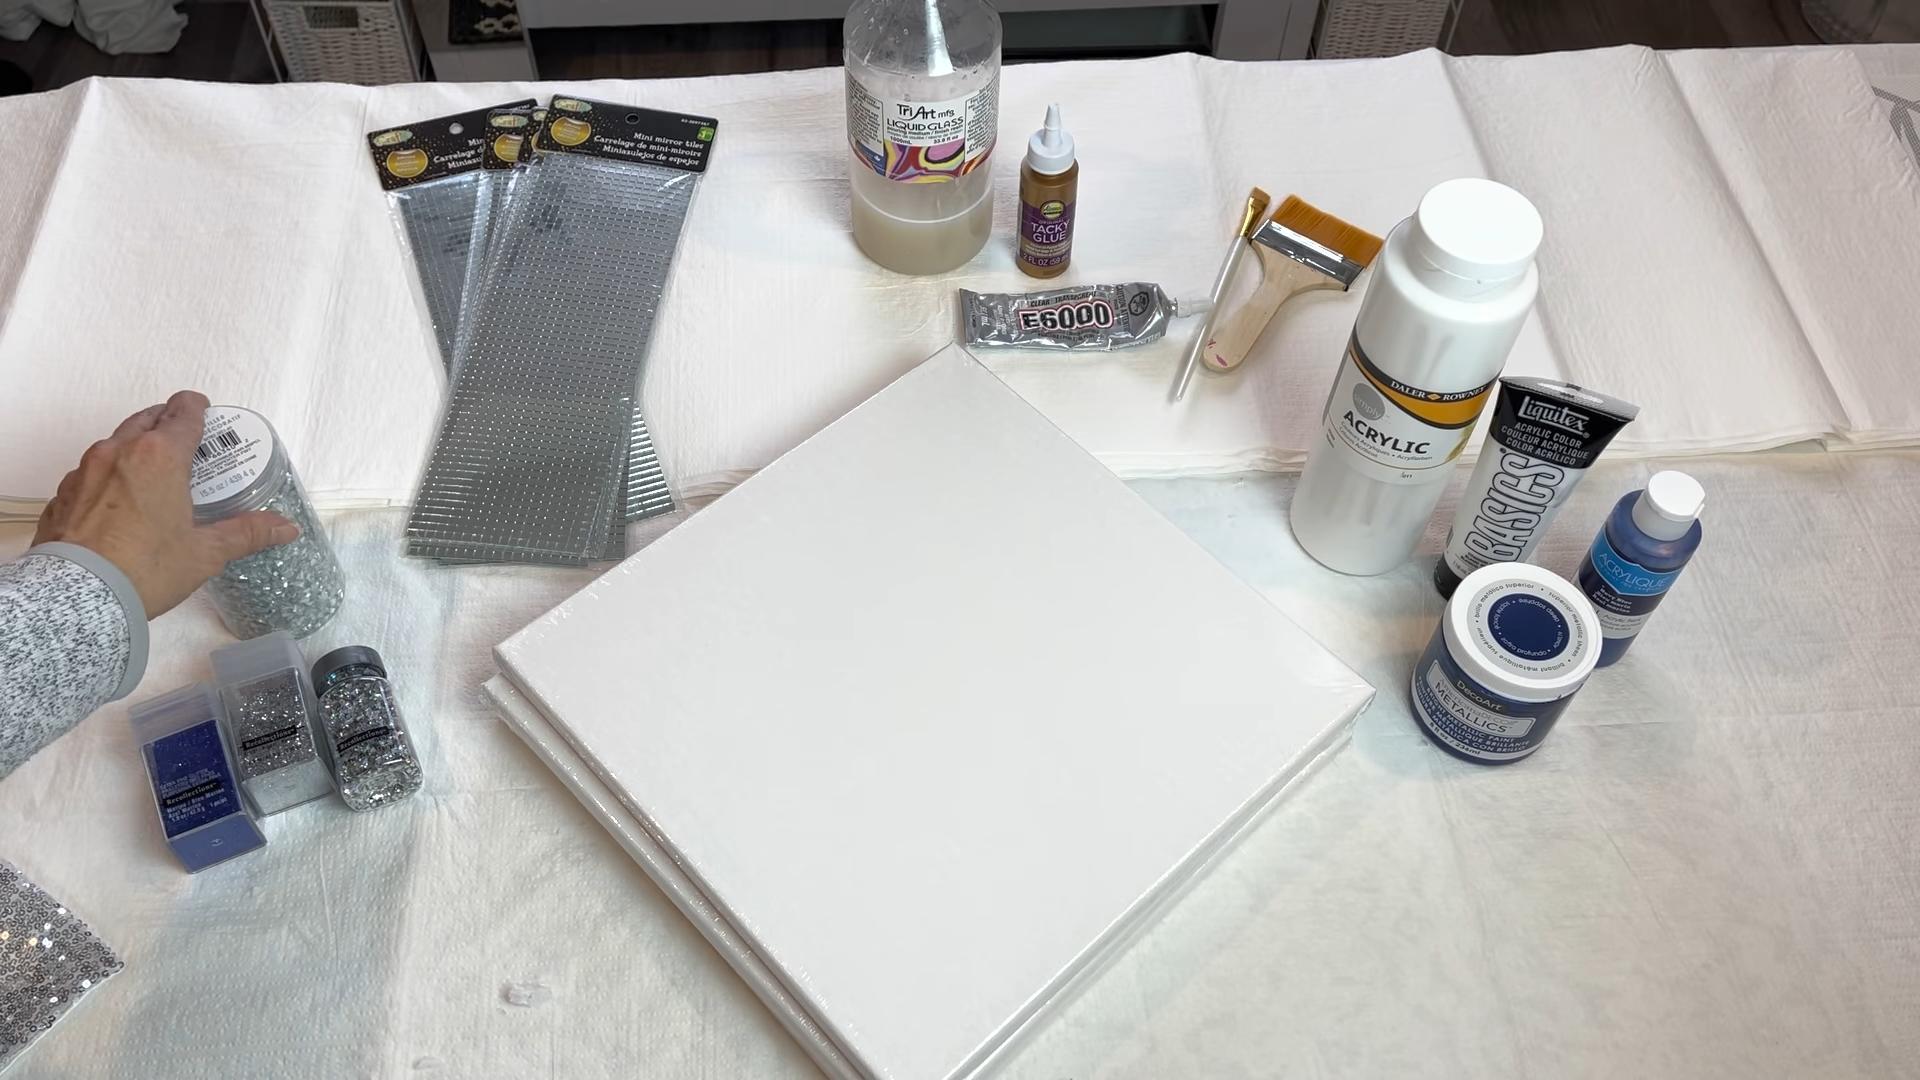
What You’ll Need:
* Blank Canvas (any size you like!)
* Acrylic Paints (various colors)
* Pouring Medium (e.g., Floetrel, Liquitex Pouring Medium)
* Silicone Oil (optional, for creating cells)
* Cups or Containers for mixing paint
* Stir Sticks
* Drop Cloth or Newspaper to protect your work surface
* Gloves (trust me, you’ll want these!)
* Torch or Heat Gun (optional, for popping bubbles and enhancing cells)
* Level
Step-by-Step Instructions:
1. Prepare Your Workspace: Lay down your drop cloth or newspaper to protect your surface. Trust me, acrylic pouring can get messy! Make sure your canvas is level. This is crucial for even pours. I use a small level to check.
2. Mix Your Paints: In separate cups, mix your acrylic paints with the pouring medium. The ratio is usually around 1 part paint to 2 parts pouring medium, but you can adjust this based on the consistency you prefer. You want the mixture to be thin enough to pour easily but not too watery. Stir thoroughly until the paint and medium are completely combined. If you’re using silicone oil, add a few drops to some of your paint mixtures (not all of them!) and stir gently. This will create those cool cell effects.
3. Choose Your Pouring Technique: There are tons of different pouring techniques you can try! Here are a few popular ones:
* Dirty Pour: This is where you layer all your different paint colors into one cup and then pour the entire mixture onto the canvas.
* Flip Cup: Similar to the dirty pour, but you flip the cup upside down onto the canvas and let the paint slowly release.
* Puddle Pour: You pour small puddles of different colors onto the canvas, allowing them to spread and blend.
* Swipe Technique: Pour lines of paint onto the canvas and then use a palette knife or piece of cardboard to swipe across the paint, creating interesting patterns.
4. Pour Your Paint: Carefully pour your paint onto the canvas using your chosen technique. Don’t be afraid to experiment! You can tilt the canvas to help the paint spread and create different effects.
5. Create Cells (Optional): If you used silicone oil, you can use a torch or heat gun to bring out the cells. Gently pass the flame over the surface of the paint, being careful not to burn it. The heat will cause the silicone oil to rise to the surface, creating those cool cell patterns.
6. Let it Dry: This is the hardest part! Acrylic pouring can take several days to completely dry, depending on the thickness of the paint. Find a safe place to let your canvas dry undisturbed.
7. Clean Up: Once your painting is completely dry, you can clean up any drips or imperfections on the back of the canvas.
Idea 2: Textured Canvas with Modeling Paste
Adding texture to your canvas can create a really unique and tactile piece of art. Modeling paste is your best friend for this!
What You’ll Need:
* Blank Canvas
* Modeling Paste
* Palette Knife or Spreader
* Acrylic Paints (for painting over the texture)
* Various Tools for Creating Texture (e.g., stencils, combs, sponges, forks – get creative!)
* Drop Cloth or Newspaper
Step-by-Step Instructions:
1. Prepare Your Canvas: Make sure your canvas is clean and free of any dust or debris.
2. Apply Modeling Paste: Using your palette knife or spreader, apply a generous layer of modeling paste to the canvas. You can apply it evenly for a uniform texture or create thicker areas for more dimension.
3. Create Texture: This is where the fun begins! Use your chosen tools to create texture in the modeling paste. Here are some ideas:
* Stencils: Place a stencil on the canvas and spread modeling paste over it. Carefully lift the stencil to reveal the textured pattern.
* Combs: Drag a comb through the modeling paste to create lines and ridges.
* Sponges: Dab a sponge into the modeling paste to create a stippled effect.
* Forks: Use a fork to create interesting patterns and textures.
* Freehand: Simply use your palette knife or fingers to sculpt the modeling paste into your desired shapes and patterns.
4. Let it Dry: Modeling paste can take a while to dry completely, so be patient! It usually takes at least 24 hours, but it could take longer depending on the thickness of the paste and the humidity.
5. Paint Your Texture: Once the modeling paste is completely dry, you can paint over it with acrylic paints. You can use a single color for a monochromatic look or use multiple colors to highlight the texture. I like to use dry brushing techniques to really bring out the texture.
6. Add Details (Optional): You can add further details to your textured canvas with paint markers, glitter, or other embellishments.
Idea 3: String Art on Canvas
String art is a classic craft that looks surprisingly sophisticated on canvas. It’s a great way to create geometric designs or even spell out words.
What You’ll Need:
* Blank Canvas
* Small Nails (e.g., upholstery tacks)
* Hammer
* String or Embroidery Floss (various colors)
* Pencil
* Ruler
* Printed Template (optional, for more complex designs)
* Pliers (optional, for removing nails)
Step-by-Step Instructions:
1. Plan Your Design: Decide on the design you want to create. You can draw it freehand on the canvas with a pencil, use a ruler to create geometric shapes, or print out a template and trace it onto the canvas.
2. Hammer in the Nails: Carefully hammer the nails into the canvas along the lines of your design. Make sure the nails are evenly spaced and hammered in to a consistent depth. You don’t want them to go all the way through the canvas!
3. Tie Off the String: Tie one end of your string to one of the nails.
4. Start Stringing: Begin wrapping the string around the nails, creating your desired pattern. There are no rules here – experiment and see what looks good! You can wrap the string randomly for a more abstract look or follow a specific pattern for a more structured design.
5. Change Colors (Optional): If you want to use multiple colors of string, simply tie off the current color and tie on the new color to a nail.
6. Finish and Secure: Once you’re happy with your design, tie off the end of the string to a nail and trim any excess.
7. Adjust and Refine: Take a step back and look at your string art. You can adjust the tension of the strings or add more strings to fill in any gaps. If you make a mistake, you can use pliers to carefully remove the nails and start over.
Idea 4: Decoupage Canvas Art
Decoupage is the art of decorating objects with paper cutouts. It’s a fantastic way to create collage-style art on canvas.
What You’ll Need:
* Blank Canvas
* Paper Cutouts (e.g., scrapbook paper, magazine clippings, tissue paper, maps)
* Decoupage Medium (e.g., Mod Podge)
* Paintbrush or Foam Brush
* Scissors
* Drop Cloth or Newspaper
* Optional: Acrylic Paints, Glitter, Embellishments
Step-by-Step Instructions:
1. Prepare Your Paper Cutouts: Gather your paper cutouts and cut them into the shapes and sizes you want. You can use scissors or a craft knife for more intricate designs.
2. Apply Decoupage Medium: Apply a thin layer of decoupage medium to the area of the canvas where you want to place your first paper cutout.
3. Place the Cutout: Carefully place the paper cutout onto the canvas and smooth it out with your fingers or a brayer to remove any air bubbles.
4. Seal with Decoupage Medium: Apply another thin layer of decoupage medium over the paper cutout to seal it in place.
5. Repeat: Repeat steps 2-4, layering your paper cutouts to create your
Conclusion
So, there you have it! Ditching the expensive art store and embracing these DIY canvas art ideas opens up a world of creative possibilities, allowing you to personalize your space without breaking the bank. We’ve explored techniques from simple abstract designs to textured masterpieces, all achievable with readily available materials and a little bit of imagination.
Why is this a must-try? Because it’s more than just creating art; it’s about expressing yourself, adding a unique touch to your home, and experiencing the satisfaction of crafting something beautiful with your own hands. Forget generic wall decor – with these DIY canvas art ideas, you’re creating conversation starters, personalized gifts, and lasting memories.
Consider these variations to further personalize your projects:
* **Color Palettes:** Experiment with different color schemes to match your existing decor. Try a monochromatic palette for a sophisticated look, or go bold with contrasting colors for a vibrant statement piece.
* **Texture Exploration:** Don’t be afraid to experiment with different textures. Add sand, fabric scraps, or even dried flowers to your canvas for a unique tactile experience.
* **Mixed Media:** Incorporate other materials like paper, beads, or metal embellishments to create mixed media masterpieces.
* **Personalized Stencils:** Create your own stencils using family photos, quotes, or meaningful symbols to add a personal touch to your artwork.
* **Resin Coating:** For a glossy, professional finish, consider applying a layer of resin to your finished canvas art. This will also protect your artwork from dust and damage.
We truly believe that anyone can create stunning DIY canvas art, regardless of their artistic experience. The key is to have fun, experiment, and let your creativity flow. Don’t be afraid to make mistakes – they often lead to unexpected and beautiful results.
Now, it’s your turn! We encourage you to try one (or all!) of these DIY canvas art ideas and transform your living space. We’re confident that you’ll be amazed at what you can create.
Most importantly, we want to hear about your experience! Share your creations with us on social media using [Your Hashtag Here] and tell us which technique you tried, what challenges you faced, and what you learned along the way. Your feedback will not only inspire others but also help us refine and improve our DIY guides. Let’s build a community of creative individuals who are passionate about transforming their homes with personalized, handmade art. So grab your canvas, gather your supplies, and get ready to unleash your inner artist!
FAQ
Frequently Asked Questions About DIY Canvas Art
We understand you might have some questions before diving into your DIY canvas art project. Here are some of the most common questions we receive, along with detailed answers to help you get started:
Q: What kind of canvas should I use?
A: The type of canvas you choose depends on your budget and the type of paint you’ll be using. Stretched canvases are the most common and readily available option. They come in various sizes and thicknesses. For acrylic and oil paints, a primed canvas is essential. You can buy pre-primed canvases or prime them yourself with gesso. For lighter mediums like watercolors or inks, a watercolor canvas or paper specifically designed for those mediums is recommended. Consider the size of the canvas based on the space you intend to fill and the complexity of your design. Smaller canvases are great for beginners, while larger canvases allow for more intricate details.
Q: What kind of paint is best for canvas art?
A: Acrylic paint is the most versatile and beginner-friendly option for canvas art. It’s water-based, dries quickly, and is available in a wide range of colors and finishes. Oil paint is another popular choice, known for its rich colors and blendability. However, it takes longer to dry and requires special solvents for cleaning. Watercolor paint can also be used on canvas, but it’s best suited for smaller pieces and requires a primed surface. Consider the desired effect and your level of experience when choosing your paint.
Q: How do I prepare my canvas before painting?
A: Most pre-stretched canvases are already primed with gesso, which creates a smooth surface for the paint to adhere to. However, if you’re using an unprimed canvas, you’ll need to apply a layer or two of gesso before painting. Apply the gesso in thin, even coats, allowing each coat to dry completely before applying the next. Lightly sand the surface after each coat for an even smoother finish. This will prevent the paint from soaking into the canvas and ensure a vibrant, long-lasting artwork.
Q: What are some essential tools for DIY canvas art?
A: Besides the canvas and paint, you’ll need a few essential tools to get started. These include paintbrushes in various sizes and shapes, a palette for mixing paints, a palette knife for applying texture, a container of water for cleaning brushes, and a rag for wiping up spills. You may also need masking tape for creating clean lines, stencils for adding patterns, and a sealant or varnish to protect your finished artwork. Having the right tools will make the process easier and more enjoyable.
Q: How do I protect my finished canvas art?
A: Once your painting is completely dry, it’s important to protect it from dust, moisture, and UV damage. You can apply a sealant or varnish to the surface of the canvas. Choose a sealant that is compatible with the type of paint you used. Apply the sealant in thin, even coats, following the manufacturer’s instructions. A sealant will not only protect your artwork but also enhance its colors and add a professional finish. Consider framing your canvas art for added protection and display.
Q: Can I use household items for texture in my canvas art?
A: Absolutely! One of the great things about DIY canvas art is that you can use a variety of household items to create unique textures. Try using sponges, crumpled paper, bubble wrap, or even old toothbrushes to add interesting patterns and dimension to your artwork. Experiment with different materials and techniques to discover your own signature style. Don’t be afraid to get creative and think outside the box!
Q: How do I clean my paintbrushes?
A: Cleaning your paintbrushes properly is essential for preserving their quality and extending their lifespan. For acrylic paint, rinse the brushes thoroughly with water immediately after use. For oil paint, use a solvent like turpentine or mineral spirits to remove the paint, followed by soap and water. Gently reshape the bristles and allow the brushes to air dry completely before storing them. Avoid leaving brushes soaking in water for extended periods, as this can damage the bristles.
Q: What if I make a mistake?
A: Don’t worry, mistakes are a part of the creative process! If you make a mistake with acrylic paint, you can usually wipe it off with a damp cloth while it’s still wet. If the paint has already dried, you can try sanding it down or painting over it. With oil paint, you can use a solvent to remove the paint or simply paint over it once it’s dry. Remember, every mistake is an opportunity to learn and grow as an artist. Embrace the imperfections and have fun with the process!
Leave a Comment