

DIY Cardboard Safe: Ever wished you had a secret hiding spot, a place where your treasures could be tucked away from prying eyes? I know I have! From childhood dreams of pirate treasure to the more practical need for securing important documents, the desire for a safe space is universal. While high-tech vaults are impressive, sometimes a simple, resourceful solution is all you need. That’s where the magic of cardboard comes in!
The concept of hidden compartments and secret containers has been around for centuries. Think of the hollowed-out books used to conceal messages during wartime or the intricate lockboxes crafted by skilled artisans. These examples highlight our innate desire for privacy and security. But you don’t need to be a master craftsman to create your own secure space.
In today’s world, with increasing concerns about privacy and the need to protect our belongings, a DIY cardboard safe offers a fun, affordable, and surprisingly effective solution. Whether you’re safeguarding your spare cash, a cherished diary, or sensitive documents, this project empowers you to take control of your security without breaking the bank. Plus, it’s a fantastic way to repurpose those cardboard boxes that always seem to accumulate! So, let’s dive in and learn how to build your very own secret fortress from the humble cardboard box!
DIY Cardboard Safe: Protect Your Treasures!
Hey there, fellow DIY enthusiasts! Ever wanted a secret hiding place for your precious belongings, but didn’t want to break the bank? Well, you’re in the right place! Today, I’m going to show you how to build a surprisingly secure cardboard safe. It’s a fun project, perfect for kids and adults alike, and it’s a great way to recycle those extra cardboard boxes lying around. Let’s get started!
Materials You’ll Need:
Before we dive in, let’s gather our supplies. You’ll need:
* A sturdy cardboard box (the thicker the cardboard, the better! Think moving box or appliance box).
* A smaller cardboard box that will fit inside the larger one (this will be the inner safe).
* A third, even smaller cardboard box (for the locking mechanism).
* A ruler or measuring tape.
* A pencil or marker.
* A craft knife or box cutter (adult supervision required!).
* Hot glue gun and glue sticks (adult supervision required!).
* Scissors.
* A metal rod or wooden dowel (for the locking bar). An old pen casing works great too!
* A combination lock (small padlock style).
* Optional: Paint, wrapping paper, decorative tape, or other materials for decorating.
Planning and Cutting the Boxes
Okay, let’s get our hands dirty! The first step is to prepare our cardboard boxes. This involves measuring, marking, and carefully cutting the cardboard. Remember, safety first! Always use a sharp craft knife with caution and protect your work surface.
1. Prepare the Outer Box: This is the main body of your safe. If your box has flaps, fold them inwards and glue them down securely with your hot glue gun. This will reinforce the box and make it more sturdy. Make sure the box is completely sealed and square.
2. Prepare the Inner Safe Box: This box needs to fit snugly inside the outer box, leaving enough room for the locking mechanism. Measure the inside dimensions of the outer box. Then, measure and cut the inner box so that it’s slightly smaller than the outer box’s interior. You want it to slide in and out easily, but not be too loose. Again, if your inner box has flaps, fold them inwards and glue them down.
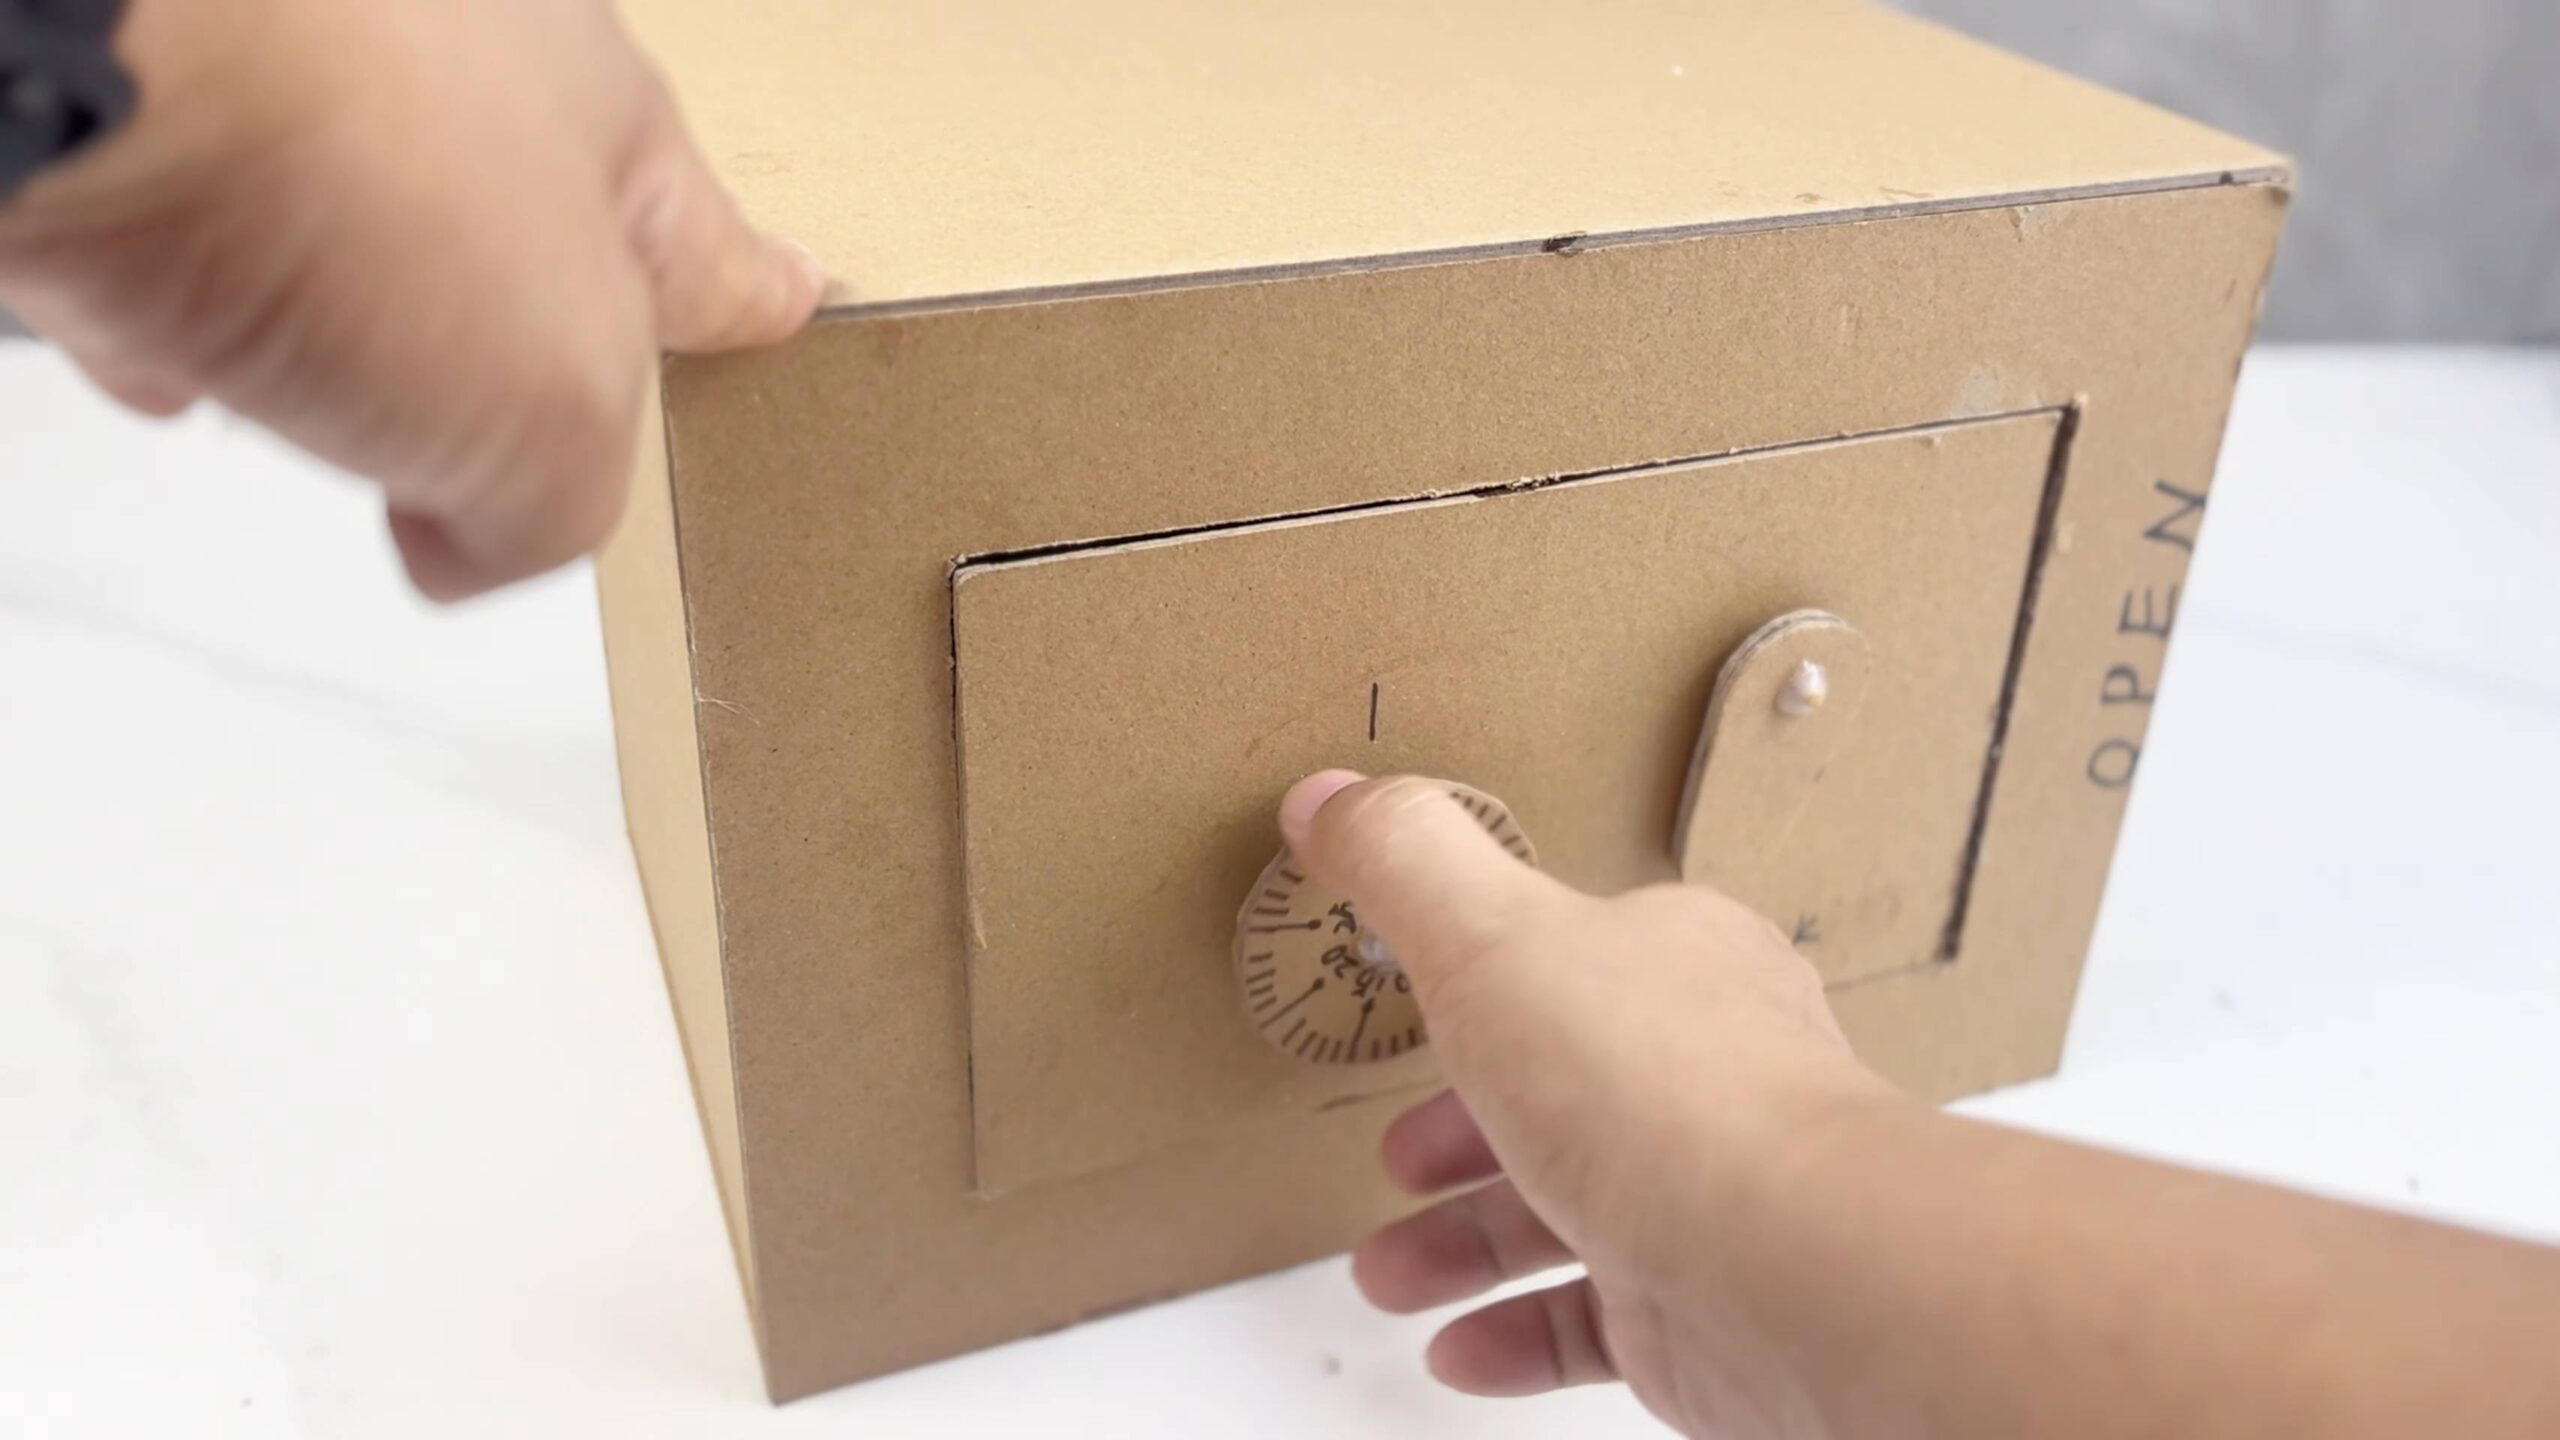
3. Create the Door Opening: Now, we need to create the door opening on the outer box. Decide which side you want to be the front of your safe. Using your ruler and pencil, draw a rectangle on this side, leaving a border of at least 2 inches on all sides. This border will provide structural support. Carefully cut along the lines you’ve drawn with your craft knife. Save the cut-out piece of cardboard – this will become our safe door!
4. Prepare the Door: Take the cardboard piece you just cut out. This is your safe door. Reinforce the edges of the door with hot glue. This will prevent the cardboard from bending or tearing easily. You can also add an extra layer of cardboard to the back of the door for added strength.
Building the Locking Mechanism
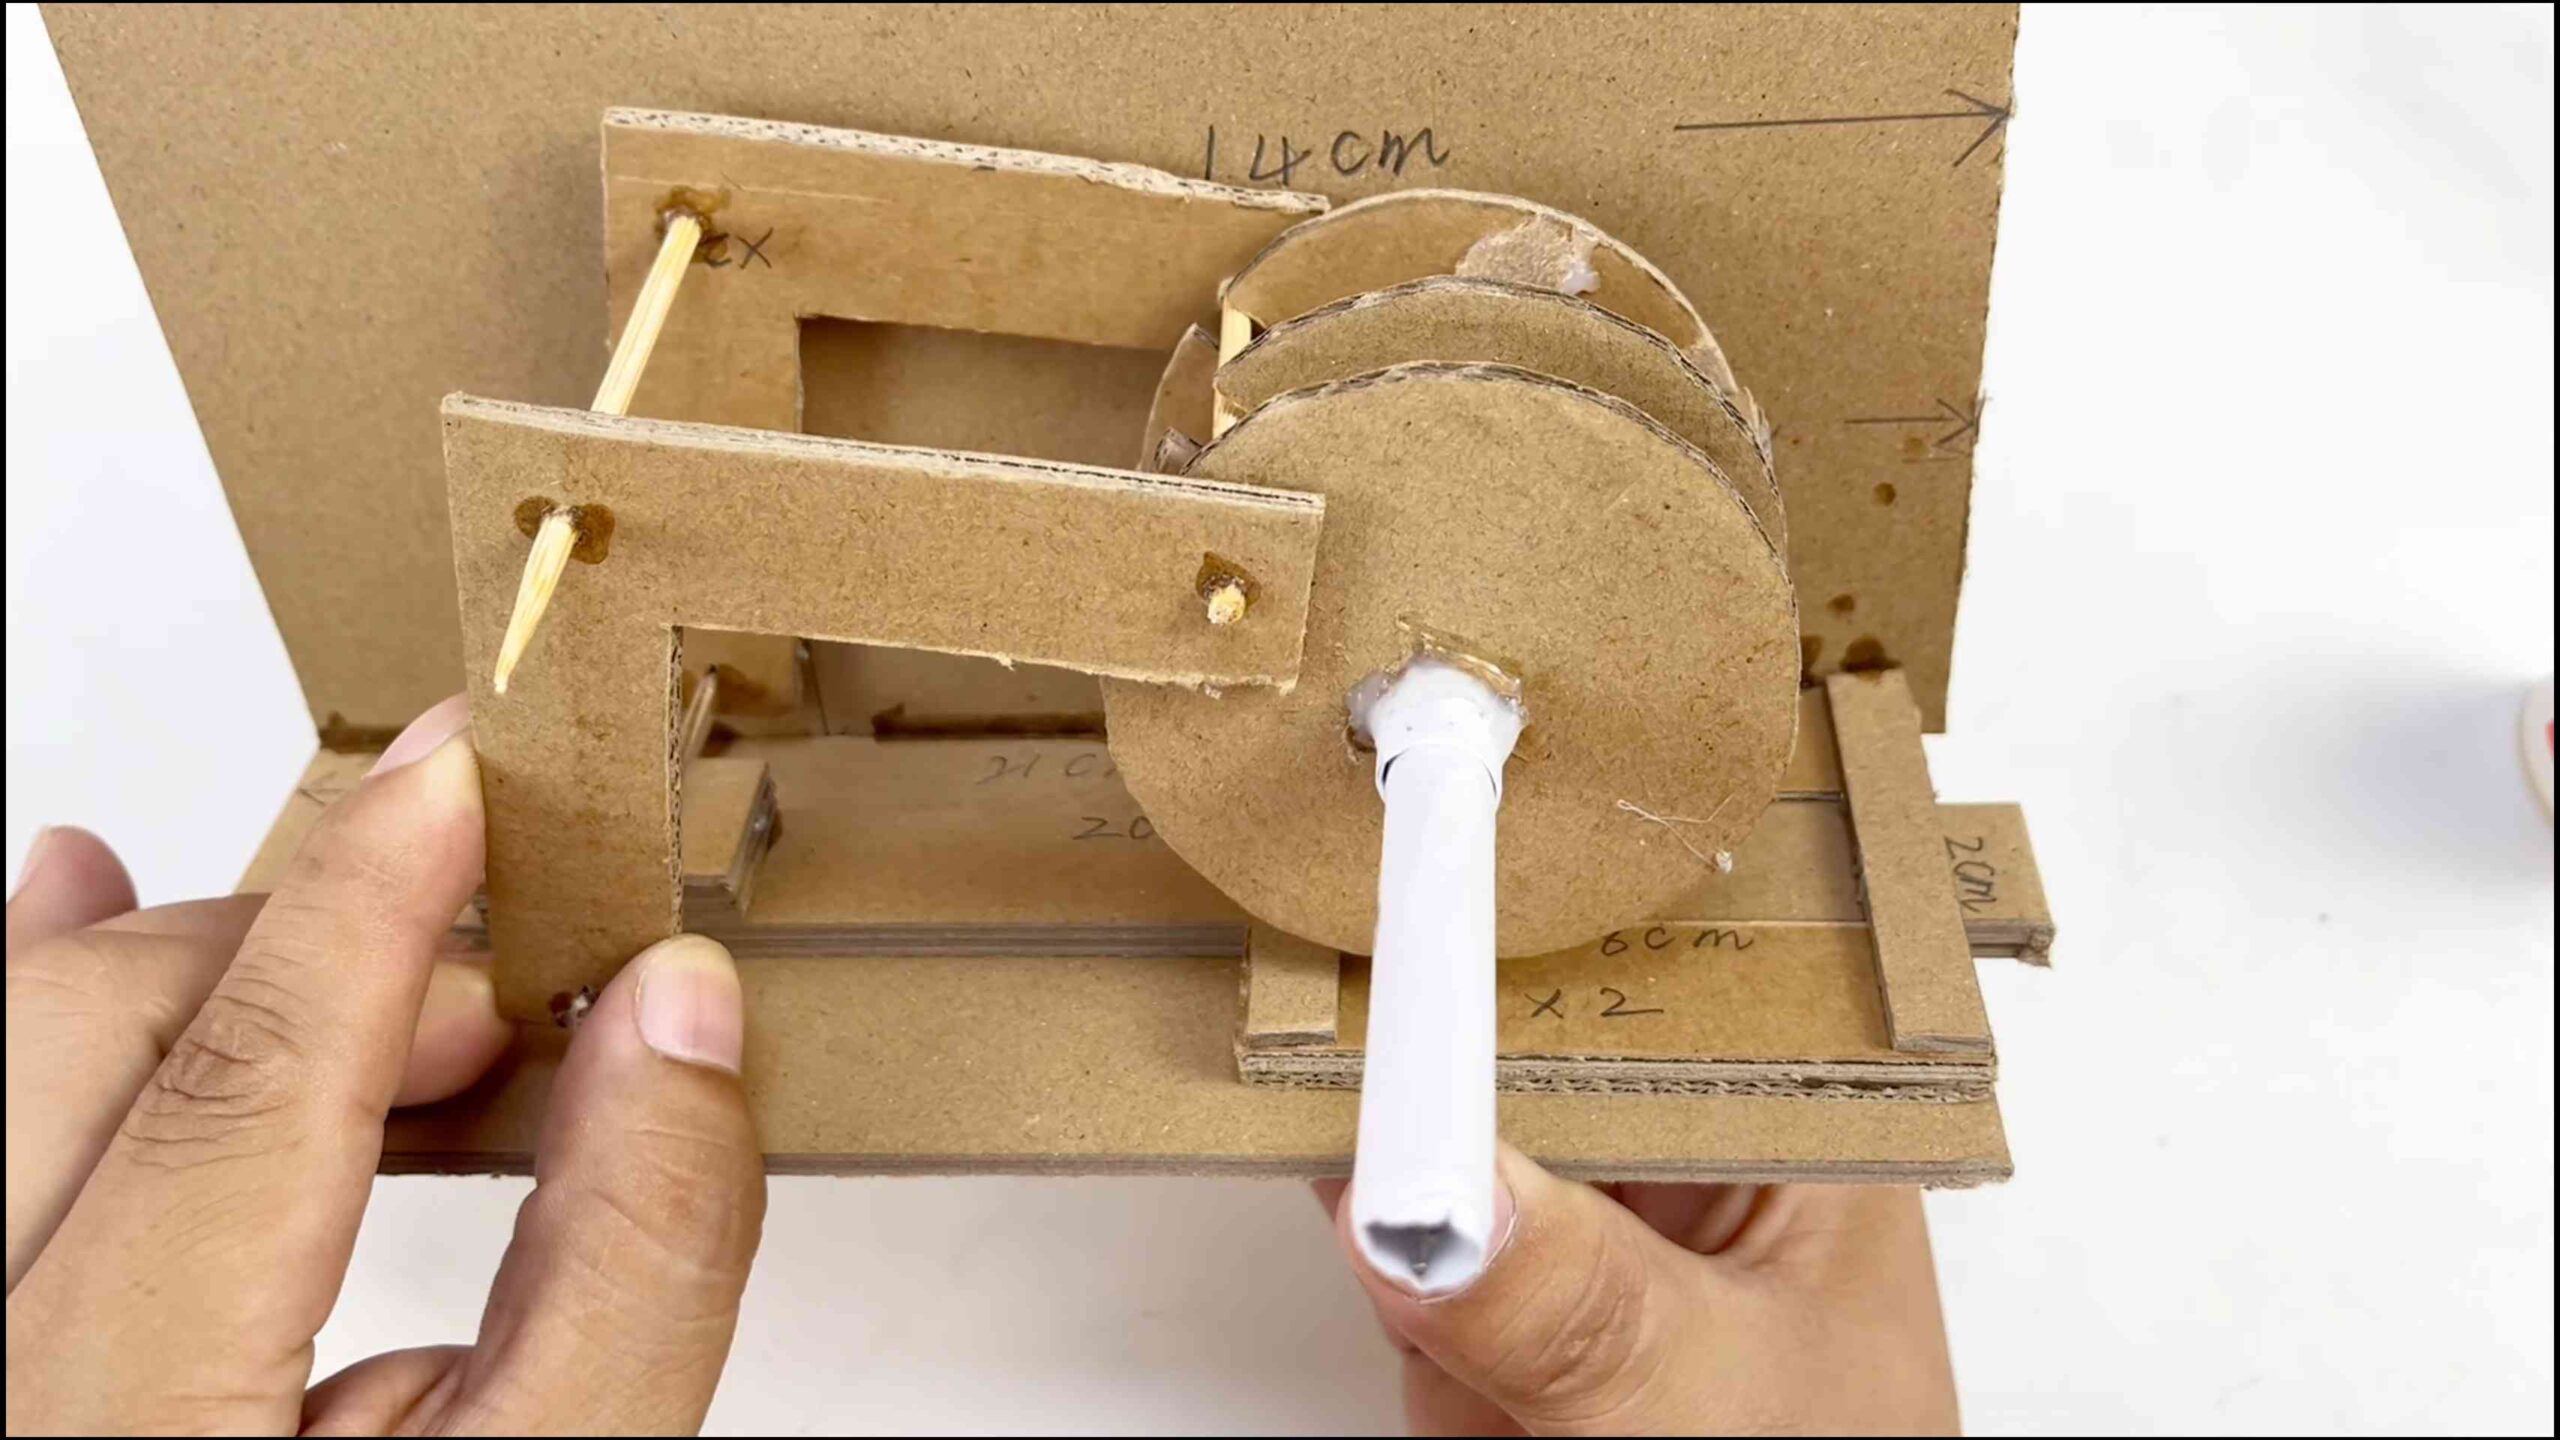
This is where the magic happens! The locking mechanism is what will keep your treasures safe and sound (well, relatively safe!). We’ll use the smallest cardboard box and the metal rod/dowel to create a simple but effective locking system.
1. Prepare the Locking Box: Take your smallest cardboard box. This will house the locking mechanism. Cut off the top flaps of the box. We only need the bottom part.
2. Create the Locking Bar Guides: On the inside of the outer box, on the side opposite the door, you need to create guides for the locking bar. These guides will hold the metal rod/dowel in place. Cut two small pieces of cardboard (about 1 inch wide and 2 inches long). Fold each piece in half to create a “U” shape. Glue these “U” shapes to the inside of the outer box, one near the top and one near the bottom, directly opposite the door opening. Make sure they are aligned so that the metal rod can slide through them easily.
3. Attach the Locking Box: Now, glue the locking box to the inside of the outer box, right next to the door opening. Make sure it’s positioned so that the top of the locking box is level with the top of the door opening. This box will house the locking bar when the safe is locked.
4. Create the Locking Bar Hole in the Door: Close the door and mark on the door where the locking bar will go through. This should be in the center of the locking box. Drill a hole through the door at this mark, large enough for the metal rod/dowel to pass through easily.
5. Install the Locking Bar: Slide the metal rod/dowel through the guides on the back of the outer box and into the locking box. When the rod is pushed all the way in, it should pass through the hole in the door, effectively locking the safe.
6. Create the Padlock Attachment: Now, we need to create a way to secure the locking bar with a padlock. On the locking box, drill a hole that lines up with the locking bar when it’s in the locked position. The hole should be large enough for the shackle of your combination lock to pass through.
7. Test the Locking Mechanism: Make sure the locking bar slides smoothly through the guides and the hole in the door. When the bar is in the locked position, the hole in the locking box should line up perfectly with the bar, allowing you to insert the padlock. Test the mechanism several times to ensure it works correctly.
Assembling the Safe
Now that we have all the components ready, it’s time to put everything together!
1. Insert the Inner Safe Box: Slide the inner safe box into the outer box. Make sure it slides in and out smoothly.
2. Attach the Door: Attach the door to the outer box using hinges. You can create simple hinges by using strong tape (like duct tape or packing tape) or by using small pieces of cardboard folded in half and glued to both the door and the outer box. Make sure the door swings open and closed easily.
3. Final Test: Test the entire safe to make sure everything works as it should. Slide the inner box in and out, open and close the door, and test the locking mechanism. Make any necessary adjustments.
Decorating Your Safe (Optional)
This is the fun part! Now you can personalize your safe and make it look however you want. Here are some ideas:
* Paint: Paint the entire safe with your favorite colors. You can use acrylic paint, spray paint, or even markers.
* Wrapping Paper: Cover the safe with wrapping paper. This is a great way to add a decorative touch.
* Decorative Tape: Use decorative tape (like washi tape) to add patterns and designs to your safe.
* Stickers: Add stickers to personalize your safe.
* Camouflage: If you want to hide your safe, you can camouflage it by painting it to blend in with its surroundings.
Tips and Tricks for a Stronger Safe
Want to make your cardboard safe even more secure? Here are a few tips:
* Use Thicker Cardboard: The thicker the cardboard, the stronger the safe. Try to use cardboard from moving boxes or appliance boxes.
* Reinforce the Corners: Reinforce the corners of the outer box with extra cardboard and hot glue. This will prevent the box from collapsing.
* Add Extra Layers of Cardboard: Add extra layers of cardboard to the door and the locking mechanism for added strength.
* Use Stronger Glue: Use a strong glue, like epoxy, for critical joints.
* Conceal the Safe: The best way to protect your treasures is to hide your safe in a discreet location.
Important Considerations
While this cardboard safe is a fun and creative project, it’s important to remember that it’s not a replacement for a real safe. It’s primarily designed for fun and light security. Here are a few things to keep in mind:
* Cardboard is Vulnerable: Cardboard can be easily cut or broken. This safe is not suitable for storing valuable items that require high security.
* Keep it Dry: Cardboard is susceptible to water damage. Keep your safe in a dry location.
* Supervision Required: Adult supervision is required when using craft knives and hot glue guns.
Troubleshooting
Having trouble with your cardboard safe? Here are a few common issues and how to fix them:
* Door Doesn’t Close Properly: Make sure the hinges are properly aligned and that the door is not warped.
* Locking Mechanism Doesn’t Work: Make sure the locking bar slides smoothly and that the holes are properly aligned.
* Inner Box Doesn’t Slide Easily: Make sure the inner box is not too large and that the outer box is square.
And there you have it! Your very own
Conclusion
So, there you have it! Creating your own DIY cardboard safe isn’t just a fun project; it’s a surprisingly effective way to add a layer of security and intrigue to your belongings. In a world saturated with expensive, high-tech security solutions, this simple, resourceful approach stands out as a testament to the power of ingenuity and resourcefulness. It’s a project that’s accessible to everyone, regardless of their budget or skill level, and the satisfaction of building something functional and secure with your own hands is truly rewarding.
But why is this DIY trick a must-try? Beyond the sheer fun of the crafting process, a cardboard safe offers several compelling advantages. First and foremost, it’s an excellent deterrent. While it might not stop a determined professional thief, it will certainly deter casual snoopers or opportunistic individuals. The unexpected nature of a cardboard safe can throw them off guard, buying you valuable time or discouraging them altogether.
Secondly, it’s a fantastic way to teach children about security and responsibility. Involving them in the construction process allows them to understand the importance of protecting their valuables and keeping their belongings safe. It’s a hands-on lesson that they’re far more likely to remember than a lecture.
Thirdly, it’s incredibly customizable. You can tailor the size, shape, and locking mechanism to suit your specific needs and preferences. Want a hidden compartment? Go for it! Prefer a combination lock over a key? No problem! The possibilities are endless.
Variations and Suggestions
Don’t be afraid to experiment with different materials and techniques to enhance your DIY cardboard safe. Consider these variations:
* Camouflage: Disguise your safe as a stack of books, a shipping box, or even a piece of furniture. The more inconspicuous it is, the better.
* Reinforcements: Add layers of cardboard or incorporate other materials like wood or metal for added strength.
* Advanced Locking Mechanisms: Explore more complex locking systems, such as combination locks, magnetic locks, or even simple electronic locks.
* Interior Design: Line the inside of your safe with felt or fabric to protect delicate items from scratches.
* Weight: Add weight to the bottom of the safe to make it more difficult to move or tip over. Sand or small rocks work well for this.
* Multiple Compartments: Create different compartments within the safe for organizing your valuables.
We strongly encourage you to give this DIY cardboard safe project a try. It’s a fun, affordable, and surprisingly effective way to enhance your home security and protect your belongings. Once you’ve built your own, we’d love to hear about your experience! Share your photos, tips, and variations in the comments below. Let’s inspire each other to create even more innovative and secure DIY solutions. Remember, security doesn’t always have to be expensive or complicated. Sometimes, the simplest solutions are the most effective. So, grab some cardboard, get creative, and start building your own DIY cardboard safe today!
FAQ
Q: How secure is a DIY cardboard safe, really?
A: Let’s be realistic: a DIY cardboard safe isn’t going to replace a professional-grade steel safe. It’s not designed to withstand a determined attack from a skilled burglar with specialized tools. However, its primary purpose is to deter casual theft and opportunistic snooping. The unexpected nature of a cardboard safe can be surprisingly effective in throwing off potential thieves. They’re likely expecting to find valuables hidden in more conventional places. Think of it as an extra layer of security, a deterrent that can buy you time or discourage theft altogether. The level of security depends heavily on the construction and locking mechanism you choose. A well-disguised and reinforced cardboard safe with a decent lock can be surprisingly effective against casual intruders.
Q: What kind of cardboard should I use?
A: The sturdier the cardboard, the better. Double-walled cardboard boxes are ideal, as they offer significantly more strength and durability than single-walled boxes. Look for boxes that are used for shipping heavy items, as these are typically made from thicker, more robust cardboard. Avoid using cardboard that is damp, damaged, or excessively worn. If you can’t find double-walled cardboard, you can reinforce single-walled cardboard by layering multiple pieces together.
Q: What’s the best way to disguise my cardboard safe?
A: Camouflage is key! The more inconspicuous your safe is, the less likely it is to attract attention. Here are a few ideas:
* Book Stack: Cut out the center of several old books and glue them together to create a hollow space for your safe.
* Shipping Box: Decorate your safe to look like a regular shipping box, complete with labels and packing tape.
* Furniture: Integrate your safe into a piece of furniture, such as a bookshelf or a desk.
* Plain Sight: Sometimes, the best hiding place is in plain sight. Disguise your safe as a common household item, such as a laundry basket or a storage container.
The key is to make your safe blend in with its surroundings and avoid anything that might draw attention to it.
Q: What kind of locking mechanism should I use?
A: The choice of locking mechanism depends on your budget, skill level, and desired level of security. Here are a few options:
* Key Lock: A simple key lock is a straightforward and reliable option. You can purchase inexpensive key locks at most hardware stores.
* Combination Lock: A combination lock offers a higher level of security than a key lock, as it requires the correct combination to open.
* Magnetic Lock: A magnetic lock uses magnets to secure the safe. These locks can be hidden inside the cardboard, making them difficult to detect.
* DIY Latch: A simple latch made from cardboard and a small bolt can be surprisingly effective.
Experiment with different locking mechanisms to find one that suits your needs and abilities.
Q: How can I reinforce my cardboard safe to make it more durable?
A: There are several ways to reinforce your cardboard safe:
* Layering: Add multiple layers of cardboard to the walls, floor, and lid of the safe.
* Wood or Metal: Incorporate pieces of wood or metal into the construction of the safe for added strength.
* Glue: Use a strong adhesive, such as construction adhesive or epoxy, to bond the cardboard layers together.
* Tape: Reinforce the seams and edges of the safe with strong packing tape.
* Internal Supports: Add internal supports, such as cardboard tubes or wooden dowels, to prevent the safe from collapsing.
Q: What should I store in my DIY cardboard safe?
A: A DIY cardboard safe is best suited for storing small, valuable items that you want to keep hidden from casual view. This might include:
* Jewelry
* Cash
* Important documents
* Small electronics
* Medications
* Sentimental items
Avoid storing highly valuable or irreplaceable items in a cardboard safe. For these items, a professional-grade safe is a better option.
Q: How do I prevent my cardboard safe from getting damaged by moisture?
A: Cardboard is susceptible to damage from moisture, so it’s important to take precautions to protect your safe. Here are a few tips:
* Location: Store your safe in a dry, well-ventilated area.
* Waterproofing: Apply a waterproof coating to the exterior of the safe.
* Desiccant Packs: Place desiccant packs inside the safe to absorb moisture.
* Avoid Direct Contact: Keep the safe off the floor to prevent it from absorbing moisture from the ground.
Q: Can I make a fireproof cardboard safe?
A: While you can’t make a completely fireproof cardboard safe, you can take steps to improve its fire resistance. Line the inside of the safe with fire-resistant materials, such as fiberglass insulation or fire-retardant fabric. However, keep in mind that a cardboard safe will never be as fire-resistant as a professional-grade fireproof safe.
Q: What if my DIY cardboard safe gets discovered?
A: If your DIY cardboard safe gets discovered, it’s important to remain calm and assess the situation. If the thief is still present, prioritize your safety and avoid confrontation. If the thief has already left, contact the authorities and report the theft. Remember that a DIY cardboard safe is primarily a deterrent, and it’s not designed to withstand a determined attack.

Leave a Comment