

DIY Cardboard Wardrobe: Tired of clothes overflowing from your closet? Or maybe you’re a renter looking for a temporary, budget-friendly storage solution? I totally get it! We’ve all been there, staring at a mountain of clothes with nowhere to put them. But what if I told you the answer was hiding in your recycling bin?
Believe it or not, crafting a DIY Cardboard Wardrobe is not only possible but surprisingly stylish and practical. Cardboard, often overlooked, has a rich history of resourceful use, from packaging essential goods to inspiring innovative art installations. Think of it as a blank canvas for your organizational dreams!
In today’s world, where sustainability and affordability are more important than ever, this DIY project ticks all the boxes. Why spend a fortune on expensive furniture when you can create a functional and personalized wardrobe using materials you likely already have? Plus, it’s a fantastic way to reduce waste and give those cardboard boxes a new lease on life. I’m excited to show you how to transform those humble boxes into a chic and functional storage space that will not only declutter your room but also unleash your inner DIY genius!
DIY Cardboard Wardrobe: Build Your Own Sustainable Closet!
Hey there, fellow DIY enthusiasts! Are you short on closet space? Maybe you’re renting, living in a dorm, or just trying to be more eco-friendly? Well, I’ve got a fantastic project for you: a DIY cardboard wardrobe! It’s surprisingly sturdy, customizable, and a great way to repurpose those extra cardboard boxes you’ve been hoarding (admit it, we all do!).
This project might seem daunting at first, but trust me, with a little patience and these detailed instructions, you’ll have a functional and unique wardrobe in no time. Let’s get started!
Materials You’ll Need:
Before we dive in, let’s gather our supplies. The amount of cardboard you need will depend on the size of your desired wardrobe, so plan accordingly.
* Lots of Cardboard Boxes: Different sizes are helpful. Think appliance boxes, moving boxes, or even large shipping boxes. The sturdier, the better!
* Measuring Tape: Essential for accurate cuts and measurements.
* Utility Knife or Box Cutter: A sharp blade is crucial for clean cuts. Be careful!
* Metal Ruler or Straight Edge: To guide your cuts and ensure straight lines.
* Hot Glue Gun and Glue Sticks: For strong and quick bonding.
* Packing Tape: For reinforcing seams and adding extra stability.
* Pencil or Marker: For marking measurements and outlines.
* Optional:
* Paint or Contact Paper: To decorate and personalize your wardrobe.
* Wooden Dowels or Metal Rods: For hanging clothes.
* Cardboard Tubes (e.g., from paper towels or wrapping paper): For creating shelves or supports.
* Clamps: To hold pieces together while the glue dries.
* Cutting Mat: To protect your work surface.
Planning Your Wardrobe Design:
This is a crucial step! Before you start cutting, take some time to plan the dimensions and layout of your wardrobe. Consider these factors:
* Available Space: Measure the area where you plan to place the wardrobe.
* Storage Needs: How many clothes do you need to hang? How much shelf space do you need?
* Box Sizes: Assess the sizes of your cardboard boxes and how they can be best utilized.
* Desired Height and Width: Determine the overall dimensions of your wardrobe.
* Number of Sections: Will it be a single unit or multiple sections?
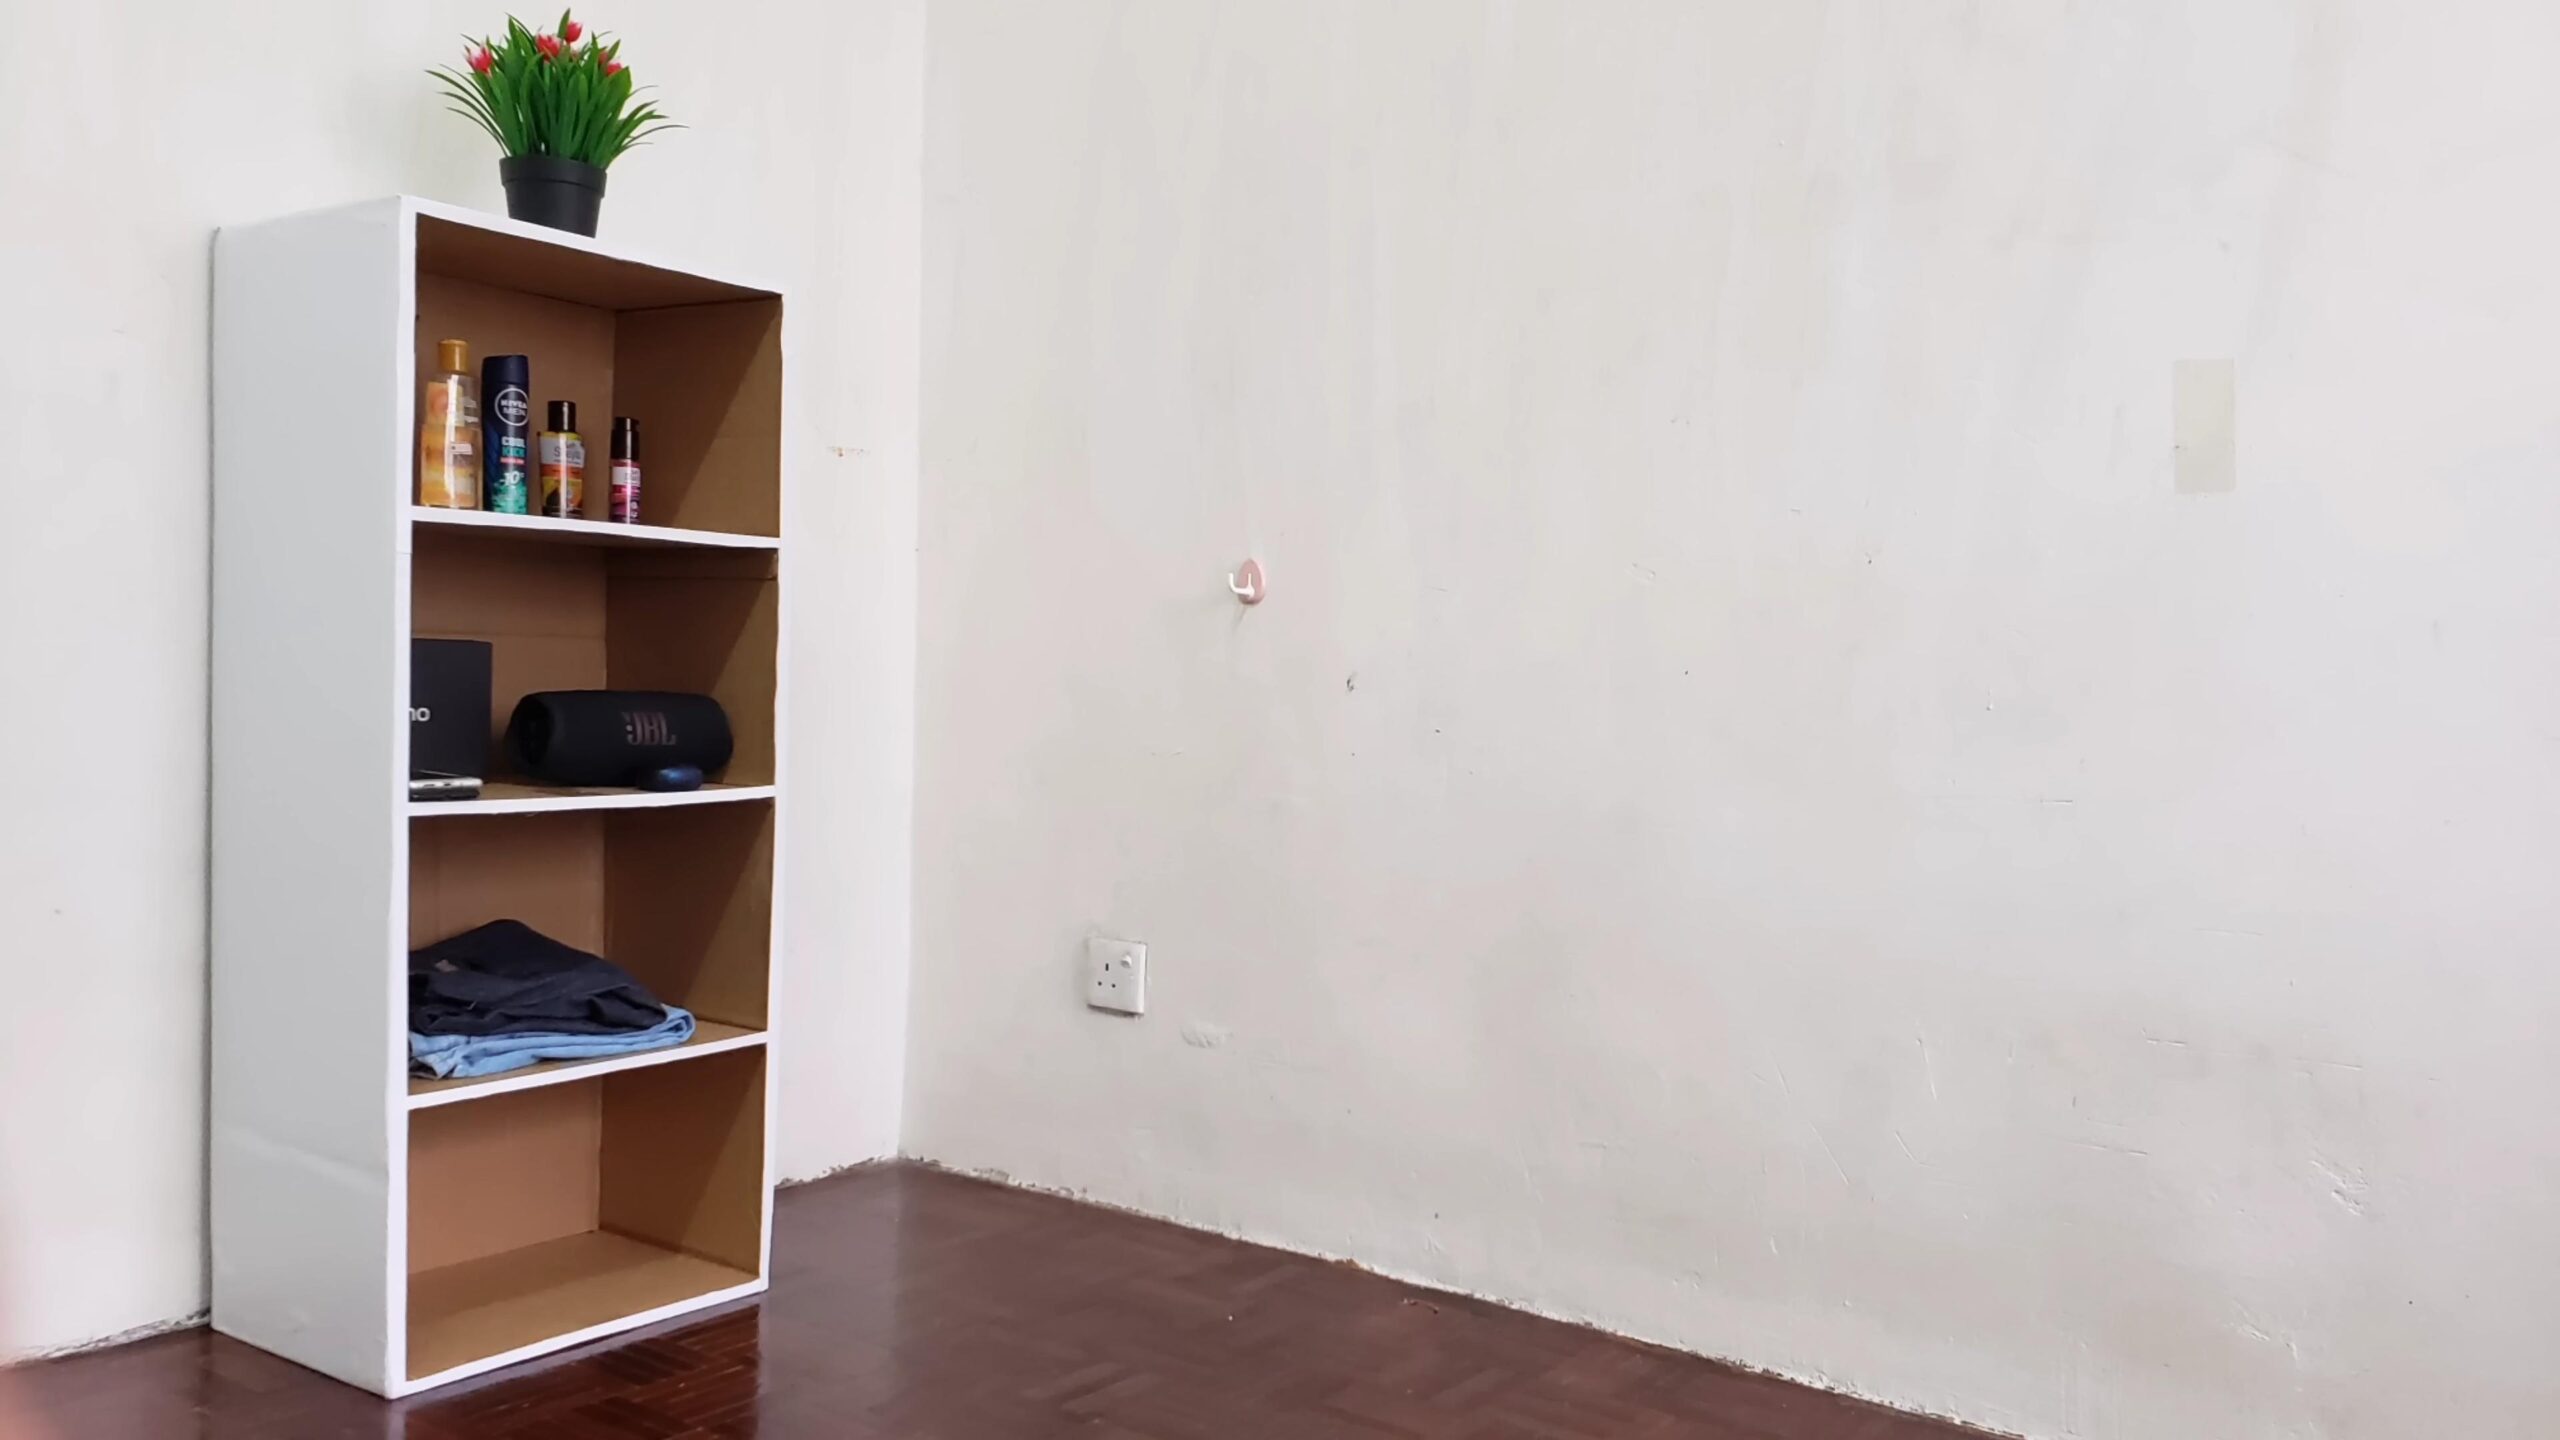
I recommend sketching out your design on paper. This will help you visualize the final product and avoid mistakes later on. Think about adding shelves, drawers (made from smaller boxes!), or even a shoe rack. The possibilities are endless!
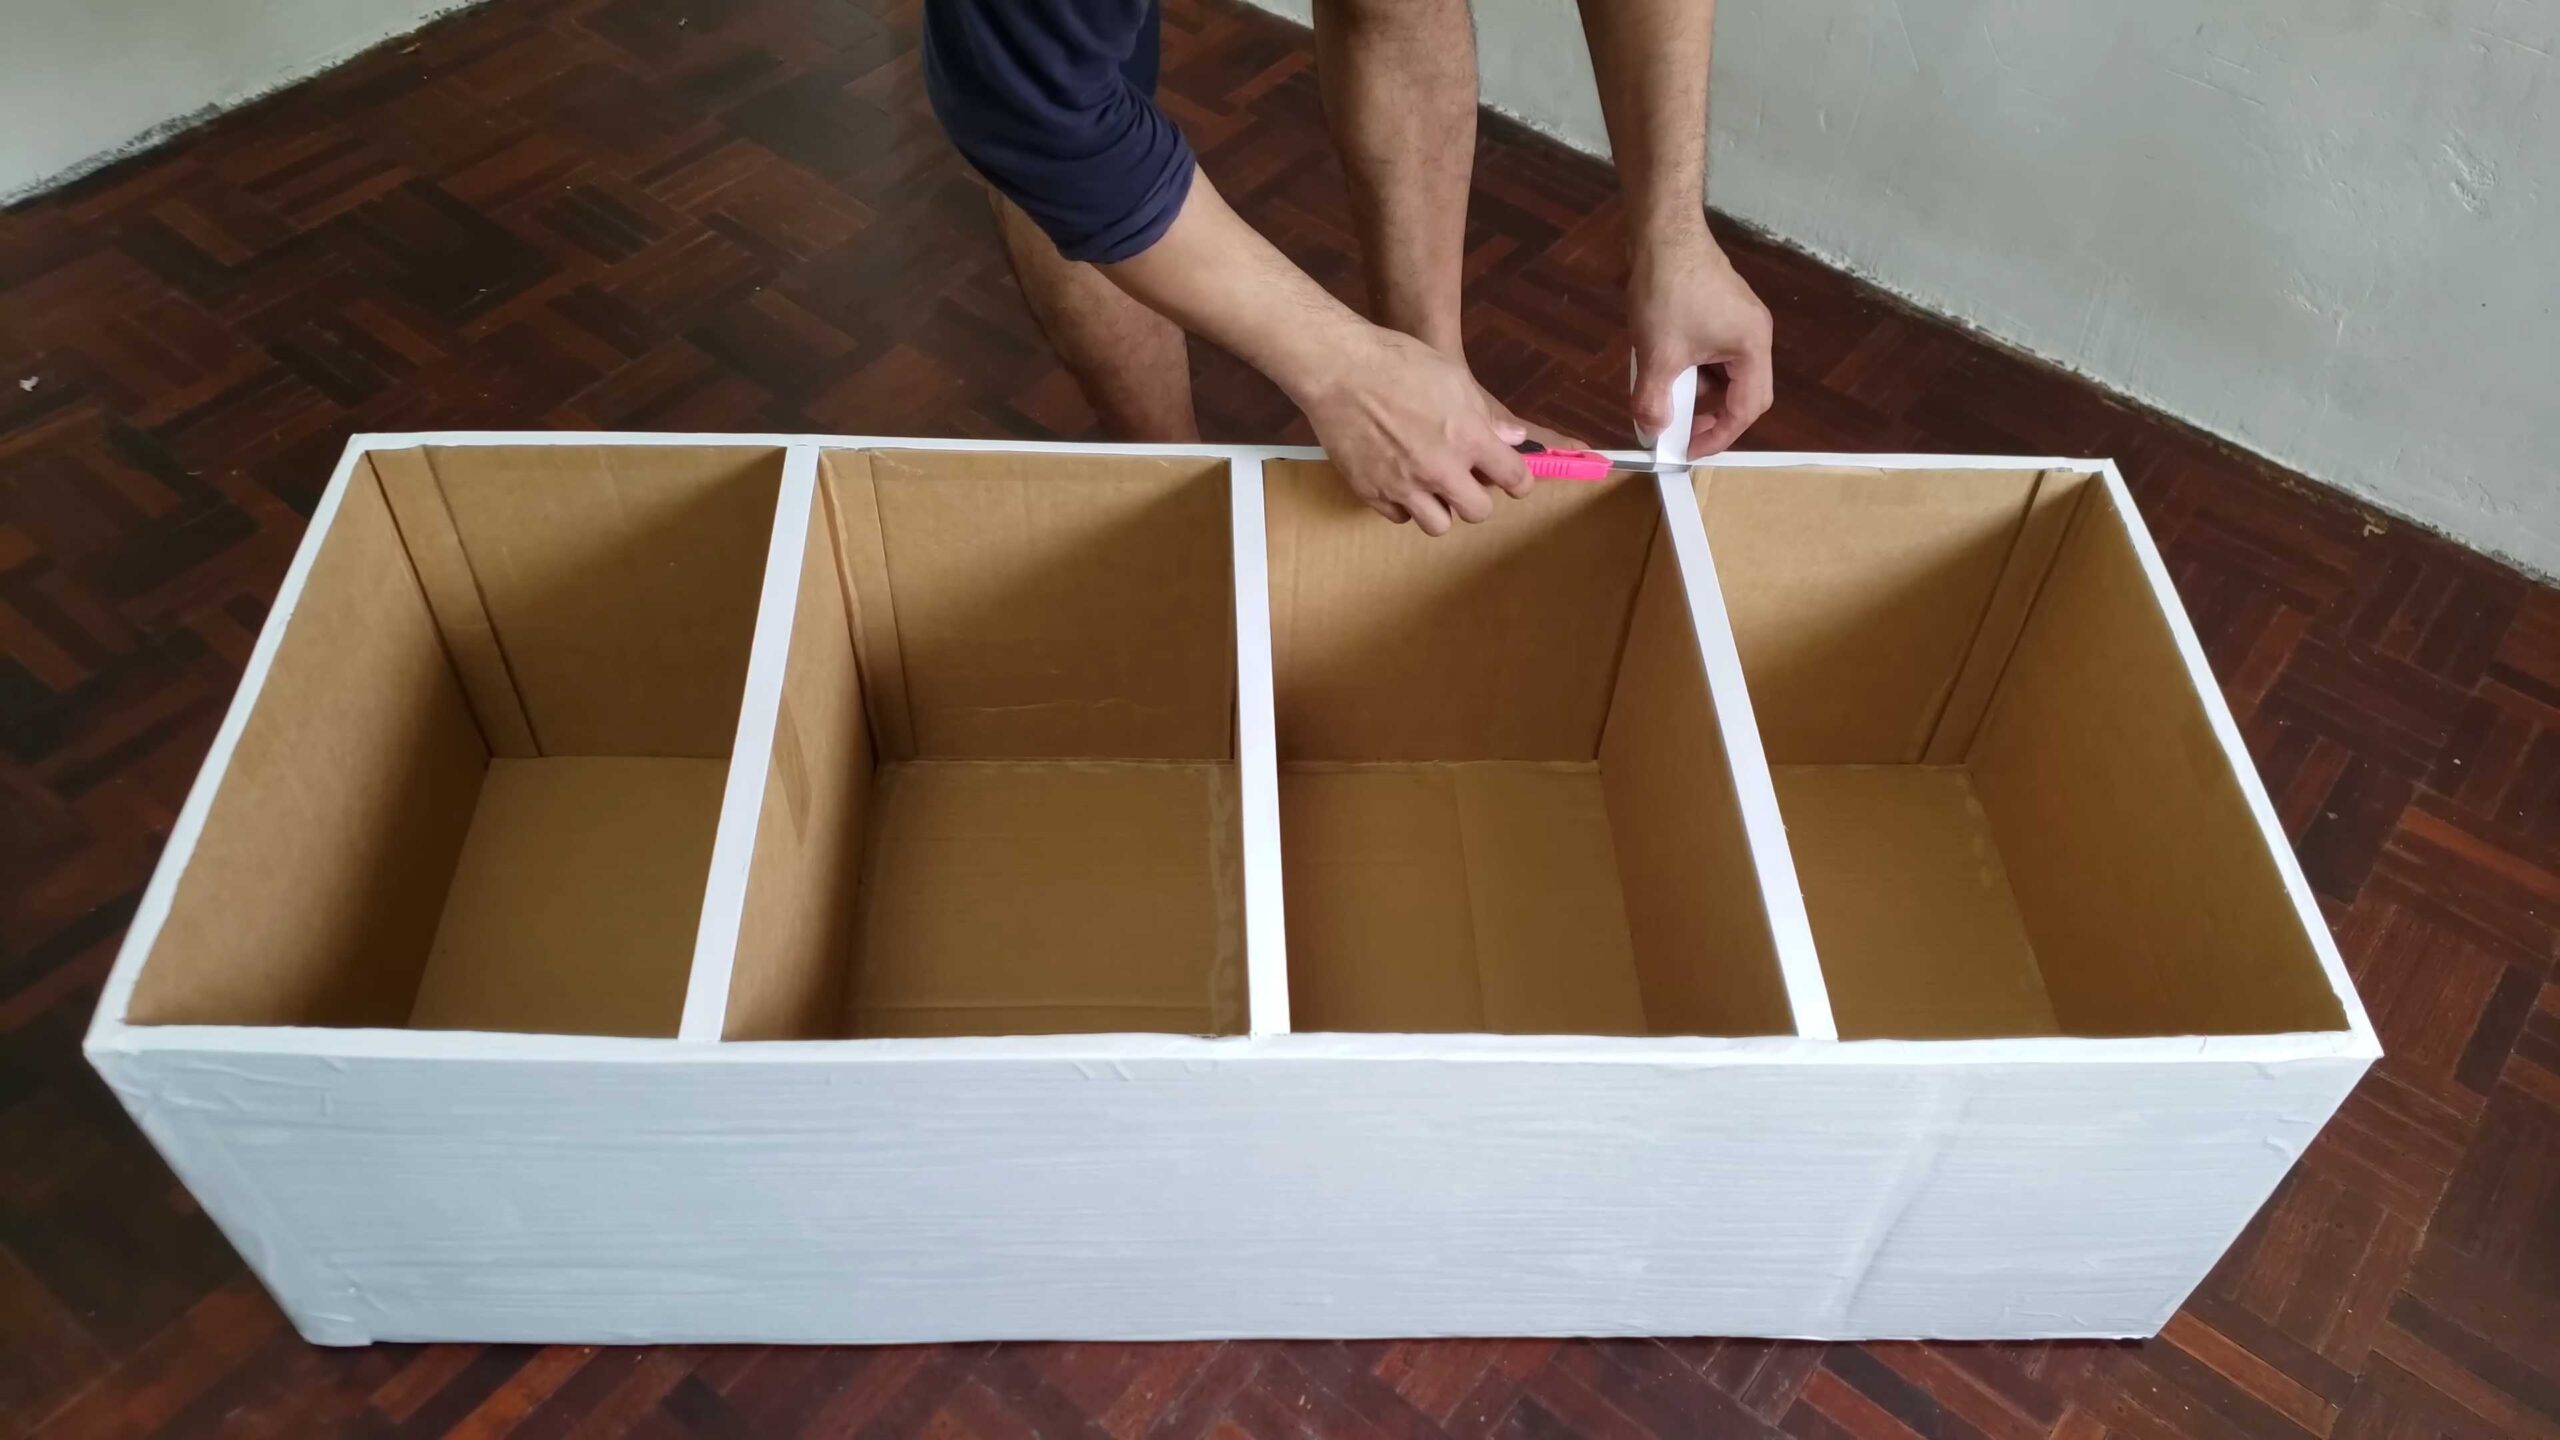
Building the Wardrobe Frame:
This is where the real construction begins! We’ll start by creating the main structure of the wardrobe.
1. Prepare the Base: Choose your largest and sturdiest box for the base. If it’s not quite the right size, you can modify it by cutting and taping it together. Make sure the base is level and stable. Reinforce the bottom with extra layers of cardboard and packing tape.
2. Create the Side Walls: Select boxes for the side walls. Ideally, they should be the same height. If not, you can trim them down using your utility knife and straight edge. Ensure the cuts are clean and straight.
3. Attach the Side Walls to the Base: Apply a generous amount of hot glue to the bottom edges of the side walls. Carefully position them onto the base, ensuring they are perpendicular and aligned. Use clamps to hold them in place while the glue dries. Reinforce the joints with packing tape for added strength.
4. Build the Top: Choose another sturdy box for the top of the wardrobe. It should be the same width as the base. Attach it to the top edges of the side walls using hot glue and packing tape, just like you did with the base.
5. Reinforce the Frame: Now that the basic frame is complete, it’s time to reinforce it. Cut strips of cardboard and glue them along the inside corners and edges of the frame. This will add significant strength and stability. Use plenty of hot glue and packing tape.
Adding Shelves and Hanging Rods:
Now that we have a solid frame, let’s add some functionality with shelves and a hanging rod.
1. Measure and Mark Shelf Positions: Decide where you want your shelves to be placed. Use your measuring tape and pencil to mark the positions on the inside of the side walls. Ensure the shelves are evenly spaced.
2. Create Shelf Supports: Cut strips of cardboard to act as shelf supports. These strips should be wide enough to provide adequate support for the shelves. Glue them to the side walls at the marked positions. You can also use cardboard tubes cut in half lengthwise for extra support.
3. Cut the Shelves: Measure the distance between the side walls and cut pieces of cardboard to fit snugly between them. Make sure the shelves are the correct width and depth.
4. Install the Shelves: Slide the shelves onto the supports and secure them with hot glue. Reinforce the edges of the shelves with packing tape.
5. Install the Hanging Rod: Decide where you want to place the hanging rod. Measure the distance between the side walls and cut a wooden dowel or metal rod to that length.
6. Create Hanging Rod Supports: Cut small squares of cardboard and roll them into tubes. Glue these tubes to the inside of the side walls at the desired height for the hanging rod. Make sure they are strong enough to support the weight of your clothes.
7. Secure the Hanging Rod: Insert the hanging rod into the supports. You can secure it with hot glue or by drilling small holes through the supports and inserting screws.
Creating Doors (Optional):
Adding doors will give your wardrobe a more polished look and help keep your clothes dust-free.
1. Measure the Door Openings: Measure the height and width of the openings where you want to install doors.
2. Cut the Door Panels: Cut pieces of cardboard to the measured dimensions. Make sure the doors are slightly larger than the openings to allow for overlap.
3. Attach Hinges: You can use simple cardboard hinges or purchase metal hinges from a hardware store. Attach the hinges to the door panels and the wardrobe frame using hot glue and screws (if using metal hinges).
4. Add a Closure Mechanism: You can use magnets, Velcro, or even simple cardboard latches to keep the doors closed. Attach the closure mechanism to the doors and the wardrobe frame.
Finishing Touches and Decoration:
Now for the fun part! Let’s personalize your wardrobe and make it look amazing.
1. Reinforce All Seams: Go over all the seams and edges with packing tape to ensure everything is securely fastened.
2. Cover with Contact Paper or Paint: This is where you can get creative! Cover the entire wardrobe with contact paper in your favorite color or pattern. Alternatively, you can paint it using acrylic paint. If painting, apply a primer first to help the paint adhere better.
3. Add Decorative Elements: Add decorative elements such as stencils, stickers, or even fabric scraps to personalize your wardrobe.
4. Install Knobs or Handles: If you added doors, install knobs or handles to make them easier to open and close. You can find inexpensive knobs at a hardware store or even make your own from cardboard.
Tips and Tricks:
* Use Strong Glue: Hot glue is great for quick bonding, but for extra strength, consider using a construction adhesive.
* Reinforce Weak Points: Pay special attention to reinforcing corners and edges, as these are the most vulnerable areas.
* Don’t Be Afraid to Experiment: This is your project, so feel free to get creative and try new things!
* Work in a Well-Ventilated Area: When using hot glue or paint, make sure you are working in a well-ventilated area.
* Take Your Time: This project may take a few days to complete, so don’t rush it. Take your time and enjoy the process.
* Consider Weight Limits: Remember that cardboard is not as strong as wood, so be mindful of the weight you place on the shelves and hanging rod.
And there you have it! Your very own DIY cardboard wardrobe. I hope you enjoyed this project as much as I did. It’s a great way to save money, be eco-friendly, and add a unique touch to your home. Happy crafting!
Conclusion
So, there you have it! Creating your own DIY cardboard wardrobe isn’t just a fun project; it’s a practical, budget-friendly, and eco-conscious solution to your storage woes. We’ve walked you through the steps, highlighting the simplicity and adaptability of this ingenious hack. But why is this a must-try?
First and foremost, it’s incredibly affordable. Forget shelling out hundreds (or even thousands!) on expensive furniture. With a little creativity and some repurposed cardboard boxes, you can construct a functional and surprisingly stylish wardrobe for a fraction of the cost. This makes it perfect for students, renters, or anyone on a tight budget.
Secondly, it’s a sustainable choice. By giving cardboard boxes a new lease on life, you’re actively reducing waste and contributing to a more environmentally friendly lifestyle. It’s a small change that can make a big difference.
Thirdly, it’s completely customizable. Unlike pre-fabricated wardrobes, you have complete control over the size, shape, and design of your DIY creation. Need extra hanging space? Add more rods. Want drawers? Incorporate smaller boxes. The possibilities are endless!
Variations and Suggestions:
* Fabric Covering: For a more polished look, consider covering your cardboard wardrobe with fabric. Burlap, linen, or even old curtains can add texture and visual appeal. Secure the fabric with glue or staples.
* Paint and Stencils: Unleash your inner artist! Paint your wardrobe with vibrant colors or use stencils to create intricate patterns. This is a great way to personalize your storage solution and make it a true reflection of your style.
* Reinforcement: For added durability, reinforce the corners and edges of your cardboard boxes with packing tape or duct tape. You can also use wooden dowels or metal rods for extra support, especially for heavier items.
* Adding Doors: Create doors using additional cardboard and hinges (you can even make hinges from fabric!). This will help keep your clothes dust-free and create a more enclosed look. Magnetic closures can be used to keep the doors shut.
* Labeling: Clearly label each section of your wardrobe to keep your clothes organized and easily accessible. Use labels, tags, or even write directly on the cardboard with a marker.
* Consider the Weight: Cardboard, while surprisingly strong, does have its limits. Avoid overloading your wardrobe with excessively heavy items. Distribute the weight evenly to prevent collapse.
* Location, Location, Location: Place your cardboard wardrobe in a dry area. Moisture can weaken the cardboard and cause it to warp or collapse.
We genuinely believe that this DIY cardboard wardrobe trick is a game-changer for anyone seeking affordable, sustainable, and customizable storage solutions. It’s a project that’s both rewarding and practical, and we’re confident that you’ll love the results.
So, what are you waiting for? Gather your cardboard boxes, unleash your creativity, and get started on your own DIY wardrobe today! We can’t wait to see what you create.
Don’t forget to share your creations with us! Post photos of your finished wardrobes on social media using #DIYCardboardWardrobe and tag us so we can admire your ingenuity. We’re eager to see your unique designs and hear about your experiences. Let’s inspire others to embrace the power of DIY and create a more sustainable future, one cardboard box at a time.
Frequently Asked Questions (FAQ)
Q: What kind of cardboard boxes should I use?
A: Ideally, you want to use sturdy, double-walled cardboard boxes. These offer the best support and durability. Appliance boxes, moving boxes, or even large shipping boxes are excellent choices. Avoid using thin or flimsy cardboard, as it won’t be strong enough to hold your clothes. Ensure the boxes are clean and dry before you start building.
Q: How do I make sure the wardrobe is stable?
A: Stability is key! Start with a solid base. Ensure the bottom boxes are level and securely taped together. Reinforce the corners and edges with packing tape or duct tape. Consider adding internal supports, such as wooden dowels or cardboard tubes, to strengthen the structure. Distribute the weight of your clothes evenly throughout the wardrobe. Avoid placing heavy items on the top shelf.
Q: What if I don’t have enough cardboard boxes?
A: Don’t worry! Cardboard boxes are readily available. Check with local grocery stores, appliance stores, or moving companies. They often have surplus boxes that they’re willing to give away. You can also ask friends, family, or neighbors if they have any boxes they’re not using. Online marketplaces and community groups can also be a good source for finding free or low-cost cardboard boxes.
Q: How do I cut the cardboard neatly?
A: A sharp utility knife or box cutter is the best tool for cutting cardboard. Use a metal ruler or straight edge as a guide to ensure clean, straight cuts. Always cut on a protected surface, such as a cutting mat or a piece of scrap cardboard, to avoid damaging your work area. Be careful when using sharp tools and always cut away from yourself.
Q: How do I attach the cardboard boxes together?
A: Packing tape is your best friend! Use wide, strong packing tape to securely attach the cardboard boxes together. Apply the tape generously, overlapping the edges for maximum strength. You can also use glue, but it may take longer to dry and may not be as strong as tape. For a more permanent bond, consider using construction adhesive.
Q: Can I paint the cardboard wardrobe? What kind of paint should I use?
A: Absolutely! Painting your cardboard wardrobe is a great way to personalize it and make it more visually appealing. Use acrylic paint, latex paint, or spray paint. Before painting, prime the cardboard with a primer designed for porous surfaces. This will help the paint adhere better and prevent it from soaking into the cardboard. Apply several thin coats of paint, allowing each coat to dry completely before applying the next.
Q: How do I clean the cardboard wardrobe?
A: To clean your cardboard wardrobe, simply wipe it down with a damp cloth. Avoid using excessive water, as it can damage the cardboard. For stubborn stains, you can use a mild detergent. Test the detergent on a small, inconspicuous area first to ensure it doesn’t damage the paint or finish.
Q: How long will a DIY cardboard wardrobe last?
A: The lifespan of your DIY cardboard wardrobe depends on several factors, including the quality of the cardboard, the construction techniques, and the weight of the items stored inside. With proper care and maintenance, a well-built cardboard wardrobe can last for several months or even years. Reinforcing the structure and avoiding overloading it will help extend its lifespan.
Q: Is a cardboard wardrobe suitable for all types of clothing?
A: A cardboard wardrobe is generally suitable for most types of clothing, including shirts, pants, dresses, and sweaters. However, it may not be ideal for very heavy items, such as winter coats or leather jackets. If you plan to store heavy items, reinforce the wardrobe accordingly.
Q: What if my cardboard wardrobe starts to sag or collapse?
A: If your cardboard wardrobe starts to sag or collapse, it’s likely due to excessive weight or weakened cardboard. Remove some of the items from the wardrobe to reduce the load. Reinforce the sagging areas with additional cardboard and tape. If the cardboard is severely damaged, consider replacing it with a new piece.
Q: Can I add shelves to my cardboard wardrobe?
A: Yes, you can definitely add shelves to your cardboard wardrobe. Cut pieces of cardboard to the desired size and shape. Reinforce the edges of the shelves with tape or cardboard strips. Attach the shelves to the sides of the wardrobe using tape, glue, or screws. Ensure the shelves are level and securely attached before placing items on them.
Q: How can I make my cardboard wardrobe look more stylish?
A: There are many ways to make your cardboard wardrobe look more stylish. Consider covering it with fabric, painting it with vibrant colors, or adding decorative elements such as stencils, stickers, or trim. You can also add hardware, such as knobs or pulls, to the doors or drawers. Get creative and personalize your wardrobe to match your style.
Q: Is a DIY cardboard wardrobe a good solution for long-term storage?
A: While a DIY cardboard wardrobe can be a great temporary or short-term storage solution, it may not be the best option for long-term storage, especially in humid or damp environments. Cardboard can be susceptible to moisture damage and pests. For long-term storage, consider investing in a more durable storage solution, such as a plastic storage container or a wooden wardrobe.
Leave a Comment