

DIY carpet stain remover: Let’s face it, accidents happen! Whether it’s a spilled glass of wine during a cozy movie night, muddy paw prints from your furry friend, or a rogue coffee splash on your way out the door, carpet stains are an inevitable part of life. But before you resign yourself to living with unsightly blemishes or shelling out a fortune for professional cleaning, I’m here to tell you there’s a better way!
For generations, resourceful homeowners have relied on simple, homemade solutions to tackle household messes. Think back to your grandmother’s era – harsh chemicals were often replaced with natural ingredients like vinegar and baking soda. These time-tested remedies weren’t just about saving money; they were about using what was readily available and minimizing exposure to potentially harmful substances. This tradition of DIY cleaning is not only economical but also empowers us to take control of our homes and the products we use.
That’s why I’m so excited to share my favorite DIY carpet stain remover recipes and techniques with you. In this article, we’ll dive into easy-to-make solutions using common household items that are not only effective but also gentle on your carpets and the environment. Say goodbye to stubborn stains and hello to a fresh, clean carpet – all without breaking the bank or resorting to harsh chemicals. Let’s get started!
DIY Carpet Stain Remover: Banish Stains Like a Pro!
Hey there, fellow DIY enthusiasts! Let’s face it, carpets are magnets for spills and stains. Whether it’s a rogue coffee cup, muddy paw prints, or a mysterious red wine incident, life happens. But don’t despair! Before you call in the professionals (and empty your wallet), let’s try a powerful, homemade carpet stain remover that’s surprisingly effective and uses ingredients you probably already have in your pantry. I’ve personally used this method countless times, and it’s saved me a fortune!
Gather Your Supplies
Before we dive in, let’s make sure we have everything we need. This will make the process smooth and efficient. Trust me, you don’t want to be running around mid-stain removal!
* Spray Bottle: A clean, empty spray bottle is essential for applying the solution evenly.
* White Vinegar: This is our secret weapon! Vinegar is a natural disinfectant and deodorizer, and it’s fantastic at breaking down stains.
* Baking Soda: Another powerhouse ingredient! Baking soda helps absorb odors and lift stains.
* Dish Soap: A mild dish soap (like Dawn) will help cut through grease and grime. Avoid using anything with bleach or strong dyes.
* Warm Water: Warm water helps activate the cleaning power of the other ingredients.
* Clean Cloths or Sponges: You’ll need these to blot and scrub the stain. Microfiber cloths work best!
* Vacuum Cleaner: We’ll use this to remove any residue after the stain is gone.
* Optional: Essential Oils (Lemon, Lavender, or Tea Tree): A few drops of essential oil can add a pleasant scent and boost the cleaning power. Lemon is great for grease, lavender for general cleaning, and tea tree for its antibacterial properties.
Mixing the Magic Potion
Now for the fun part! Let’s create our stain-busting solution.
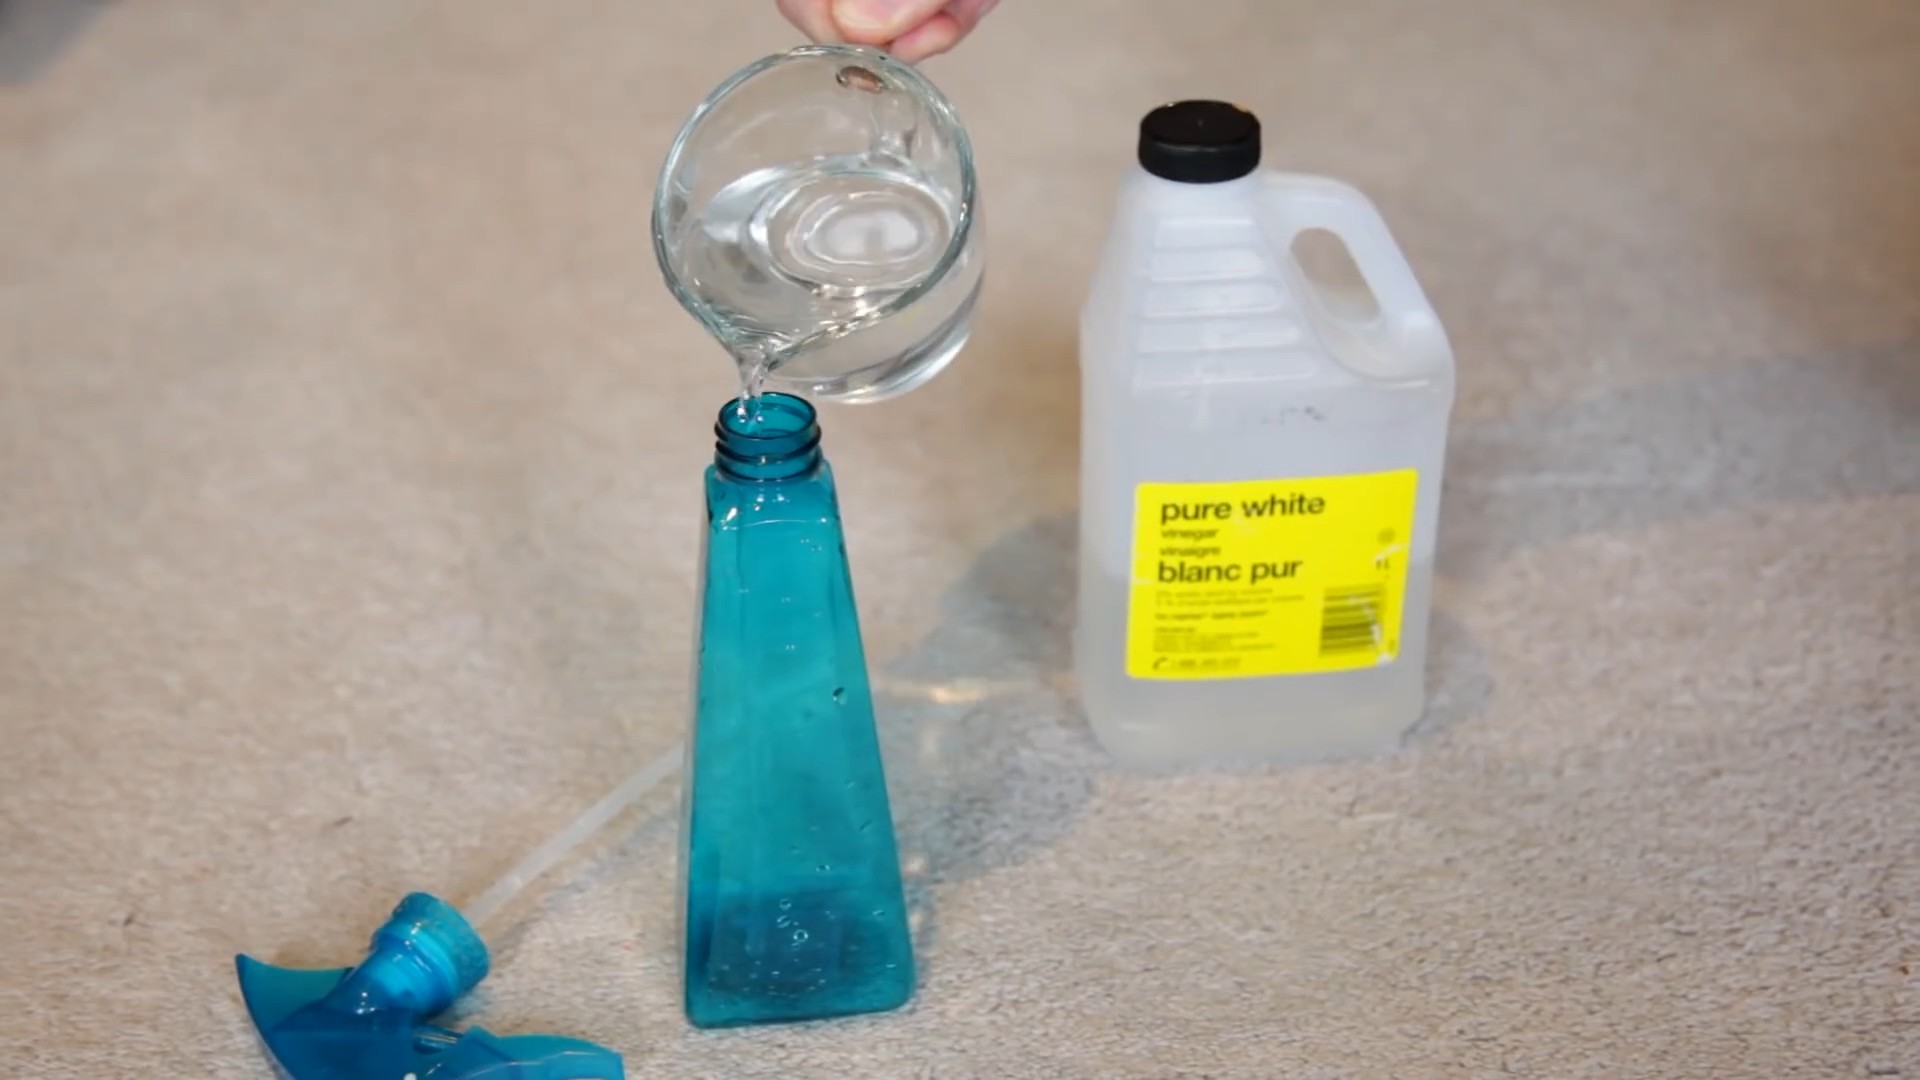
1. Combine Ingredients: In your spray bottle, mix the following:
* 1/2 cup white vinegar
* 1/4 cup baking soda
* 1 teaspoon mild dish soap
* 1 cup warm water
* (Optional) 5-10 drops of essential oil
2. Mix Gently: Close the spray bottle tightly and gently swirl the mixture to combine. Be careful, as the baking soda and vinegar will react and create some fizz! Don’t shake it vigorously, or you might end up with a foamy mess.
3. Test in an Inconspicuous Area: Before applying the solution to the stain, test it on a hidden area of your carpet (like under a piece of furniture or in a closet) to ensure it doesn’t discolor or damage the fibers. This is a crucial step, especially for delicate or antique carpets. Wait for the test area to dry completely before proceeding.
Tackling the Stain: Step-by-Step
Okay, we’ve got our supplies and our solution. Let’s get down to business and conquer that stain!
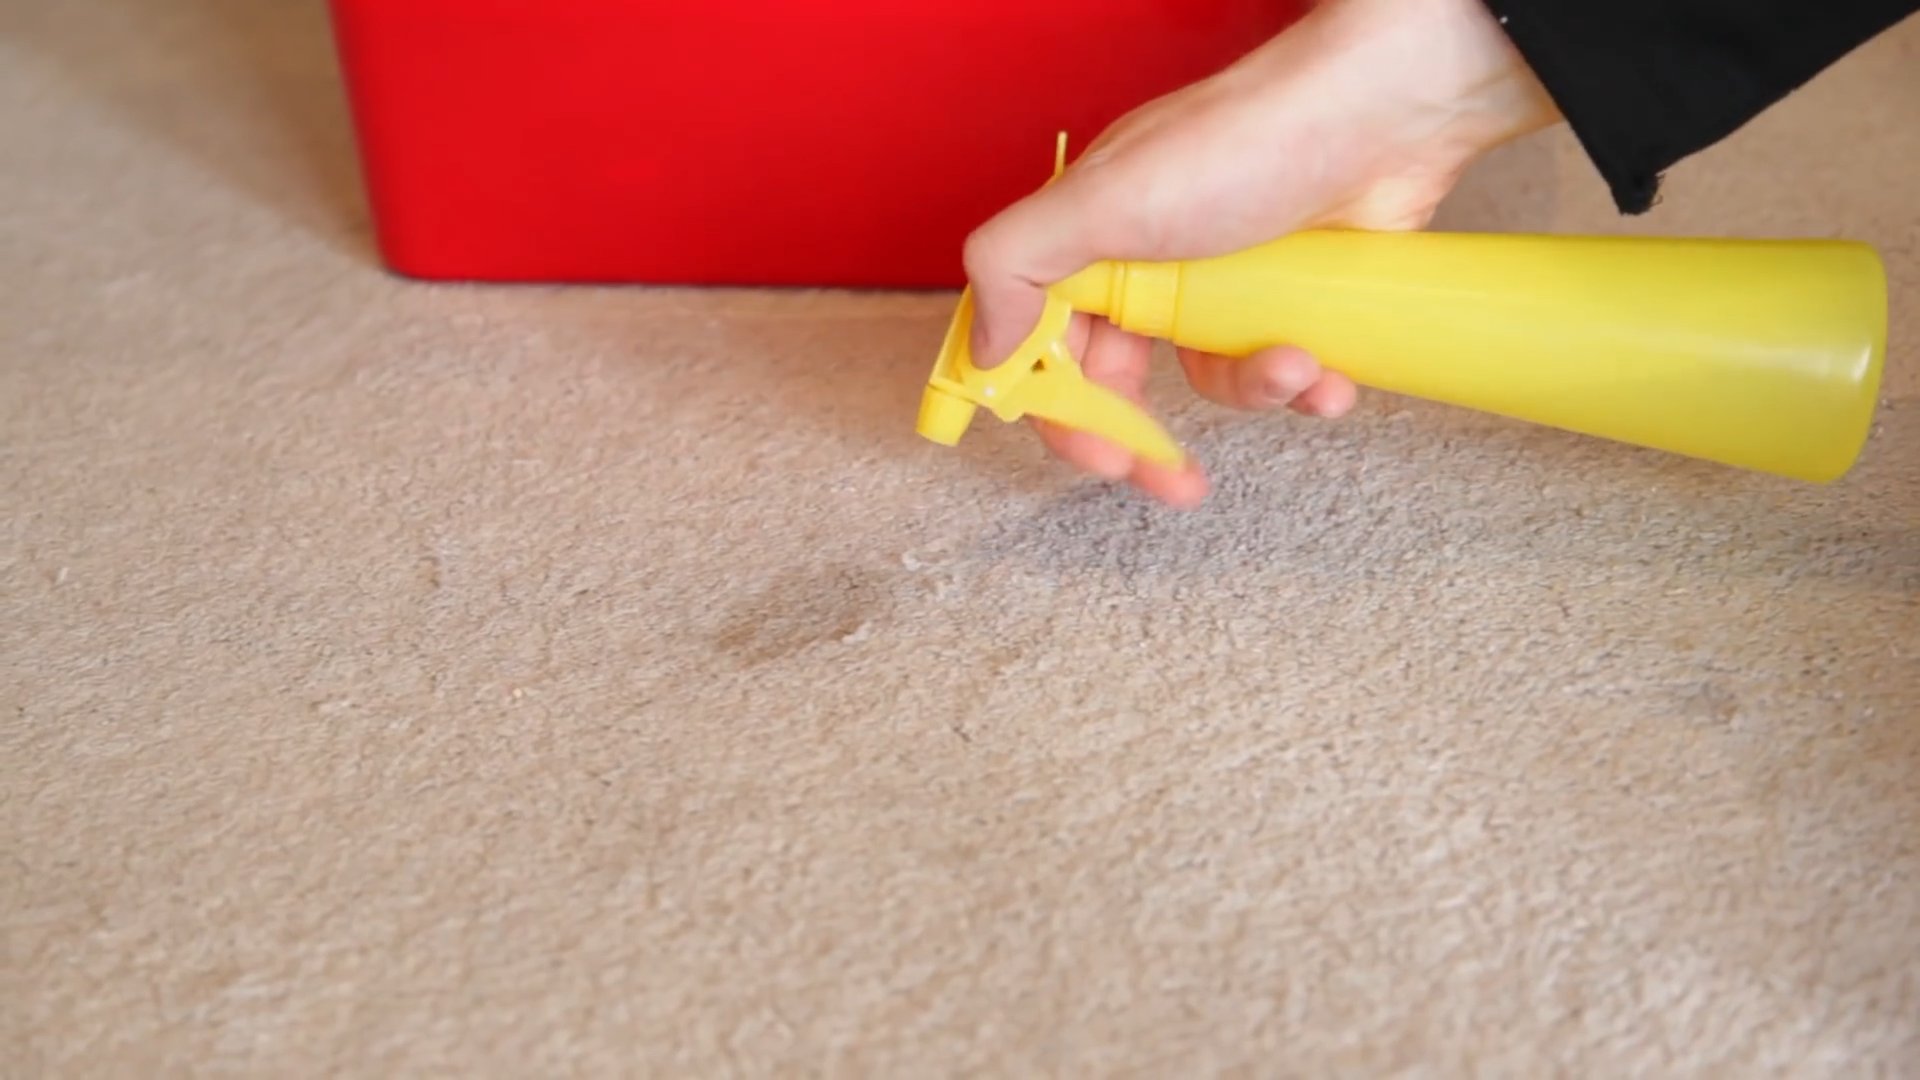
1. Blot the Stain: If the stain is fresh, immediately blot up as much of the liquid as possible with a clean cloth or paper towel. Work from the outside of the stain inward to prevent it from spreading. Apply firm pressure, but avoid rubbing, which can grind the stain deeper into the fibers.
2. Spray the Solution: Generously spray the stain with your DIY carpet stain remover. Make sure the area is thoroughly saturated, but not soaking wet. You want the solution to penetrate the stain, but you don’t want to over-saturate the carpet padding underneath.
3. Let it Sit: Allow the solution to sit on the stain for 5-10 minutes. This gives the ingredients time to break down the stain and lift it from the fibers. For stubborn stains, you can let it sit for up to 30 minutes, but keep an eye on it to make sure it doesn’t dry out completely.
4. Blot Again: After the solution has had time to work its magic, blot the stain again with a clean cloth or sponge. Use a blotting motion, working from the outside in. You should see the stain transferring to the cloth.
5. Scrub Gently (If Needed): If the stain is still visible after blotting, gently scrub the area with a soft-bristled brush or sponge. Avoid using harsh scrubbing motions, as this can damage the carpet fibers. Work in a circular motion, applying light pressure.
6. Rinse with Water: Once you’ve removed as much of the stain as possible, rinse the area with clean, warm water. You can do this by lightly spraying the area with water and then blotting it up with a clean cloth. Repeat this process until you’ve removed all traces of the cleaning solution.
7. Dry the Area: To dry the area, blot it with a clean, dry cloth. You can also use a fan or a hairdryer (on a low setting) to speed up the drying process. Make sure the area is completely dry to prevent mold or mildew growth.
8. Vacuum: Once the area is completely dry, vacuum it thoroughly to restore the carpet fibers and remove any remaining residue.
Dealing with Specific Stain Types
While our general stain remover is pretty versatile, some stains require a little extra attention. Here are a few tips for tackling specific types of stains:
Coffee Stains
Coffee stains can be tricky, especially if they’ve been sitting for a while. For fresh coffee stains, blot immediately and then follow the steps above. For older stains, you might need to repeat the process a few times. You can also try adding a little bit of hydrogen peroxide to the solution (test in an inconspicuous area first!) for extra stain-fighting power.
Red Wine Stains
Red wine stains are notorious for being difficult to remove. The key is to act fast! Blot up as much of the wine as possible immediately. Then, pour a generous amount of salt onto the stain. The salt will absorb the remaining wine. Let it sit for several hours, or even overnight, and then vacuum it up. Follow with our DIY stain remover for any remaining discoloration.
Pet Stains
Pet stains require special attention because they can leave behind lingering odors. After removing the stain with our DIY solution, sprinkle baking soda liberally over the area and let it sit for several hours, or even overnight. The baking soda will absorb any remaining odors. Then, vacuum it up. You can also use an enzymatic cleaner specifically designed for pet stains for extra odor control.
Grease Stains
Grease stains can be tough to remove because they’re oily and tend to cling to carpet fibers. For grease stains, start by blotting up as much of the grease as possible with a clean cloth or paper towel. Then, sprinkle cornstarch or baking soda over the stain to absorb the remaining grease. Let it sit for 30 minutes, and then vacuum it up. Follow with our DIY stain remover, paying special attention to the dish soap, which will help cut through the grease.
Preventing Future Stains
Of course, the best way to deal with stains is to prevent them in the first place! Here are a few tips for keeping your carpets clean and stain-free:
* Act Fast: The sooner you address a spill, the easier it will be to remove the stain.
* Use Rugs and Mats: Place rugs and mats in high-traffic areas to protect your carpets from dirt and spills.
* Regular Vacuuming: Vacuum your carpets regularly (at least once a week) to remove dirt and debris that can contribute to staining.
* Professional Cleaning: Consider having your carpets professionally cleaned once or twice a year to remove deep-seated dirt and stains.
* Stain Protection: Apply a stain protector to your carpets to help repel spills and make them easier to clean.
Important Considerations
* Always test in an inconspicuous area first! I can’t stress this enough.
* Avoid using too much water. Over-saturating your carpet can lead to mold and mildew growth.
* Be patient. Some stains may require multiple treatments to remove completely.
* If you’re unsure about anything, consult a professional carpet cleaner.
And there you have it! With a little elbow grease and this simple DIY carpet stain remover, you can keep your carpets looking fresh and clean without breaking the bank. Happy cleaning!
Conclusion
So, there you have it! A simple, effective, and budget-friendly way to tackle those pesky carpet stains. This DIY carpet stain remover isn’t just about saving money; it’s about taking control of your cleaning routine and knowing exactly what’s going onto your carpets and into your home. Commercial stain removers often contain harsh chemicals that can be harmful to your family and pets, not to mention the environment. By making your own, you’re opting for a safer, more natural alternative without sacrificing cleaning power.
Why is this DIY trick a must-try? Because it works! It’s a powerful combination of readily available ingredients that target a wide range of stains, from coffee spills and muddy footprints to pet accidents and food messes. Plus, the satisfaction of creating something yourself and seeing it work wonders on your carpets is incredibly rewarding.
But the best part? You can customize this recipe to suit your specific needs. For instance, if you’re dealing with a particularly stubborn stain, you can increase the concentration of vinegar or baking soda. For a more pleasant scent, add a few drops of your favorite essential oil, like lavender or lemon, to the spray bottle. Just be sure to test the essential oil on an inconspicuous area of your carpet first to ensure it doesn’t cause any discoloration.
Another variation you might consider is using club soda instead of water. The carbonation in club soda can help to lift stains and loosen dirt, making it even more effective. For older, set-in stains, you might need to repeat the application process several times, allowing the solution to sit for a longer period before blotting.
Don’t be afraid to experiment and find what works best for your carpets and your specific stain challenges. The beauty of this DIY approach is its flexibility and adaptability.
We’re confident that once you try this DIY carpet stain remover, you’ll be amazed by the results. It’s a game-changer for anyone who wants to keep their carpets looking fresh and clean without breaking the bank or exposing their family to harsh chemicals.
Now, it’s your turn! We encourage you to give this DIY carpet stain remover a try and see the difference it can make in your home. And most importantly, we want to hear about your experience! Share your before-and-after photos, your tips and tricks, and any variations you’ve tried in the comments below. Let’s build a community of DIY cleaning enthusiasts and help each other keep our carpets looking their best! Your feedback will not only help other readers but also inspire us to create even more helpful and effective DIY cleaning solutions. So, grab your ingredients, get mixing, and prepare to be amazed! Happy cleaning!
Frequently Asked Questions (FAQ)
What types of stains does this DIY carpet stain remover work on?
This DIY carpet stain remover is effective on a wide range of common household stains, including:
* Coffee and tea spills
* Red wine stains (especially when treated quickly)
* Mud and dirt
* Pet stains (urine, vomit, feces)
* Food spills (sauce, grease, chocolate)
* Ink (depending on the type of ink)
* Juice stains
However, it’s important to note that some stains, particularly older or heavily set-in stains, may require multiple treatments or a professional cleaning. Always test the solution on an inconspicuous area of your carpet first to ensure it doesn’t cause any discoloration.
Is this DIY carpet stain remover safe for all types of carpets?
While this DIY carpet stain remover is generally safe for most types of carpets, it’s crucial to test it on an inconspicuous area first, especially if you have delicate or natural fiber carpets like wool or silk. Some carpets may be more sensitive to vinegar or baking soda, so it’s always best to err on the side of caution. If you’re unsure about the suitability of this solution for your carpet, consult with a professional carpet cleaner.
How long should I leave the solution on the stain before blotting?
The amount of time you leave the solution on the stain will depend on the severity and age of the stain. For fresh stains, you can blot immediately after applying the solution. For older or more stubborn stains, allow the solution to sit for 5-10 minutes before blotting. For heavily set-in stains, you may need to repeat the application process several times, allowing the solution to sit for up to 30 minutes each time. Always blot gently and avoid rubbing, as rubbing can spread the stain and damage the carpet fibers.
Can I use this DIY carpet stain remover on upholstery?
Yes, this DIY carpet stain remover can also be used on upholstery, but it’s even more important to test it on an inconspicuous area first, as upholstery fabrics can be more delicate than carpets. Follow the same application and blotting instructions as you would for carpets. Avoid saturating the upholstery with the solution, and allow it to air dry completely after cleaning.
What if the stain doesn’t come out completely after the first treatment?
Don’t be discouraged if the stain doesn’t disappear completely after the first treatment. Some stains, especially older or heavily set-in ones, may require multiple applications. Repeat the application and blotting process several times, allowing the solution to sit for a longer period each time. You can also try increasing the concentration of vinegar or baking soda in the solution. If the stain persists after several treatments, it may be necessary to consult with a professional carpet cleaner.
Can I add essential oils to this DIY carpet stain remover?
Yes, you can add a few drops of your favorite essential oil to the spray bottle for a more pleasant scent. Lavender, lemon, and tea tree oil are all good options. However, be sure to test the essential oil on an inconspicuous area of your carpet first to ensure it doesn’t cause any discoloration. Also, be mindful of using essential oils if you have pets, as some essential oils can be toxic to animals.
How should I store the leftover DIY carpet stain remover?
Store the leftover DIY carpet stain remover in a tightly sealed spray bottle in a cool, dark place. The solution should be good for several months. However, it’s always best to make a fresh batch each time you need it to ensure maximum effectiveness.
Is baking soda harmful to my vacuum cleaner?
While baking soda is generally safe for vacuum cleaners, it’s important to use it sparingly. Excessive amounts of baking soda can clog the filter and damage the motor. If you’re using baking soda to deodorize your carpet, sprinkle a thin layer over the carpet, let it sit for 15-30 minutes, and then vacuum thoroughly. Be sure to clean your vacuum cleaner’s filter regularly to prevent clogs.
What are the benefits of using a DIY carpet stain remover over commercial products?
There are several benefits to using a DIY carpet stain remover over commercial products:
* **Cost-effective:** DIY solutions are typically much cheaper than commercial products.
* **Safer:** DIY solutions often contain fewer harsh chemicals, making them safer for your family and pets.
* **Environmentally friendly:** DIY solutions are often more environmentally friendly than commercial products, as they reduce the use of plastic packaging and harmful chemicals.
* **Customizable:** You can customize the ingredients in your DIY solution to suit your specific needs and preferences.
* **Control over ingredients:** You know exactly what’s going onto your carpets and into your home.
What if I don’t have vinegar? Can I substitute it with something else?
While vinegar is a key ingredient in this DIY carpet stain remover due to its acidity and cleaning properties, you can try substituting it with lemon juice in a pinch. Lemon juice also has acidic properties that can help to break down stains. However, vinegar is generally more effective and readily available. If you don’t have either vinegar or lemon juice, you can try using a solution of baking soda and water, but it may not be as effective on all types of stains.

Leave a Comment