

DIY Cucumber Soap Recipe: Who doesn’t love the refreshing feeling of a cool cucumber on a hot summer day? Imagine capturing that invigorating sensation in your daily shower! This isn’t just another soap recipe; it’s a ticket to a spa-like experience right in your own bathroom. For centuries, cucumbers have been celebrated for their soothing and hydrating properties, dating back to ancient civilizations where they were used in beauty rituals.
But why should you bother making your own cucumber soap? Well, store-bought soaps often contain harsh chemicals that can strip your skin of its natural oils, leaving it feeling dry and irritated. With this DIY cucumber soap recipe, you have complete control over the ingredients, ensuring a gentle and nourishing cleanse. Plus, it’s incredibly satisfying to create something beautiful and beneficial with your own two hands! I’m excited to share this simple yet effective recipe that will leave your skin feeling refreshed, revitalized, and oh-so-smooth. Get ready to ditch those harsh chemicals and embrace the natural goodness of cucumber!
DIY Cucumber Soap: A Refreshing Treat for Your Skin
Hey there, fellow DIY enthusiasts! Today, I’m super excited to share one of my favorite homemade soap recipes: Cucumber Soap! This soap is incredibly refreshing, especially during the warmer months, and it’s packed with skin-loving benefits thanks to the cucumber. Plus, making your own soap is surprisingly easy and rewarding. Let’s dive in!
Why Cucumber Soap?
Cucumber isn’t just for salads! It’s a fantastic ingredient for skincare because it’s:
* Hydrating: Cucumber has a high water content, making it excellent for moisturizing dry skin.
* Soothing: It can help calm irritated skin, reduce redness, and relieve sunburn.
* Rich in Antioxidants: Cucumber contains antioxidants that protect your skin from damage caused by free radicals.
* Brightening: It can help even out skin tone and reduce the appearance of dark circles.
Gathering Your Supplies
Before we start, let’s make sure we have everything we need. Safety first! Remember to wear gloves and eye protection when working with lye.
* Lye (Sodium Hydroxide): This is essential for saponification (the chemical reaction that turns oils into soap). You can find it at most hardware stores or online. Handle with extreme care!
* Distilled Water: To dissolve the lye. Using distilled water ensures there are no impurities that could affect the soap.
* Coconut Oil: This adds hardness and cleansing properties to the soap. I usually use refined coconut oil to avoid a strong coconut scent.
* Olive Oil: This contributes to a mild and moisturizing soap. Extra virgin olive oil is great, but regular olive oil works just as well.
* Palm Oil (Optional): Palm oil adds hardness and lather. If you’re concerned about sustainability, you can substitute it with shea butter or cocoa butter, but the soap might be a bit softer.
* Cucumber: The star of the show! You’ll need about one large cucumber.
* Essential Oils (Optional): For fragrance. I like to use a blend of peppermint and tea tree oil for a refreshing scent, but you can choose your favorites. Lavender, rosemary, or even a cucumber fragrance oil would work well.
* Soap Mold: You can use a silicone mold, a wooden mold lined with parchment paper, or even a cardboard box lined with plastic wrap.
* Stick Blender: This is crucial for emulsifying the oils and lye solution. A regular blender won’t work as well.
* Two Heat-Resistant Containers: One for the lye solution and one for the oils.
* Thermometer: To monitor the temperature of the lye solution and oils.
* Gloves and Eye Protection: Safety first! Lye is corrosive and can cause burns.
* Apron: To protect your clothing.
* Scale: For accurate measurements. Soapmaking is a science, so precise measurements are important.
* Spoons or Spatulas: For stirring.
* Vinegar: To neutralize any lye spills.
Recipe (for approximately 2 lbs of soap)
This recipe is a guideline, and you can adjust it slightly to suit your preferences. However, it’s important to maintain the correct lye concentration for safe and effective saponification.
* Coconut Oil: 9 oz
* Olive Oil: 12 oz
* Palm Oil (or Shea Butter/Cocoa Butter): 6 oz
* Lye (Sodium Hydroxide): 4.1 oz
* Distilled Water: 10.5 oz
* Cucumber Puree: 4 oz (from about 1 large cucumber)
* Essential Oils (Optional): 0.5 – 1 oz (depending on your preference)
Step-by-Step Instructions
Okay, let’s get started! Remember to work in a well-ventilated area and take your time.
Phase 1: Preparing the Lye Solution
This is the most crucial and potentially dangerous step, so pay close attention.
1. Measure the Distilled Water: Carefully measure the distilled water into your heat-resistant container.
2. Measure the Lye: In a separate container, carefully measure the lye.
3. Slowly Add Lye to Water: Always add the lye to the water, never the other way around! Slowly pour the lye into the water, stirring constantly with a spoon or spatula. The mixture will heat up rapidly.
4. Monitor the Temperature: Use your thermometer to monitor the temperature of the lye solution. It will likely reach around 180-200°F (82-93°C).
5. Let it Cool: Set the lye solution aside in a safe place to cool down. You want it to reach a temperature of around 100-120°F (38-49°C).
Phase 2: Preparing the Oils
1. Measure the Oils: In your other heat-resistant container, measure out the coconut oil, olive oil, and palm oil (or shea butter/cocoa butter).
2. Melt the Oils: If your coconut oil and palm oil are solid, gently melt them over low heat on the stove or in the microwave. Be careful not to overheat the oils.
3. Combine the Oils: Once the oils are melted, combine them in the container and stir well.
4. Monitor the Temperature: Use your thermometer to monitor the temperature of the oils. You want them to reach a temperature of around 100-120°F (38-49°C), similar to the lye solution.
Phase 3: Preparing the Cucumber Puree
1. Wash and Peel the Cucumber: Wash the cucumber thoroughly and peel it.
2. Puree the Cucumber: Cut the cucumber into chunks and puree it in a blender or food processor until smooth.
3. Measure the Cucumber Puree: Measure out 4 oz of cucumber puree. You can strain it through a cheesecloth if you want a smoother soap, but I usually leave it as is for added texture.
Phase 4: Combining the Lye Solution and Oils
This is where the magic happens!
1. Check Temperatures: Make sure both the lye solution and the oils are around 100-120°F (38-49°C). The closer the temperatures are, the better.
2. Slowly Add Lye Solution to Oils: Slowly pour the lye solution into the oils, stirring constantly with your stick blender.
3. Emulsify: Continue blending with the stick blender until the mixture reaches “trace.” Trace is when the mixture thickens enough that a drizzle of the soap batter on top of the mixture leaves a visible trace for a few seconds before disappearing. This usually takes a few minutes. Be patient!
4. Add Cucumber Puree and Essential Oils: Once you’ve reached trace, add the cucumber puree and essential oils (if using) to the soap batter.
5. Stir Well: Gently stir the cucumber puree and essential oils into the soap batter until they are evenly distributed.
Phase 5: Pouring and Curing the Soap
Almost there!
1. Pour into Mold: Carefully pour the soap batter into your prepared soap mold.
2. Tap the Mold: Gently tap the mold on the counter to release any air bubbles.
3. Insulate (Optional): If you’re using a wooden or cardboard mold, you can insulate it with a towel or blanket to help the soap saponify evenly. This is especially important in colder climates.
4. Let it Sit: Let the soap sit in the mold for 24-48 hours. During this time, the saponification process will continue, and the soap will harden.
5. Unmold: After 24-48 hours, carefully unmold the soap. If it’s still too soft, let it sit for another day or two.
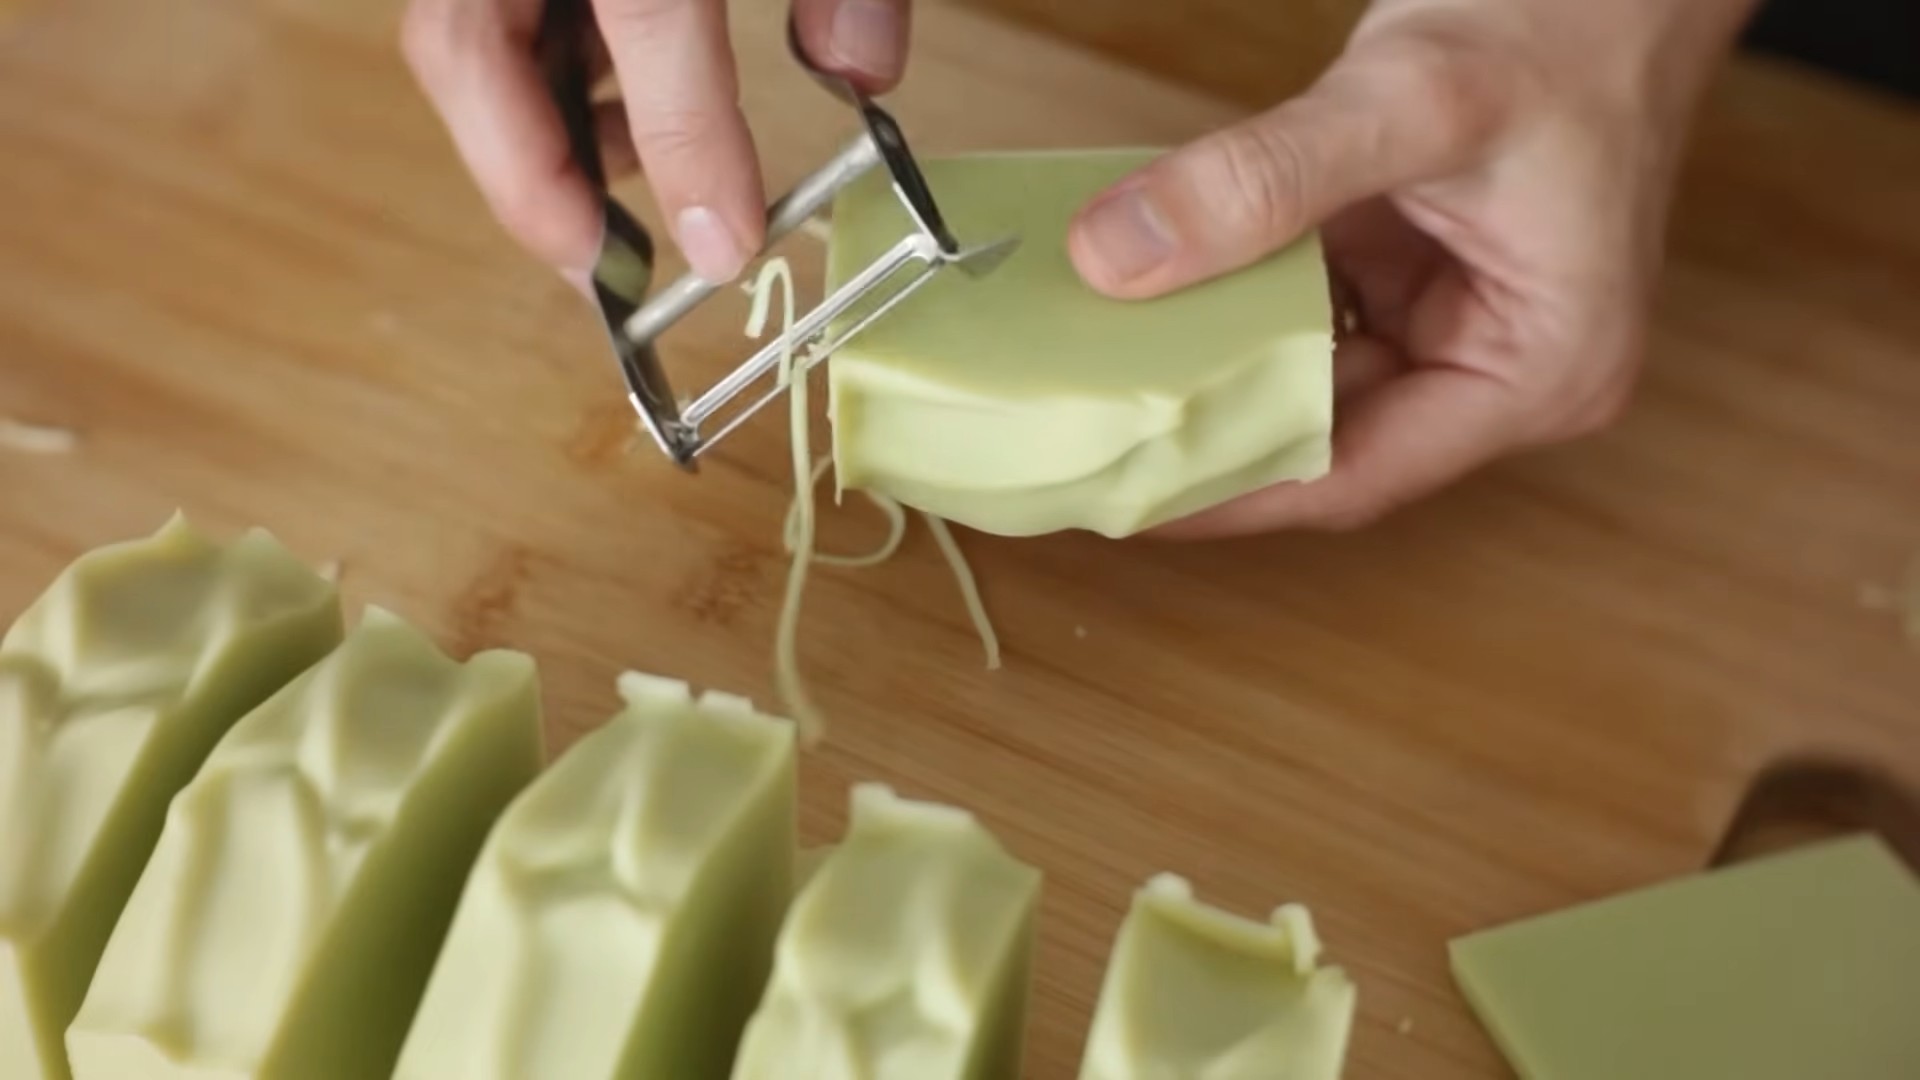
6. Cut into Bars: Cut the soap into bars using a knife or a soap cutter.
7. Cure: This is the most important step! Place the soap bars on a wire rack in a well-ventilated area for 4-6 weeks. During this time, the excess water will evaporate, and the soap will become harder and milder. Turn the bars occasionally to ensure even curing.
Tips and Troubleshooting
* Lye Safety: Always wear gloves and eye protection when working with lye. If you get lye on your skin, flush it with plenty of water and then apply vinegar to neutralize it. If you get lye in your eyes, flush them with plenty of water for at least 15 minutes and seek medical attention immediately.
* Trace: Don

Conclusion
So, there you have it! A simple, refreshing, and incredibly beneficial DIY cucumber soap recipe that you can whip up in your own kitchen. Forget harsh chemicals and mystery ingredients – this homemade soap allows you to control exactly what goes onto your skin, harnessing the natural power of cucumber for a gentle and effective cleanse.
But why is this DIY trick a must-try? Beyond the satisfaction of creating something yourself, this cucumber soap offers a multitude of benefits. The cucumber’s high water content provides intense hydration, leaving your skin feeling supple and moisturized. Its anti-inflammatory properties can soothe irritated skin, reduce redness, and even help alleviate the discomfort of sunburn. Plus, the vitamins and antioxidants present in cucumber contribute to a brighter, more even skin tone, combating the effects of free radicals and promoting a youthful glow.
This isn’t just about making soap; it’s about investing in your skin’s health and well-being with a natural, cost-effective solution. It’s about knowing exactly what you’re putting on your body and avoiding potentially harmful additives found in commercial soaps. And let’s be honest, the subtle, refreshing scent of cucumber is simply divine!
Looking to personalize your creation? The possibilities are endless! Consider adding a tablespoon of honey for extra moisturizing power and antibacterial benefits. A few drops of tea tree oil can transform this into an acne-fighting powerhouse. For a more luxurious feel, incorporate a teaspoon of shea butter or cocoa butter into the melted soap base. You could even experiment with different essential oils like lavender or chamomile for added relaxation and aromatherapy benefits. Think about adding finely ground oatmeal for gentle exfoliation. Remember to always test a small amount of the soap on a discreet area of your skin before using it all over, especially if you have sensitive skin or allergies.
Don’t be intimidated by the “DIY” label. This recipe is incredibly straightforward and requires minimal effort. The reward – a luxurious, natural, and personalized soap – is well worth the small investment of time.
We wholeheartedly encourage you to try this DIY cucumber soap recipe. Embrace the opportunity to create something beautiful and beneficial for your skin. Once you experience the difference that natural ingredients can make, you’ll never look at store-bought soap the same way again.
And most importantly, we want to hear about your experience! Did you try the recipe? What variations did you make? How did your skin react? Share your thoughts, tips, and photos in the comments below. Let’s build a community of DIY skincare enthusiasts and spread the word about the amazing benefits of homemade cucumber soap! Your feedback will not only help others but also inspire us to create even more exciting and effective DIY recipes in the future. So go ahead, give it a try, and let us know what you think!
Frequently Asked Questions (FAQ)
What kind of soap base should I use?
We recommend using a melt-and-pour soap base for this recipe, as it’s the easiest and safest option for beginners. Look for a clear or white soap base, depending on your preference. Clear soap bases will allow the green color of the cucumber to shine through more vibrantly. Opt for a soap base that is free of sulfates and parabens for a more natural and gentle product. Goat’s milk soap base is another excellent choice for its moisturizing properties.
How long does the soap last?
The shelf life of your DIY cucumber soap will depend on the ingredients you use and how you store it. Generally, it should last for several months if stored in a cool, dry place away from direct sunlight. The cucumber itself can contribute to a shorter shelf life compared to commercially produced soaps, so it’s best to use it within a reasonable timeframe. If you notice any changes in color, texture, or smell, it’s best to discard the soap.
Can I use cucumber juice instead of pureed cucumber?
While you can use cucumber juice, pureed cucumber is preferable. The pulp in the pureed cucumber provides additional benefits, such as gentle exfoliation. Cucumber juice alone might not provide the same level of hydration and skin-soothing properties. If you do use cucumber juice, be sure to use it immediately after juicing to prevent oxidation and loss of nutrients. You may also need to adjust the amount of liquid you add to the soap base to achieve the desired consistency.
My soap is too soft. What did I do wrong?
A soft soap can be caused by a few factors. First, ensure you’re using the correct ratio of cucumber to soap base. Too much cucumber can introduce excess moisture, resulting in a softer soap. Second, make sure you’re not overheating the soap base during the melting process. Overheating can alter the soap’s structure and affect its hardness. Finally, allow the soap to fully harden in the mold before removing it. If the soap is still too soft, you can try re-melting it and adding a small amount of stearic acid, which acts as a hardening agent.
Can I add other ingredients to the soap?
Absolutely! This recipe is highly customizable. You can add essential oils for fragrance and therapeutic benefits, herbs for visual appeal and added skin benefits, or other natural ingredients like honey, oatmeal, or clay. Just be mindful of the quantities you add, as too much of any ingredient can affect the soap’s texture and performance. Always research the potential benefits and risks of any new ingredient before adding it to your soap.
Is this soap suitable for all skin types?
Cucumber is generally considered safe and beneficial for most skin types, including sensitive skin. However, it’s always a good idea to perform a patch test before using any new skincare product, especially if you have known allergies or sensitivities. If you experience any irritation, discontinue use immediately. If you have specific skin concerns, such as eczema or psoriasis, consult with a dermatologist before using this soap.
How do I store the finished soap?
Store your DIY cucumber soap in a cool, dry place away from direct sunlight. A soap dish with good drainage is ideal to prevent the soap from becoming soggy. You can also wrap the soap in parchment paper or store it in an airtight container to protect it from moisture and dust. Avoid storing the soap in humid environments, such as the bathroom, as this can shorten its lifespan.
Can I use this soap on my face?
Yes, this soap is gentle enough to be used on your face. However, avoid getting it in your eyes, as it can cause irritation. If you have sensitive facial skin, start by using the soap once or twice a week and gradually increase the frequency as tolerated. Always follow up with a moisturizer after cleansing your face.
Where can I find the ingredients for this recipe?
You can find melt-and-pour soap bases, essential oils, and other soap-making supplies at most craft stores, online retailers specializing in soap-making supplies, and some health food stores. Cucumbers are readily available at your local grocery store or farmer’s market. When purchasing ingredients, opt for high-quality, natural options whenever possible.
Leave a Comment