

DIY Drain Cleaner Recipe: Are you tired of slow-draining sinks and tubs? I know I am! It’s frustrating to watch water pool around your feet while showering or wait ages for the kitchen sink to empty after washing dishes. Store-bought drain cleaners can be harsh, expensive, and frankly, a bit scary to use. But don’t worry, you don’t need to resort to those harsh chemicals!
For generations, resourceful homeowners have relied on simple, homemade solutions to tackle common household problems. Think about it – before the age of mass-produced cleaners, people used readily available ingredients like vinegar and baking soda to keep their homes running smoothly. This tradition of resourcefulness is something I deeply admire, and it’s what inspired me to share this DIY drain cleaner recipe with you.
A clogged drain isn’t just an inconvenience; it can also lead to unpleasant odors and even attract pests. Plus, constantly pouring chemical drain cleaners down your pipes can damage them over time, leading to costly repairs. That’s why having a safe, effective, and affordable DIY solution is so important. This simple recipe uses ingredients you probably already have in your pantry, and it’s incredibly easy to make. So, let’s ditch the harsh chemicals and learn how to unclog your drains the natural way!
DIY Drain Cleaner: Banish Clogs Naturally!
Okay, let’s face it: clogged drains are the bane of every homeowner’s existence. And those commercial drain cleaners? They’re often harsh, expensive, and not exactly eco-friendly. But don’t despair! I’m going to share my go-to DIY drain cleaner recipe that’s effective, affordable, and uses ingredients you probably already have in your pantry. Trust me, this works wonders!
What You’ll Need
Before we dive in, let’s gather our supplies. This is a super simple recipe, so you won’t need much:
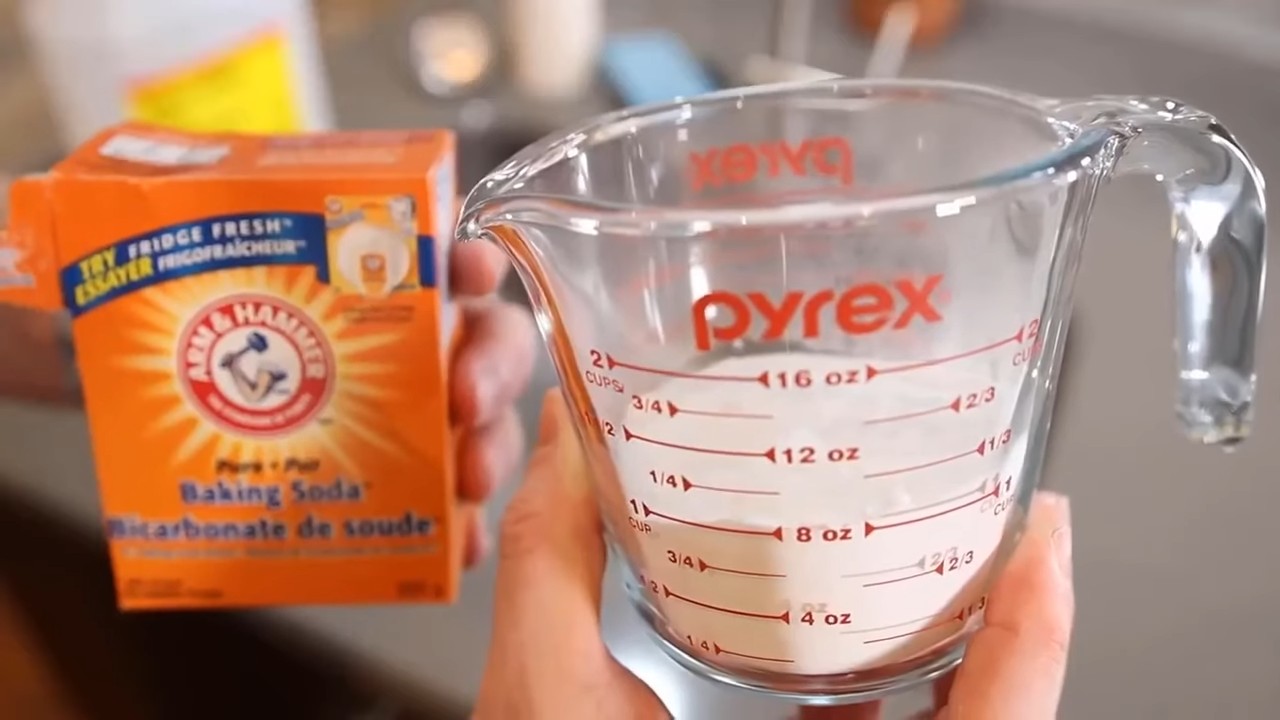
* 1 cup baking soda
* 2 cups boiling water
* 1 cup white vinegar
* Optional: A few drops of your favorite essential oil (like lemon, tea tree, or lavender) for a fresh scent.
* A kettle or pot for boiling water
* A measuring cup
* A funnel (optional, but helpful)
* Rubber gloves (optional, but recommended)
The Magic Formula: Baking Soda, Vinegar, and Boiling Water
This combination is a powerhouse when it comes to breaking down clogs. The baking soda acts as a mild abrasive, while the vinegar creates a fizzing action that helps to loosen debris. The boiling water then flushes everything away. It’s a simple chemical reaction that’s surprisingly effective.
Step-by-Step Instructions: Unclogging Your Drain Like a Pro
Alright, let’s get down to business! Follow these steps carefully, and you’ll be saying goodbye to that stubborn clog in no time.
1. Clear the Area: Before you start, remove any standing water from the sink or tub. You want the ingredients to directly target the clog, not just sit on top of water. Use a cup or small container to scoop out any excess water.
2. Pour in the Baking Soda: Carefully pour one cup of baking soda down the drain. If you have a funnel, this is where it comes in handy! It helps to prevent any spills and ensures that all the baking soda goes where it needs to go.
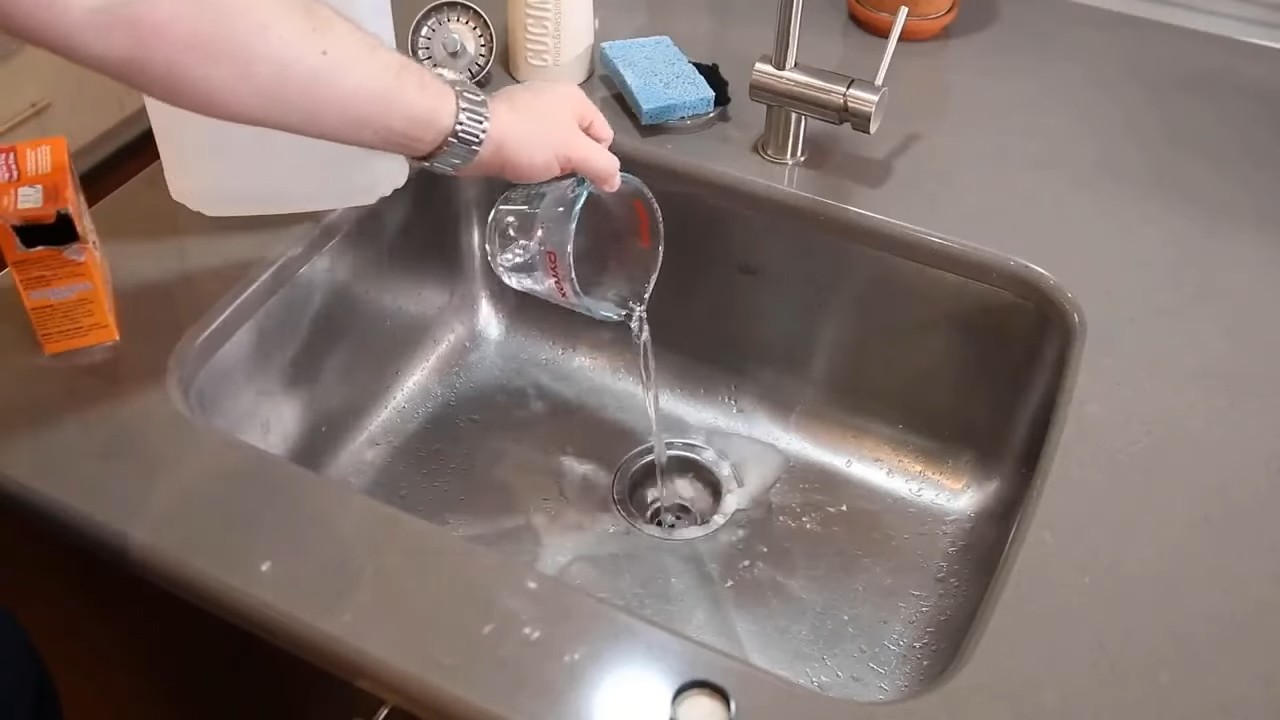
3. Add the Boiling Water (Part 1): Slowly pour one cup of boiling water down the drain, following the baking soda. This helps to activate the baking soda and start breaking down the clog. Let it sit for a few minutes. I usually give it about 5 minutes to work its magic.
4. The Vinegar Volcano: Now for the fun part! Pour one cup of white vinegar down the drain. You’ll immediately notice a fizzing reaction. This is the baking soda and vinegar reacting, creating carbon dioxide gas that helps to dislodge the clog.
5. Let it Fizz and Sit: Let the mixture fizz and bubble for at least 30 minutes. For really stubborn clogs, I sometimes let it sit for a few hours, or even overnight. The longer it sits, the more time it has to break down the blockage.
6. Flush with Boiling Water (Part 2): After the waiting period, carefully pour the remaining cup of boiling water down the drain. This will help to flush away any remaining debris and clear the drain.
7. Test the Drain: Turn on the faucet and see if the water drains freely. If it does, congratulations! You’ve successfully unclogged your drain. If the water is still draining slowly, repeat the process one more time.
8. Optional: Add Essential Oils: If you want to add a fresh scent to your drain, add a few drops of your favorite essential oil after the drain is clear. Lemon, tea tree, and lavender are all great choices.
Dealing with Stubborn Clogs: When One Round Isn’t Enough
Sometimes, one round of this DIY drain cleaner isn’t enough to completely clear a stubborn clog. Don’t worry, it happens! Here’s what to do if your drain is still draining slowly:
* Repeat the Process: The simplest solution is often the best. Just repeat the entire process from step 2 to step 7. Sometimes, it just takes a second round to fully break down the clog.
* Use a Plunger: After the second round of the DIY drain cleaner, try using a plunger. The combination of the chemical reaction and the physical force of the plunger can often dislodge even the most stubborn clogs. Make sure there’s enough water in the sink or tub to cover the cup of the plunger.
* Try a Drain Snake: If the plunger doesn’t work, you might need to resort to a drain snake (also known as a plumbing snake). This is a flexible tool that you can insert into the drain to physically break up or pull out the clog. You can find drain snakes at most hardware stores. Be careful when using a drain snake, as you don’t want to damage your pipes.
* Call a Plumber: If you’ve tried everything and the drain is still clogged, it might be time to call a professional plumber. There could be a more serious issue with your plumbing that requires professional attention.
Preventing Future Clogs: A Few Tips and Tricks
Prevention is always better than cure! Here are a few tips to help prevent future clogs:
* Use Drain Screens: Install drain screens in your sinks and tubs to catch hair, food scraps, and other debris before they go down the drain. This is one of the easiest and most effective ways to prevent clogs.
* Avoid Pouring Grease Down the Drain: Grease is a major culprit when it comes to clogged drains. Never pour grease down the drain! Instead, let it cool and solidify, then scrape it into the trash.
* Flush with Hot Water Regularly: Once a week, flush your drains with hot water to help prevent buildup. This is especially important for kitchen sinks, where grease and food particles are more likely to accumulate.
* Be Mindful of What You Flush: Avoid flushing anything down the toilet that isn’t toilet paper or human waste. This includes feminine hygiene products, wipes (even “flushable” ones), and cotton balls.
* Regular Maintenance: Use this DIY drain cleaner recipe every few months as a preventative measure, even if your drains aren’t clogged. This will help to keep them clear and flowing smoothly.
Safety First: Important Precautions
While this DIY drain cleaner is much safer than commercial alternatives, it’s still important to take a few precautions:
* Wear Rubber Gloves: While not strictly necessary, wearing rubber gloves can protect your hands from any irritation caused by the baking soda and vinegar.
* Be Careful with Boiling Water: Always handle boiling water with care to avoid burns.
* Ventilate the Area: The fizzing reaction can release some fumes, so make sure the area is well-ventilated.
* Keep Out of Reach of Children and Pets: Store baking soda, vinegar, and essential oils out of reach of children and pets.
* Avoid Mixing with Commercial Drain Cleaners: Never mix this DIY drain cleaner with commercial drain cleaners. The combination could create dangerous fumes.
Why This Works: The Science Behind the Fizz
The effectiveness of this DIY drain cleaner lies in the chemical reaction between baking soda (sodium bicarbonate) and vinegar (acetic acid). When these two substances combine, they create carbon dioxide gas and water. The carbon dioxide gas creates pressure that helps to dislodge the clog, while the water helps to flush it away. The baking soda also acts as a mild abrasive, helping to scrub away any stubborn debris.
Essential Oils: Adding a Touch of Freshness
While essential oils aren’t necessary for unclogging your drain, they can add a pleasant scent and help to neutralize any lingering odors. Here are a few of my favorite essential oils to use:
* Lemon: Lemon essential oil has a bright, citrusy scent that’s perfect for freshening up your drain. It also has antibacterial properties.
* Tea Tree: Tea tree essential oil has a clean, medicinal scent and is known for its antibacterial and antifungal properties.
* Lavender: Lavender essential oil has a calming, floral scent that can help to relax and soothe.
* Peppermint: Peppermint essential oil has a refreshing, minty scent that can help to invigorate and energize.
Just add a few drops of your chosen essential oil to the drain after you’ve flushed it with boiling water.
Troubleshooting: Common Issues and Solutions
Here are a few common issues you might encounter when using this DIY drain cleaner and how to solve them:
* The drain is still draining slowly after multiple attempts: The clog might be too large or too far down the drain for this method to be effective. Try using a drain snake or calling a plumber.
* The mixture isn’t fizzing: Make sure you’re using fresh baking soda and vinegar. Old baking soda can lose its potency. Also, make sure you’re using the correct proportions of baking soda and vinegar.
* The drain smells worse after using the DIY drain cleaner: This is usually a temporary issue. The fizzing action can sometimes release trapped odors. Try flushing the drain with hot water and adding
Conclusion
So, there you have it! A simple, effective, and remarkably inexpensive DIY drain cleaner recipe that can save you a fortune on plumbing bills and harsh chemical solutions. We’ve walked you through the process, highlighting the ease and accessibility of using common household ingredients to tackle those frustrating clogs. But why is this DIY trick a must-try?
Firstly, it’s about control. You know exactly what’s going into your drains – no mystery chemicals with potentially harmful side effects. This is especially important if you have a septic system or are concerned about the environmental impact of commercial drain cleaners. Secondly, it’s about cost-effectiveness. The ingredients – baking soda, vinegar, and boiling water – are pantry staples, meaning you’re likely to have them on hand already. Compared to the price of a single bottle of commercial drain cleaner, this DIY solution is incredibly budget-friendly. Thirdly, it’s about empowerment. There’s a certain satisfaction in solving a problem yourself, and unclogging a drain with your own homemade concoction is a small victory that can brighten your day.
But the benefits don’t stop there. This DIY drain cleaner recipe is also surprisingly versatile.
Variations and Suggestions
* Essential Oil Boost: For a more pleasant scent and potentially enhanced cleaning power, add a few drops of your favorite essential oil to the baking soda before adding the vinegar. Tea tree oil, lemon oil, or eucalyptus oil are excellent choices for their antibacterial and deodorizing properties. Just be sure to use essential oils that are safe for your plumbing system.
* Preventative Maintenance: Don’t wait for a full-blown clog to use this method. Pouring this DIY drain cleaner down your drains once a month can help prevent buildup and keep your pipes flowing smoothly. Think of it as a regular spa treatment for your plumbing!
* Stubborn Clogs: For particularly stubborn clogs, you might need to repeat the process a few times. You can also try using a plunger after the baking soda and vinegar have had a chance to work their magic. Sometimes, a little extra elbow grease is all it takes.
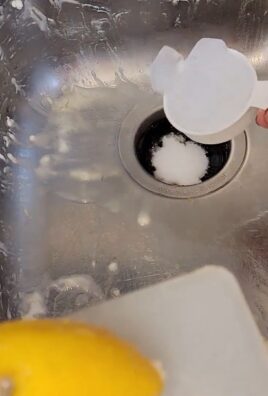
* Salt Power: Add 1/2 cup of salt to the baking soda before adding the vinegar. The salt acts as an abrasive, helping to scrub away debris and grease.
We understand that trying something new can be daunting, but we urge you to give this DIY drain cleaner recipe a try. It’s a safe, effective, and affordable alternative to harsh chemicals, and it’s something you can easily do yourself.
We are confident that you’ll be amazed by the results.
So, ditch the expensive and potentially harmful commercial drain cleaners and embrace the power of this simple DIY solution. Your wallet, your plumbing, and the environment will thank you.
Now, we want to hear from you! Have you tried this DIY drain cleaner recipe? What were your results? Do you have any tips or variations to share? Let us know in the comments below! Your experiences can help others discover the benefits of this fantastic DIY trick. Share your stories, ask questions, and let’s build a community of DIY drain-cleaning experts!
Frequently Asked Questions (FAQ)
Here are some of the most common questions people have about using a DIY drain cleaner recipe:
Q: Is this DIY drain cleaner recipe safe for all types of pipes?
A: Generally, yes, this DIY drain cleaner recipe is safe for most types of pipes, including PVC, copper, and older metal pipes. The ingredients are relatively mild and don’t generate excessive heat like some commercial drain cleaners. However, if you have very old or fragile pipes, it’s always a good idea to test a small amount in an inconspicuous area first. If you have any concerns, consult with a plumber.
Q: How often can I use this DIY drain cleaner recipe?
A: For preventative maintenance, you can use this recipe once a month. If you’re dealing with a clog, you can repeat the process a few times in a row, allowing the mixture to sit for at least 30 minutes each time. However, if the clog persists after several attempts, it’s best to consult a plumber to avoid damaging your pipes.
Q: What if I don’t have vinegar? Can I use something else?
A: Vinegar is the preferred acid for this recipe because it’s readily available and relatively mild. However, you can substitute it with lemon juice or citric acid powder mixed with water. The key is to have an acid that will react with the baking soda to create fizzing action, which helps to dislodge the clog.
Q: How long should I let the baking soda and vinegar mixture sit in the drain?
A: For minor clogs, letting the mixture sit for 30 minutes is usually sufficient. For more stubborn clogs, you can let it sit for up to an hour or even overnight. Just be sure to flush the drain thoroughly with boiling water afterward.
Q: The baking soda and vinegar mixture didn’t work. What should I do?
A: If the baking soda and vinegar mixture doesn’t work, try repeating the process. You can also try using a plunger after the mixture has had a chance to work. If the clog persists, you may need to use a drain snake or auger to physically remove the blockage. As a last resort, consult a plumber.
Q: Can I use this DIY drain cleaner recipe in my toilet?
A: While you can technically use this recipe in your toilet, it’s generally not as effective as it is in sinks and showers. Toilets often have larger clogs that require more aggressive methods. If you’re dealing with a clogged toilet, try using a plunger first. If that doesn’t work, you may need to use a toilet auger or call a plumber.
Q: Is it safe to mix this DIY drain cleaner recipe with commercial drain cleaners?
A: Absolutely not! Mixing this DIY drain cleaner recipe with commercial drain cleaners can create dangerous chemical reactions that can release toxic fumes and damage your pipes. Never mix different types of drain cleaners, whether they’re homemade or commercial.
Q: What are some signs that I have a clogged drain?
A: Some common signs of a clogged drain include slow drainage, gurgling sounds coming from the drain, foul odors emanating from the drain, and water backing up in the sink or shower. If you notice any of these signs, it’s a good idea to address the issue promptly to prevent a more serious clog from forming.
Q: How can I prevent clogged drains in the first place?
A: There are several things you can do to prevent clogged drains. These include:
* Using drain screens to catch hair and debris.
* Avoiding pouring grease down the drain.
* Flushing the drain with hot water after each use.
* Regularly cleaning your drain stoppers and traps.
* Using this DIY drain cleaner recipe as a preventative measure.
Q: I have a septic system. Is this DIY drain cleaner recipe safe to use?
A: Yes, this DIY drain cleaner recipe is generally considered safe for septic systems. The ingredients are biodegradable and won’t harm the beneficial bacteria in your septic tank. However, it’s always a good idea to use it in moderation and avoid pouring excessive amounts down the drain at once.
Q: Can I use this recipe on a garbage disposal?
A: Yes, this recipe can be used on a garbage disposal. After pouring the boiling water, run the disposal for a few seconds to help flush out any remaining debris.
Q: What kind of vinegar should I use?
A: White distilled vinegar is the best choice for this recipe because it’s inexpensive and readily available. You can also use apple cider vinegar, but it may not be as effective.
We hope these FAQs have answered your questions about using this DIY drain cleaner recipe. Remember to always exercise caution and consult with a professional if you’re unsure about anything. Happy drain cleaning!

Leave a Comment