

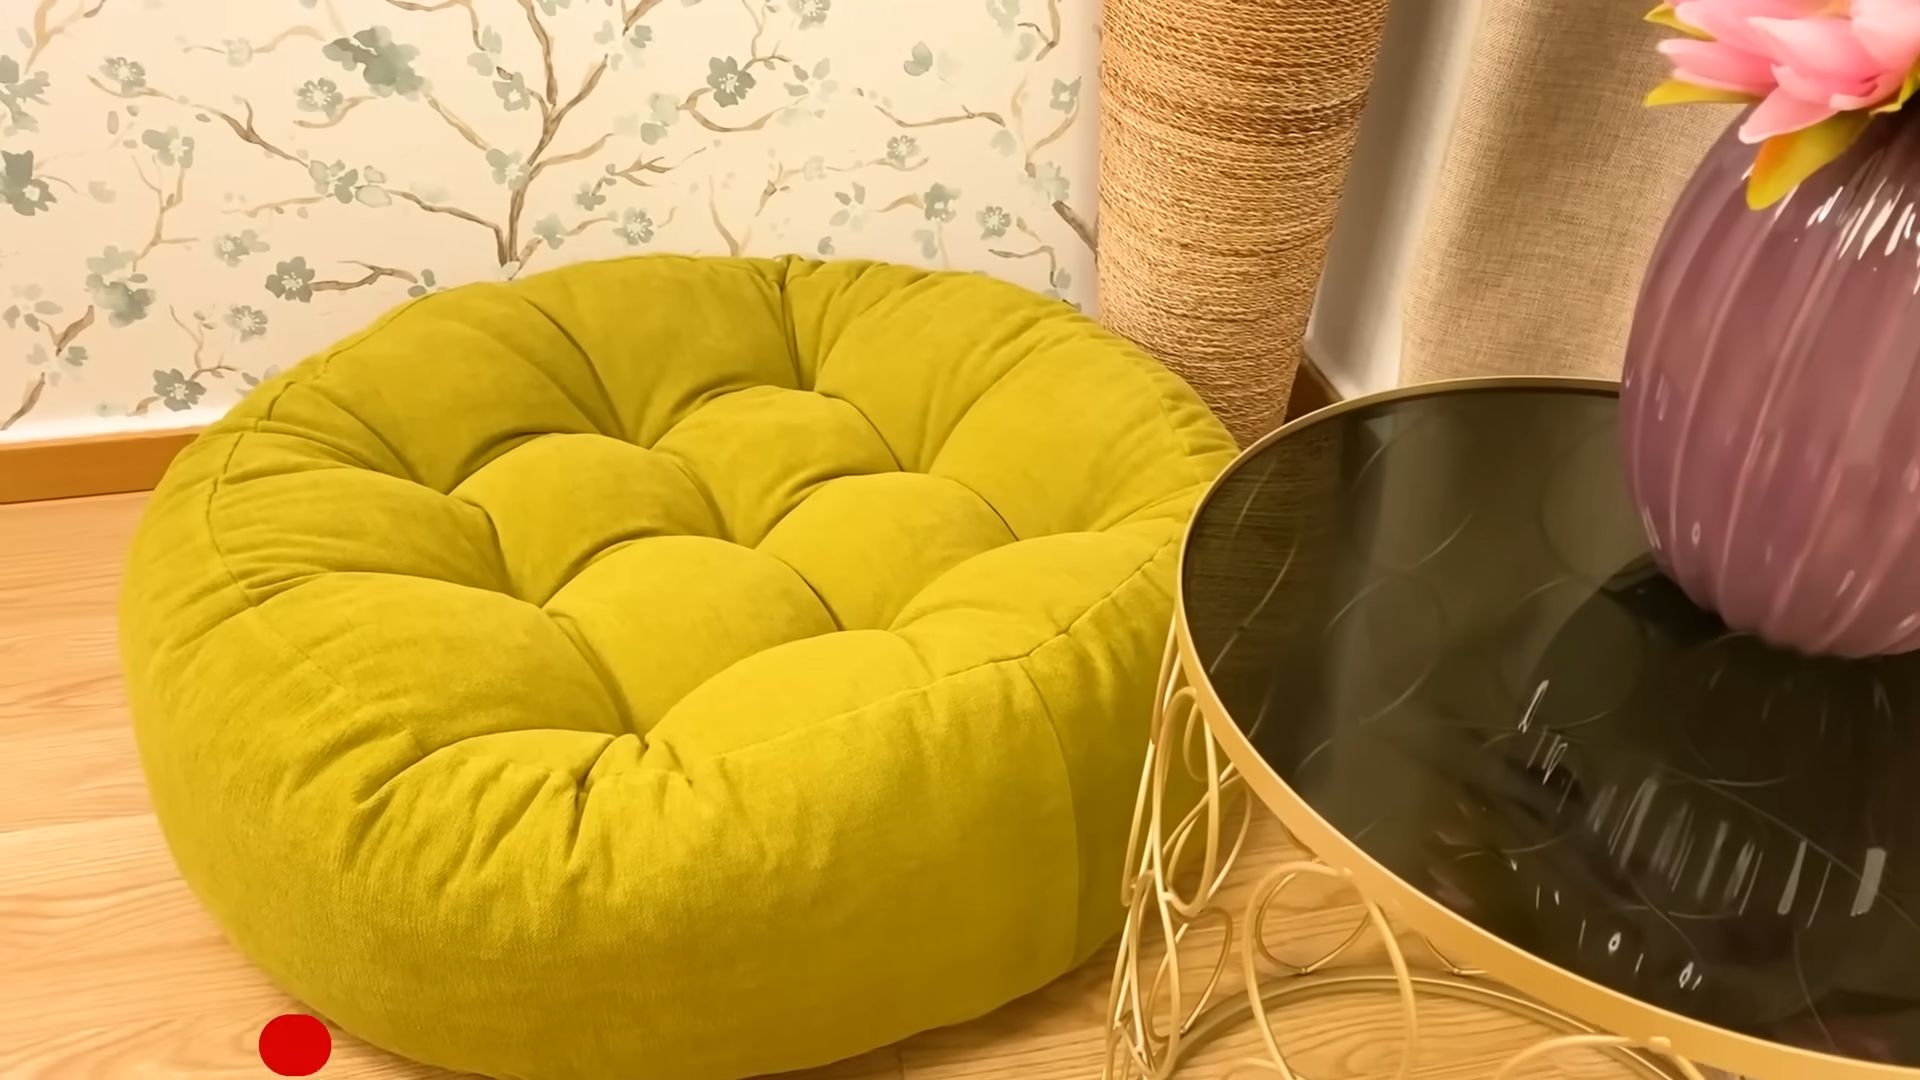
DIY Floor Puff Cushion: Imagine sinking into a cloud of comfort after a long day, not on your couch, but on a stylish, handmade floor cushion you crafted yourself! Sounds dreamy, right? This isn’t just about adding extra seating; it’s about injecting personality and warmth into your living space with a touch of your own creativity.
Floor cushions have a rich history, popping up in various cultures for centuries. From the intricately woven cushions of the Middle East to the simple, functional mats of Japan, they’ve always been a symbol of relaxation and communal gathering. Now, you can bring that tradition into your home with a modern, DIY twist!
Why do you need this DIY Floor Puff Cushion hack? Well, let’s be honest, furniture can be expensive! Plus, sometimes you just need a flexible seating option that can be easily moved around. Maybe you have kids who love to sprawl on the floor, or perhaps you enjoy meditating in a cozy corner. Whatever your reason, creating your own floor puff cushion is a budget-friendly and fun way to add comfort and style to your home. I’m going to show you how to make a floor puff cushion that’s not only comfortable but also reflects your unique style. Get ready to unleash your inner crafter!
DIY Floor Puff Cushion: A Cozy Seating Project
Hey there, fellow DIY enthusiasts! Ever wanted a super comfy, oversized floor cushion to lounge on while reading, watching movies, or just chilling? Well, today, I’m going to walk you through creating your very own floor puff cushion. It’s a surprisingly simple project, even for beginners, and the result is a stylish and incredibly comfortable addition to any room. Let’s get started!
Materials You’ll Need
Before we dive in, let’s gather all the necessary materials. This will make the process smoother and prevent any frustrating mid-project supply runs.
* Fabric: This is where you can really get creative! I recommend using a durable fabric like canvas, denim, upholstery fabric, or even a thick cotton. The amount you’ll need depends on the desired size of your cushion. For a roughly 3-foot diameter cushion, you’ll need about 3-4 yards of fabric. Consider the width of the fabric when calculating.
* Sewing Machine: A sewing machine is essential for this project. If you don’t have one, consider borrowing one from a friend or family member, or renting one from a local sewing shop.
* Thread: Choose a thread that matches your fabric. A strong, all-purpose thread is a good choice.
* Scissors or Rotary Cutter: For cutting the fabric accurately. A rotary cutter and cutting mat are especially helpful for cutting large pieces of fabric.
* Measuring Tape or Ruler: Accuracy is key for a well-shaped cushion.
* Pins: To hold the fabric pieces together while sewing.
* Chalk or Fabric Marker: For marking the fabric.
* Stuffing: This is what will give your cushion its plushness. You have several options here:
* Polyester Fiberfill: This is a common and affordable option. It’s lightweight and easy to work with.
* Foam Pieces: Recycled foam pieces are a great eco-friendly option. You can often find them at upholstery shops or furniture stores.
* Old Clothes or Fabric Scraps: This is a fantastic way to repurpose old items and save money. Just make sure the fabric is clean and free of any hard objects.
* Beanbag Filling: Polystyrene beads offer a different feel, but can be messy.
* Large Bowl or Plate: To use as a template for drawing circles.
* Optional: Zipper or Velcro Closure: If you want to be able to remove and wash the cushion cover, you’ll need a zipper or Velcro closure.
Cutting the Fabric
This is a crucial step, so take your time and measure carefully. We’ll be creating the top, bottom, and side panels of the cushion.
1. Cut the Top and Bottom Circles:
* Decide on the desired diameter of your cushion. A 3-foot diameter is a good starting point.
* Using your measuring tape, find the radius (half the diameter). In this case, it would be 1.5 feet.
* Place your large bowl or plate on the fabric and trace around it with your chalk or fabric marker. If your bowl isn’t big enough, you can create a makeshift compass using a string and pencil. Tie one end of the string to the pencil and the other end to a pin. Stick the pin in the center of where you want your circle to be, and hold the string taut while drawing a circle with the pencil.
* Cut out the two circles. These will be the top and bottom of your cushion.
2. Cut the Side Panel:
* The length of the side panel will determine the height of your cushion. I recommend a height of 8-12 inches.
* To calculate the width of the side panel, you’ll need to calculate the circumference of your circle. The formula for circumference is C = πd (where C is the circumference, π is approximately 3.14, and d is the diameter).
* So, for a 3-foot diameter cushion, the circumference would be approximately 3.14 x 3 = 9.42 feet. Convert this to inches: 9.42 feet x 12 inches/foot = 113.04 inches.
* Cut a rectangle of fabric that is the desired height (8-12 inches) and the calculated width (approximately 113 inches). You may need to piece together multiple strips of fabric to achieve this length, especially if your fabric isn’t very wide. If you do piece it together, make sure to sew the seams securely.
* Important Note: Add seam allowances to all your measurements! I recommend adding at least 1/2 inch seam allowance to all sides of each piece.
Sewing the Cushion Cover
Now comes the fun part – putting it all together!
1. Sew the Side Panel into a Loop:
* Fold the side panel rectangle in half lengthwise, with the right sides of the fabric facing each other.
* Pin the short edges together.
* Sew along the pinned edge with a 1/2 inch seam allowance.
* Press the seam open.
2. Attach the Top Circle to the Side Panel:
* Pin the top circle to the top edge of the side panel loop, with the right sides of the fabric facing each other. This can be a bit tricky, so take your time and use plenty of pins. You’ll need to ease the fabric of the circle around the curve of the side panel.
* Sew around the circle with a 1/2 inch seam allowance.
* Clip the seam allowance around the curve to help it lie flat. Be careful not to cut through the stitching.
* Press the seam allowance towards the side panel.
3. Attach the Bottom Circle to the Side Panel:
* Repeat the process from step 2 to attach the bottom circle to the bottom edge of the side panel loop.
* Leave a 12-18 inch opening along one section of the bottom circle for stuffing. This opening will also be used to insert a zipper or velcro closure if you choose to add one.
4. Adding a Zipper or Velcro Closure (Optional):
* If you want to be able to remove and wash the cushion cover, now is the time to add a zipper or Velcro closure.
* Zipper: Place the zipper face down along the opening you left in the bottom circle. Pin it in place and sew it to the fabric.
* Velcro: Cut two strips of Velcro that are the length of the opening. Pin one strip of Velcro to one side of the opening and the other strip to the other side. Sew the Velcro in place.
Stuffing the Cushion
This is where your cushion starts to take shape and become super comfy!
1. Turn the Cushion Cover Right Side Out:
* Carefully turn the cushion cover right side out through the opening you left in the bottom circle.
* Use a point turner or a blunt object to push out the seams and corners.
2. Start Stuffing:
* Begin stuffing the cushion with your chosen filling. Start with small handfuls and distribute the filling evenly throughout the cushion.
* Make sure to fill the corners and edges first.
* Continue stuffing until the cushion is firm and plump, but not overly stuffed. You want it to be comfortable to sit on.
3. Close the Opening:
* Once the cushion is stuffed to your liking, it’s time to close the opening.
* If you added a zipper or Velcro closure, simply close it.
* If you didn’t add a closure, fold the raw edges of the opening inward and pin them together.
* Sew the opening closed with a hidden stitch (also known as a slip stitch). This will create an invisible seam.
Finishing Touches
Congratulations! You’ve created your very own floor puff cushion. Here are a few finishing touches to make it even better:
* Fluff It Up: Give your cushion a good fluff to distribute the filling evenly.
* Add Decorative Stitching (Optional): You can add decorative stitching around the edges of the cushion for a more polished look.
* Accessorize: Add some throw pillows or a cozy blanket to complete the look.
And there you have it! A comfy and stylish floor puff cushion that you made yourself. Enjoy lounging on your new creation! I hope you found this tutorial helpful. Happy crafting!

Conclusion
So, there you have it! Creating your own DIY floor puff cushion isn’t just a fun project; it’s a game-changer for your home comfort and style. Forget those expensive store-bought options that often lack personality and don’t quite fit your space. This method allows you to craft a unique, comfortable, and budget-friendly seating solution tailored precisely to your needs and aesthetic.
Why is this DIY floor puff cushion a must-try? Because it empowers you to take control of your home décor. You get to choose the fabrics, the colors, the size – everything! Imagine sinking into a plush, oversized cushion made from your favorite vintage textiles or a vibrant, modern print that perfectly complements your living room. The possibilities are truly endless.
Beyond the customization aspect, this project is incredibly rewarding. There’s a special satisfaction that comes from creating something beautiful and functional with your own hands. Plus, it’s a fantastic way to upcycle old clothes, blankets, or fabric scraps, giving them a new lease on life and reducing waste.
Ready to take your DIY floor puff cushion to the next level? Consider these variations:
* Add a handle: Sew a sturdy fabric handle onto the top or side for easy portability. This is especially useful if you plan to move the cushion around frequently.
* Experiment with filling: While cotton batting is a great option, you can also use shredded foam, old pillows, or even beanbag filling for a different feel. Just be sure to choose a filling that’s comfortable and supportive.
* Incorporate embellishments: Add tassels, pom-poms, embroidery, or appliques to personalize your cushion and make it truly one-of-a-kind.
* Create different shapes: Don’t limit yourself to a round cushion! Try making a square, rectangular, or even an abstractly shaped floor puff cushion.
* Waterproof it: For outdoor use, use outdoor fabric and consider lining the inside with a waterproof material.
We’re confident that you’ll love the process and the result of making your own DIY floor puff cushion. It’s a simple, satisfying, and stylish way to enhance your home.
Now it’s your turn! Gather your materials, unleash your creativity, and get crafting. We can’t wait to see what you come up with. Don’t forget to share your creations with us on social media using #DIYFloorPuffCushion. We’re eager to see your unique designs and hear about your experience. Happy crafting!
Frequently Asked Questions (FAQ)
What kind of fabric is best for a DIY floor puff cushion?
The best fabric for your DIY floor puff cushion depends on your intended use and aesthetic preferences. For durability and easy cleaning, consider heavier fabrics like denim, canvas, upholstery fabric, or even repurposed materials like old jeans or curtains. If you’re aiming for a softer, more luxurious feel, opt for velvet, corduroy, or a thick cotton blend. For outdoor use, choose weather-resistant fabrics specifically designed for outdoor furniture. Remember to pre-wash your fabric before sewing to prevent shrinkage later on.
What’s the best filling for a floor puff cushion?
The ideal filling depends on your desired level of comfort and support. Cotton batting is a popular choice for its softness and affordability. Shredded foam provides more structure and support, while beanbag filling offers a more relaxed, moldable feel. You can also use old pillows, blankets, or even recycled plastic bottles as filling. Experiment with different fillings to find what works best for you. Consider the weight of the filling as well, as a heavier filling will make the cushion more stable.
How much fabric and filling do I need?
The amount of fabric and filling you’ll need depends on the size and shape of your floor puff cushion. For a standard round cushion (approximately 30 inches in diameter), you’ll need about 2-3 yards of fabric for the outer cover. As for filling, it’s best to start with a generous amount and adjust as you go. A good rule of thumb is to have at least 5-10 pounds of filling on hand, depending on the type of filling you choose. It’s always better to have too much than not enough!
How do I clean my DIY floor puff cushion?
Cleaning your DIY floor puff cushion depends on the fabric and filling you’ve used. If the cover is removable, you can typically machine wash it on a gentle cycle and tumble dry on low. For non-removable covers, spot clean with a mild detergent and water. Avoid using harsh chemicals or bleach, as these can damage the fabric. If you’ve used a filling that’s not washable, consider airing out the cushion regularly to prevent odors. For outdoor cushions, wipe down with a damp cloth and mild soap.
Can I make a floor puff cushion without sewing?
Yes, you can! There are several no-sew methods for creating a floor puff cushion. One popular technique involves using fabric glue or fusible webbing to attach the fabric pieces together. Another option is to repurpose an old tire or inner tube as the base of the cushion and wrap it with fabric. While these methods may not be as durable as sewing, they’re a great option for beginners or those who don’t have access to a sewing machine.
How do I make my floor puff cushion more supportive?
If you find that your floor puff cushion is too soft or lacks support, there are several things you can do. First, try using a denser filling, such as shredded foam or beanbag filling. You can also add a layer of batting or foam to the bottom of the cushion for extra support. Another option is to create an inner cushion or liner filled with a more rigid material, such as a foam insert or a tightly packed filling.
What if I don’t have enough fabric scraps?
If you don’t have enough fabric scraps to make a floor puff cushion, don’t worry! You can purchase fabric remnants or discounted fabric from your local fabric store. You can also check online marketplaces or thrift stores for affordable fabric options. Another creative idea is to use old clothing items, such as jeans, t-shirts, or sweaters, to create a patchwork cushion.
How do I prevent my floor puff cushion from losing its shape?
To prevent your floor puff cushion from losing its shape, it’s important to use a high-quality filling and to distribute it evenly throughout the cushion. You can also add an inner liner or casing to help maintain the cushion’s shape. Regularly fluffing and rotating the cushion will also help to prevent it from becoming flattened or misshapen.
Is this a good project for beginners?
Yes, making a DIY floor puff cushion is a great project for beginners! The basic sewing skills required are relatively simple, and there are many variations that can be adapted to different skill levels. With a little patience and creativity, anyone can create a beautiful and comfortable floor puff cushion.
How can I make my DIY floor puff cushion unique?
There are endless ways to make your DIY floor puff cushion unique! Experiment with different fabrics, colors, and patterns. Add embellishments like tassels, pom-poms, or embroidery. Create a patchwork design using fabric scraps. Incorporate vintage textiles or repurposed materials. The possibilities are limited only by your imagination!

Leave a Comment