

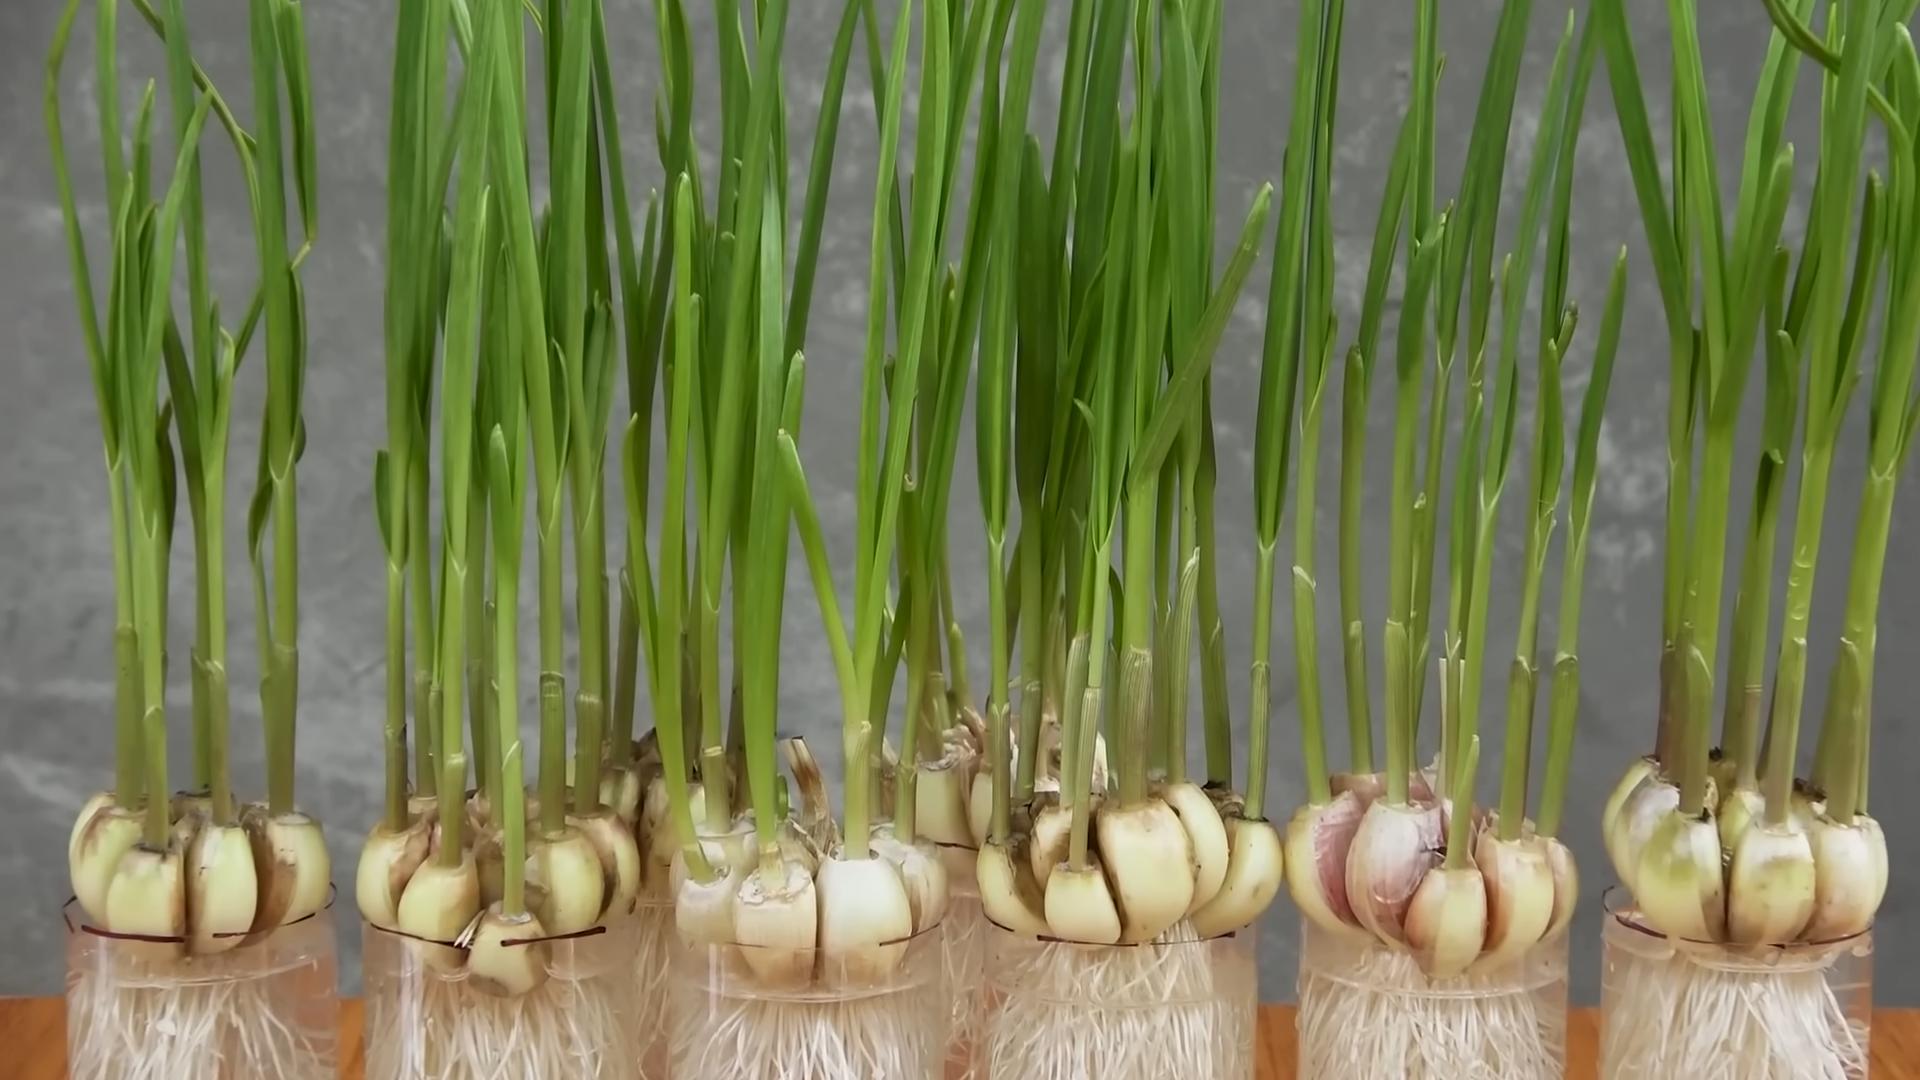
DIY Garlic Growing Bottles: Imagine fresh, pungent garlic readily available right outside your kitchen door, without ever having to till a garden bed! Sounds dreamy, right? Well, it’s absolutely achievable, and I’m here to show you how with this incredibly simple and rewarding DIY project.
For centuries, garlic has been a staple in cuisines around the world, not just for its incredible flavor but also for its purported health benefits. From ancient Egyptian tombs to modern-day kitchens, garlic’s presence is a testament to its enduring appeal. But let’s be honest, sometimes finding the space and time for a traditional garden can be a challenge. That’s where this clever hack comes in!
This DIY garlic growing bottles method is perfect for apartment dwellers, those with limited garden space, or anyone who simply wants a fun and easy way to grow their own garlic. Forget about weeding, extensive soil preparation, and battling pests in a large garden. With just a few recycled plastic bottles, some soil, and a little bit of sunshine, you can cultivate your own supply of this culinary essential. I’m so excited to share this simple, space-saving solution that will bring the joy of fresh garlic right to your fingertips. Let’s get started!
DIY Garlic Growing Bottles: A Step-by-Step Guide to Bountiful Bulbs!
Hey there, fellow gardening enthusiasts! I’m so excited to share this super fun and surprisingly effective DIY project with you: growing garlic in repurposed plastic bottles! Forget about needing a huge garden plot – this method is perfect for small spaces, balconies, or even just a sunny windowsill. Plus, it’s a fantastic way to recycle and reduce waste. Let’s dive in!
What You’ll Need: The Garlic Grower’s Toolkit
Before we get our hands dirty, let’s gather all the necessary supplies. Trust me, having everything ready beforehand will make the whole process much smoother and more enjoyable.
* Plastic Bottles: The star of the show! I recommend using 2-liter soda bottles or similar sizes. The number of bottles you’ll need depends on how much garlic you want to grow. Make sure they’re clean and dry.
* Garlic Cloves: Choose organic garlic from a local farmer’s market or reputable garden center. Avoid supermarket garlic, as it may have been treated to prevent sprouting. Look for large, firm cloves with no signs of mold or damage.
* Potting Mix: A good quality potting mix is crucial for healthy garlic growth. It should be well-draining and rich in nutrients. I like to use a mix specifically formulated for vegetables.
* Perlite or Vermiculite: This will improve drainage and aeration in the potting mix.
* Water: Essential for keeping your garlic happy and hydrated.
* Scissors or a Utility Knife: For cutting the plastic bottles. Be careful!
* Drill or Screwdriver (Optional): For creating drainage holes.
* Gloves (Optional): To keep your hands clean.
* Measuring Cup or Scoop: For portioning the potting mix.
* Labels and a Marker: To keep track of your garlic varieties (if you’re growing more than one).
Preparing the Bottles: Creating the Perfect Garlic Home
This is where we transform those ordinary plastic bottles into mini garlic gardens! It’s a simple process, but take your time and be careful when using sharp tools.
1. Clean the Bottles: Thoroughly wash the plastic bottles with soap and water to remove any residue. Rinse them well and let them dry completely. This helps prevent mold and disease.
2. Cut the Bottles: Using your scissors or utility knife, carefully cut the bottles in half horizontally. You’ll be using the bottom half as the planting container. I usually cut mine about 6-8 inches from the bottom.
3. Create Drainage Holes: This is super important! Garlic doesn’t like soggy feet. If your bottle doesn’t already have drainage holes, use a drill or screwdriver to create several holes in the bottom of each bottle. Aim for at least 4-5 holes, about ¼ inch in diameter.
4. Optional: Nesting Bottles for Water Reservoir: For added convenience and to reduce watering frequency, you can create a simple self-watering system. Cut the top half of another bottle and invert it inside the bottom half, creating a reservoir. Make sure the neck of the inverted bottle doesn’t touch the bottom of the container to allow for water wicking. You can then fill the reservoir with water, and the soil will absorb moisture as needed.
Planting the Garlic: Giving Your Cloves a Head Start
Now for the fun part – planting the garlic! This is where you get to nurture those little cloves and watch them grow into delicious, pungent bulbs.
1. Prepare the Potting Mix: In a large container, mix your potting mix with perlite or vermiculite. I usually use a ratio of about 4 parts potting mix to 1 part perlite/vermiculite. This will ensure good drainage and aeration.
2. Fill the Bottles: Fill each prepared bottle with the potting mix, leaving about an inch of space at the top. Gently tap the bottle to settle the soil.
3. Select and Prepare the Cloves: Choose the largest, healthiest cloves from your garlic bulb. Gently separate the cloves from the bulb, being careful not to damage them. Leave the papery skin on the cloves.
4. Plant the Cloves: Make a small hole in the soil, about 2-3 inches deep. Place the clove in the hole, pointy end facing up. Cover the clove with soil and gently firm the soil around it.
5. Space the Cloves: If you’re planting multiple cloves in one bottle, space them about 3-4 inches apart to allow them room to grow.
6. Water Thoroughly: After planting, water the bottles thoroughly until water drains out of the drainage holes. This will help settle the soil and encourage root growth.
7. Label Your Bottles: If you’re growing different varieties of garlic, label each bottle with the variety name and planting date. This will help you keep track of your progress.
Caring for Your Garlic: Nurturing Your Growing Bulbs
Once your garlic is planted, it’s important to provide it with the right care to ensure healthy growth and a bountiful harvest.
1. Sunlight: Garlic needs plenty of sunlight to thrive. Place your bottles in a location that receives at least 6-8 hours of direct sunlight per day. A south-facing window or balcony is ideal.
2. Watering: Water your garlic regularly, especially during dry periods. The soil should be consistently moist, but not waterlogged. Check the soil moisture by sticking your finger into the soil. If the top inch feels dry, it’s time to water. If you’re using the self-watering bottle method, replenish the water reservoir as needed.
3. Fertilizing: Garlic is a heavy feeder, so it benefits from regular fertilization. Use a balanced liquid fertilizer, diluted to half strength, every 2-3 weeks. You can also amend the soil with compost or aged manure before planting.
4. Weeding: Keep the bottles free of weeds, as they can compete with the garlic for nutrients and water. Gently pull out any weeds that appear.
5. Mulching (Optional): Applying a layer of mulch, such as straw or wood chips, can help retain moisture, suppress weeds, and regulate soil temperature.
6. Pest and Disease Control: Keep an eye out for pests and diseases. Common garlic pests include aphids and onion thrips. Diseases like white rot and downy mildew can also affect garlic. If you notice any problems, treat them promptly with an appropriate organic pesticide or fungicide. Neem oil is a good option for controlling many pests and diseases.
7. Cold Stratification: Garlic needs a period of cold stratification (exposure to cold temperatures) to develop properly. If you live in a warm climate, you can simulate this by placing the bottles in the refrigerator for a few weeks before planting. However, if you plant in the fall, the natural winter temperatures will provide the necessary cold stratification.
Harvesting Your Garlic: The Sweet Reward of Your Labor
After months of care and patience, it’s finally time to harvest your garlic! This is the most rewarding part of the whole process.
1. Timing: Garlic is typically ready to harvest in late spring or early summer, about 8-9 months after planting. The exact timing will depend on your climate and the variety of garlic you’re growing.
2. Signs of Maturity: Look for these signs that your garlic is ready to harvest:
* The lower leaves of the plant will start to turn yellow and brown.
* The flower stalk (if present) will begin to curl and straighten.
* The bulbs will be plump and well-formed.
3. Harvesting: Gently loosen the soil around the garlic bulb with a trowel or garden fork. Carefully lift the bulb out of the soil, being careful not to damage it.
4. Curing: After harvesting, cure your garlic in a well-ventilated, dry place for 2-3 weeks. This will allow the bulbs to dry and develop their flavor. Hang the garlic plants upside down in bunches or spread them out on a screen.
5. Storing: Once the garlic is cured, trim the roots and stems. Store the bulbs in a cool, dry, and dark place. Properly cured and stored garlic can last for several months.
Troubleshooting: Addressing Common Garlic Growing Issues
Even with the best care, you might encounter some challenges along the way. Here are some common problems and how to address them:
* Yellowing Leaves: This could be a sign of nutrient deficiency, overwatering, or disease. Check the soil moisture and fertilize if necessary. If you suspect a disease, treat it with an appropriate fungicide.
* Small Bulbs: This could be due to insufficient sunlight, poor soil, or overcrowding. Make sure your garlic is getting enough sunlight and fertilize regularly. If you planted the cloves too close together, thin them out.
* Pest Infestations: Inspect your plants regularly for pests.
Conclusion
So, there you have it! Growing your own garlic in bottles is not just a quirky gardening experiment; it’s a genuinely rewarding and space-saving way to enjoy fresh, flavorful garlic right at your fingertips. We’ve walked you through the simple steps, highlighting how accessible and manageable this project truly is, even for those with limited gardening experience or space.
Why is this DIY garlic growing method a must-try? Because it offers a unique blend of convenience, sustainability, and control. Imagine the satisfaction of harvesting plump, juicy garlic cloves from repurposed bottles, knowing exactly where your food came from and how it was grown. No more mystery ingredients or questionable origins – just pure, unadulterated garlic goodness. Plus, it’s an excellent way to reduce waste by giving those empty bottles a new lease on life.
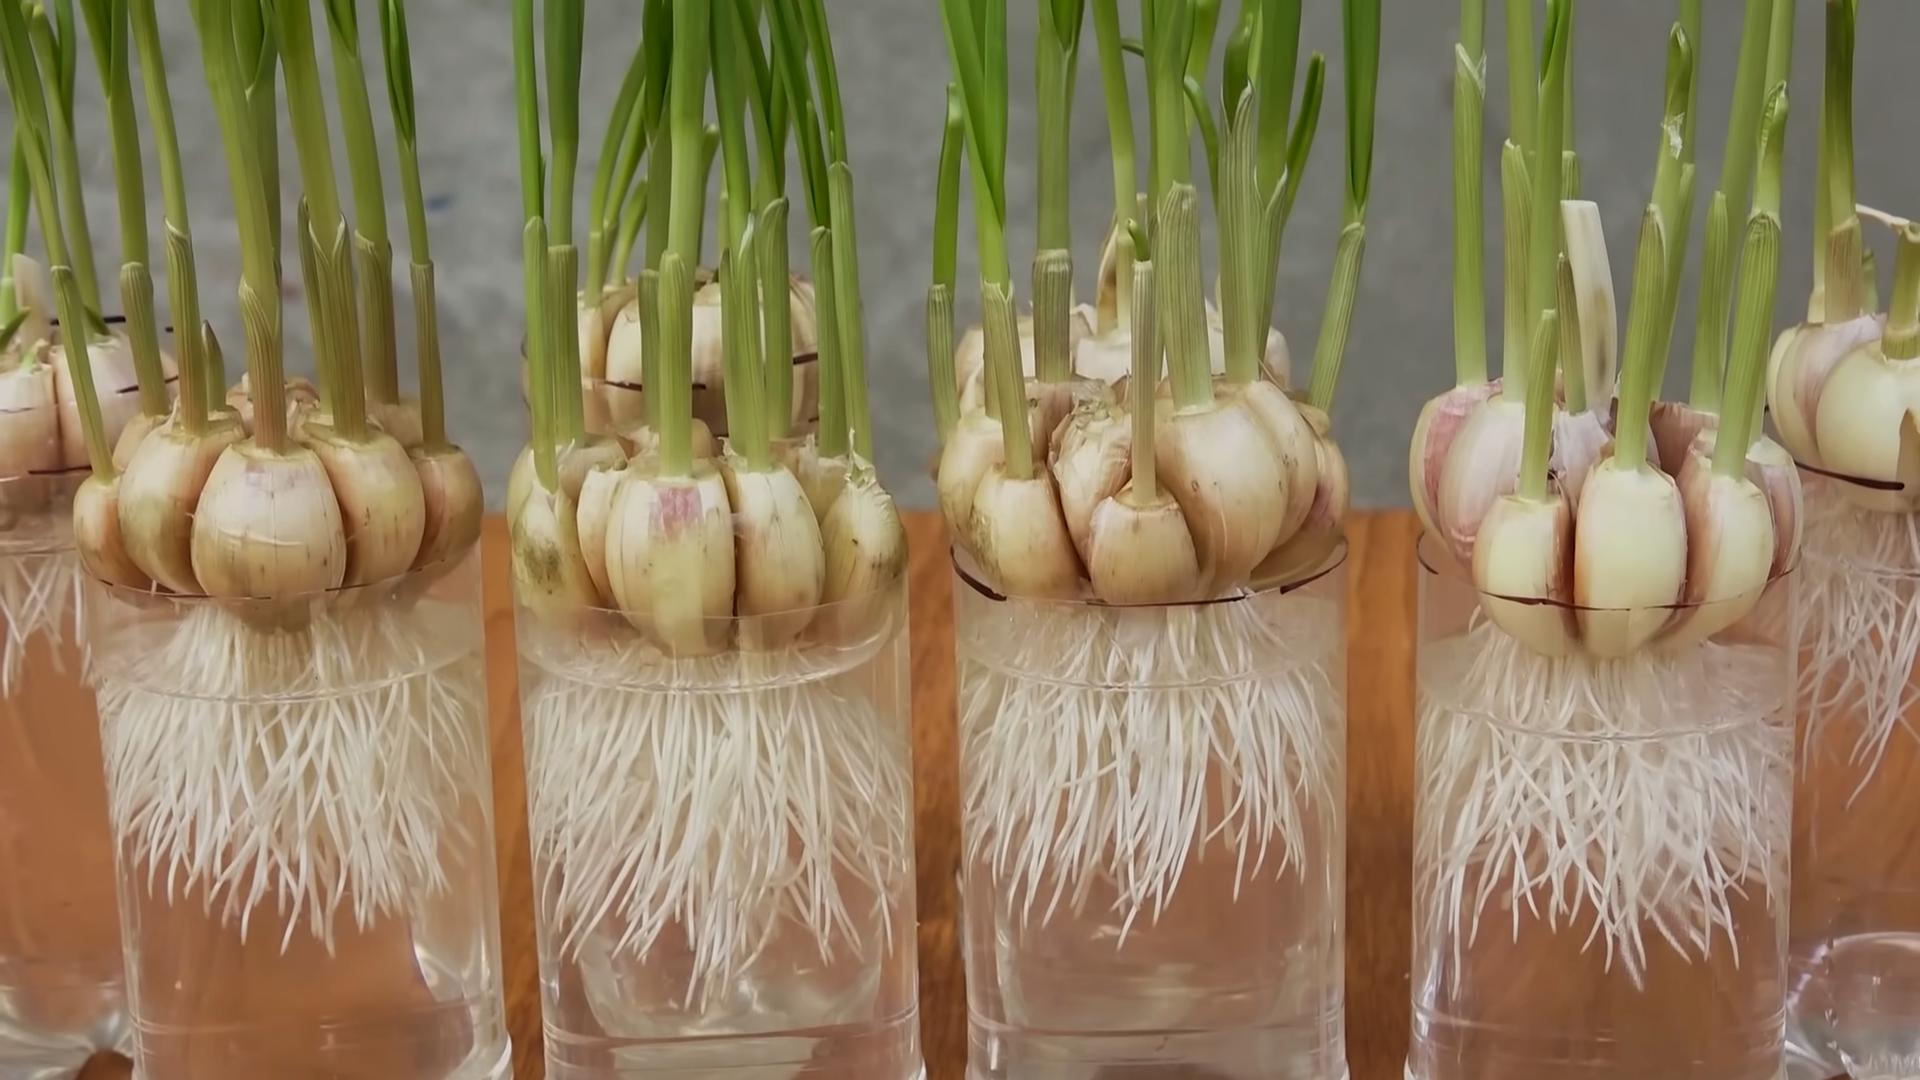
But the benefits don’t stop there. Growing garlic in bottles allows for better drainage control, minimizing the risk of root rot, a common problem in traditional garden beds. It also makes it easier to monitor soil conditions and adjust watering as needed. And let’s not forget the aesthetic appeal! A collection of garlic-filled bottles can add a touch of rustic charm to your balcony, patio, or windowsill.
Looking to spice things up? Consider these variations:
* Experiment with different garlic varieties: From the robust flavor of hardneck garlic to the milder taste of softneck varieties, each type offers a unique culinary experience. Try planting a mix of varieties to discover your favorites.
* Add companion plants: Interplant your garlic with herbs like parsley or thyme to deter pests and enhance the overall health of your mini-garden.
* Get creative with your bottle selection: While clear bottles are ideal for monitoring root growth, you can also use colored or textured bottles to add visual interest. Just be sure the bottles are clean and have adequate drainage holes.
* Vertical Gardening: If space is truly at a premium, consider creating a vertical garlic garden by stacking or hanging your bottles. This is a fantastic way to maximize your growing area and create a stunning visual display.
We’ve shown you how easy it is to embark on this exciting gardening adventure. Now, it’s your turn to get your hands dirty (or, in this case, garlicky!). Gather your supplies, follow our simple instructions, and prepare to be amazed by the results.
We are confident that you’ll find this DIY garlic growing method to be both enjoyable and rewarding. But don’t just take our word for it – try it for yourself! We encourage you to share your experiences with us and the wider gardening community. Post photos of your garlic-filled bottles on social media using #DIYGarlicBottles, and let us know what you’ve learned along the way. Your insights and tips could inspire others to embrace this sustainable and delicious way of growing their own garlic.
So, what are you waiting for? Grab those bottles, get some garlic cloves, and start growing your own fresh, flavorful garlic today! You’ll be amazed at how easy and rewarding it is to cultivate this culinary staple right in your own home. This method of DIY garlic growing is a game changer!
Frequently Asked Questions (FAQ)
What kind of bottles are best for growing garlic?
The best bottles for growing garlic are clear plastic or glass bottles that are at least 2 liters in size. Clear bottles allow you to monitor the root growth and soil moisture levels. Make sure the bottles are clean and have drainage holes drilled in the bottom to prevent waterlogging. Avoid using bottles that have contained harmful chemicals or pesticides.
How many drainage holes should I drill in the bottles?
You should drill at least 4-5 drainage holes in the bottom of each bottle. The holes should be about ¼ inch in diameter. Adequate drainage is crucial for preventing root rot, which can be a major problem for garlic.
What type of soil should I use for growing garlic in bottles?
Use a well-draining potting mix that is rich in organic matter. A mixture of compost, perlite, and peat moss is ideal. Avoid using garden soil, as it can be too heavy and compact, leading to poor drainage.
When is the best time to plant garlic in bottles?
The best time to plant garlic in bottles is in the fall, about 4-6 weeks before the first expected frost. This allows the garlic cloves to establish roots before winter. In warmer climates, you can plant garlic in late winter or early spring.
How deep should I plant the garlic cloves?
Plant the garlic cloves about 2-3 inches deep, with the pointed end facing up. Space the cloves about 4-6 inches apart to allow for adequate growth.
How often should I water the garlic plants in bottles?
Water the garlic plants regularly, keeping the soil consistently moist but not waterlogged. Check the soil moisture levels regularly and water when the top inch of soil feels dry. Reduce watering during the winter months when the plants are dormant.
How much sunlight do garlic plants need?
Garlic plants need at least 6-8 hours of sunlight per day. Place the bottles in a sunny location where they will receive plenty of direct sunlight. If you don’t have a sunny spot, you can supplement with grow lights.
Do I need to fertilize the garlic plants?
Yes, garlic plants benefit from regular fertilization. Use a balanced fertilizer that is rich in nitrogen, phosphorus, and potassium. Fertilize every 2-3 weeks during the growing season. You can also amend the soil with compost or other organic matter to provide additional nutrients.
How long does it take for garlic to mature in bottles?
Garlic typically takes about 8-9 months to mature. You can harvest the garlic when the leaves start to turn yellow and brown.
How do I harvest garlic from bottles?
To harvest garlic from bottles, gently loosen the soil around the base of the plant and carefully pull the garlic bulb out of the bottle. Be careful not to damage the bulb.
Can I reuse the bottles for growing garlic again?
Yes, you can reuse the bottles for growing garlic again. However, it’s important to clean the bottles thoroughly before reusing them to prevent the spread of diseases. Wash the bottles with soap and water and disinfect them with a bleach solution.
What are some common problems when growing garlic in bottles?
Some common problems when growing garlic in bottles include root rot, pests, and nutrient deficiencies. Root rot can be prevented by ensuring adequate drainage and avoiding overwatering. Pests can be controlled with organic pesticides or by handpicking them off the plants. Nutrient deficiencies can be addressed by fertilizing regularly.
Can I grow other vegetables in bottles using the same method?
Yes, you can grow other vegetables in bottles using the same method. Some good options include herbs, lettuce, spinach, and peppers. Just be sure to choose vegetables that are well-suited to container gardening and provide them with the appropriate growing conditions.
What if my garlic doesn’t form bulbs?
If your garlic doesn’t form bulbs, it could be due to several factors, including insufficient sunlight, poor soil, or improper watering. Make sure your garlic plants are getting enough sunlight, are planted in well-draining soil, and are watered regularly. You may also need to fertilize them more frequently. Another reason could be that you are growing a type of garlic that is not suited for your climate.
Is it possible to grow garlic indoors year-round using this method?
Yes, it is possible to grow garlic indoors year-round using this method, provided you can supply adequate light and temperature. Use grow lights to supplement natural sunlight, and maintain a consistent temperature between 60-70°F (15-21°C). You may need to adjust your watering and fertilizing schedule based on the indoor environment.
Leave a Comment