

DIY Key Holder Craft: Never Lose Your Keys Again! Are you tired of that frantic morning scramble, desperately searching for your keys before you can even think about your coffee? I know I am! We’ve all been there, haven’t we? Well, fret no more, because this article is your ultimate guide to creating a stylish and functional DIY key holder craft that will not only keep your keys organized but also add a touch of personality to your entryway.
Key holders, in their simplest form, have been around for ages. Think back to medieval times, where chatelaines – decorative belt hooks – served a similar purpose, holding keys and other essential household items. While our needs might be a little different today, the desire for organization and a touch of personal flair remains the same.
In today’s busy world, time is precious. Wasting minutes searching for misplaced keys is not only frustrating but also eats into our valuable time. That’s where this DIY key holder craft comes in! I’m going to show you how to create a beautiful and practical key holder that will solve your key-losing woes and add a touch of your unique style to your home. Plus, it’s a fantastic way to upcycle materials and get creative. Let’s get crafting!
DIY Key Holder: Never Lose Your Keys Again!
Okay, friends, let’s face it: we’ve all been there. Rummaging through bags, frantically searching under couch cushions, and retracing our steps, all because we can’t find our keys! Well, those days are over! Today, I’m going to show you how to create a super cute and functional DIY key holder that will not only keep your keys organized but also add a touch of personality to your entryway. Get ready to say goodbye to key chaos!
What You’ll Need: The Supply List
Before we dive in, let’s gather our supplies. This project is pretty versatile, so feel free to get creative with your materials!
* A piece of wood (approximately 6″ x 12″ is a good starting point, but adjust to your liking). I used a reclaimed piece of pallet wood for a rustic look!
* Key hooks (you can find these at any hardware store; choose the style and number you prefer).
* Paint, stain, or varnish (depending on the look you’re going for). I’m using a chalk paint for a vintage vibe.
* Sandpaper (various grits, from rough to fine).
* Drill with drill bits (sized appropriately for your key hooks and mounting hardware).
* Screwdriver (or drill with screwdriver bit).
* Measuring tape or ruler.
* Pencil.
* Sawtooth hanger or D-rings for mounting.
* Wood glue (optional, for extra security when attaching the hanger).
* Clamps (optional, but helpful for securing the wood while gluing).
* Protective eyewear and a dust mask (safety first!).
* Paintbrushes or rags for applying paint/stain.
* Sealer (optional, for added protection).
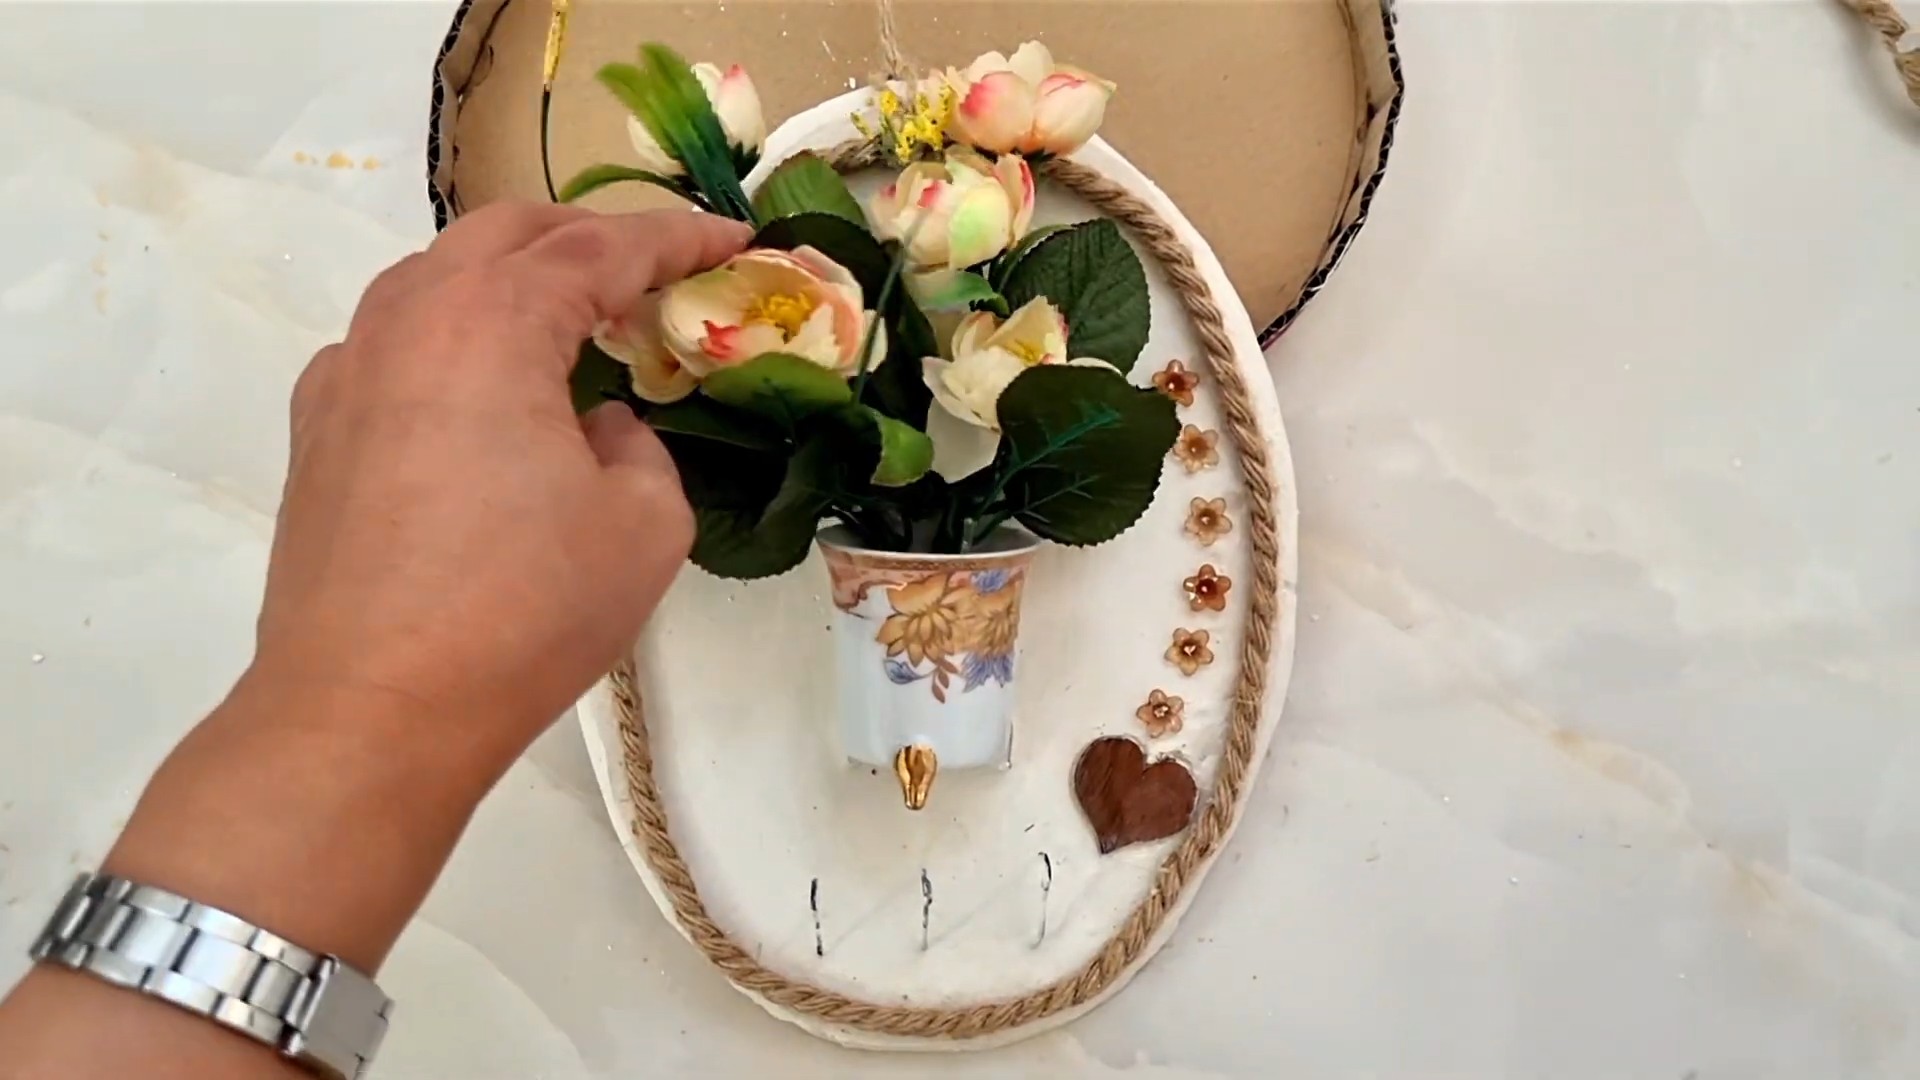
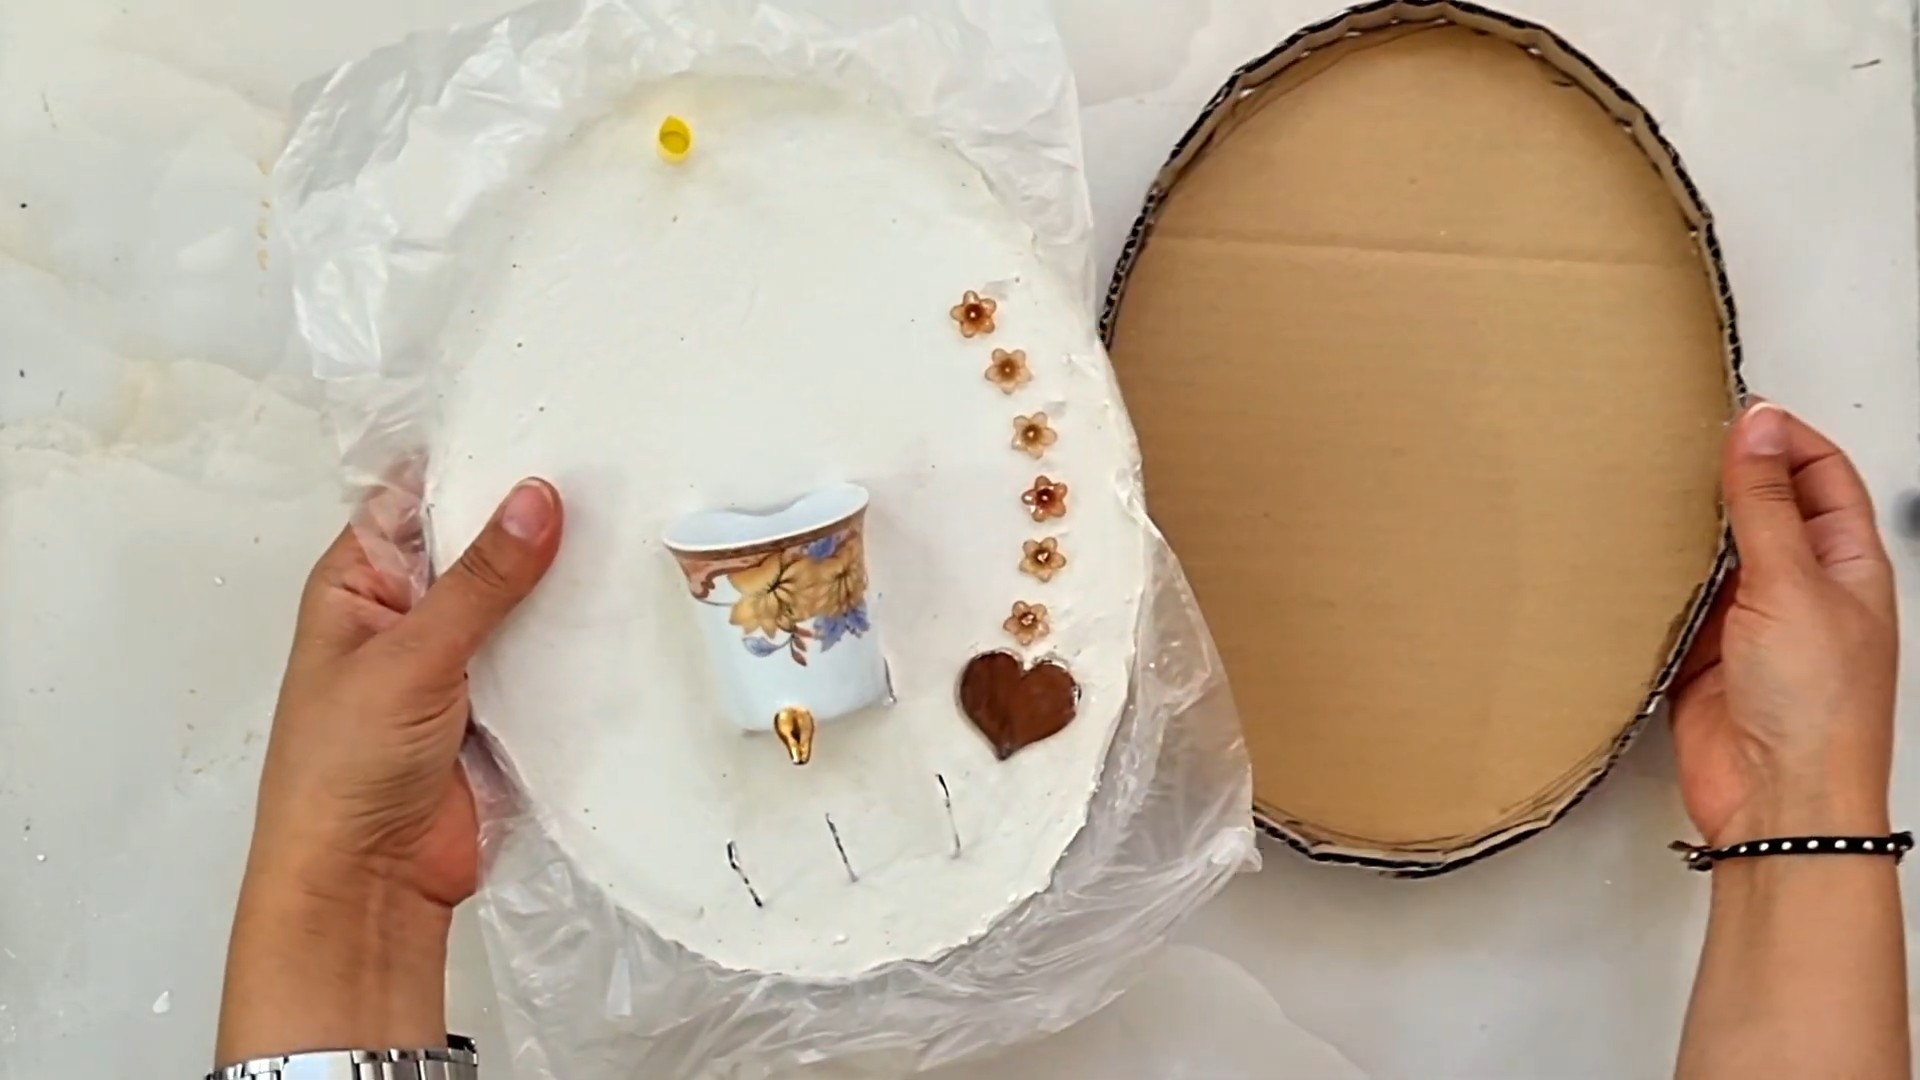
* Embellishments (optional: stencils, stamps, decorative knobs, twine, etc. Let your creativity shine!).
Phase 1: Preparing the Wood
This is where we lay the foundation for our key holder. A little prep work goes a long way!
1. Sanding Time! Start by sanding your piece of wood. If you’re using reclaimed wood like me, you’ll want to start with a coarser grit sandpaper (like 80 or 100) to remove any rough edges, splinters, or old finish. Then, gradually move to finer grits (120, 180, and finally 220) to create a smooth surface. Remember to sand with the grain of the wood. This will prevent unsightly scratches. Don’t forget to wear your dust mask!
2. Cleaning Up: After sanding, wipe down the wood with a damp cloth to remove any sanding dust. This will ensure that your paint or stain adheres properly. Let it dry completely before moving on.
3. Cutting (If Necessary): If your piece of wood is too large, now’s the time to cut it to the desired size. Use a saw (hand saw or power saw) to make a clean, straight cut. Remember to measure twice and cut once!
Phase 2: Painting, Staining, or Varnishing
Now for the fun part: adding color and personality!
1. Choosing Your Finish: Decide whether you want to paint, stain, or varnish your key holder. Paint offers the most color options, while stain enhances the natural beauty of the wood grain. Varnish provides a clear protective coating. I’m going with chalk paint because I love the matte finish and the ease of distressing it later.
2. Applying the Finish: If you’re painting, apply a thin, even coat of paint using a paintbrush or roller. Let it dry completely according to the paint manufacturer’s instructions. You may need to apply a second or even a third coat for full coverage. If you’re staining, apply the stain with a rag or brush, let it sit for a few minutes (depending on the desired darkness), and then wipe off the excess with a clean rag. For varnish, apply thin, even coats with a brush, allowing each coat to dry completely before applying the next.
3. Distressing (Optional): If you’re using chalk paint or a similar type of paint, you can distress the edges and surfaces of the key holder for a vintage look. Use sandpaper to gently rub away some of the paint, revealing the wood underneath. Focus on areas that would naturally wear over time, such as edges and corners.
4. Sealing (Optional but Recommended): To protect your painted or stained key holder, apply a coat of sealer. This will help prevent scratches and water damage. Choose a sealer that is compatible with your chosen finish. Apply it according to the manufacturer’s instructions.
Phase 3: Attaching the Key Hooks
This is where the magic happens! We’re turning a piece of wood into a functional key holder.
1. Marking the Hook Placement: Use a measuring tape or ruler to determine where you want to place your key hooks. Space them evenly along the bottom edge of the wood. Use a pencil to mark the screw holes for each hook. Consider how many keys you typically carry and space the hooks accordingly.
2. Pre-Drilling (Important!): Before screwing in the key hooks, pre-drill pilot holes at the marked locations. This will prevent the wood from splitting and make it easier to insert the screws. Use a drill bit that is slightly smaller than the diameter of the screws.
3. Attaching the Hooks: Now, carefully screw the key hooks into the pre-drilled holes. Use a screwdriver or a drill with a screwdriver bit. Make sure the hooks are securely attached and facing the correct direction.
Phase 4: Adding the Mounting Hardware
Time to get this beauty on the wall!
1. Choosing Your Mounting Method: Decide whether you want to use a sawtooth hanger or D-rings to mount your key holder. Sawtooth hangers are easy to install and work well for lightweight items. D-rings are more secure and can support heavier items.
2. Installing the Hanger: If you’re using a sawtooth hanger, center it on the back of the key holder, near the top edge. Use small nails or screws to attach it securely. For extra security, you can add a dab of wood glue before attaching the hanger. If you’re using D-rings, attach them to the back of the key holder, near the top corners. Use screws to secure them in place. Again, wood glue can be used for added strength.
3. Clamping (If Using Glue): If you used wood glue, clamp the hanger or D-rings in place until the glue is completely dry. This will ensure a strong and lasting bond.
Phase 5: Embellishing (Optional, But Highly Encouraged!)
This is your chance to really personalize your key holder and make it your own!
1. Stenciling: Use stencils to add designs, patterns, or words to your key holder. You can use paint, markers, or even wood burning tools.
2. Stamping: Rubber stamps are another great way to add decorative elements. Use ink pads in various colors to create unique designs.
3. Decorative Knobs: Instead of traditional key hooks, you can use decorative knobs. These add a touch of elegance and can be found in a variety of styles and materials.
4. Twine or Rope: Wrap twine or rope around the key holder for a rustic touch. You can also use it to create a hanging loop.
5. Photos or Artwork: Attach small photos or artwork to the key holder using Mod Podge or other adhesive.
Final Touches and Hanging Your Masterpiece!
1. Inspect Your Work: Take a good look at your key holder and make sure everything is secure and properly attached. Tighten any loose screws or nails.
2. Clean Up: Wipe down the key holder with a clean cloth to remove any dust or fingerprints.
3. Hanging Time! Find the perfect spot for your new key holder near your entryway. Use a level to ensure it’s hanging straight. Hang it securely on a nail or screw.
And there you have it! A beautiful and functional DIY key holder that will keep your keys organized and add a touch of personality to your home. Now you can finally say goodbye to those frantic key searches! Enjoy!
Conclusion
So, there you have it! Transforming ordinary materials into a stylish and functional DIY key holder is not only incredibly rewarding but also a fantastic way to personalize your space and keep those pesky keys organized. Forget rummaging through drawers or frantically searching under cushions – with this simple project, your keys will always have a designated home, right where you need them.
The beauty of this DIY key holder craft lies in its adaptability. Feel free to experiment with different materials. Instead of reclaimed wood, consider using a sleek piece of acrylic for a modern look, or perhaps a rustic slab of slate for a more earthy vibe. The hooks themselves can be swapped out for vintage knobs, decorative pulls, or even repurposed silverware for a truly unique touch.
Consider painting your key holder with vibrant colors to match your décor, or use stencils to add intricate patterns. For a more personalized touch, you could even incorporate family photos or meaningful quotes using decoupage techniques. If you’re feeling particularly ambitious, try adding a small shelf above the hooks to create a mini entryway organizer for mail, sunglasses, or other small essentials.
This DIY key holder craft is more than just a practical solution; it’s an opportunity to unleash your creativity and add a personal touch to your home. It’s a project that can be completed in an afternoon, requires minimal tools and materials, and delivers maximum impact. Plus, it’s a fantastic conversation starter! Imagine the compliments you’ll receive when guests admire your handcrafted creation.
We wholeheartedly encourage you to give this DIY key holder craft a try. It’s a fun, affordable, and satisfying project that will not only declutter your life but also add a touch of personality to your home. Don’t be afraid to get creative, experiment with different materials and designs, and make it your own.
Once you’ve completed your masterpiece, we’d love to see it! Share your creations with us on social media using [Your Hashtag] and tell us about your experience. What materials did you use? What challenges did you overcome? What unique touches did you add? We’re eager to see your ingenuity and inspire others to embark on their own DIY adventures. So, grab your tools, gather your materials, and get crafting! You’ll be amazed at what you can create with a little bit of imagination and effort. Happy crafting!
Frequently Asked Questions (FAQ)
What kind of wood is best for making a DIY key holder?
The best type of wood for your DIY key holder depends on the aesthetic you’re aiming for and your skill level. Reclaimed wood is a popular choice for its rustic charm and eco-friendliness. Pine is a readily available and affordable option that’s easy to work with, making it ideal for beginners. Hardwoods like oak or maple offer greater durability and a more refined look, but they can be more challenging to cut and drill. Consider the grain pattern and color of the wood as well, ensuring it complements your home décor. Ultimately, the “best” wood is the one that best suits your personal preferences and the overall design of your DIY key holder.
What type of hooks should I use for my key holder?
The type of hooks you use will depend on the weight of your keys and the overall style of your key holder. Small, lightweight hooks are suitable for a few keys, while larger, sturdier hooks are necessary for heavier keychains or multiple sets of keys. Consider using decorative hooks to add a touch of personality to your project. Options include vintage-style hooks, modern minimalist hooks, or even repurposed hardware like drawer pulls or cabinet knobs. Ensure the hooks are securely attached to the wood using screws or nails, and that they are spaced appropriately to prevent keys from tangling.
How do I attach the hooks to the wood securely?
The most secure way to attach hooks to wood is by using screws. First, pre-drill pilot holes slightly smaller than the diameter of the screws to prevent the wood from splitting. Then, carefully screw the hooks into the pilot holes, ensuring they are tightened securely. If you’re using nails, choose nails that are long enough to penetrate deeply into the wood, and hammer them in straight and firmly. For added security, you can use wood glue in conjunction with screws or nails. Apply a small amount of glue to the back of the hook before attaching it to the wood.
Can I paint or decorate my DIY key holder?
Absolutely! Painting or decorating your DIY key holder is a great way to personalize it and match your home décor. You can use acrylic paints, spray paints, or even chalk paints to achieve different looks. Consider using stencils to add patterns or designs, or try decoupage techniques to incorporate photos or quotes. Before painting, sand the wood surface smooth and apply a primer to ensure the paint adheres properly. After painting, seal the surface with a clear coat of varnish or polyurethane to protect it from scratches and wear.
How do I hang my DIY key holder on the wall?
There are several ways to hang your DIY key holder on the wall, depending on its size and weight. For lighter key holders, you can use adhesive strips or picture-hanging hooks. For heavier key holders, it’s best to use screws and wall anchors. Locate a stud in the wall for maximum support, and pre-drill pilot holes before inserting the screws. If you can’t find a stud, use wall anchors to provide a secure hold. Ensure the key holder is level before tightening the screws. You can also attach D-rings to the back of the key holder and hang it on nails or screws.
What if I don’t have access to power tools?
No problem! While power tools can make the process faster and easier, you can still create a beautiful DIY key holder using hand tools. A hand saw can be used to cut the wood to size, and a hand drill can be used to create pilot holes for the hooks. Sandpaper can be used to smooth the edges and surfaces of the wood. The process may take a bit longer, but the results will be just as rewarding.
Can I use recycled materials for this project?
Definitely! Using recycled materials is a great way to make your DIY key holder even more sustainable and unique. Consider using reclaimed wood from old furniture or pallets, repurposed hardware like drawer pulls or cabinet knobs, or even recycled metal scraps. Get creative and see what you can find around your home or at local thrift stores.
How can I make my DIY key holder more personalized?
There are countless ways to personalize your DIY key holder. Consider adding your family name or a meaningful quote using stencils or vinyl lettering. Incorporate family photos or artwork using decoupage techniques. Use paint colors that match your home décor or reflect your personal style. Add decorative elements like beads, buttons, or shells. The possibilities are endless!
What if I make a mistake?
Don’t worry, mistakes happen! If you make a mistake while cutting the wood, you can try to salvage it by sanding down the edges or using wood filler to repair any imperfections. If you drill a hole in the wrong place, you can fill it with wood filler and sand it smooth. If you make a mistake while painting, you can simply repaint the area. The key is to be patient and persistent, and don’t be afraid to experiment.
Where can I find inspiration for my DIY key holder design?
There are many places to find inspiration for your DIY key holder design. Browse online platforms like Pinterest, Instagram, and Etsy for ideas. Look through home décor magazines and websites for inspiration. Visit local craft stores and hardware stores to see what materials are available. And don’t be afraid to let your own creativity guide you!

Leave a Comment