

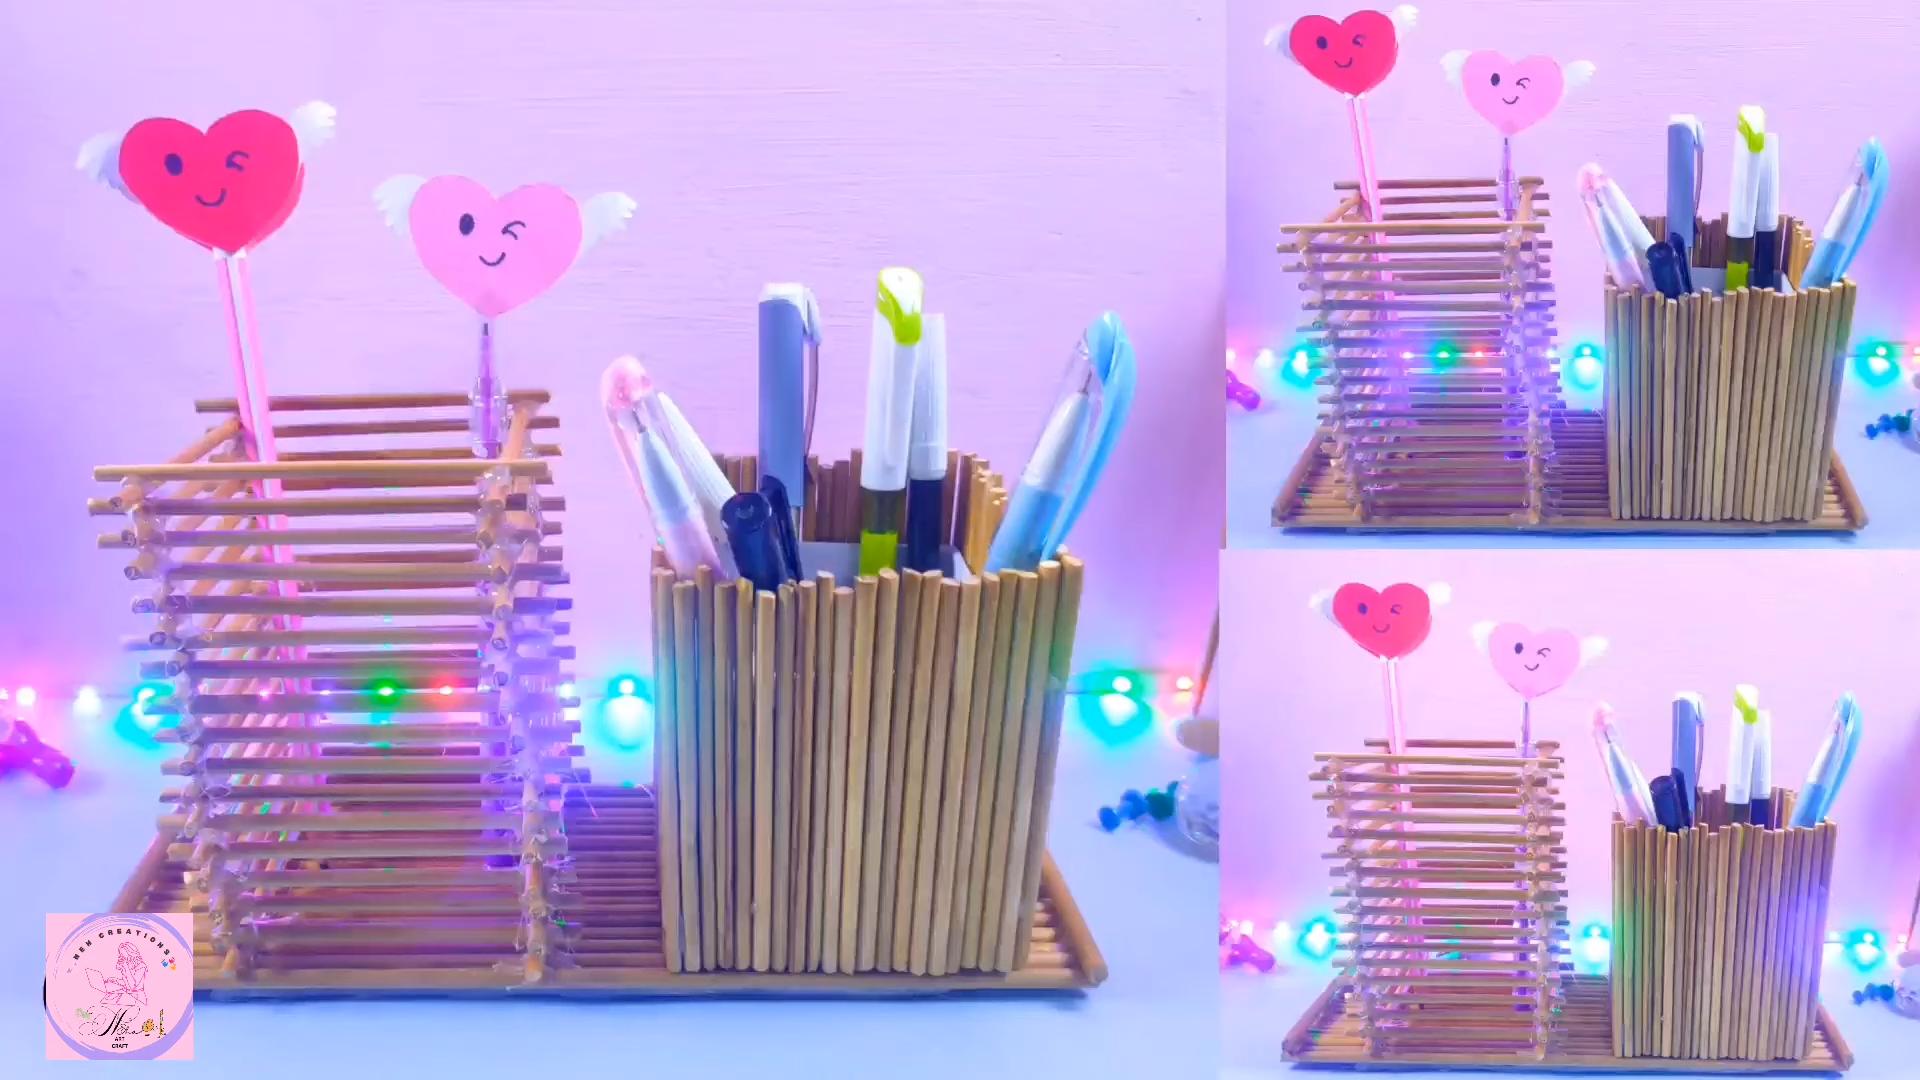
DIY Pen Holder: Tired of your desk looking like a stationery explosion? I know the feeling! Pens scattered everywhere, highlighters playing hide-and-seek, and sticky notes clinging to dear life. It’s a common problem, and that’s why I’m so excited to share this super simple and incredibly satisfying DIY project with you: creating your very own pen holder!
Humans have been organizing their writing tools for centuries. From ancient scribes carefully storing their reeds in clay pots to Renaissance artists meticulously arranging their quills, the need for a dedicated pen holder is a timeless one. While the materials and styles have evolved, the underlying purpose remains the same: to keep our essential tools within easy reach and maintain a sense of order.
But why bother with a DIY pen holder when you can just buy one? Well, for starters, it’s a fantastic way to declutter your space and add a personal touch to your workspace. Plus, it’s incredibly budget-friendly! You can repurpose items you already have around the house, giving them a new lease on life and reducing waste. More importantly, crafting your own DIY pen holder allows you to customize it to perfectly fit your needs and style. Whether you’re a minimalist who prefers sleek and simple designs or a creative soul who loves vibrant colors and quirky embellishments, this project is your chance to let your personality shine. So, grab your supplies, and let’s get crafting!
DIY Upcycled Denim Pen Holder: A Stylish Desk Organizer
Hey there, fellow crafters! Are you drowning in pens, pencils, and markers? Do you have a pair of old jeans you’re about to toss? Well, hold on! I’m going to show you how to transform that denim into a super cool and functional pen holder. This project is not only a great way to declutter your desk but also a fantastic way to give old clothes a new life. Plus, it’s surprisingly easy! Let’s get started!
Materials You’ll Need:
* Old pair of jeans (preferably a sturdy denim)
* Scissors or rotary cutter
* Ruler or measuring tape
* Sewing machine (optional, but recommended for durability)
* Needle and thread (if you don’t have a sewing machine)
* Hot glue gun and glue sticks (optional, for extra reinforcement or embellishments)
* Cardboard tube (from paper towels or wrapping paper)
* Cardboard sheet (for the base)
* Pencil or marker
* Fabric scraps (for lining – optional)
* Embellishments (buttons, beads, patches, etc. – optional)
Planning and Preparation
Before we dive into the cutting and sewing, let’s plan out our pen holder. This will help ensure a smooth and successful project.
* Decide on the height: Think about how tall you want your pen holder to be. Consider the height of your tallest pens and pencils. I usually aim for around 6-7 inches.
* Choose your denim section: The leg of the jeans works best for this project. You can use either the upper or lower leg, depending on the desired look and any existing wear and tear on the denim.
* Consider the style: Do you want a simple, minimalist pen holder, or something more embellished? Think about adding pockets, patches, or other decorative elements.
Cutting and Preparing the Denim
Okay, now for the fun part – cutting up those jeans!
1. Cut the jean leg: Lay your jeans flat and carefully cut off one of the legs. Make sure the cut is straight and even.
2. Measure and cut the denim piece: Measure the circumference of your cardboard tube. Add about an inch for seam allowance. Then, measure the desired height of your pen holder (plus an inch for seam allowance at the top and bottom). Cut a rectangular piece of denim according to these measurements. For example, if your tube’s circumference is 9 inches and you want a 6-inch tall pen holder, cut a piece of denim that is 10 inches wide and 8 inches tall.
3. Prepare the edges: If you’re using a sewing machine, you can serge or zigzag stitch the edges of the denim to prevent fraying. If you’re hand-sewing, you can fold the edges inward and iron them to create a clean, finished look.
Sewing the Denim Sleeve
This is where we transform the flat piece of denim into a cylindrical sleeve that will fit snugly around the cardboard tube.
1. Fold and pin: Fold the denim rectangle in half lengthwise, with the right sides (the side you want to show) facing each other. Pin along the long edge to hold the fabric in place.
2. Sew the seam: Using a sewing machine, sew along the pinned edge with a straight stitch, using a ½-inch seam allowance. If you’re hand-sewing, use a backstitch for a strong and durable seam.
3. Turn right side out: Once the seam is sewn, carefully turn the denim sleeve right side out. Use a point turner or a blunt object to push out the corners and create a crisp edge.
4. Iron the seam: Iron the seam flat to create a professional finish.
Creating the Base
Now, let’s create a sturdy base for our pen holder.
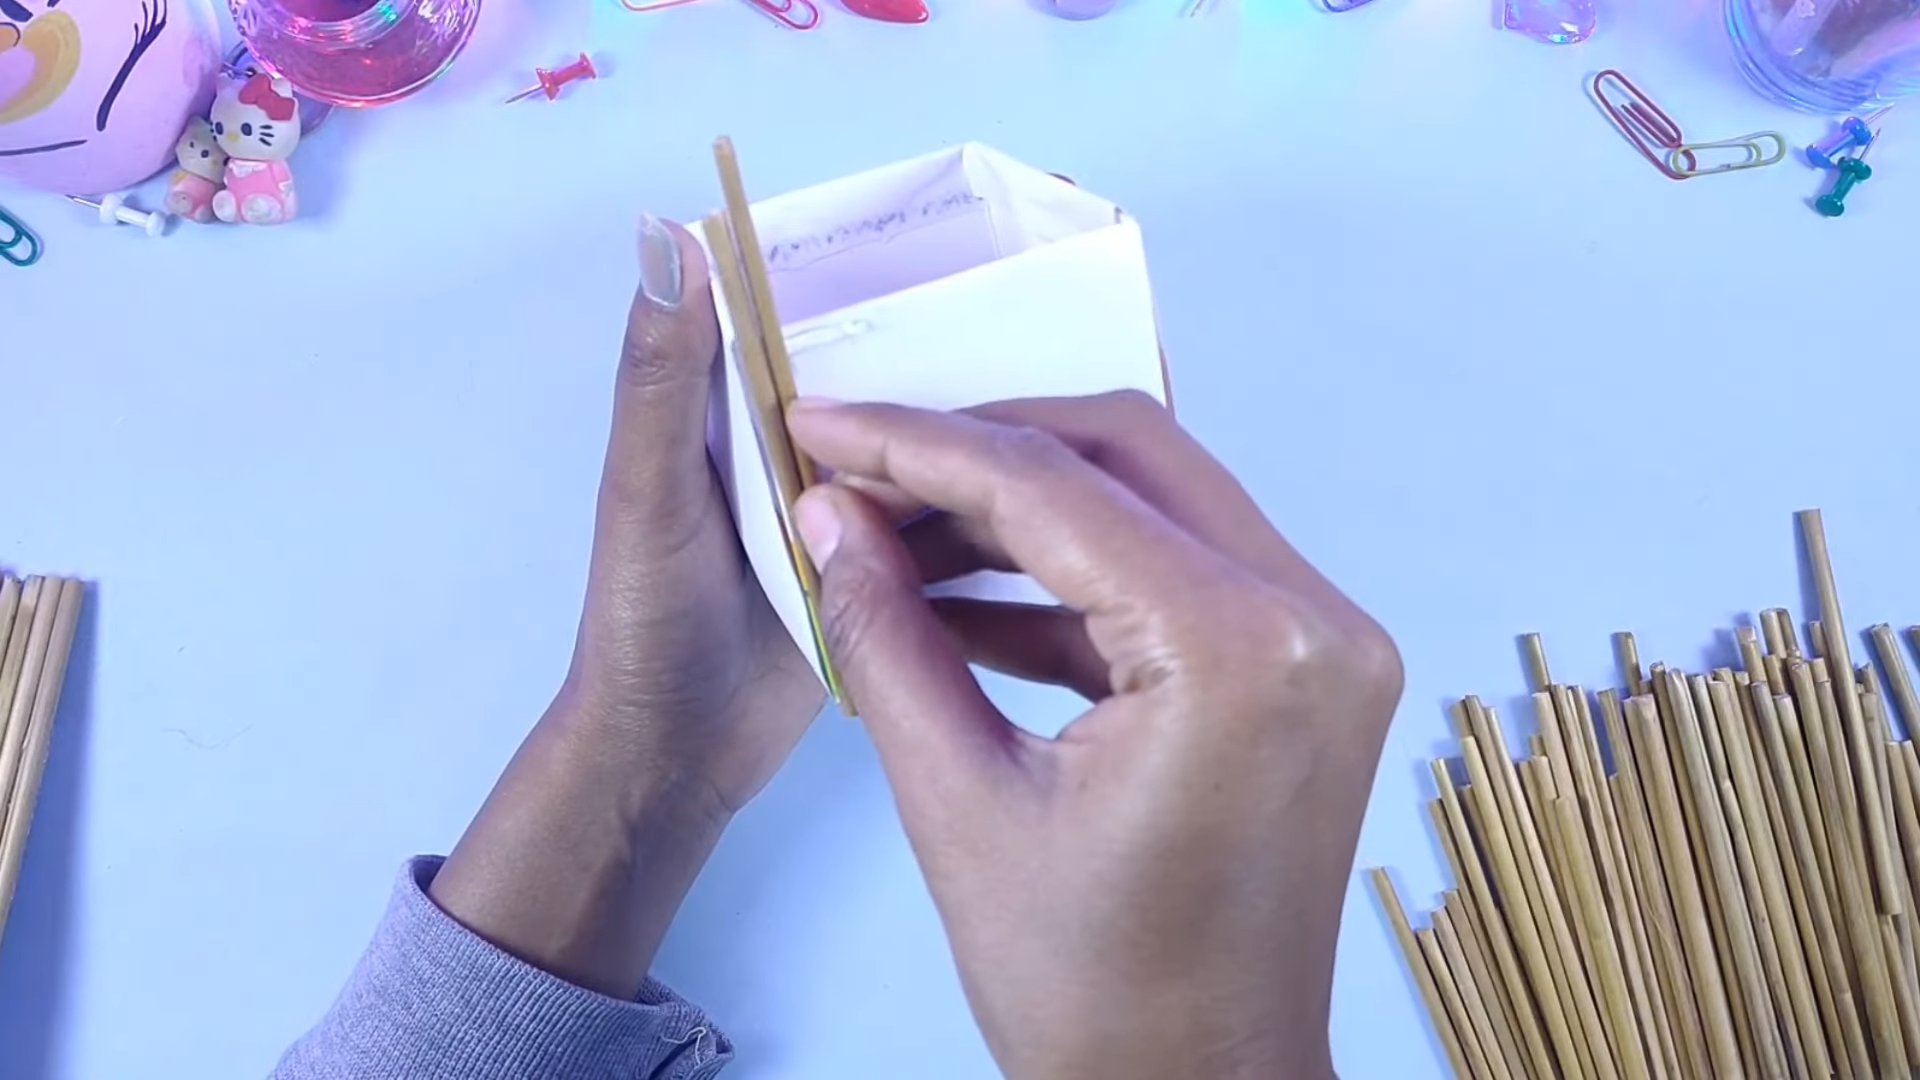
1. Trace the tube: Place the cardboard tube on the cardboard sheet and trace around it with a pencil or marker.
2. Cut out the circle: Carefully cut out the cardboard circle. Make sure the circle is slightly larger than the tube’s diameter to allow for easy attachment.
3. (Optional) Cover the base: If you want a more polished look, you can cover the cardboard circle with fabric. Cut a piece of fabric slightly larger than the circle. Apply hot glue to the cardboard and carefully adhere the fabric, folding the edges over to the back.
Assembling the Pen Holder
This is where everything comes together!
1. Slide the denim sleeve onto the tube: Carefully slide the denim sleeve over the cardboard tube. Make sure the seam is positioned where you want it to be (usually at the back).
2. Secure the bottom edge: Fold the bottom edge of the denim sleeve inward, about ½ inch. Use hot glue to attach the folded edge to the cardboard base. Work in small sections, applying glue and pressing the denim firmly onto the cardboard. Alternatively, you can hand-sew the denim to the base using a whip stitch.
3. Secure the top edge: Fold the top edge of the denim sleeve inward, about ½ inch. You can either glue or sew this edge down. If you’re gluing, apply hot glue to the inside of the denim sleeve and press it firmly against the cardboard tube. If you’re sewing, use a running stitch or a whip stitch to secure the edge.
4. (Optional) Add a lining: For a more finished look, you can add a fabric lining to the inside of the pen holder. Cut a piece of fabric that is the same height as the inside of the denim sleeve and the same circumference as the cardboard tube. Sew the fabric into a cylinder, then glue or sew it to the inside of the denim sleeve.
Embellishing Your Pen Holder (Optional)
This is where you can really let your creativity shine!
* Add pockets: Cut small squares or rectangles of denim from the leftover jean scraps. Fold the edges inward and sew or glue them onto the outside of the pen holder to create small pockets for holding erasers, paper clips, or other small items.
* Attach patches: Iron-on or sew-on patches are a great way to add personality to your pen holder. Choose patches that reflect your interests or hobbies.
* Sew on buttons and beads: Sew buttons, beads, or other embellishments onto the denim for a unique and eye-catching look.
* Use fabric paint: Use fabric paint to create designs or patterns on the denim.
* Add lace or ribbon: Glue or sew lace or ribbon around the top or bottom of the pen holder for a delicate touch.
* Fringe it: Cut thin strips of denim from the leftover scraps and attach them to the top or bottom of the pen holder to create a fringed effect.
Alternative Method: No-Sew Pen Holder
If you don’t have a sewing machine or prefer not to sew, you can still create a fantastic denim pen holder using hot glue.
1. Cut the denim: Follow the same steps as above to cut the denim piece to the correct size.
2. Fold and glue: Fold the denim rectangle in half lengthwise, with the right sides facing each other. Use hot glue to glue the long edge together, creating a seam.
3. Turn right side out: Carefully turn the denim sleeve right side out.
4. Attach to the base: Follow the same steps as above to attach the denim sleeve to the cardboard tube and base, using hot glue to secure all the edges.
5. Embellish: Add any embellishments you like using hot glue.
Tips and Tricks
* Use a sturdy denim: Thicker denim will create a more durable and long-lasting pen holder.
* Reinforce the seams: If you’re using a sewing machine, use a double stitch or a zigzag stitch to reinforce the seams. If you’re hand-sewing, use a backstitch for a strong and secure seam.
* Use a hot glue gun carefully: Hot glue can be very hot, so be careful not to burn yourself. Use a low-temperature glue gun if possible.
* Get creative with embellishments: Don’t be afraid to experiment with different embellishments to create a unique and personalized pen holder.
* Recycle other materials: You can use other recycled materials, such as old t-shirts or fabric scraps, to create your pen holder.
* Make multiple pen holders: Once you get the hang of it, you can make multiple pen holders to organize your entire desk or to give as gifts.
Troubleshooting
* Denim is too thick to sew: If your denim is too thick to sew easily, try using a heavier needle in your sewing machine or hand-sewing with a strong needle and thread. You can also try using a thinner denim fabric.
* Hot glue isn’t holding: Make sure the surfaces you’re gluing are clean and dry. Use
Conclusion
So, there you have it! Transforming everyday items into functional and stylish organizers is not only incredibly satisfying but also a fantastic way to declutter and personalize your workspace. This DIY pen holder project is more than just a craft; it’s a statement about resourcefulness, creativity, and adding a personal touch to your environment.
Why is this DIY pen holder a must-try? Because it’s simple, affordable, and endlessly customizable. Forget those generic, mass-produced desk organizers. With just a few readily available materials and a little imagination, you can create a pen holder that perfectly reflects your style and meets your specific needs. It’s a fantastic way to upcycle materials that might otherwise end up in the trash, contributing to a more sustainable lifestyle. Plus, the sense of accomplishment you’ll feel after completing this project is truly rewarding.
But the fun doesn’t stop there! Feel free to experiment with different materials and designs.
Variations and Suggestions:
* Fabric Frenzy: Instead of paper or paint, wrap your container in fabric scraps. Use different patterns and textures to create a visually appealing collage. Secure the fabric with fabric glue or double-sided tape.
* Nature’s Touch: Gather small twigs and branches from your backyard and glue them around the container for a rustic, natural look. You can even add small pebbles or shells for extra texture.
* Personalized Prints: Print out your favorite photos, quotes, or patterns and decoupage them onto the container. This is a great way to showcase your personality and create a truly unique pen holder.
* Metallic Magic: Use metallic spray paint or adhesive foil to give your pen holder a glamorous and sophisticated touch. Gold, silver, or copper accents can instantly elevate the look.
* Washi Tape Wonders: Washi tape is your best friend for adding colorful and intricate designs. Use different patterns and widths to create stripes, geometric shapes, or even miniature landscapes.
* Add Compartments: Use cardboard dividers to create separate compartments within the pen holder for different types of pens, pencils, and other stationery items.
* Go Vertical: Stack multiple containers on top of each other to create a multi-tiered pen holder. This is a great option for maximizing space and organizing a larger collection of writing instruments.
We encourage you to unleash your creativity and make this DIY pen holder truly your own. Don’t be afraid to experiment with different techniques and materials until you find a style that you love.
Once you’ve created your masterpiece, we’d love to see it! Share your photos and experiences with us on social media using #DIYPenHolder and #CreativeCrafts. We can’t wait to see what you come up with! This simple project can bring a lot of joy and organization to your life, so grab your supplies and get crafting! Let’s transform those ordinary containers into extraordinary desk organizers.
FAQ
Q: What kind of container is best for making a DIY pen holder?
A: The beauty of this project is its versatility! You can use a wide variety of containers, such as:
* Tin cans: These are readily available and sturdy, making them a great option for holding heavier pens and pencils. Just be sure to clean them thoroughly and remove any sharp edges.
* Glass jars: Mason jars, pasta sauce jars, or even old candle jars can be transformed into stylish pen holders. You can paint them, wrap them in fabric, or leave them clear for a minimalist look.
* Plastic bottles: Cut off the top of a plastic bottle and decorate it to create a lightweight and durable pen holder. This is a great way to upcycle plastic waste.
* Cardboard tubes: Empty paper towel or toilet paper rolls can be used to create individual pen holders or grouped together to form a larger organizer.
* Yogurt or Sour Cream Containers: These are the perfect size for holding pens and pencils and are often discarded.
Ultimately, the best container is the one that you have on hand and that suits your aesthetic preferences.
Q: What kind of glue should I use for this project?
A: The type of glue you use will depend on the materials you’re working with. Here are some recommendations:
* For paper and fabric: White school glue, craft glue, or fabric glue are all good options.
* For heavier materials like twigs or shells: Hot glue or super glue will provide a stronger hold.
* For decoupage: Mod Podge is a popular choice for sealing and protecting your designs.
* For attaching embellishments: A glue gun is useful for quickly and securely attaching small items like beads, buttons, or sequins.
Always follow the manufacturer’s instructions when using glue, and be sure to work in a well-ventilated area.
Q: How can I make my DIY pen holder more stable?
A: If you’re using a lightweight container, you can add weight to the bottom to make it more stable. Here are a few ideas:
* Fill the bottom with pebbles, sand, or rice.
* Glue a heavy object, such as a washer or a coin, to the bottom of the container.
* Attach a wider base to the bottom of the container using cardboard or wood.
Q: How can I prevent my pen holder from scratching my desk?
A: To protect your desk from scratches, you can add felt pads to the bottom of your pen holder. These are available at most craft stores and hardware stores. You can also use a piece of cork or foam to create a non-slip base.
Q: Can I use spray paint on any type of container?
A: While spray paint can be used on many surfaces, it’s important to choose the right type of paint for your container. For plastic containers, use a spray paint that is specifically designed for plastic. For metal containers, use a rust-resistant primer before applying the spray paint. Always work in a well-ventilated area and follow the manufacturer’s instructions.
Q: How can I make my DIY pen holder waterproof?
A: If you plan to use your pen holder in a damp environment, such as a bathroom or kitchen, you’ll want to make it waterproof. You can do this by:
* Sealing the container with a waterproof sealant.
* Using a waterproof paint or coating.
* Lining the inside of the container with a waterproof material, such as plastic or rubber.
Q: What if I don’t have any of the suggested materials?
A: Don’t worry! Get creative and use what you have on hand. The beauty of DIY projects is that they can be adapted to suit your resources. Use old magazines, newspapers, or even junk mail to decorate your pen holder. Look around your house for interesting materials that you can repurpose.
Q: How do I clean my DIY pen holder?
A: The cleaning method will depend on the materials you used to create your pen holder. For most surfaces, a damp cloth will suffice. Avoid using harsh chemicals or abrasive cleaners, as these can damage the finish. For fabric-covered pen holders, you can spot clean with a mild detergent.
Q: Is this a good project for kids?
A: Yes, this DIY pen holder project is a great activity for kids, with adult supervision. It’s a fun and creative way to encourage them to organize their belongings and express their artistic talents. Just be sure to use non-toxic materials and supervise them closely when using glue or sharp objects.
Q: Where can I find more inspiration for DIY pen holder designs?
A: The internet is a treasure trove of inspiration! Search for “DIY pen holder ideas” on Pinterest, Google Images, or YouTube to find countless examples and tutorials. You can also browse craft blogs and websites for more creative ideas.
Leave a Comment