

DIY pot protectors are a game-changer for any home gardener, and trust me, I’ve learned this the hard way! How many times have you lovingly nurtured your seedlings, only to find them decimated by curious critters or knocked over by a rogue gust of wind? It’s heartbreaking, isn’t it?
Protecting your precious plants is a tale as old as gardening itself. From ancient Egyptians using thorny branches to ward off animals to medieval gardeners building elaborate walled gardens, the need to safeguard our green companions has always been paramount. But let’s face it, we don’t all have the space (or the budget!) for a full-blown fortress around our tomato plants.
That’s where these simple, effective, and budget-friendly DIY pot protectors come in. I’m going to show you how to create barriers that will keep your plants safe from nibbling pests, clumsy pets, and even the occasional over-enthusiastic toddler. Plus, these projects are so easy, you can whip them up in an afternoon using materials you probably already have lying around. Ready to give your plants the VIP treatment they deserve? Let’s get started!
DIY Pot Protectors: Say Goodbye to Scratched Cookware!
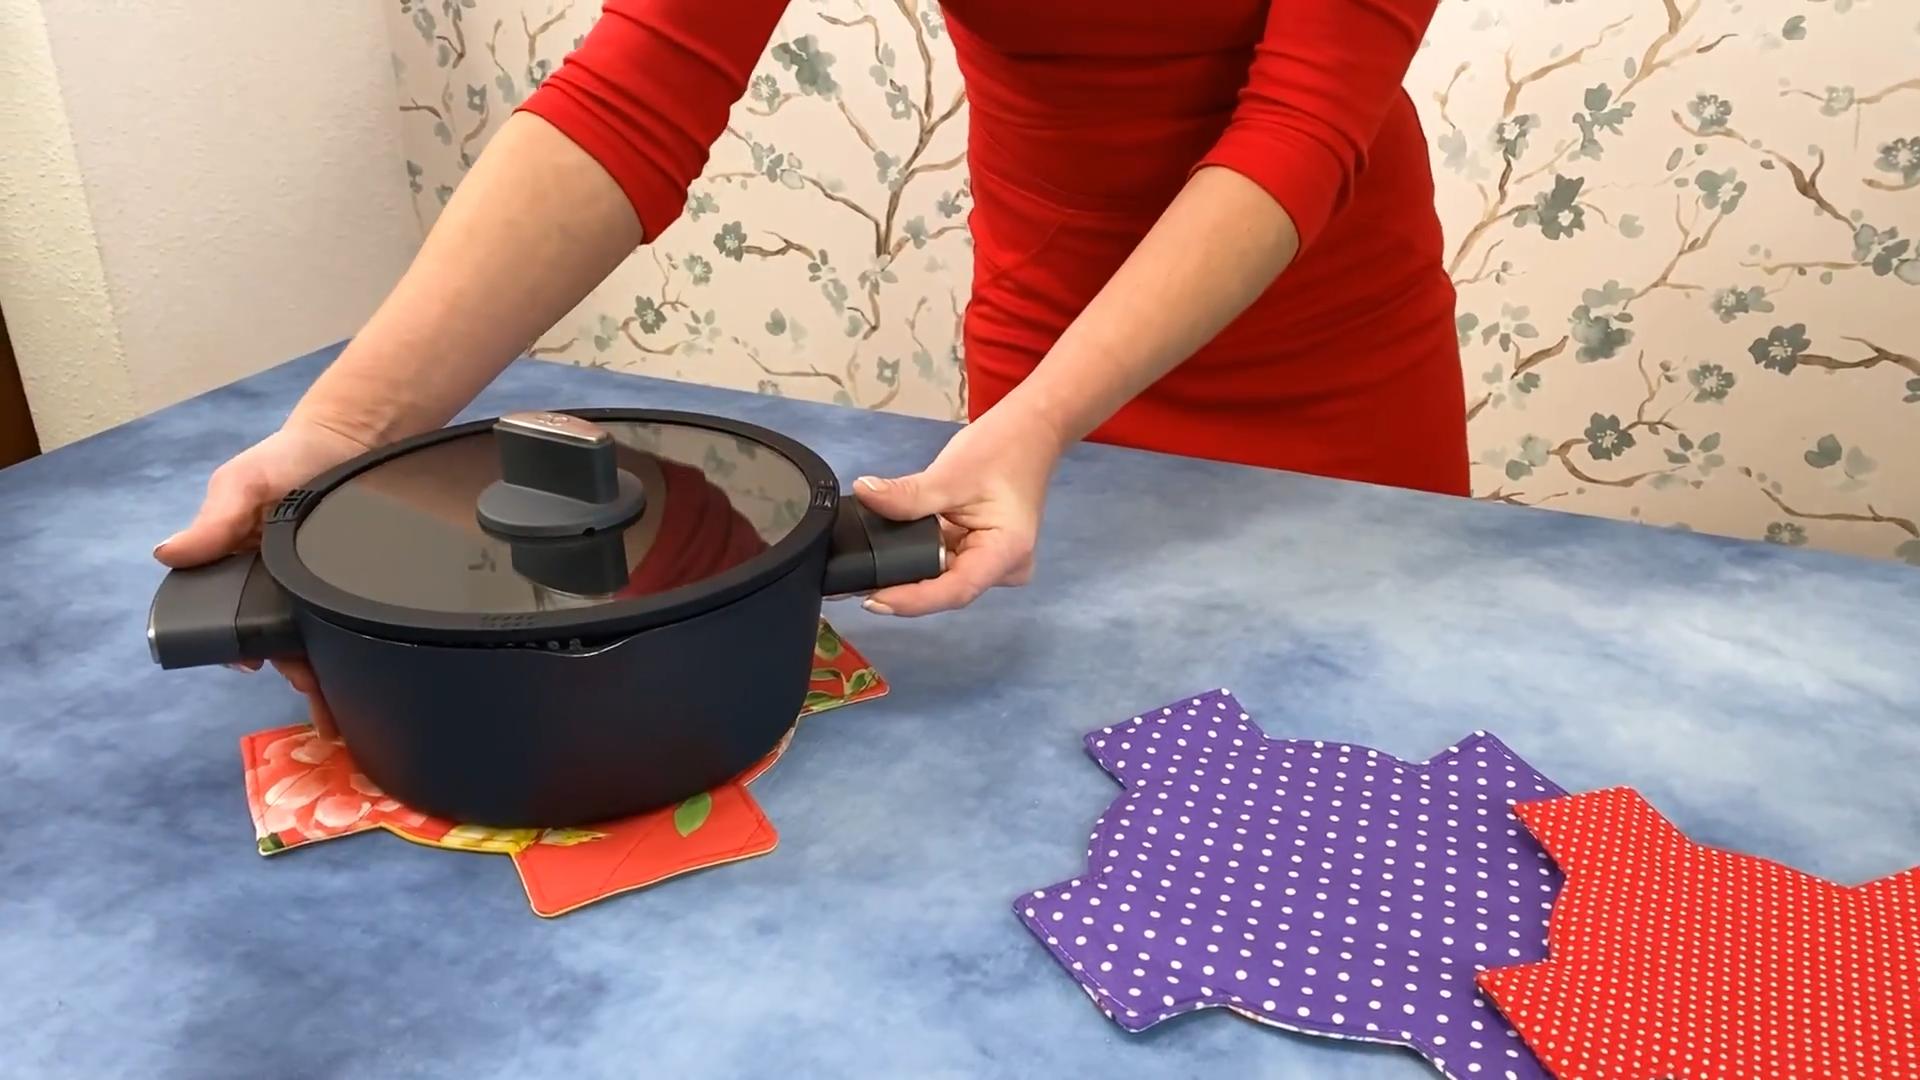
Okay, friends, let’s talk about something near and dear to my heart (and my cookware!): protecting those precious pots and pans. I’ve spent good money on my kitchen set, and the last thing I want is to see them all scratched and dinged from being stacked together. That’s why I decided to ditch the flimsy store-bought protectors and make my own! This DIY project is super easy, customizable, and way more cost-effective. Plus, it’s a great way to use up scrap fabric you might have lying around. Let’s get started!
What You’ll Need
Before we dive in, let’s gather our supplies. Don’t worry, you probably already have most of this stuff!
* **Fabric:** Felt is my go-to for this project. It’s inexpensive, comes in tons of colors, and doesn’t fray, which means less sewing! You can also use fleece, cotton, or even upcycled t-shirts. Just make sure it’s a relatively thick fabric to provide good cushioning.
* **Scissors:** A good pair of fabric scissors is essential. Dull scissors will make your life miserable, trust me.
* **Measuring Tape or Ruler:** We need to get those sizes right!
* **Pencil or Fabric Marker:** For tracing our circles.
* **Sewing Machine (Optional):** While you *can* hand-sew these, a sewing machine will make the process much faster and more durable.
* **Thread:** Choose a color that complements your fabric.
* **Pins:** To hold the fabric layers together while sewing.
* **Circular Objects for Tracing:** Plates, bowls, or pot lids in various sizes. This is how we’ll create different sized protectors.
* **Iron and Ironing Board (Optional):** For pressing the fabric if needed.
* **Cardboard (Optional):** To create a template for consistent sizes.
Designing Your Pot Protectors
The beauty of this DIY is that you can customize the size and shape of your protectors to perfectly fit your cookware. Here’s how I approach the design phase:
* **Inventory Time:** Take a look at your pots and pans. Note the diameters of the bottoms of each one. This will help you determine the sizes of protectors you need.
* **Size Matters:** I like to make my protectors slightly larger than the bottom of the pot or pan. This ensures full coverage and prevents scratching. Aim for about 1/2 inch to 1 inch larger in diameter.
* **Shape Options:** While circles are the most common and easiest shape, you can get creative! You could make square protectors for square pans, or even custom shapes to fit specific cookware.
* **Template Creation (Optional):** If you want to make multiple protectors of the same size, creating a cardboard template is a great idea. Simply trace your desired circle onto cardboard, cut it out, and use it as a guide for cutting your fabric.
Step-by-Step Instructions: Creating Your Pot Protectors
Alright, let’s get down to the nitty-gritty! Here’s how I make my pot protectors:
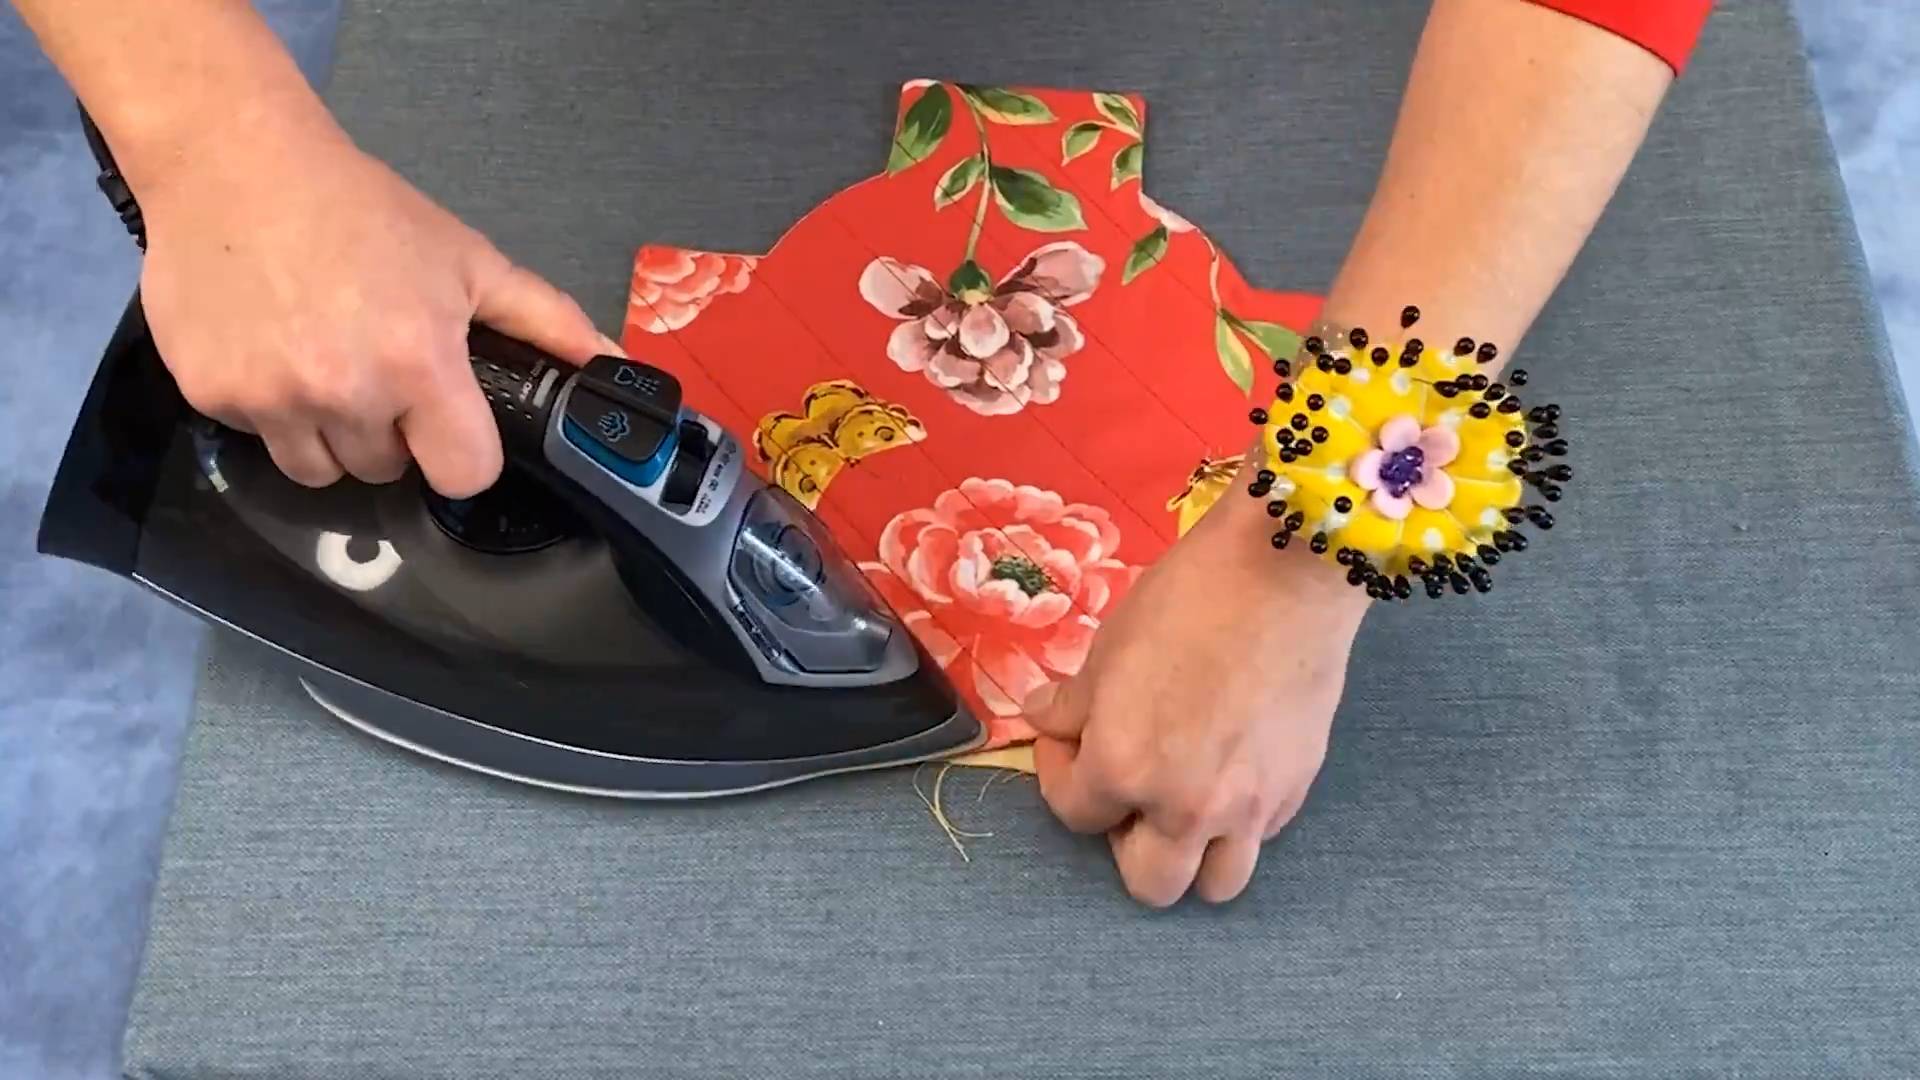
1. **Prepare Your Fabric:** If your fabric is wrinkled, give it a quick press with an iron. This will make it easier to work with.
2. **Trace Your Circles:** Choose a circular object (plate, bowl, pot lid) that’s the size you want your protector to be. Place it on your fabric and trace around it with a pencil or fabric marker. Remember to add that extra 1/2 inch to 1 inch for full coverage.
3. **Cut Out Your Fabric:** Carefully cut out the circle you traced. You’ll need *two* circles of fabric for each protector. This will give it enough thickness to provide adequate cushioning.
4. **Pin the Layers Together:** Place the two fabric circles on top of each other, aligning the edges. Use pins to secure them together. This will prevent the fabric from shifting while you sew.
5. **Sew Around the Edge:** Now it’s time to sew! If you’re using a sewing machine, set it to a straight stitch. Sew around the edge of the circle, about 1/4 inch from the edge. Leave a small opening (about 2-3 inches) unsewn. This is important!
6. **Turn Right Side Out:** Carefully reach inside the opening and turn the protector right side out. This will hide the raw edges of the fabric.
7. **Stuffing (Optional):** For extra cushioning, you can add a small amount of stuffing to the protector. I sometimes use leftover fabric scraps or cotton balls. Don’t overstuff it, though, or it will be too bulky.
8. **Close the Opening:** Fold the raw edges of the opening inward and pin them together. Then, either hand-sew the opening closed with a blind stitch, or carefully machine-sew it closed, staying close to the edge.
9. **Finishing Touches:** Give your protector a final press with the iron to smooth out any wrinkles. And that’s it! You’ve made your first pot protector!
10. **Repeat:** Repeat steps 2-9 for all the different sizes of protectors you need.
Variations and Extra Tips
Want to take your pot protectors to the next level? Here are a few ideas:
* **Color Coding:** Use different colors of fabric for different sized protectors. This will make it easy to grab the right size when you’re stacking your cookware.
* **Adding a Loop:** Sew a small loop of fabric onto one edge of the protector. This will allow you to hang it up for easy storage.
* **Using Quilted Fabric:** For extra cushioning and a more decorative look, use quilted fabric. You can buy pre-quilted fabric, or quilt your own!
* **Embellishments:** Add buttons, ribbons, or other embellishments to personalize your protectors.
* **Upcycling:** Get creative with your fabric choices! Use old t-shirts, towels, or even denim scraps to make your protectors.
* **Hand Sewing:** If you don’t have a sewing machine, don’t worry! You can easily hand-sew these protectors. Use a simple running stitch or back stitch. It will just take a little longer.
* **Felt Appliques:** Cut out fun shapes from felt and sew them onto your protectors for a playful touch. Stars, hearts, or even little kitchen utensils would look adorable!
* **Consider the Thickness:** If you’re using a thinner fabric, consider using three or even four layers for each protector to provide adequate cushioning.
* **Washability:** If you’re using a fabric that’s machine washable, make sure to pre-wash it before making your protectors. This will prevent them from shrinking after they’re sewn.
* **Non-Slip Fabric:** For added security, you could add a layer of non-slip fabric to one side of the protector. This will help prevent it from sliding around when you’re stacking your cookware. You can find non-slip fabric at most fabric stores.
* **Consider the Heat:** While these protectors are great for preventing scratches, they’re not designed to withstand high heat. Don’t use them as trivets or pot holders.
* **Storage Solutions:** Once you’ve made your protectors, consider how you’ll store them. You could keep them in a drawer, hang them on hooks, or even store them inside your pots and pans.
* **Experiment with Shapes:** While circles are the easiest, don’t be afraid to experiment with other shapes! You could make square protectors for square pans, or even custom shapes to fit specific cookware. Just make sure the shape provides adequate coverage.
* **Gift Idea:** These pot protectors make a thoughtful and practical gift for anyone who loves to cook. Package them up nicely with a ribbon and a handwritten card.
Troubleshooting Tips
Even the easiest DIY projects can sometimes have hiccups. Here are a few common problems and how to fix them:
* **Fabric Slipping:** If your fabric is slipping while you’re sewing, use more pins! Pin the layers together every inch or two.
* **Uneven Edges:** If your edges are uneven after cutting, don’t worry too much. You can trim them up with scissors after you’ve sewn the protector.
* **Holes in the Seam:** If you accidentally create a hole in the seam while sewing, simply backstitch over the hole to reinforce it.
* **Opening Too Small:** If you made the opening too small to turn the protector right side out, carefully use a seam ripper to enlarge it slightly.
* **Stuffing Lumpy:** If your stuffing is lumpy, try fluffing it up before you put it in the protector. You can also use a chopstick or pencil to distribute the stuffing evenly.
I hope this guide has inspired you to create your own DIY pot protectors! It’s a simple project that can make a big difference in the longevity of your cookware. Happy crafting!
Conclusion
So, there you have it! Crafting your own DIY pot protectors isn’t just a clever way to save money; it’s an investment in the longevity of your cookware and a testament to your resourcefulness. We’ve walked you through a simple, effective method for creating these essential kitchen accessories using materials you likely already have on hand. Forget those flimsy, store-bought protectors that tear after a few uses. These homemade versions are durable, customizable, and, dare we say, even a little bit stylish.
Why is this DIY trick a must-try? Because it addresses a common kitchen frustration: scratched and damaged cookware. Those unsightly scratches not only detract from the appearance of your pots and pans but can also compromise their non-stick surfaces and even leach unwanted materials into your food over time. By using DIY pot protectors, you’re actively preventing this damage, extending the lifespan of your cookware, and ensuring a safer, more enjoyable cooking experience.
But the beauty of this project lies in its adaptability. Feel free to experiment with different fabrics. Consider using felt for a softer, more luxurious feel, or repurpose old towels or blankets for a truly eco-friendly approach. You can also get creative with the shapes and sizes of your protectors. Make individual protectors for each pot and pan, or create larger, multi-layered protectors for stacking multiple items at once. Add decorative stitching, embroidery, or even fabric paint to personalize your protectors and make them a unique addition to your kitchen.
For those who want to take it a step further, consider adding a layer of heat-resistant fabric to your DIY pot protectors. This is especially useful for protecting delicate surfaces from hot pots and pans fresh off the stove. You can also experiment with different closure methods, such as buttons, snaps, or Velcro, to keep your protectors securely in place.
Don’t be afraid to think outside the box and tailor this project to your specific needs and preferences. The possibilities are endless!
We are confident that once you experience the benefits of using DIY pot protectors, you’ll never go back to stacking your cookware unprotected again. It’s a small investment of time and effort that yields significant returns in terms of cookware preservation and peace of mind.
So, grab your scissors, gather your materials, and get crafting! We encourage you to try this DIY trick and share your experience with us. Let us know what materials you used, what variations you tried, and how your DIY pot protectors are working for you. Share your photos and tips in the comments section below. We can’t wait to see your creative creations and learn from your experiences. Happy crafting!
FAQ
What materials are best for making DIY pot protectors?
The best materials for DIY pot protectors are durable, soft, and preferably heat-resistant. Felt is a popular choice because it’s readily available, inexpensive, and provides good cushioning. Cotton fabric, especially thick cotton like denim or canvas, is also a good option. You can also repurpose old towels, blankets, or even t-shirts. If you’re concerned about heat, consider adding a layer of heat-resistant fabric, such as silicone-coated fabric or quilted batting. Avoid using materials that are prone to shedding or unraveling, as these can leave fibers on your cookware.
How do I determine the right size for my pot protectors?
The size of your pot protectors will depend on the size of your pots and pans. The easiest way to determine the right size is to measure the diameter of your cookware and add a few inches for overlap. You can also trace the outline of your pots and pans onto paper or cardboard to create a template. Remember to make your protectors slightly larger than the cookware to ensure adequate coverage and protection. For stacking multiple items, consider creating larger, multi-layered protectors that can accommodate several pots and pans at once.
How do I clean my DIY pot protectors?
The cleaning method for your DIY pot protectors will depend on the materials you used. Felt protectors can usually be spot-cleaned with a damp cloth and mild detergent. Cotton protectors can be machine-washed on a gentle cycle and tumble-dried on low heat. If you used repurposed materials, follow the care instructions for those materials. Avoid using harsh chemicals or bleach, as these can damage the fabric and potentially leach into your cookware. It’s also a good idea to air dry your protectors whenever possible to prevent shrinkage.
Can I use these protectors for non-stick cookware?
Yes, absolutely! In fact, DIY pot protectors are especially beneficial for non-stick cookware. The soft materials used in these protectors will prevent scratches and damage to the delicate non-stick surfaces, extending the lifespan of your pans. Be sure to use soft, non-abrasive materials like felt or cotton to avoid scratching the non-stick coating. Regularly inspect your protectors for any signs of wear and tear, and replace them as needed to ensure optimal protection.
How do I store my DIY pot protectors when they’re not in use?
There are several ways to store your DIY pot protectors when they’re not in use. You can stack them neatly in a drawer or cabinet, or hang them on hooks using loops or tabs. If you have limited storage space, consider rolling them up and securing them with a rubber band or ribbon. You can also store them inside your pots and pans when they’re not in use. Just make sure the protectors are clean and dry before storing them to prevent mold or mildew growth.
Are there any safety precautions I should take when making DIY pot protectors?
When making DIY pot protectors, always use sharp scissors or rotary cutters with caution. Protect your work surface with a cutting mat to prevent damage. If you’re using a sewing machine, follow the manufacturer’s instructions and take care to avoid injury. When using hot glue, be careful not to burn yourself. If you’re adding heat-resistant fabric, make sure it’s certified for food contact and follow the manufacturer’s instructions for use. Always supervise children when they’re helping with this project.
Can I sell my DIY pot protectors?
Yes, you can definitely sell your DIY pot protectors! They make a great handmade item to sell at craft fairs, online marketplaces, or even through local shops. Be sure to use high-quality materials and create well-made, durable protectors. You can also offer customization options, such as different colors, sizes, and fabrics. Price your protectors competitively and market them effectively to attract customers. Remember to comply with all applicable laws and regulations regarding handmade products.
What if I don’t have a sewing machine? Can I still make these?
Absolutely! While a sewing machine can make the process faster and easier, you can definitely make DIY pot protectors without one. Simply hand-stitch the edges of your fabric pieces together using a simple running stitch or blanket stitch. You can also use fabric glue to adhere the edges together, but be sure to use a glue that is non-toxic and washable. Hand-stitching or gluing will take a bit longer, but it’s a perfectly viable option for those who don’t have access to a sewing machine.


Leave a Comment