

DIY Scrapbook Gift: Looking for a heartfelt and unique present that screams “I care”? Forget generic store-bought items! I’m here to guide you through creating a stunning DIY scrapbook gift, a treasure trove of memories that will be cherished for years to come.
Scrapbooking itself has a rich history, evolving from simple memory albums in the 16th century to the elaborate, personalized art form we know and love today. Think of it as a modern-day time capsule, a tangible representation of shared experiences and cherished moments. Cultures around the world have long valued preserving memories through visual storytelling, and a scrapbook is a beautiful way to continue that tradition.
In our increasingly digital world, tangible keepsakes are more precious than ever. Why settle for a fleeting social media post when you can create a lasting legacy? This DIY scrapbook gift isn’t just about sticking photos in a book; it’s about crafting a narrative, weaving together memories with personal touches that show how much you truly care. I’ll show you simple yet effective techniques to transform ordinary materials into an extraordinary gift. Whether it’s for a birthday, anniversary, or just because, this DIY project is guaranteed to bring a smile to their face and warm their heart. Let’s get crafting!
Creating a Personalized DIY Scrapbook: A Gift from the Heart
Hey there! Are you looking for a truly special and heartfelt gift idea? Forget store-bought presents – let’s dive into creating a personalized scrapbook! This isn’t just any scrapbook; it’s a journey down memory lane, a tangible expression of your love and appreciation. I promise, the recipient will cherish this far more than anything you could buy.
Planning Your Scrapbook Adventure
Before we even think about glue sticks and glitter, let’s map out our scrapbook journey. This planning phase is crucial for a smooth and enjoyable crafting experience.
* **Choose a Theme:** What’s the occasion? Is it a birthday, anniversary, graduation, or just a “thinking of you” gift? A clear theme will guide your photo selection, embellishments, and overall design. For example, if it’s an anniversary scrapbook, focus on photos and mementos from your relationship.
* **Gather Your Materials:** This is where the fun begins! Think about photos, ticket stubs, handwritten notes, pressed flowers, maps, brochures – anything that holds sentimental value. Don’t forget the essential crafting supplies like:
* Scrapbook album (choose a size and style that suits your theme)
* Acid-free paper (various colors and patterns)
* Adhesive (photo-safe glue, double-sided tape, glue dots)
* Scissors and craft knife
* Ruler and pencil
* Embellishments (stickers, washi tape, ribbons, buttons, brads, charms)
* Pens and markers (for journaling and captions)
* **Select Your Photos:** Go through your digital and physical photo collections. Choose the best quality photos that tell a story. Don’t be afraid to include candid shots and funny moments!
* **Organize Your Photos:** Once you’ve selected your photos, arrange them in chronological order or by theme. This will help you create a cohesive narrative throughout the scrapbook.
* **Sketch Out Page Layouts:** Before gluing anything down, experiment with different layouts. Consider the size and shape of your photos, the amount of journaling you want to include, and the placement of embellishments.
Step-by-Step Scrapbook Creation
Alright, let’s get our hands dirty! Follow these steps to bring your scrapbook vision to life.
1. **Prepare Your Photos:** If you have digital photos, print them in various sizes. For physical photos, make sure they are clean and free of dust. You can also trim them into different shapes (squares, circles, etc.) to add visual interest.
2. **Choose Your Background Paper:** Select a background paper that complements your photos and theme. You can use a single color for the entire scrapbook or mix and match different patterns and textures.
3. **Adhere Your Photos:** Use photo-safe adhesive to attach your photos to the background paper. Make sure to apply the adhesive evenly to prevent the photos from curling or peeling.
4. **Add Journaling and Captions:** This is where you add your personal touch! Write captions that describe the photos, share memories, or express your feelings. You can use handwritten notes, typed captions, or even printed quotes.
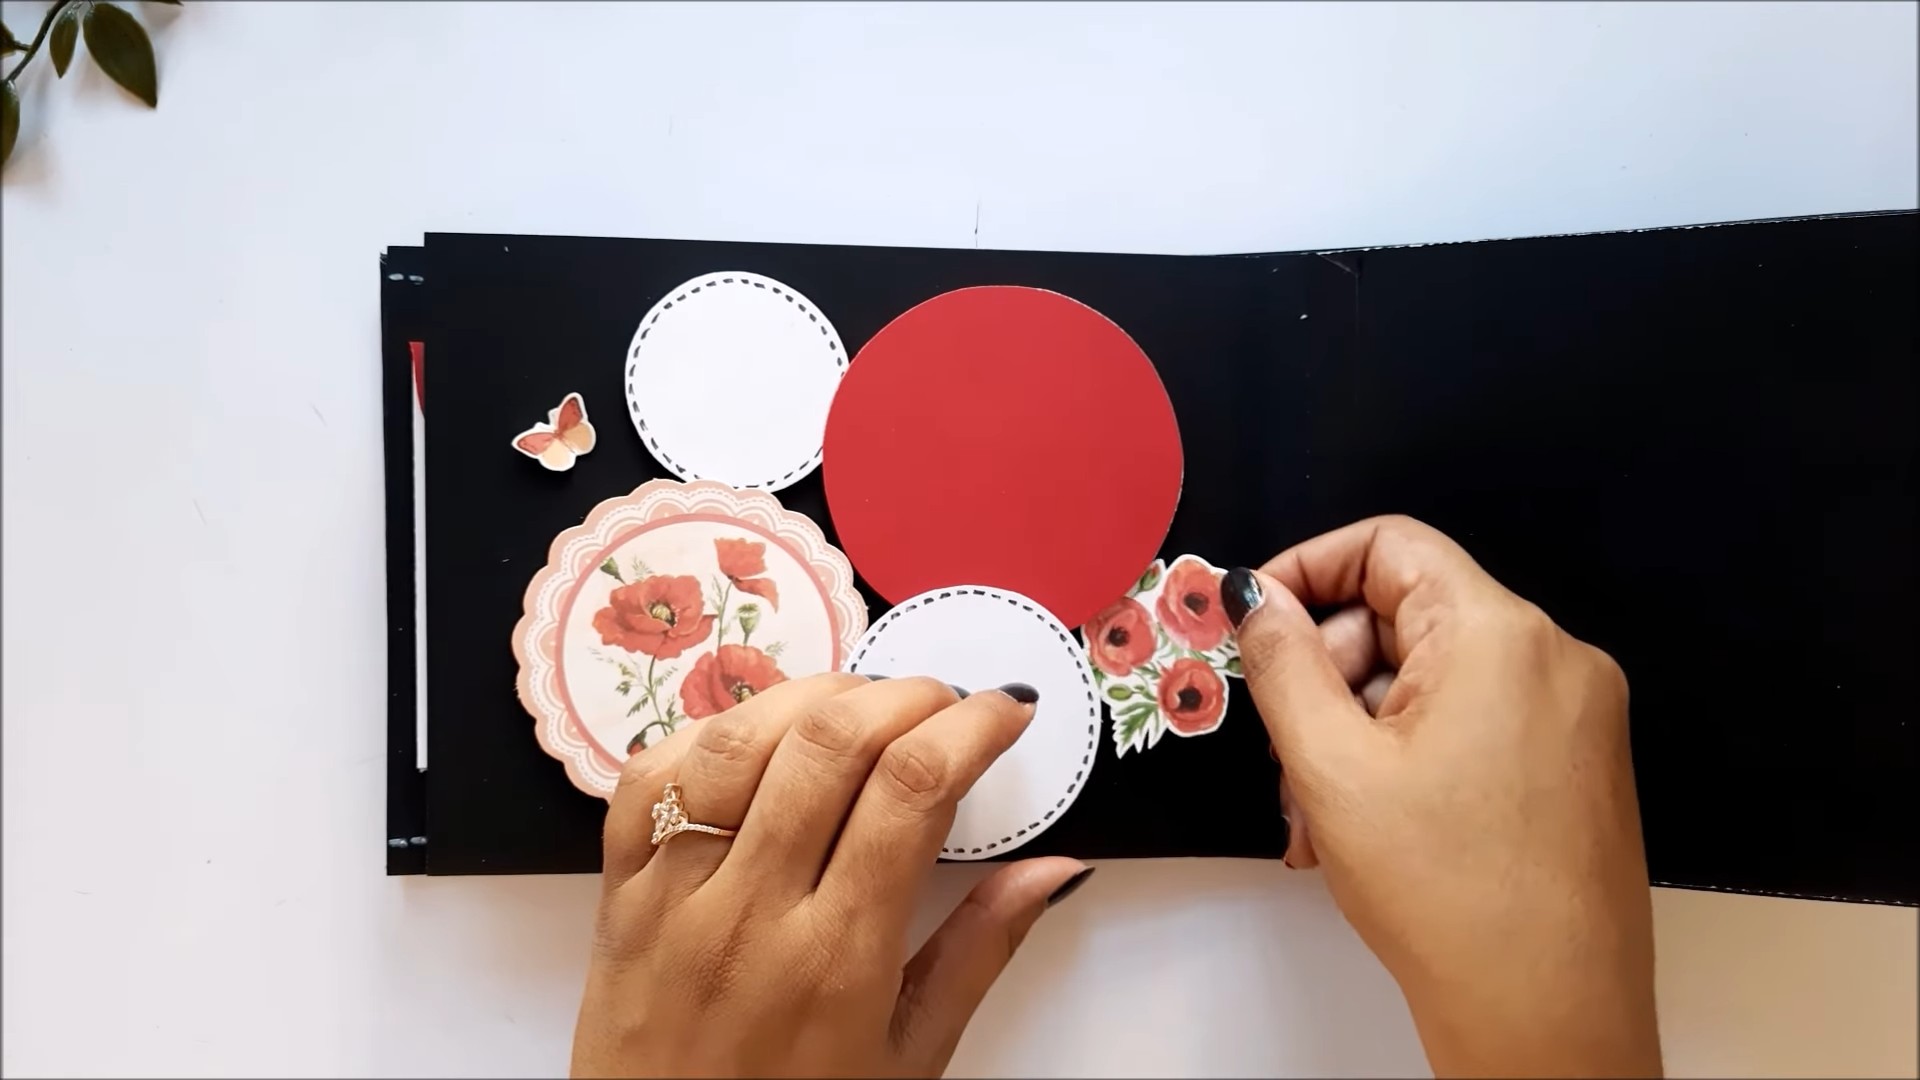
5. **Incorporate Embellishments:** Now for the fun part! Add embellishments to enhance your pages and create visual interest. Use stickers, washi tape, ribbons, buttons, and other decorative elements to complement your photos and theme.
6. **Layer and Cluster:** Don’t be afraid to layer your photos, journaling, and embellishments. Create clusters of elements to draw the eye and add depth to your pages.
7. **Add Borders and Frames:** Use borders and frames to highlight your photos and create a polished look. You can use paper strips, washi tape, or even draw borders with markers.
8. **Consider White Space:** While it’s tempting to fill every inch of the page, remember the importance of white space. Leaving some empty areas will allow your photos and embellishments to breathe and prevent the page from looking cluttered.
9. **Protect Your Pages:** Once you’ve completed a page, consider adding a page protector to keep it safe from dust and damage.
10. **Repeat and Refine:** Repeat steps 2-9 for each page of your scrapbook. As you go, refine your layouts and adjust your embellishments as needed.
Adding Special Touches
Want to take your scrapbook to the next level? Here are some ideas for adding special touches that will make it even more memorable.
* **Include Mementos:** Incorporate ticket stubs, handwritten notes, pressed flowers, maps, brochures, and other mementos that hold sentimental value.
* **Create Pockets and Envelopes:** Add pockets and envelopes to your pages to hold extra photos, letters, or small keepsakes.
* **Use Interactive Elements:** Incorporate interactive elements like lift-the-flaps, pull-out tags, or spinning wheels to add a playful touch.
* **Add Texture:** Use different textures to add visual interest to your pages. Try using textured paper, fabric scraps, or even natural elements like leaves or twigs.
* **Incorporate Quotes and Poems:** Add meaningful quotes or poems that relate to your theme or the recipient of the scrapbook.
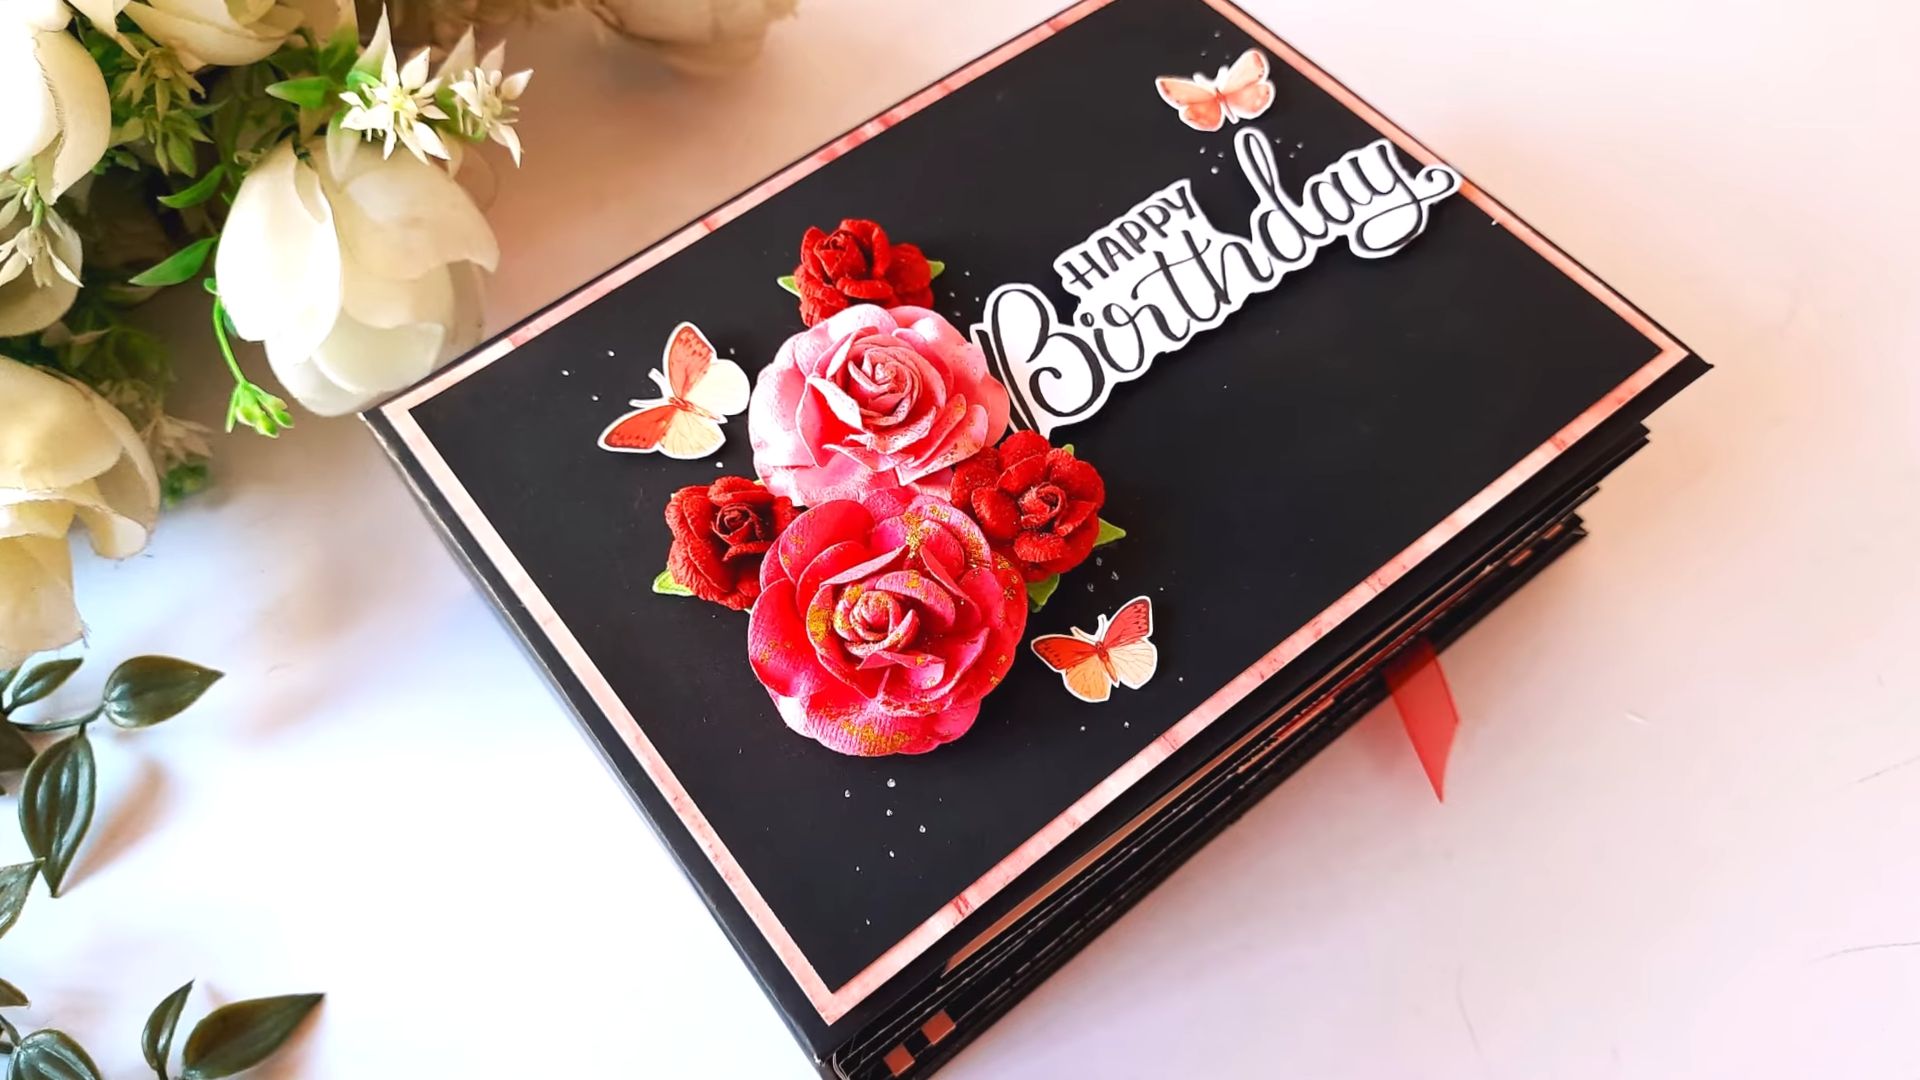
* **Personalize the Cover:** Don’t forget to personalize the cover of your scrapbook! Add a title, a photo, or a special message.
Section 1: Photo Preparation and Selection
This is a critical step. You can’t just throw any old photo in there! Think about the story you want to tell.
1. **Digital Photo Editing:** Before printing, I like to do some basic editing. Adjust the brightness, contrast, and color balance. Crop out any unnecessary elements. There are tons of free photo editing apps and websites you can use.
2. **Printing Photos:** I recommend printing photos in various sizes. A mix of 4×6, 3×5, and even some smaller wallet-sized prints can add visual interest. Consider printing some photos in black and white for a classic look.
3. **Physical Photo Cleaning:** If you’re using physical photos, gently clean them with a soft cloth to remove any dust or fingerprints. Be careful not to scratch the surface.
4. **Photo Selection Criteria:** Ask yourself: Does this photo tell a story? Does it evoke a memory? Is it of good quality? If the answer to any of these questions is no, consider leaving it out.
Section 2: Page Layout Design
This is where your creativity really shines! Don’t be afraid to experiment.
1. **Sketching Layouts:** Grab a pencil and paper and sketch out some ideas for each page. Consider the placement of your photos, journaling, and embellishments.
2. **The Rule of Thirds:** This is a basic design principle that can help you create visually appealing layouts. Imagine dividing your page into nine equal sections with two horizontal and two vertical lines. Place your focal points along these lines or at their intersections.
3. **Creating a Focal Point:** Every page should have a focal point – something that immediately draws the eye. This could be a large photo, a bold embellishment, or a handwritten title.
4. **Balancing Elements:** Strive for balance in your layouts. Don’t overload one side of the page while leaving the other side empty.
5. **Using Templates:** If you’re feeling overwhelmed, there are tons of scrapbook page templates available online. These can provide a great starting point for your designs.
Section 3: Embellishment Techniques
Embellishments are the icing on the cake! They add personality and flair to your scrapbook.
1. **Washi Tape Wonders:** Washi tape is a scrapbooker’s best friend! It comes in a variety of colors, patterns, and widths, and it’s perfect for adding borders, accents, and even creating mini banners.
2. **Sticker Strategies:** Stickers are another essential embellishment. Choose stickers that complement your theme and add visual interest to your pages.
3. **Ribbon and Twine:** Add texture and dimension to your scrapbook with ribbons and twine. Tie them around photos, create bows, or use them to hang tags.
4. **Button Bonanza:** Buttons are a classic embellishment that can add a touch of whimsy to your pages. Use them to create clusters, add accents, or even create mini flowers.
5. **Brads and Eyelets:** Brads and eyelets are perfect for attaching tags, photos, and other embellishments to your pages. They also add a touch of metal to your scrapbook.
6. **Creating Handmade Embellishments:** Don’t be afraid to get crafty and create your own embellishments! You can use paper scraps, fabric scraps, or even natural elements to create unique and personalized decorations.
Section 4: Journaling and Storytelling
The journaling is what truly makes this scrapbook special. It’s your chance to share your memories and feelings.
1. **Brainstorming Ideas:** Before you start writing, brainstorm some ideas for your journaling. What memories do you want to share? What feelings do you want to express?
2
Conclusion
So, there you have it! Crafting a DIY scrapbook gift is more than just gluing photos onto paper; it’s about weaving memories, emotions, and a whole lot of love into a tangible keepsake. It’s a gift that speaks volumes, far beyond anything you could purchase in a store. This isn’t just about saving money; it’s about investing your time and creativity into something truly special and personal.
Why is this DIY trick a must-try? Because in a world saturated with mass-produced items, a handmade scrapbook stands out as a beacon of thoughtfulness. It shows the recipient that you care enough to dedicate your time and energy to creating something unique for them. It’s a gift that will be treasured for years to come, a constant reminder of shared experiences and cherished moments. Plus, the process itself is incredibly therapeutic and rewarding!
But don’t feel limited by the suggestions we’ve offered. The beauty of a DIY scrapbook is its endless possibilities for customization. Consider these variations to truly personalize your creation:
* Theme it up! Instead of a general scrapbook, focus on a specific theme, like a travel adventure, a wedding anniversary, a baby’s first year, or even a collection of inside jokes.
* Incorporate different textures and materials. Think beyond paper! Add fabric scraps, ticket stubs, dried flowers, ribbons, buttons, or even small mementos from your shared experiences.
* Get digital! Print out screenshots of funny text messages, social media posts, or even QR codes that link to relevant videos or playlists.
* Make it interactive! Include pockets for hidden notes, pull-out tabs with extra photos, or even a small envelope containing a handwritten letter.
* Consider different binding methods. While a traditional ring-bound scrapbook is classic, explore other options like a Japanese stab binding or a simple ribbon tie.
Ultimately, the best DIY scrapbook is one that reflects your personality and the unique bond you share with the recipient. Don’t be afraid to experiment, get creative, and let your imagination run wild!
We wholeheartedly encourage you to try this DIY trick and create a stunning scrapbook gift for someone special. It’s an investment of time that yields immeasurable returns in terms of sentimental value and heartfelt appreciation.
Once you’ve embarked on your scrapbook adventure, we’d love to hear about your experience! Share your creations, tips, and challenges in the comments below. Let’s inspire each other and spread the joy of handmade gifts! What unique elements did you incorporate? What was the recipient’s reaction? Your insights could help other readers create even more amazing DIY scrapbook gifts. So, grab your scissors, glue, and photos, and get ready to create a masterpiece!
Frequently Asked Questions (FAQ)
What kind of photos work best for a DIY scrapbook?
The best photos for a DIY scrapbook are those that tell a story and evoke emotions. Think about including a mix of posed portraits, candid snapshots, and photos of significant places or events. High-resolution photos will generally look better when printed, but don’t be afraid to include lower-quality images if they hold special meaning. Consider the overall theme and color scheme of your scrapbook when selecting your photos to ensure a cohesive and visually appealing result. Also, remember to make copies of your original photos before using them in your scrapbook, just in case!
What are some essential supplies I need to create a DIY scrapbook?
While the specific supplies you’ll need will depend on your design preferences, here’s a list of essential items to get you started:
* Scrapbook album: Choose a size and binding style that suits your needs. Ring-bound albums are versatile and allow you to easily add or rearrange pages.
* Acid-free paper: This is crucial for preserving your photos and preventing them from yellowing or deteriorating over time.
* Adhesive: Opt for acid-free photo-safe adhesive, such as photo corners, double-sided tape, or glue dots. Avoid using regular glue, as it can damage your photos.
* Scissors and craft knife: For trimming photos and paper.
* Ruler: For precise measurements and straight lines.
* Pens and markers: For journaling and adding captions. Choose acid-free and archival-quality pens to prevent fading.
* Embellishments: Stickers, die-cuts, ribbons, buttons, and other decorative elements to add personality to your pages.
* Photo-safe storage boxes: To store extra photos, embellishments, and other scrapbook supplies.
How do I arrange photos and embellishments on a scrapbook page?
There’s no right or wrong way to arrange photos and embellishments, but here are a few tips to help you create visually appealing layouts:
* Create a focal point: Choose one photo or element to be the main focus of the page and arrange other elements around it.
* Use the rule of thirds: Divide the page into thirds both horizontally and vertically, and place key elements along these lines or at their intersections.
* Create visual balance: Distribute elements evenly across the page to avoid a cluttered or lopsided look.
* Use layering: Layer photos, paper, and embellishments to add depth and dimension.
* Add journaling: Write captions, stories, or memories to accompany your photos.
* Leave white space: Don’t overcrowd the page. Leaving some blank space can help to highlight the key elements and create a more balanced composition.
* Consider a theme: If your scrapbook has a specific theme, use colors, patterns, and embellishments that complement the theme.
How can I preserve my DIY scrapbook for years to come?
Proper storage and handling are essential for preserving your DIY scrapbook. Here are a few tips:
* Store your scrapbook in a cool, dry place: Avoid storing it in direct sunlight, as this can cause the photos and paper to fade.
* Use acid-free materials: As mentioned earlier, acid-free paper, adhesive, and pens are crucial for preventing deterioration.
* Handle your scrapbook with clean hands: Oils and dirt from your hands can damage the photos and paper.
* Consider using page protectors: These clear plastic sleeves will protect your pages from dust, fingerprints, and other damage.
* Avoid overcrowding the pages: Overcrowding can put stress on the binding and cause the pages to warp.
* Digitize your scrapbook: Scan or photograph your scrapbook pages to create a digital backup. This will ensure that your memories are preserved even if the physical scrapbook is damaged.
What if I’m not very creative? Can I still make a beautiful DIY scrapbook gift?
Absolutely! You don’t need to be a professional artist to create a beautiful DIY scrapbook. Here are a few tips for those who feel less creative:
* Start with a simple design: Don’t try to do too much at once. Focus on creating clean and uncluttered layouts.
* Use templates and sketches: There are many free templates and sketches available online that can help you plan your page layouts.
* Copy ideas from others: Browse scrapbook magazines, websites, and social media for inspiration. Don’t be afraid to adapt ideas to your own style.
* Focus on the photos: Let the photos be the star of the show. You don’t need a lot of fancy embellishments to create a meaningful scrapbook.
* Ask for help: If you’re feeling stuck, ask a friend or family member for their input.
* Remember, it’s the thought that counts: The most important thing is that you put your heart into creating a thoughtful and personal gift. Even if your scrapbook isn’t perfect, the recipient will appreciate the effort you put into it. The most important thing is the memories you are preserving.


Leave a Comment