

DIY Sink Scrub: Are you tired of stubborn stains and lingering odors plaguing your kitchen sink? I know I was! It felt like no matter how much I scrubbed, my sink never truly felt clean. That’s when I decided to ditch the harsh chemicals and explore the world of homemade cleaning solutions.
The tradition of using natural ingredients for cleaning dates back centuries. Our grandmothers relied on simple, readily available items like vinegar, baking soda, and lemon to keep their homes sparkling. They understood the power of these ingredients, and now, we can too! This isn’t just about cleaning; it’s about connecting with a simpler, more sustainable way of life.
Let’s face it, commercial cleaning products can be expensive and often contain harsh chemicals that are harmful to both our health and the environment. That’s where this DIY sink scrub comes in! Not only is it incredibly effective at removing grime and leaving your sink gleaming, but it’s also budget-friendly and eco-conscious. I’m going to share my favorite recipe for a powerful, all-natural sink scrub that will transform your cleaning routine. Get ready to say goodbye to stubborn stains and hello to a sparkling, fresh-smelling sink!
DIY Sink Scrub: Sparkling Clean Without the Harsh Chemicals!
Hey everyone! I’m so excited to share my go-to recipe for a DIY sink scrub that’s not only incredibly effective but also avoids all those harsh chemicals you find in store-bought cleaners. I’ve been using this for years, and my sinks have never looked better! Plus, it’s super cheap to make, using ingredients you probably already have in your pantry. Let’s get started!
What You’ll Need:
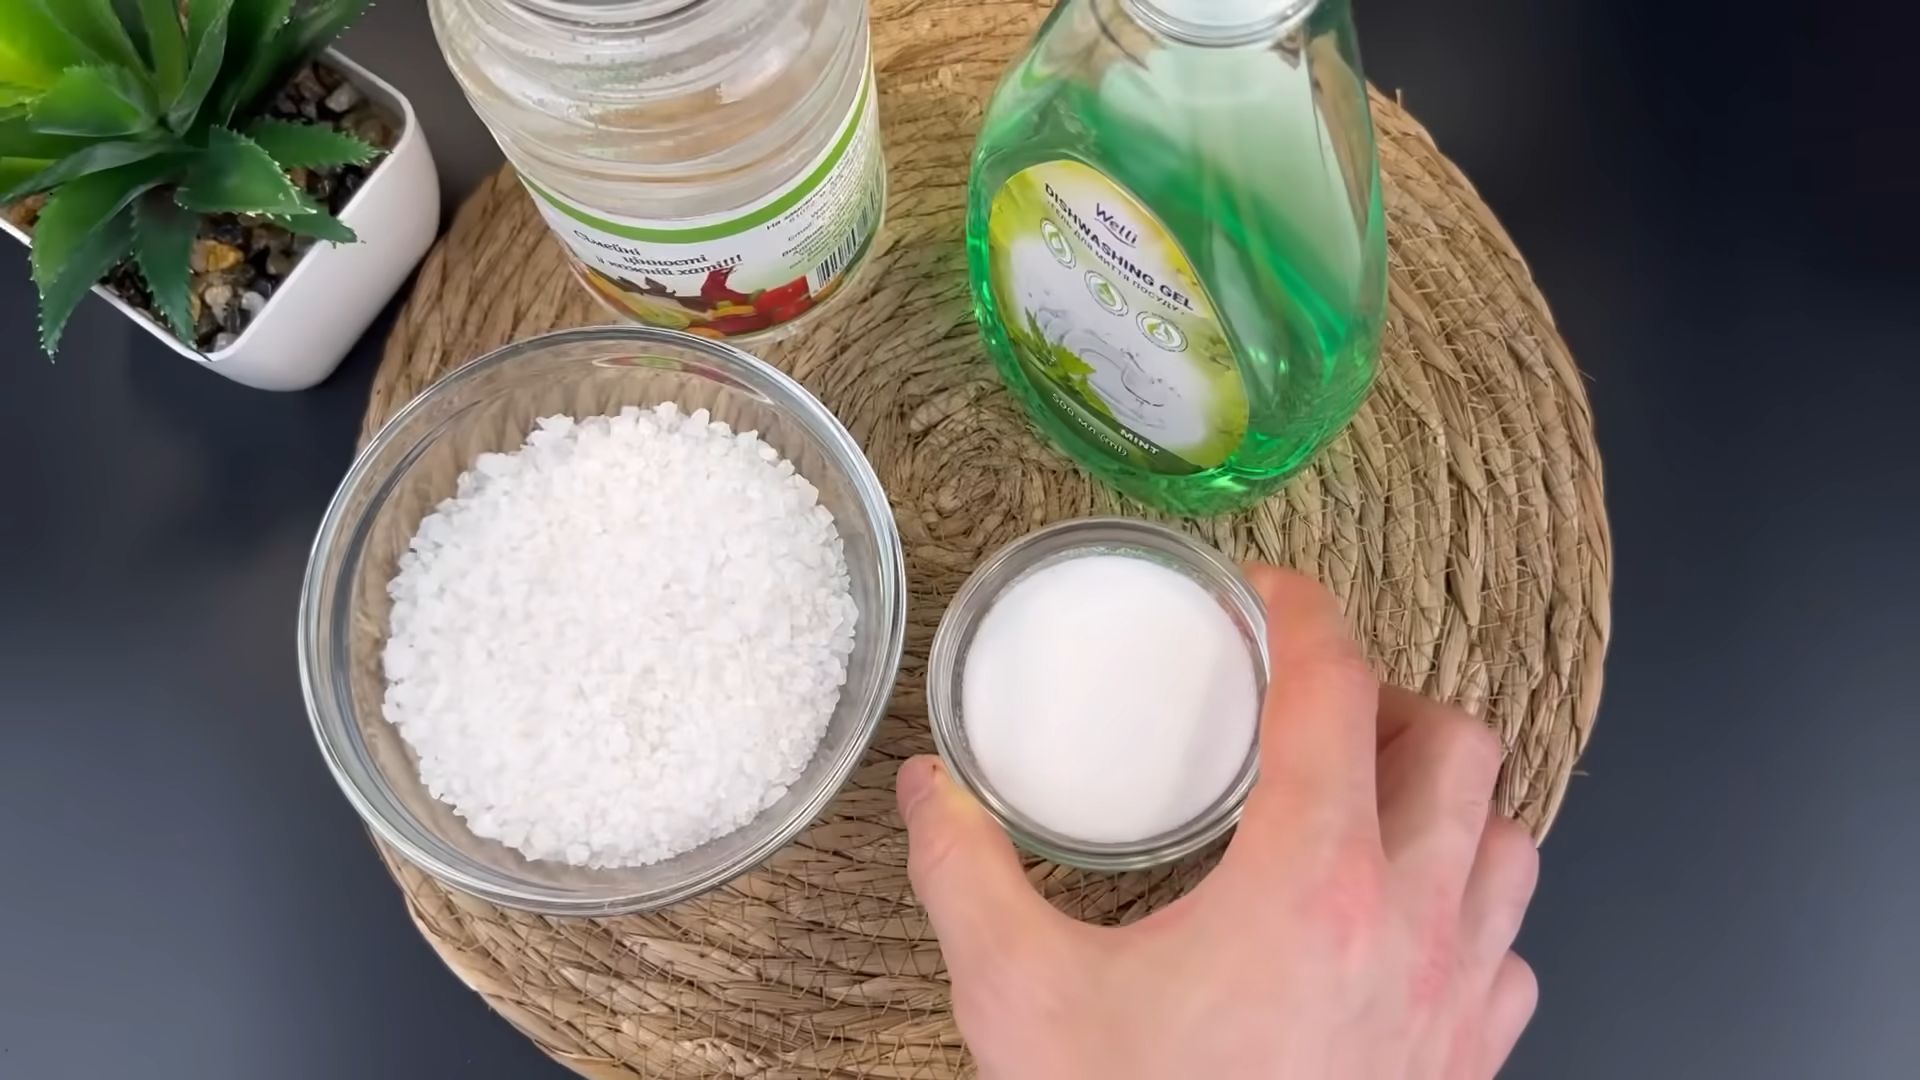
* 1 cup Baking Soda: This is the workhorse of our scrub. It’s a mild abrasive that gently scrubs away grime and stains.
* 1/2 cup Salt (Table Salt or Coarse Salt): The salt adds extra scrubbing power to tackle tougher stains and buildup. I prefer coarse salt for this.
* 1/4 cup Liquid Dish Soap: This helps to bind the ingredients together and provides a cleaning boost. I usually use Dawn, but any dish soap will work.
* 10-15 drops Essential Oil (Optional): This is purely for fragrance. I love using lemon, tea tree, or lavender, but feel free to experiment with your favorites! Lemon is great for cutting through grease, tea tree is antibacterial, and lavender is just calming.
* Airtight Container: To store your scrub. A glass jar or plastic container works perfectly.
* Spoon or Fork: For mixing.
* Measuring Cups and Spoons: For accurate measurements.
Step-by-Step Instructions:
1. Combine the Dry Ingredients: In a medium-sized bowl, pour in the 1 cup of baking soda and the 1/2 cup of salt. Use your spoon or fork to thoroughly mix them together. Make sure there are no large clumps of salt. We want a nice, even mixture.
2. Add the Dish Soap: Now, pour in the 1/4 cup of liquid dish soap. Start mixing gently. You’ll notice the mixture will start to clump up. That’s perfectly normal! Keep stirring until the dish soap is evenly distributed throughout the baking soda and salt.
3. Incorporate the Essential Oils (Optional): If you’re using essential oils, now’s the time to add them. I usually add about 10-15 drops, but you can adjust this to your preference. Remember, the more you add, the stronger the scent will be. Once you’ve added the oils, give the mixture another good stir to ensure they’re evenly dispersed.
4. Check the Consistency: The consistency of your scrub should be slightly damp and crumbly, almost like wet sand. If it’s too dry, you can add a tiny bit more dish soap, a teaspoon at a time, until you reach the desired consistency. If it’s too wet, add a little more baking soda.
5. Transfer to an Airtight Container: Once you’re happy with the consistency, transfer your DIY sink scrub to an airtight container. This will prevent it from drying out and keep it fresh for longer. I usually use a glass jar with a lid, but any airtight container will do.
Using Your DIY Sink Scrub:
1. Wet the Sink: Before applying the scrub, wet the entire surface of your sink with water. This will help the scrub spread more easily and prevent scratching.
2. Apply the Scrub: Scoop out a small amount of the scrub (about a tablespoon or two, depending on the size of your sink) and apply it to the wet surface.
3. Scrub Away! Using a sponge, scrub brush, or even a microfiber cloth, start scrubbing the sink in a circular motion. Pay extra attention to areas with stains, water spots, or buildup. Don’t be afraid to put a little elbow grease into it!
4. Rinse Thoroughly: Once you’ve scrubbed the entire sink, rinse it thoroughly with water. Make sure to remove all traces of the scrub.
5. Dry and Admire: Finally, dry the sink with a clean towel or microfiber cloth. Step back and admire your sparkling clean sink!
Tackling Stubborn Stains:
Sometimes, you might encounter stubborn stains that require a little extra attention. Here’s how I handle them:
1. Make a Paste: Mix a small amount of the scrub with a little bit of water to create a thick paste.
2. Apply to the Stain: Apply the paste directly to the stain and let it sit for about 10-15 minutes. This allows the baking soda and salt to penetrate the stain and loosen it.
3. Scrub Again: After 10-15 minutes, scrub the stain again with a sponge or brush. You might need to apply a little more pressure this time.
4. Rinse and Repeat (If Necessary): Rinse the area thoroughly with water. If the stain is still visible, repeat the process. For really tough stains, you might need to repeat it a few times.
Cleaning Different Sink Materials:
This DIY sink scrub is generally safe for most sink materials, but here are a few things to keep in mind:
* Stainless Steel: This scrub works great on stainless steel sinks! Just be sure to scrub in the direction of the grain to avoid scratching.
* Porcelain: Porcelain sinks are generally durable, but avoid using excessive pressure when scrubbing to prevent chipping.
* Composite: Composite sinks can be more prone to scratching, so test the scrub in an inconspicuous area first. Use a soft sponge or microfiber cloth and avoid abrasive scrub brushes.
* Cast Iron: Cast iron sinks are durable but can rust if the enamel coating is damaged. Avoid using harsh abrasives and dry the sink thoroughly after cleaning.
Tips and Tricks for the Best Results:
* Don’t Overdo the Dish Soap: Too much dish soap can make the scrub too wet and difficult to work with. Start with the recommended amount and add more only if needed.
* Experiment with Essential Oils: Have fun experimenting with different essential oil combinations to find your favorite scent!
* Store Properly: Always store your DIY sink scrub in an airtight container to prevent it from drying out.
* Use Regularly: For best results, use this scrub regularly to prevent buildup and keep your sink sparkling clean. I usually use it once or twice a week.
* Test in an Inconspicuous Area: If you’re unsure about using this scrub on a particular surface, test it in an inconspicuous area first to make sure it doesn’t cause any damage.
* Don’t Use on Gold Plated Fixtures: Avoid using this scrub on gold-plated fixtures, as it can scratch the finish.
Why I Love This DIY Sink Scrub:
I absolutely love this DIY sink scrub because it’s:
* Effective: It cleans my sinks just as well as store-bought cleaners, if not better!
* Affordable: It’s incredibly cheap to make, using ingredients I already have on hand.
* Natural: It avoids all those harsh chemicals that can be harmful to my health and the environment.
* Customizable: I can customize the scent by adding my favorite essential oils.
* Easy to Make: It takes just a few minutes to whip up a batch.
Troubleshooting:
* Scrub is too dry: Add a teaspoon of dish soap at a time until you reach the desired consistency.
* Scrub is too wet: Add a tablespoon of baking soda at a time until you reach the desired consistency.
* Scrub is not cleaning effectively: Make sure you’re using enough pressure when scrubbing. You can also try letting the scrub sit on the surface for a few minutes before scrubbing.
* Scrub is leaving a residue: Make sure you’re rinsing the sink thoroughly with water. You can also try using a clean, damp cloth to wipe away any remaining residue.
I hope you enjoy this DIY sink scrub as much as I do! It’s a simple, effective, and affordable way to keep your sinks sparkling clean without the harsh chemicals. Happy cleaning!

Conclusion
So, there you have it! A simple, effective, and budget-friendly way to keep your sink sparkling clean. This DIY sink scrub isn’t just about saving money; it’s about knowing exactly what’s going into your cleaning products and avoiding harsh chemicals that can damage your sink and the environment. We’ve all been there, staring at a grimy sink, wondering how to tackle the stubborn stains and buildup. Store-bought cleaners can be expensive and often contain ingredients we’d rather avoid. This homemade solution offers a powerful alternative, utilizing the natural cleaning power of ingredients you likely already have in your pantry.
But the beauty of this DIY approach lies in its adaptability. Feel free to experiment with different essential oils to create a scent that you love. Lavender, lemon, tea tree, and eucalyptus are all excellent choices, not only for their pleasant aromas but also for their antibacterial properties. For extra scrubbing power on particularly tough stains, consider adding a tablespoon of borax to the mixture. Borax is a natural mineral that acts as a powerful cleaning agent and deodorizer.
Another variation you might want to try is incorporating a bit of castile soap into the paste. Castile soap is a gentle, all-natural soap made from vegetable oils. Adding a small amount, about a teaspoon, will help to create a slightly sudsier scrub and further enhance its cleaning abilities. Remember to adjust the amount of water to achieve the desired paste consistency.
Beyond the basic recipe, think about the tools you use to apply the scrub. A soft-bristled brush is ideal for reaching tight corners and crevices, while a non-abrasive sponge is perfect for larger surfaces. Avoid using steel wool or harsh scouring pads, as these can scratch your sink, especially if it’s made of stainless steel or porcelain.
The real magic of this DIY sink scrub is in its simplicity and effectiveness. It’s a quick and easy way to maintain a clean and hygienic kitchen or bathroom. It’s also a fantastic way to reduce your reliance on commercially produced cleaning products, contributing to a more sustainable lifestyle.
We wholeheartedly encourage you to give this DIY sink scrub a try. You’ll be amazed at how easily it tackles grime and leaves your sink looking brand new. And most importantly, we want to hear about your experience! Share your results, any variations you tried, and any tips you discovered in the comments below. Let’s build a community of DIY cleaning enthusiasts and help each other keep our homes sparkling clean, naturally! Don’t forget to take before-and-after photos – we’d love to see the transformation! Your feedback will help us refine the recipe and provide even better cleaning solutions for everyone. So, grab your ingredients, get scrubbing, and let us know how it goes! We are confident that you will love this easy and effective way to keep your sink clean.
Frequently Asked Questions (FAQ)
What kind of sink is this DIY scrub safe for?
This DIY sink scrub is generally safe for most common sink materials, including stainless steel, porcelain, ceramic, and enamel. However, it’s always a good idea to test a small, inconspicuous area first, especially if you have a more delicate or antique sink. Avoid using it on natural stone sinks like marble or granite, as the baking soda can be abrasive and potentially damage the surface. For those types of sinks, a pH-neutral cleaner specifically designed for stone is recommended. If you are unsure about your sink material, consult the manufacturer’s instructions or a professional cleaner.
How often should I use this DIY sink scrub?
The frequency of use depends on how often you use your sink and how quickly it gets dirty. For most households, using this scrub once or twice a week is sufficient to maintain a clean and shiny sink. If you have a particularly busy kitchen or bathroom, you may need to use it more frequently. Pay attention to the buildup of grime and stains, and adjust your cleaning schedule accordingly. Regular use will prevent stubborn stains from setting in and make cleaning easier in the long run.
Can I store the leftover DIY sink scrub?
Yes, you can store leftover DIY sink scrub in an airtight container in a cool, dry place. A glass jar or a plastic container with a tight-fitting lid works well. The scrub should last for several weeks, if not longer. However, it’s best to use it within a reasonable timeframe to ensure the ingredients remain fresh and effective. If you notice any changes in the texture or smell of the scrub, it’s best to discard it and make a fresh batch.
What if I don’t have essential oils? Can I still make the scrub?
Absolutely! Essential oils are optional and primarily added for fragrance and their antibacterial properties. If you don’t have any on hand, you can still make the scrub without them. The baking soda and dish soap will still provide excellent cleaning power. You can also try adding a squeeze of lemon juice for a fresh scent and extra cleaning boost. Lemon juice contains citric acid, which is a natural disinfectant and degreaser.
The scrub seems too dry/too wet. How do I adjust the consistency?
Achieving the right consistency is key to an effective scrub. If the scrub is too dry, simply add a little more water, a teaspoon at a time, until you reach a paste-like consistency. If the scrub is too wet, add a bit more baking soda, a tablespoon at a time, until it thickens up. The ideal consistency should be thick enough to spread easily but not so runny that it drips off your sponge or brush.
Is this DIY sink scrub safe for septic systems?
Yes, this DIY sink scrub is generally considered safe for septic systems. The ingredients, baking soda and dish soap, are biodegradable and do not contain harsh chemicals that can harm the beneficial bacteria in your septic tank. However, it’s always a good idea to use the scrub in moderation and avoid flushing large amounts of it down the drain at once. If you have any concerns about your septic system, consult a professional.
Can I use this scrub on other surfaces besides the sink?
While this scrub is primarily designed for sinks, it can also be used on other surfaces, such as bathtubs, showers, and countertops. However, it’s important to test a small, inconspicuous area first to ensure it doesn’t damage the surface. Avoid using it on delicate or porous materials like marble or granite. It’s also not recommended for use on painted surfaces, as the baking soda can be abrasive.
What kind of dish soap should I use?
Any mild dish soap will work well in this DIY sink scrub. Choose a dish soap that you like and that is effective at cutting through grease and grime. You can also opt for a natural or eco-friendly dish soap to reduce your environmental impact. Avoid using dish soaps that contain harsh chemicals or abrasives, as these can damage your sink.
My sink has really tough stains. Will this scrub be effective?
For really tough stains, you may need to let the scrub sit on the stain for a longer period of time, about 10-15 minutes, before scrubbing. You can also try adding a tablespoon of borax to the mixture for extra cleaning power. Borax is a natural mineral that acts as a powerful cleaning agent and deodorizer. For extremely stubborn stains, you may need to repeat the process several times.
Can I use vinegar in this DIY sink scrub?
While vinegar is a great natural cleaner, it’s not recommended to mix it with baking soda in a closed container. The combination creates carbon dioxide gas, which can cause pressure to build up and potentially explode the container. However, you can use vinegar as a pre-treatment for tough stains. Simply spray the stain with vinegar, let it sit for a few minutes, and then apply the DIY sink scrub.


Leave a Comment