

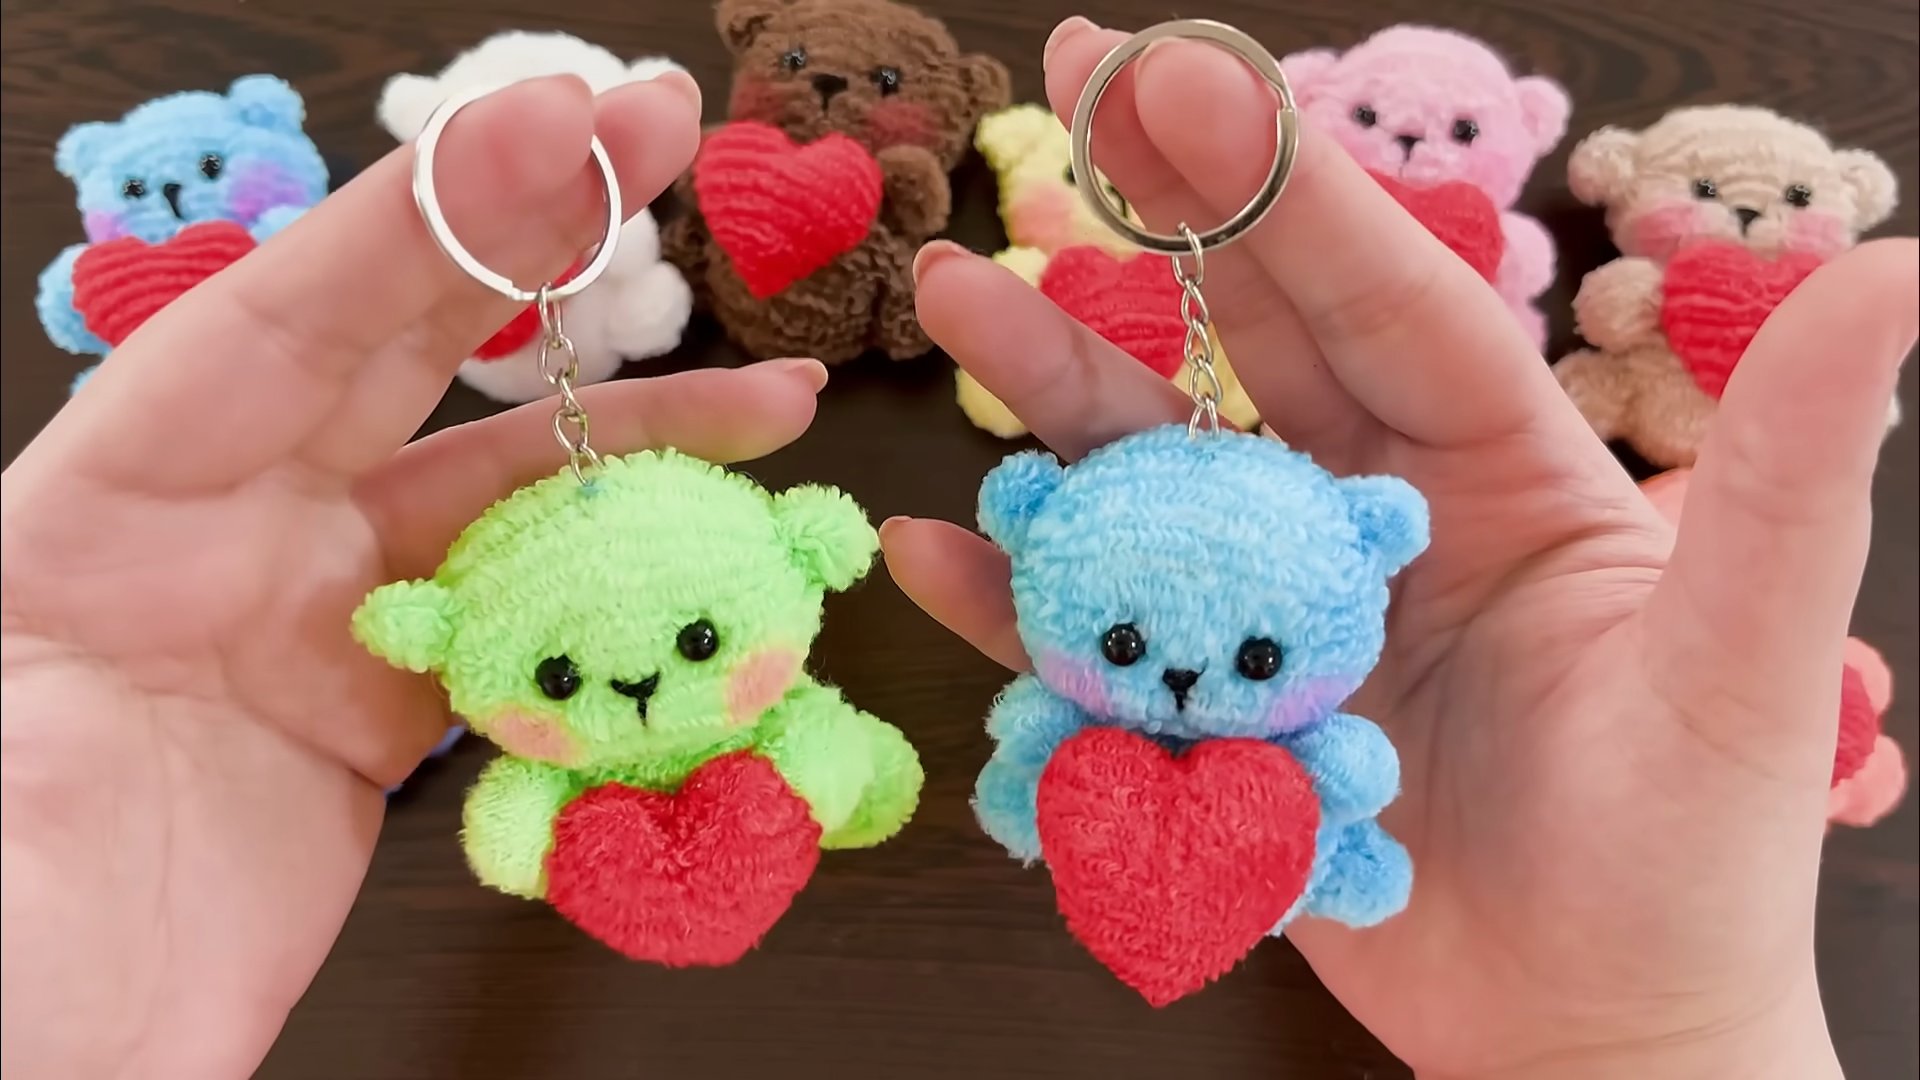
DIY Teddy Bear Keychain: Who doesn’t love a cute and cuddly teddy bear? Now, imagine carrying that adorable charm with you wherever you go! This isn’t just about crafting; it’s about creating a personalized keepsake that brings a smile to your face every time you see it.
The history of teddy bears is surprisingly heartwarming, dating back to the early 20th century and inspired by President Theodore “Teddy” Roosevelt. They quickly became a symbol of comfort and innocence, a tradition we’re keeping alive with a modern twist. But instead of just keeping them on a shelf, we’re turning them into stylish and functional accessories!
In today’s fast-paced world, adding a personal touch to your belongings can make all the difference. A DIY Teddy Bear Keychain is more than just an accessory; it’s a reflection of your personality and creativity. Plus, let’s be honest, store-bought keychains can be a bit… generic. Why settle for ordinary when you can craft something extraordinary? I’m going to show you how to create a unique and adorable keychain that’s sure to turn heads and spark conversations. Whether you’re looking for a fun weekend project or a thoughtful handmade gift, this guide will walk you through each step, making it easy and enjoyable to create your very own cuddly companion.
DIY Adorable Teddy Bear Keychain: A Step-by-Step Guide
Hey there, fellow crafters! Ever wanted a super cute, personalized keychain? I’m going to walk you through creating your very own adorable teddy bear keychain. It’s a fun and relatively easy project, perfect for using up scrap fabric and adding a touch of handmade charm to your keys, backpack, or even as a sweet little gift. Let’s get started!
What You’ll Need: Gathering Your Supplies
Before we dive in, let’s make sure you have everything you need. This will save you from running around mid-project (we’ve all been there!).
* **Fabric:** Felt is fantastic for beginners because it doesn’t fray easily, but you can use any soft fabric you like – fleece, cotton, even upcycled sweater scraps! You’ll need a small piece for the bear’s body and smaller pieces for details like the ears, muzzle, and any accessories you want to add.
* **Embroidery Floss or Thread:** Choose colors that complement your fabric. I like to use embroidery floss for a more visible, decorative stitch, but regular sewing thread works just fine.
* **Stuffing:** Poly-fil stuffing is the classic choice, but you can also use cotton balls, fabric scraps, or even rice (though rice might make the keychain a bit heavier).
* **Keychain Ring and Chain:** You can find these at most craft stores or online. Make sure the ring is sturdy enough to hold your bear.
* **Scissors:** A good pair of sharp scissors is essential for clean cuts.
* **Needle:** A hand-sewing needle with an eye large enough for your chosen thread.
* **Pins:** These will help hold your fabric pieces together while you sew.
* **Pencil or Fabric Marker:** For tracing your pattern onto the fabric.
* **Pattern:** You can find free teddy bear keychain patterns online (just search “teddy bear keychain pattern”) or draw your own! I’ll provide some guidance on creating your own pattern below.
* **Optional Embellishments:** Buttons, beads, ribbon, small felt shapes – anything you want to use to personalize your bear!
Creating Your Teddy Bear Pattern
If you’re feeling creative, designing your own pattern is a great way to make your keychain truly unique. Don’t worry, it’s easier than it sounds!
1. **Sketch Your Bear:** Start by sketching a simple teddy bear shape on a piece of paper. Think about the overall size and proportions. A good size for a keychain bear is around 3-4 inches tall.
2. **Break Down the Shape:** Divide your sketch into basic shapes: a head, a body, two ears, and a muzzle (optional).
3. **Create Separate Pattern Pieces:** Trace each of these shapes onto separate pieces of paper. Add a seam allowance of about 1/4 inch around each piece. This is the extra fabric you’ll need for sewing.
4. **Refine Your Pattern:** Cut out your pattern pieces and test them out by pinning them together. Make any adjustments needed to get the shape you want.
5. **Muzzle Considerations:** If you’re adding a muzzle, consider making it a contrasting color. You can also add a small felt nose to the muzzle.
6. **Ear Placement:** Think about where you want the ears to sit on the head. Experiment with different placements before finalizing your pattern.
Sewing Your Teddy Bear: Step-by-Step Instructions
Alright, now for the fun part – bringing your teddy bear to life!
1. **Trace and Cut Your Fabric:** Place your pattern pieces onto your chosen fabric and trace around them with a pencil or fabric marker. Remember to trace two pieces for the body (front and back) and two pieces for each ear and muzzle (if using). Cut out all the fabric pieces carefully.
2. **Attach the Muzzle (Optional):** If you’re using a muzzle, pin it to the front body piece. Using a running stitch or blanket stitch, sew the muzzle securely to the body.
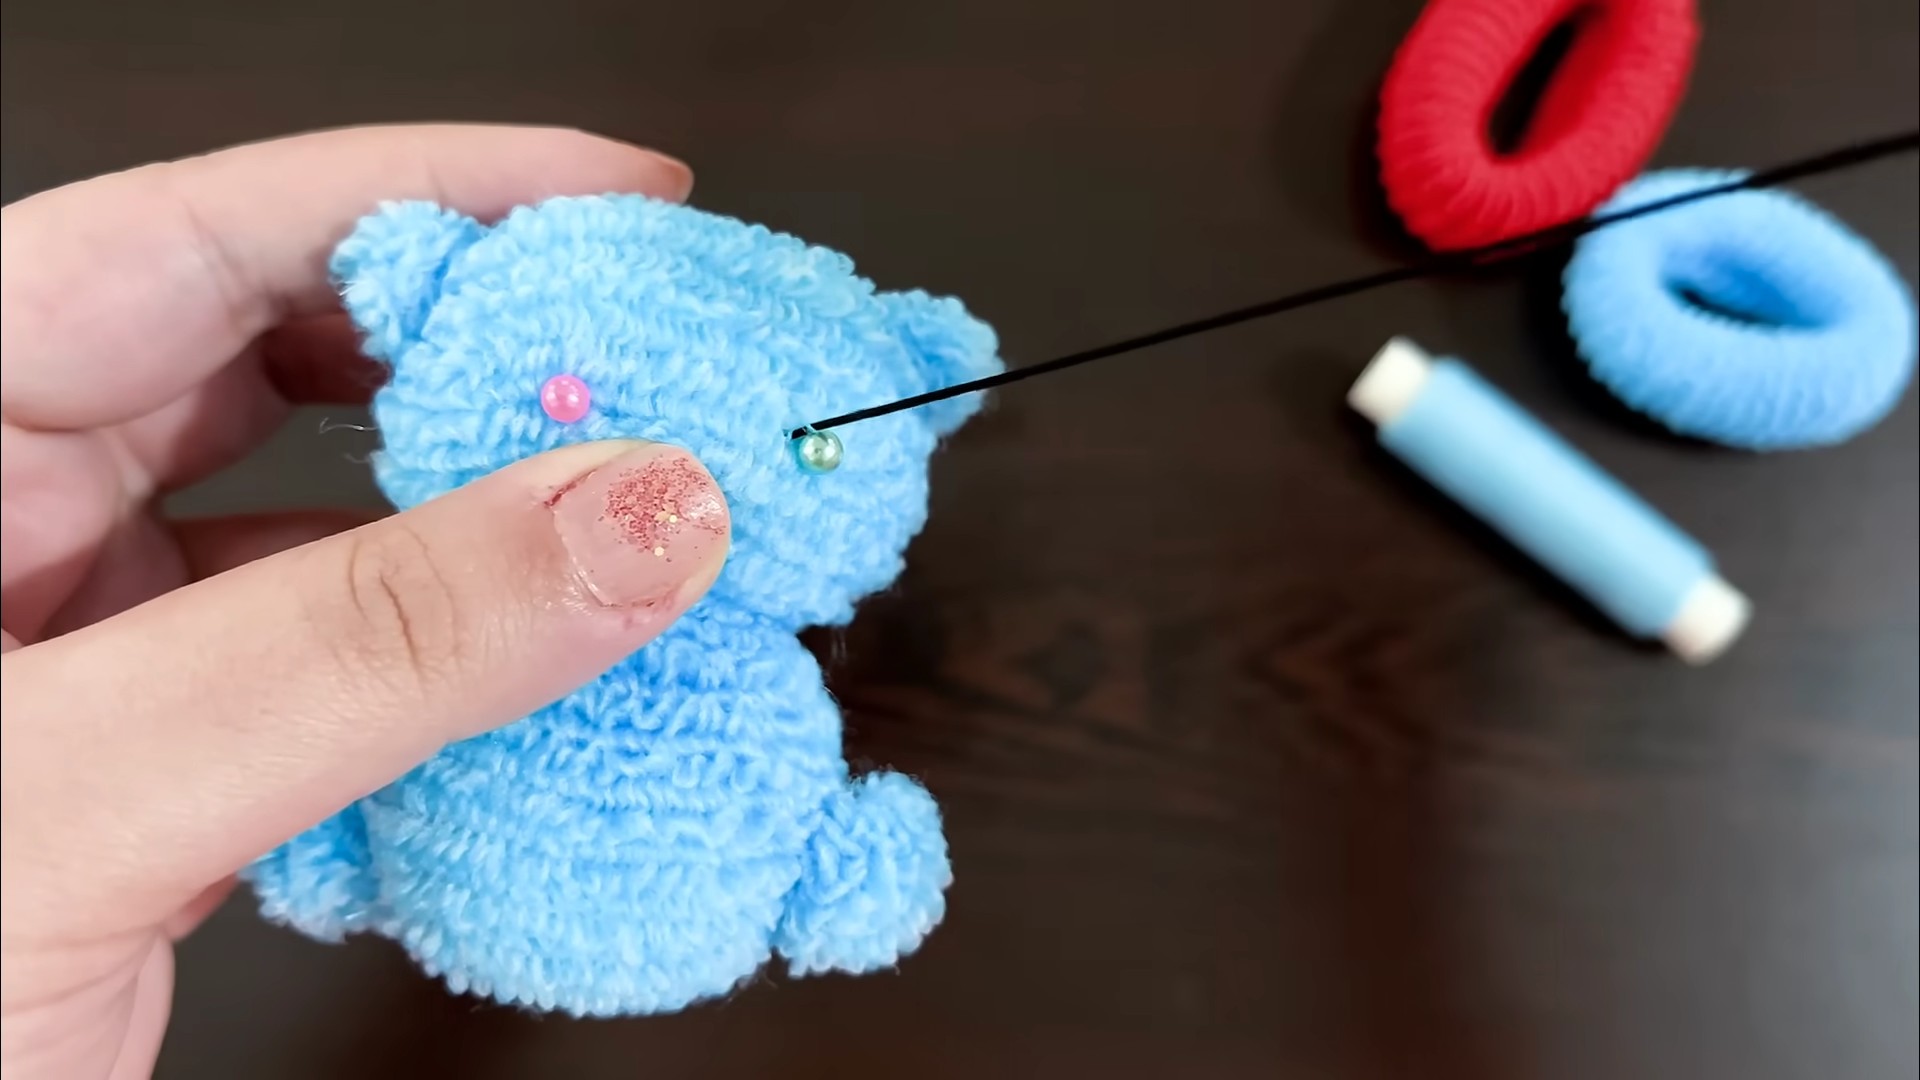
3. **Add Facial Features:** Now’s the time to add your bear’s eyes and nose. You can use small beads, buttons, or embroider them with floss. I like to use French knots for the eyes and a simple satin stitch for the nose.
4. **Sew the Ears:** Take two ear pieces and pin them together, right sides facing out. Sew around the curved edge of the ear, leaving the bottom edge open. Repeat for the other ear.
5. **Attach the Ears to the Head:** Pin the ears to the right side of the front body piece, positioning them where you want them to sit. Baste them in place with a few stitches to hold them securely.
6. **Pin the Body Pieces Together:** Place the front and back body pieces together, right sides facing out. Pin around the edges, making sure the ears are sandwiched between the layers.
7. **Sew Around the Body:** Using a blanket stitch, running stitch, or back stitch, sew around the entire body, leaving a small opening (about 1-2 inches) at the bottom for stuffing.
8. **Turn Right Side Out:** Carefully turn the teddy bear right side out through the opening. Use a pencil or chopstick to gently push out the seams and corners.
9. **Stuff the Bear:** Start stuffing the bear with your chosen filling. Use small pieces of stuffing and work your way around, making sure to fill all the corners and curves. Stuff firmly, but not too tightly, to give your bear a nice shape.
10. **Close the Opening:** Once the bear is stuffed to your liking, fold the raw edges of the opening inward and pin them together. Using a ladder stitch or whip stitch, sew the opening closed.
11. **Attach the Keychain:** Now for the final touch! Find the center top of your bear’s head. Using a needle and thread, create a loop through the fabric. Attach the keychain ring to this loop. Make sure the loop is secure and strong enough to hold the weight of the bear.
12. **Add Embellishments (Optional):** This is where you can really personalize your keychain! Add a ribbon bow around the bear’s neck, sew on some small buttons, or glue on felt shapes. Let your creativity shine!
Tips and Tricks for a Perfect Teddy Bear Keychain
Here are a few extra tips to help you create a keychain you’ll love:
* Use a Thimble: If you’re using a thicker fabric or find it difficult to push the needle through, a thimble can be a lifesaver.
* Practice Your Stitches: Before you start sewing the bear, practice your chosen stitch on a scrap piece of fabric. This will help you get a feel for the stitch and ensure that your stitches are even and consistent.
* Iron Your Fabric: Ironing your fabric before you cut out the pattern pieces will help prevent wrinkles and make it easier to work with.
* Use a Walking Foot (If You Have One): If you’re using a sewing machine, a walking foot can help prevent the fabric from slipping and bunching up.
* Don’t Be Afraid to Experiment: This is your project, so don’t be afraid to experiment with different fabrics, colors, and embellishments. The possibilities are endless!
* Personalize it! Add initials, dates, or small charms to make it extra special.
Troubleshooting Common Issues
Sometimes, things don’t go exactly as planned. Here are a few common issues and how to fix them:
* **Lumpy Stuffing:** If your bear looks lumpy, try using smaller pieces of stuffing and working them into the corners and curves more carefully. You can also try massaging the bear to distribute the stuffing more evenly.
* **Seams Coming Undone:** If your seams are coming undone, make sure you’re using a strong thread and that your stitches are close together. You can also reinforce the seams by sewing over them twice.
* **Difficulty Turning Right Side Out:** If you’re having trouble turning the bear right side out, try using a pencil or chopstick to gently push out the seams and corners. Be careful not to tear the fabric.
* **Uneven Stitches:** If your stitches are uneven, practice your chosen stitch on a scrap piece of fabric. You can also try using a sewing machine with a stitch regulator.
Variations and Ideas
Once you’ve mastered the basic teddy bear keychain, you can try these variations:
* **Different Animals:** Use the same basic techniques to create other animal keychains, such as cats, dogs, bunnies, or even mythical creatures like unicorns!
* **Themed Keychains:** Create themed keychains for holidays, birthdays, or special occasions. For example, you could make a Christmas bear with a Santa hat or a Valentine’s Day bear with a heart.
* **Miniature Backpack Charms:** Make smaller versions of the teddy bear to use as backpack charms.
* **Personalized Gifts:** These keychains make wonderful personalized gifts for friends and family.
I hope you have a blast creating your own adorable teddy bear keychain! Remember to have fun and let
Conclusion
So, there you have it! Transforming a simple teddy bear into an adorable and personalized keychain is not only incredibly easy but also a fantastic way to add a touch of whimsy and personality to your everyday life. This DIY teddy bear keychain project is more than just a craft; it’s an opportunity to unleash your creativity, repurpose old toys, and create something truly unique.
Why is this a must-try? Because it’s accessible to everyone, regardless of crafting experience. The materials are readily available, the steps are straightforward, and the results are undeniably charming. Imagine the smiles you’ll get when you show off your handmade keychain, a tiny, furry friend accompanying you on all your adventures. It’s a conversation starter, a mood booster, and a tangible reminder of your creative spirit.
But the fun doesn’t stop there! Feel free to experiment with different variations to truly make it your own. Consider using miniature teddy bears for a more delicate keychain, or larger ones for a bolder statement. You can also personalize your keychain with embellishments like beads, sequins, ribbons, or even tiny charms that reflect your interests. Think about adding a small initial charm for a personalized touch, or a miniature bell for a playful jingle.
For a more durable keychain, consider reinforcing the stitching around the keyring attachment point with a strong adhesive like fabric glue or even a dab of hot glue (use with caution!). You could also explore different types of keyrings, from simple split rings to more decorative lobster clasps.
Don’t be afraid to get creative with the teddy bear itself! You could dye the fur a different color, add patches of fabric for a quirky look, or even give your teddy bear a tiny outfit. The possibilities are endless!
We wholeheartedly encourage you to give this DIY teddy bear keychain project a try. It’s a rewarding experience that will leave you with a charming and personalized accessory. And most importantly, we want to hear about your creations! Share your photos and stories with us in the comments below. Let us know what variations you tried, what challenges you encountered, and what you learned along the way. Your experiences will inspire others to embark on their own crafting adventures. So grab your teddy bear, gather your supplies, and let the crafting begin! We can’t wait to see what you create!
Frequently Asked Questions (FAQ)
What kind of teddy bear is best for making a keychain?
The best type of teddy bear for a keychain is one that is relatively small and lightweight. A bear that is too large or heavy will be cumbersome to carry around on your keys. Look for teddy bears that are around 4-6 inches in height. The material of the bear doesn’t matter as much, but a bear with tightly woven fur will be more durable and less likely to shed. Avoid bears with delicate embellishments that could easily fall off. Pre-loved teddy bears are perfect for this project, giving them a new lease on life!
What kind of keyring should I use?
The type of keyring you use depends on your personal preference and the overall aesthetic you’re going for. A standard split ring is a simple and functional option. Lobster clasps are a bit more decorative and allow you to easily attach and detach the keychain from your bag or belt loop. You can also find keyrings with swivel attachments, which can help prevent the keychain from getting tangled. Consider the size and weight of the teddy bear when choosing a keyring; a larger bear will require a sturdier keyring.
How do I attach the keyring securely to the teddy bear?
Attaching the keyring securely is crucial to prevent your teddy bear from falling off. The best method is to use a strong needle and thread to sew the keyring directly onto the teddy bear’s head or back. Reinforce the stitching multiple times, creating a secure loop around the keyring. For added security, you can also use a small amount of fabric glue or hot glue (use with caution!) to adhere the keyring to the fur. Make sure the glue is completely dry before attaching the keychain to your keys. Consider using a small piece of ribbon or fabric to create a loop that you can then sew the keyring onto, distributing the weight more evenly.
What if I don’t have a teddy bear? Can I use another type of stuffed animal?
Absolutely! While this project focuses on teddy bears, you can easily adapt it to other types of small stuffed animals. Consider using a small plush animal like a bunny, a cat, or even a cartoon character. The same principles apply: choose a small, lightweight animal and attach the keyring securely. Just be mindful of the animal’s shape and features when deciding where to attach the keyring.
How can I clean my DIY teddy bear keychain?
Cleaning your teddy bear keychain will depend on the material of the bear and any embellishments you’ve added. For most teddy bears, spot cleaning with a damp cloth and mild detergent is the best option. Avoid submerging the entire keychain in water, as this could damage the stuffing or cause the fur to mat. If your teddy bear is heavily soiled, you can try hand-washing it in a sink with cool water and mild detergent. Gently squeeze out the excess water and allow it to air dry completely. Avoid using a dryer, as the heat could damage the fur or melt any glue.
Can I make these to sell?
Yes, you can absolutely make these to sell! DIY teddy bear keychains are a popular item at craft fairs and online marketplaces. Just be sure to check if the teddy bears you are using have any copyright restrictions. If you are using licensed characters, you may need to obtain permission before selling them. Consider offering personalized keychains with custom names or initials to increase their appeal.
What are some other ways to personalize my teddy bear keychain?
There are endless ways to personalize your teddy bear keychain! Here are a few ideas:
* Add a small tag with your name or initials.
* Dress your teddy bear in a miniature outfit.
* Give your teddy bear a tiny hat or bow.
* Embroider a design onto the teddy bear’s fur.
* Attach small charms that reflect your interests.
* Use different colored threads to sew the keyring on for a pop of color.
* Add googly eyes for a playful touch.
* Use fabric markers to draw designs on the teddy bear’s fur.
What if the stuffing starts to come out?
If the stuffing starts to come out of your teddy bear keychain, you’ll need to repair the hole as soon as possible to prevent further loss of stuffing. Use a needle and thread to sew the hole closed, using small, tight stitches. You can also add a small amount of fabric glue to reinforce the stitching. If a significant amount of stuffing has been lost, you may need to add some new stuffing before sewing the hole closed. You can purchase stuffing at most craft stores.
Is this project suitable for children?
This project is generally suitable for older children and teenagers, but it requires adult supervision, especially when using needles and glue. Younger children can participate in choosing the teddy bear and embellishments, but the actual sewing and gluing should be done by an adult. Make sure to use child-safe materials and tools.
Where can I find inspiration for my DIY teddy bear keychain?
The internet is a great source of inspiration for your DIY teddy bear keychain project! Browse online crafting blogs, social media platforms like Pinterest and Instagram, and online marketplaces like Etsy to see what other crafters are creating. You can also find inspiration in everyday life, such as your favorite colors, patterns, and themes. Don’t be afraid to experiment and try new things!
Leave a Comment