

DIY tomato garden ideas – that’s what you’re after, right? Well, you’ve come to the right place! Imagine biting into a sun-warmed, juicy tomato, bursting with flavor that no store-bought variety can ever match. That’s the magic of growing your own, and trust me, it’s easier than you think! For centuries, cultivating tomatoes has been a cherished tradition, from the ancient Aztecs who first domesticated them to the Italian immigrants who popularized them in America.
But let’s be honest, sometimes gardening feels overwhelming. Maybe you’re short on space, time, or even just confidence. That’s where these DIY tricks and hacks come in. I’m here to show you that creating a thriving tomato patch, even in a small apartment or balcony, is totally achievable.
Why do you need these DIY tomato garden ideas? Because fresh, homegrown tomatoes are simply better! Plus, gardening is incredibly therapeutic, connecting you with nature and providing a sense of accomplishment. So, ditch the bland supermarket tomatoes and get ready to embark on a fun and rewarding journey to grow your own delicious, vibrant crop. I’m excited to share my favorite tips and tricks to help you create the tomato garden of your dreams!

DIY Tomato Garden: From Seed to Sauce on a Budget!
Okay, tomato lovers, let’s get our hands dirty! I’m going to walk you through creating a thriving tomato garden, even if you’re short on space or cash. We’ll cover everything from starting seeds to building simple supports, so you can enjoy juicy, homegrown tomatoes all season long.
Choosing Your Tomato Varieties
Before we even think about soil, let’s talk tomatoes! The variety you choose will significantly impact your success.
* **Consider your climate:** Some varieties thrive in hot, humid conditions, while others prefer cooler climates. Check your local extension office or garden center for recommendations.
* **Think about space:** Determinate tomatoes grow to a specific size and produce all their fruit at once, making them ideal for containers or smaller gardens. Indeterminate tomatoes keep growing and producing fruit throughout the season, requiring more space and support.
* **Flavor preferences:** Do you love a sweet, juicy slicer for sandwiches? Or are you looking for a tangy paste tomato for sauces? There’s a tomato for every taste! Some popular choices include:
* **Beefsteak:** Large, meaty, and perfect for slicing.
* **Roma:** Paste tomato, great for sauces and canning.
* **Cherry:** Small, sweet, and ideal for snacking.
* **Heirloom varieties:** Offer unique flavors and colors, but may require more care.
Starting Your Tomato Seeds Indoors
Starting seeds indoors gives you a head start on the growing season, especially if you live in a cooler climate. I usually start mine about 6-8 weeks before the last expected frost.
1. **Gather your supplies:** You’ll need:
* Seed starting trays or small pots
* Seed starting mix (this is different from regular potting soil – it’s lighter and better for germination)
* Tomato seeds
* Spray bottle with water
* Heat mat (optional, but helpful)
* Grow light (essential if you don’t have a very sunny window)
2. **Prepare your seed starting trays:** Fill each cell or pot with seed starting mix, leaving about half an inch of space at the top. Gently tap the tray to settle the mix.
3. **Sow your seeds:** Place 2-3 tomato seeds in the center of each cell or pot. Cover them with a thin layer of seed starting mix (about ¼ inch).
4. **Water gently:** Use a spray bottle to moisten the soil. Avoid overwatering, which can lead to damping off (a fungal disease that kills seedlings).
5. **Provide warmth and light:** Place the seed starting trays on a heat mat (if using) and under a grow light. If you’re using a window, choose the sunniest spot you can find. Keep the grow light on for 14-16 hours per day.
6. **Maintain moisture:** Check the soil daily and mist with water as needed to keep it consistently moist, but not soggy.
7. **Thin seedlings:** Once the seedlings have their first true leaves (the second set of leaves that appear after the initial seed leaves), thin them to one plant per cell or pot. Choose the strongest, healthiest-looking seedling and snip off the others at the soil line with scissors. Don’t pull them out, as this can disturb the roots of the remaining seedling.
Transplanting Your Tomato Seedlings
Once the danger of frost has passed and the soil has warmed up, it’s time to transplant your tomato seedlings outdoors.
1. **Harden off your seedlings:** This is a crucial step to acclimate your seedlings to outdoor conditions. For about a week before transplanting, gradually expose them to more sunlight and wind each day. Start with an hour or two in a sheltered spot and gradually increase the time.
2. **Prepare your garden bed or containers:** Choose a sunny location that receives at least 6-8 hours of sunlight per day. Tomatoes need well-drained soil that is rich in organic matter. Amend your soil with compost or aged manure before planting. If you’re using containers, choose pots that are at least 12 inches in diameter for determinate varieties and 18 inches or larger for indeterminate varieties.
3. **Dig your planting holes:** Dig holes that are slightly larger than the root balls of your seedlings. Space determinate tomatoes about 2-3 feet apart and indeterminate tomatoes about 3-4 feet apart.
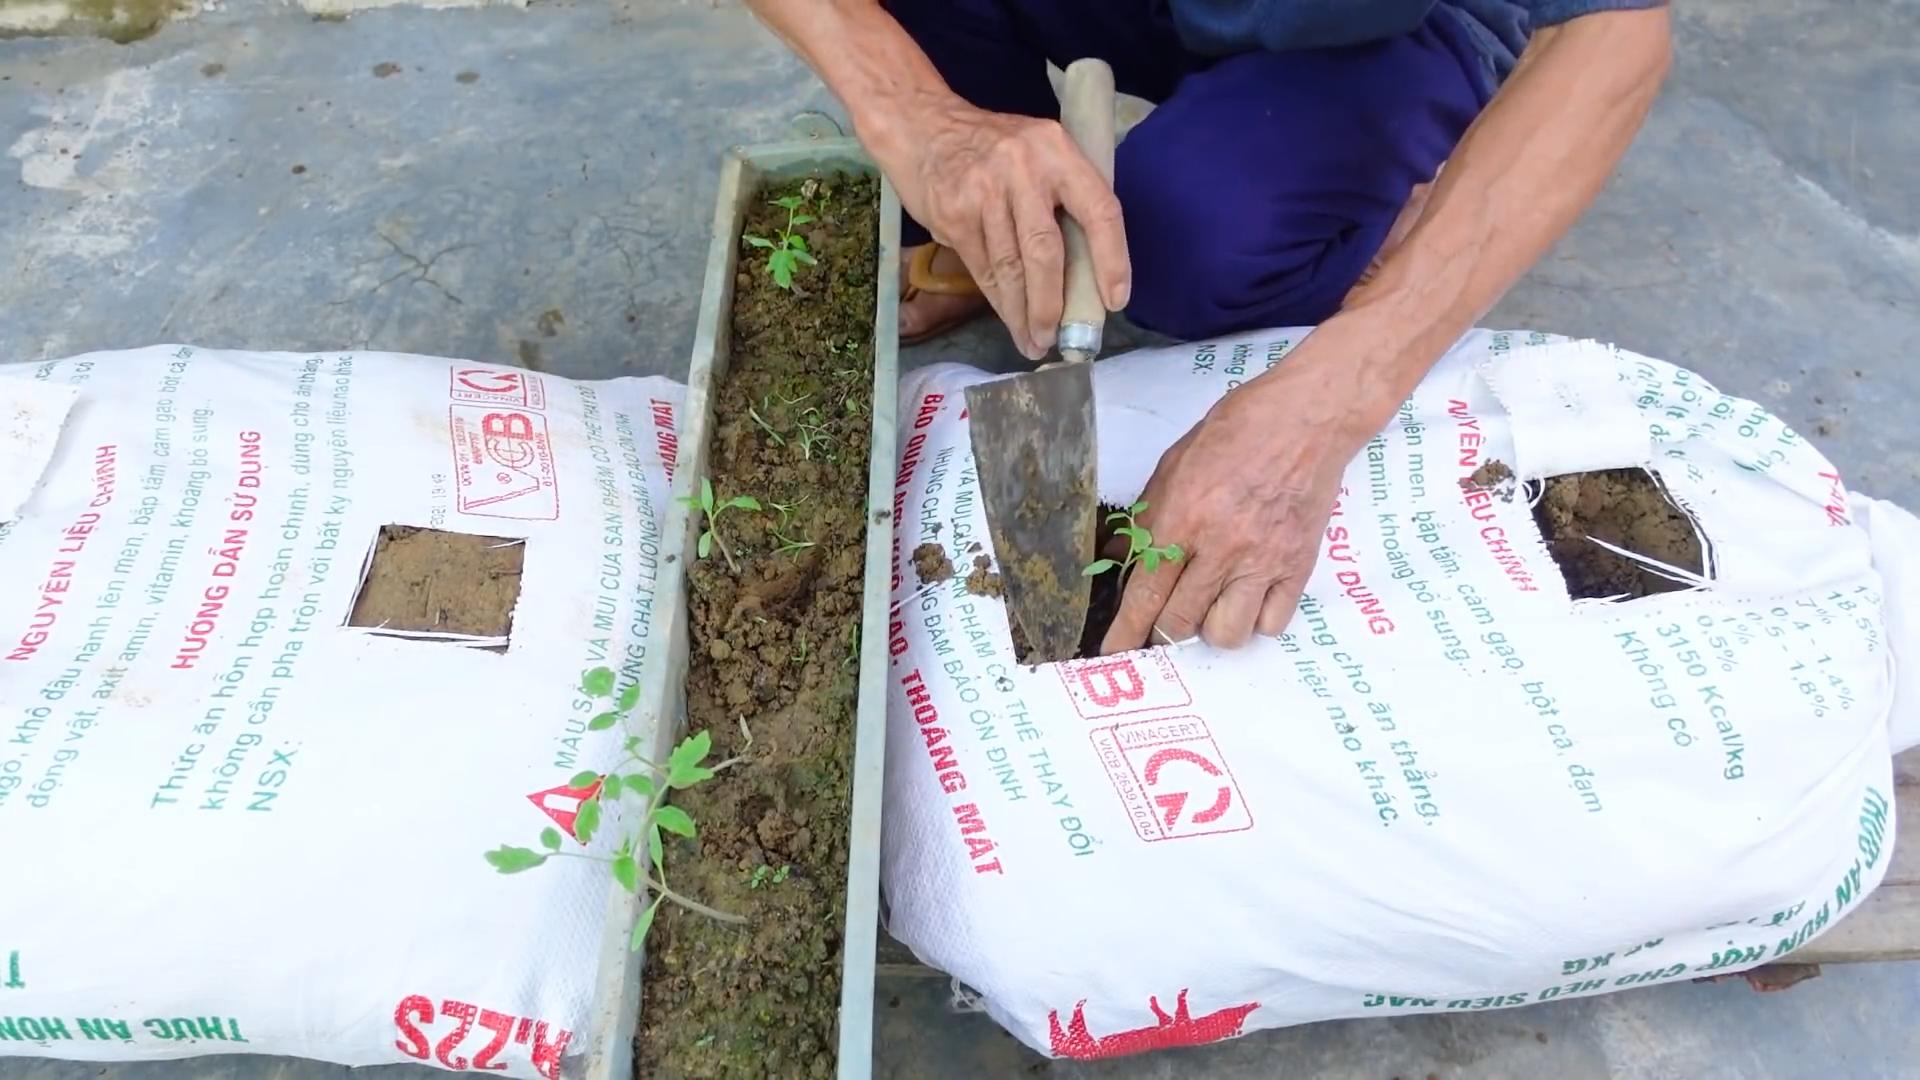
4. **Plant your seedlings:** Gently remove the seedlings from their pots or trays. If the roots are circling the bottom of the pot, gently loosen them before planting. Place the seedlings in the holes and backfill with soil. Bury the stem up to the first set of leaves. This encourages the plant to develop more roots along the buried stem, resulting in a stronger, healthier plant.
5. **Water thoroughly:** Water the newly transplanted seedlings well to help them settle in.
6. **Add mulch:** Apply a layer of mulch around the base of the plants to help retain moisture, suppress weeds, and regulate soil temperature. Straw, shredded leaves, or wood chips are all good options.
Building Simple Tomato Supports
Tomato plants, especially indeterminate varieties, need support to keep them off the ground and prevent the fruit from rotting. Here are a few simple and affordable options:
* **Tomato cages:** These are readily available at garden centers and are easy to use. Simply place the cage over the plant when you transplant it.
* **Stakes:** Drive a sturdy stake into the ground next to the plant and tie the stem to the stake with soft twine or fabric strips.
* **DIY trellis:** You can build a simple trellis using wooden stakes and wire or twine.
1. Drive two stakes into the ground about 4-6 feet apart.
2. Run wire or twine between the stakes, creating horizontal supports for the tomato plants to climb.
3. As the plants grow, tie the stems to the supports.
* **Florida weave:** This method involves driving stakes into the ground between each plant and weaving twine back and forth between the stakes to support the plants.
1. Drive stakes into the ground between each tomato plant.
2. Tie twine to the first stake, about 1 foot above the ground.
3. Weave the twine back and forth between the stakes, supporting the tomato plants.
4. As the plants grow, add more layers of twine.
Caring for Your Tomato Plants
Once your tomato plants are established, here are a few tips to keep them healthy and productive:
* **Water regularly:** Tomatoes need consistent moisture, especially during hot weather. Water deeply at the base of the plants, avoiding wetting the foliage, which can encourage disease. Aim for about 1-2 inches of water per week.
* **Fertilize:** Feed your tomato plants every 2-3 weeks with a balanced fertilizer. Look for a fertilizer that is specifically formulated for tomatoes.
* **Prune:** Pruning can help improve air circulation and encourage fruit production. Remove suckers (the small shoots that grow between the main stem and the branches) from indeterminate varieties.
* **Pest and disease control:** Monitor your plants regularly for pests and diseases. Common tomato pests include aphids, tomato hornworms, and whiteflies. Common diseases include early blight, late blight, and blossom end rot. Treat any problems promptly with organic pest control methods or fungicides.
* Blossom end rot is a common problem caused by calcium deficiency. To prevent it, ensure your soil has adequate calcium and water consistently. You can also add crushed eggshells to the soil around your plants.
Harvesting Your Tomatoes
The moment we’ve all been waiting for! Tomatoes are ready to harvest when they are fully colored and slightly soft to the touch. Gently twist the fruit from the vine, leaving the stem attached.
* Don’t refrigerate your tomatoes! Refrigeration can ruin their flavor and texture. Store them at room temperature for the best taste.
* If you have green tomatoes at the end of the season, you can ripen them indoors by placing them in a paper bag with an apple or banana. The ethylene gas released by the fruit will help them ripen.
Troubleshooting Common Tomato Problems
Even with the best care, you might encounter some problems along the way. Here are a few common issues and how to address them:
* **Yellowing leaves:** This can be caused by a variety of factors, including nutrient deficiencies, overwatering, or disease. Check the soil drainage and fertilize if necessary.
* **Blossom drop:** This is when the flowers fall off the plant without producing fruit. It can be caused by temperature extremes, lack of pollination, or stress. Ensure your plants are getting enough water and sunlight. You can also try hand-pollinating the flowers by gently shaking the plant.
* **Cracked fruit:** This is often caused by inconsistent watering. Water regularly and deeply, especially during dry spells.
* **Pests:** Identify the pest and use appropriate organic pest control methods, such as insecticidal soap or neem oil.
Extending Your Tomato Season
Want to enjoy fresh tomatoes for as long as possible? Here are a few tips:
*
Conclusion
So, there you have it! Transforming your outdoor space with these DIY tomato garden ideas isn’t just about growing delicious, sun-ripened tomatoes; it’s about cultivating a connection with nature, fostering creativity, and enjoying the immense satisfaction of harvesting something you’ve nurtured from seed (or seedling!). We’ve explored a range of options, from the space-saving ingenuity of vertical planters and hanging baskets to the rustic charm of repurposed containers and the organized efficiency of raised beds. Each approach offers a unique aesthetic and caters to different levels of gardening experience and available space.
But why is this DIY approach a must-try? Because it empowers you to take control of your food source, reduce your reliance on store-bought produce (often laden with pesticides), and enjoy tomatoes bursting with flavor that simply can’t be matched. Plus, it’s incredibly rewarding! There’s nothing quite like the taste of a tomato you’ve grown yourself, knowing the care and attention that went into its creation.
Beyond the methods we’ve discussed, feel free to experiment and personalize your DIY tomato garden. Consider companion planting – basil, marigolds, and carrots are excellent choices for deterring pests and enhancing tomato growth. You could also explore different tomato varieties, from juicy beefsteaks to sweet cherry tomatoes, to create a diverse and flavorful harvest. For those with limited sunlight, research tomato varieties that thrive in partial shade. And don’t forget the importance of proper watering and fertilization to ensure healthy, productive plants. Think about adding a small trellis or support system as your plants grow, especially for larger varieties.
Ultimately, the best DIY tomato garden is the one that works best for you and your space. Don’t be afraid to get your hands dirty, embrace the learning process, and have fun with it! The beauty of DIY is that it’s all about customization and adaptation.
We wholeheartedly encourage you to embark on this gardening adventure. Start small, if you’re a beginner, and gradually expand your garden as you gain confidence and experience. The rewards are well worth the effort.
And most importantly, we want to hear about your experiences! Share your photos, tips, and challenges in the comments below. Let’s create a community of DIY tomato gardeners, inspiring and supporting each other along the way. What innovative container did you use? What tomato variety exceeded your expectations? What unexpected challenges did you overcome? Your insights could be invaluable to other aspiring gardeners. Let’s cultivate not only tomatoes but also a thriving community of passionate growers. So, get planting and share your DIY tomato garden ideas with the world!
FAQ
What are the best tomato varieties for container gardening?
Choosing the right tomato variety is crucial for success in container gardening. Determinate varieties, which grow to a specific size and produce all their fruit at once, are generally better suited for containers than indeterminate varieties, which continue to grow and produce fruit throughout the season. Some excellent determinate varieties for containers include:
* Bush Early Girl: A reliable and early-producing variety that’s perfect for smaller containers.
* Roma: A popular choice for making sauces and pastes, Romas are compact and productive.
* Patio: As the name suggests, Patio tomatoes are specifically bred for container gardening and produce abundant yields of small, flavorful tomatoes.
* Celebrity: A versatile hybrid that performs well in containers and produces medium-sized, flavorful tomatoes.
For indeterminate varieties, consider dwarf or compact types like:
* Tiny Tim: A miniature tomato plant that’s ideal for very small spaces and produces tiny, sweet tomatoes.
* Balcony: A compact indeterminate variety that’s well-suited for hanging baskets and small containers.
Remember to check the plant tag or seed packet for information on the plant’s growth habit and size before making your selection.
How much sunlight do tomato plants need?
Tomato plants are sun-loving vegetables and require at least 6-8 hours of direct sunlight per day to thrive. Insufficient sunlight can lead to leggy growth, reduced fruit production, and bland-tasting tomatoes. Choose a location for your DIY tomato garden that receives ample sunlight throughout the day. If you’re growing tomatoes indoors, supplement with grow lights to ensure they receive enough light. Rotate your containers regularly to ensure all sides of the plant receive equal exposure to sunlight.
What type of soil is best for growing tomatoes in containers?
The ideal soil for container-grown tomatoes is a well-draining potting mix that’s rich in organic matter. Avoid using garden soil in containers, as it can become compacted and poorly drained, leading to root rot and other problems. A good potting mix will provide adequate drainage, aeration, and nutrients for healthy tomato growth. You can also amend your potting mix with compost, aged manure, or other organic materials to improve its fertility and water-holding capacity. Consider adding perlite or vermiculite to further improve drainage.
How often should I water my tomato plants in containers?
Watering frequency depends on several factors, including the size of the container, the weather conditions, and the type of potting mix you’re using. Generally, you should water your tomato plants deeply whenever the top inch of soil feels dry to the touch. Avoid overwatering, as this can lead to root rot. During hot, dry weather, you may need to water your plants daily or even twice a day. Use a watering can or hose with a gentle spray nozzle to avoid damaging the plants. Consider using a self-watering container or adding a layer of mulch to help retain moisture.
What are some common tomato pests and diseases, and how can I prevent them?
Tomato plants are susceptible to a variety of pests and diseases, including aphids, whiteflies, tomato hornworms, blossom end rot, and early blight. To prevent these problems, practice good gardening hygiene, such as removing weeds and debris from around your plants. Inspect your plants regularly for signs of pests or diseases and take action promptly. Use organic pest control methods, such as insecticidal soap or neem oil, to control pests. Ensure proper air circulation around your plants to prevent fungal diseases. Water your plants at the base to avoid wetting the foliage, which can also promote fungal growth. Choose disease-resistant tomato varieties whenever possible.
How do I fertilize my tomato plants in containers?
Tomato plants are heavy feeders and require regular fertilization to produce abundant yields. Use a balanced fertilizer that’s specifically formulated for tomatoes, following the instructions on the label. You can also use organic fertilizers, such as compost tea or fish emulsion. Fertilize your plants every 2-3 weeks throughout the growing season. Avoid over-fertilizing, as this can lead to excessive foliage growth and reduced fruit production.
How do I prune my tomato plants?
Pruning can help improve air circulation, promote fruit production, and prevent diseases. For determinate varieties, pruning is generally not necessary. For indeterminate varieties, prune suckers (the small shoots that grow between the main stem and the branches) to encourage the plant to focus its energy on fruit production. Remove any yellowing or diseased leaves to prevent the spread of disease.
How do I deal with blossom end rot?
Blossom end rot is a common problem in tomatoes that’s caused by a calcium deficiency. To prevent blossom end rot, ensure that your soil is rich in calcium and that your plants are receiving consistent watering. You can also add calcium to the soil by amending it with bone meal or crushed eggshells. If you notice blossom end rot on your tomatoes, remove the affected fruit and adjust your watering and fertilization practices.
When is the best time to harvest my tomatoes?
Tomatoes are typically ready to harvest when they’re fully colored and slightly soft to the touch. The exact color will depend on the variety. Gently twist the tomato from the vine, leaving the stem attached. Store your harvested tomatoes at room temperature for the best flavor.
Leave a Comment