

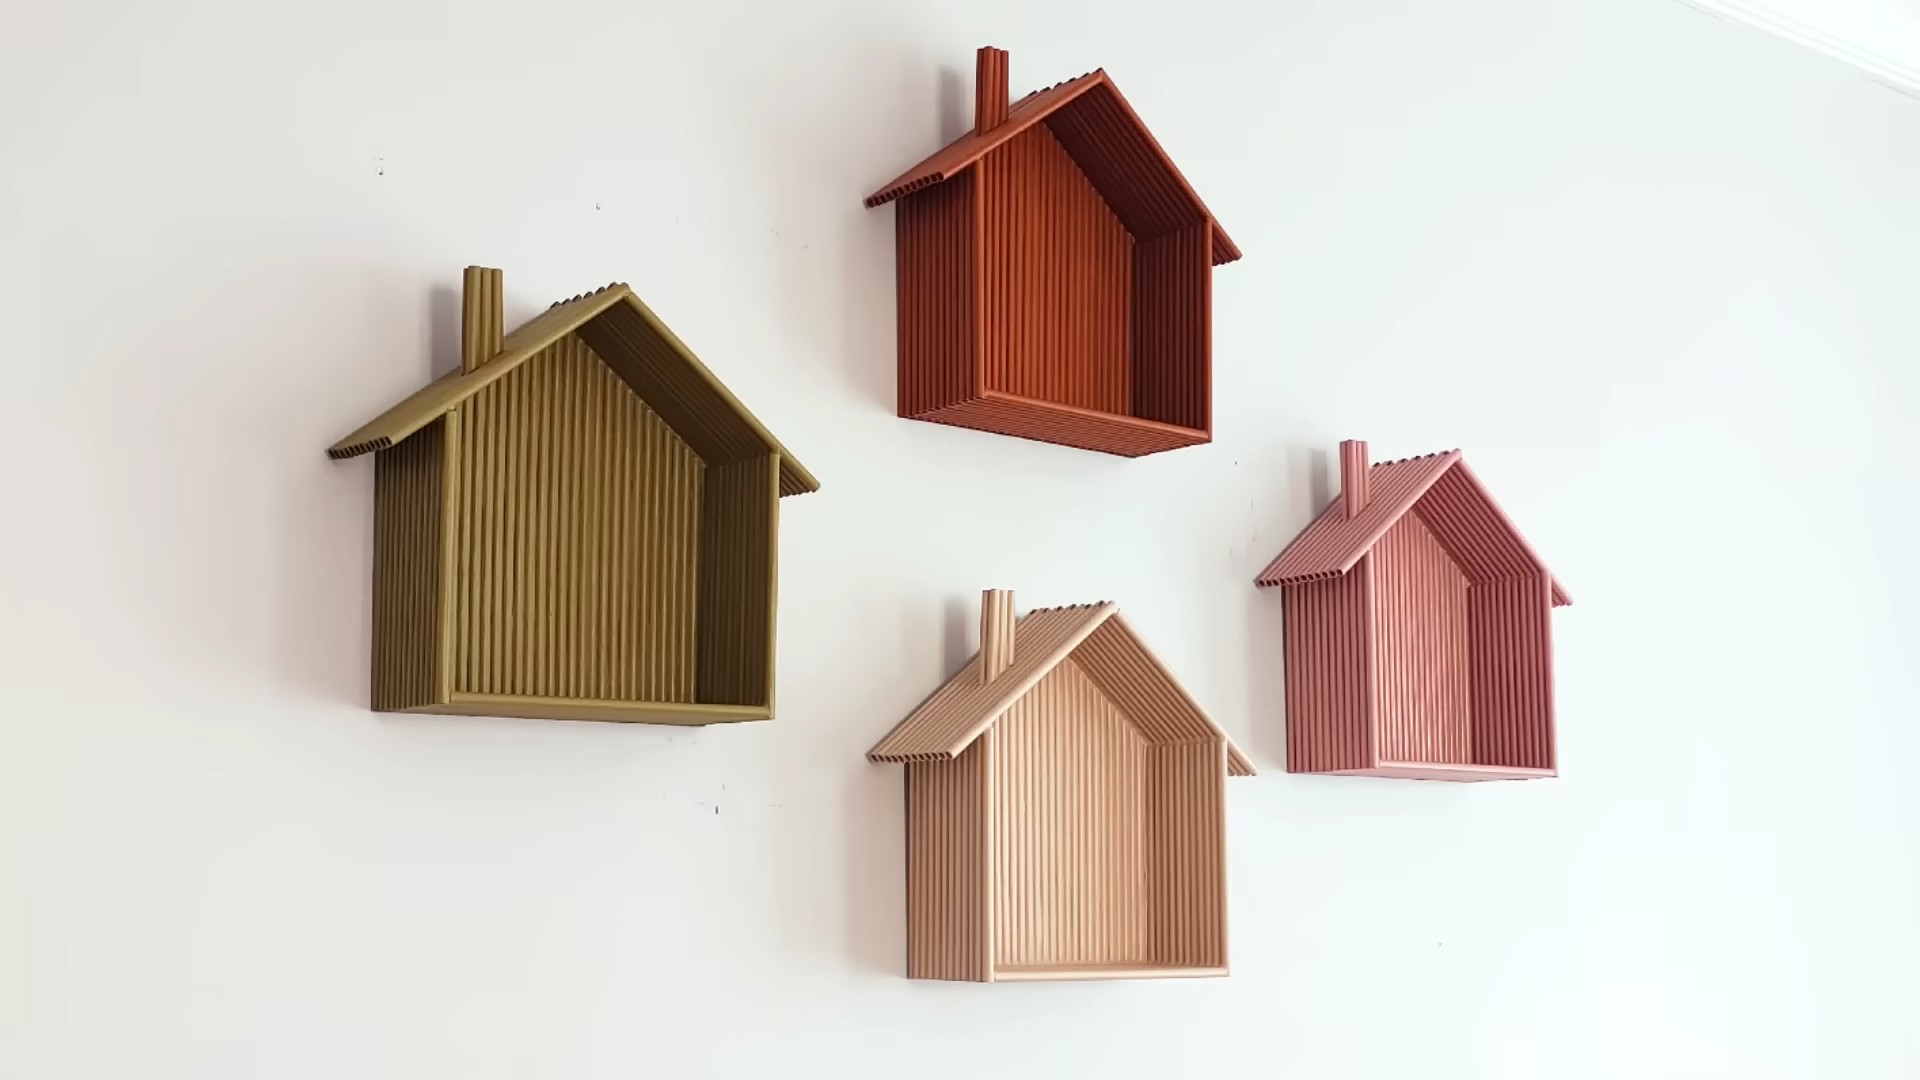
DIY Upcycled Wall Shelf: Transform Trash into Treasure!
Have you ever looked at a pile of discarded materials and thought, “There has to be a better use for this?” I know I have! That’s why I’m so excited to share this incredibly rewarding DIY project with you: creating a stunning DIY upcycled wall shelf. Forget those generic, mass-produced shelves – we’re talking about crafting something unique, sustainable, and totally *you*.
Upcycling, in its essence, is a practice as old as resourcefulness itself. Throughout history, communities have repurposed materials out of necessity, transforming scraps into functional and beautiful objects. Think of the quilts made from fabric remnants, or the furniture built from reclaimed wood. This isn’t just about saving money; it’s about honoring the materials we already have and reducing our environmental footprint.
Why do you need a DIY upcycled wall shelf in your life? Because it’s the perfect solution for adding storage and style to any room, without breaking the bank. Whether you’re looking to display your favorite plants, organize your books, or showcase your travel souvenirs, a custom-made shelf adds a personal touch that store-bought options simply can’t match. Plus, it’s a fantastic way to express your creativity and contribute to a more sustainable lifestyle. Let’s dive in and turn those forgotten items into a functional work of art!
DIY Upcycled Wall Shelf: From Trash to Treasure!
Hey there, fellow DIY enthusiasts! I’m so excited to share this project with you. We’re going to transform something old and unwanted into a stylish and functional wall shelf. Get ready to unleash your inner upcycling artist! This project is perfect for adding a touch of personality to any room while being kind to the environment.
Materials You’ll Need:
Before we dive in, let’s gather our supplies. Don’t worry, you probably have a lot of these lying around already!
* Your Upcycled Item: This could be an old drawer, a wooden crate, a vintage suitcase, a sturdy box – anything with a relatively flat back that can be mounted on a wall. For this tutorial, I’m using an old wooden drawer I found at a flea market.
* Sandpaper: Various grits (80, 120, 220) for smoothing surfaces.
* Primer: To prepare the surface for painting or staining.
* Paint or Stain: Choose a color that complements your decor. I’m going with a lovely shade of teal for a pop of color.
* Paintbrushes or Foam Rollers: For applying primer and paint/stain.
* Sealer (Optional): To protect the finish and add durability. Polyurethane or varnish works great.
* Measuring Tape: For accurate measurements.
* Pencil: For marking measurements.
* Level: Crucial for ensuring your shelf is straight.
* Drill: With appropriate drill bits for wood and wall type.
* Screws: Choose screws that are long enough to securely attach the shelf to the wall, but not so long that they poke through the front.
* Wall Anchors: If you’re not drilling into studs, you’ll need wall anchors to support the weight of the shelf. Choose anchors appropriate for the weight you plan to put on the shelf.
* Safety Glasses: Protect your eyes from dust and debris.
* Dust Mask: To avoid inhaling dust particles while sanding.
* Drop Cloth or Newspaper: To protect your work surface.
* Wood Filler (Optional): For filling any holes or imperfections in the wood.
* Clamps (Optional): Helpful for holding pieces together while the glue dries (if you’re adding decorative elements).
* Decorative Elements (Optional): Knobs, pulls, stencils, decoupage materials – get creative!
Preparing Your Upcycled Item:
This is where the magic begins! We’ll take our chosen item and get it ready for its transformation.
1. Cleaning: Start by thoroughly cleaning your upcycled item. Remove any dirt, dust, or grime with a damp cloth and mild soap. Let it dry completely. I found some cobwebs and years of dust on my drawer, so this step was essential!
2. Disassembly (If Necessary): If your item has any parts that you want to remove or adjust, now’s the time. For example, I removed the drawer pull from my drawer because I planned to replace it with something more modern.
3. Sanding: This is a crucial step for creating a smooth surface for painting or staining. Start with a coarser grit sandpaper (80 grit) to remove any rough spots or old finishes. Then, move on to a medium grit (120 grit) to smooth out the surface further. Finally, finish with a fine grit (220 grit) for a super smooth finish. Remember to sand in the direction of the wood grain. Don’t forget to wear your dust mask!
4. Filling Imperfections (Optional): If your item has any holes, cracks, or imperfections, use wood filler to fill them in. Let the wood filler dry completely according to the manufacturer’s instructions, and then sand it smooth.
5. Priming: Apply a coat of primer to the entire surface of your item. Primer helps the paint or stain adhere better and provides a more even finish. Let the primer dry completely according to the manufacturer’s instructions.
Painting or Staining Your Shelf:
Now for the fun part – adding color and personality!
1. Applying the First Coat: Apply the first coat of paint or stain evenly, using a paintbrush or foam roller. Follow the manufacturer’s instructions for drying time. I prefer using a foam roller for a smoother finish, especially on larger surfaces.
2. Sanding Lightly (Optional): Once the first coat is dry, you can lightly sand it with a fine-grit sandpaper (220 grit) to remove any imperfections and create an even smoother surface for the second coat.
3. Applying the Second Coat: Apply a second coat of paint or stain, again ensuring even coverage. Let it dry completely. Two coats usually provide the best coverage and color depth.
4. Adding Decorative Elements (Optional): This is where you can really let your creativity shine! You can add stencils, decoupage, decorative knobs or pulls, or any other embellishments you like. I decided to add a new, sleek drawer pull to my drawer.
5. Sealing (Optional): If you want to protect the finish of your shelf and make it more durable, apply a coat of sealer. Polyurethane or varnish works well. Let the sealer dry completely according to the manufacturer’s instructions.
Mounting Your Shelf:
Almost there! Now we just need to securely attach our beautiful new shelf to the wall.
1. Locating Wall Studs: Use a stud finder to locate the wall studs in the area where you want to hang your shelf. If you can screw directly into a stud, that’s the most secure option.
2. Marking Screw Locations: Use a measuring tape and pencil to mark the locations where you want to drill the screws. Make sure the marks are level! Use a level to double-check.
3. Drilling Pilot Holes: Drill pilot holes at the marked locations. The pilot holes should be slightly smaller than the diameter of your screws. This will make it easier to drive the screws in and prevent the wood from splitting.
4. Installing Wall Anchors (If Necessary): If you’re not drilling into studs, you’ll need to install wall anchors at the marked locations. Follow the manufacturer’s instructions for installing the wall anchors.
5. Attaching the Shelf: Carefully position the shelf against the wall, aligning the pilot holes with the screw locations or wall anchors. Use a drill to drive the screws through the shelf and into the wall studs or wall anchors. Make sure the screws are tight, but don’t overtighten them, as this could damage the wood or wall.
6. Checking for Level: Once the shelf is attached, use a level to make sure it’s perfectly level. If it’s not, you may need to adjust the screws slightly.
Final Touches:
Congratulations! You’ve successfully upcycled an old item into a stylish and functional wall shelf. Now, let’s add the finishing touches.
1. Cleaning Up: Clean up any dust or debris from the drilling and sanding process.
2. Adding Items to Your Shelf: Arrange your favorite books, plants, photos, or other decorative items on your new shelf.
3. Admiring Your Work: Step back and admire your handiwork! You’ve created something beautiful and unique while giving an old item a new lease on life.
Tips and Tricks:
Here are a few extra tips to help you make the most of this project:
* Choose the Right Upcycled Item: Consider the size, shape, and weight capacity of your chosen item. Make sure it’s sturdy enough to support the items you plan to put on the shelf.
* Experiment with Different Finishes: Don’t be afraid to experiment with different paint colors, stains, and decorative techniques.
* Get Creative with Mounting: There are many different ways to mount a shelf. You can use brackets, floating shelf hardware, or even rope.
* Safety First: Always wear safety glasses and a dust mask when sanding or drilling.
* Don’t Be Afraid to Ask for Help: If you’re not comfortable with any of the steps in this project, don’t hesitate to ask a friend or family member for help.
I hope you enjoyed this DIY tutorial! I can’t wait to see what amazing upcycled wall shelves you create. Happy crafting!
Conclusion
So, there you have it! Transforming discarded materials into a stylish and functional upcycled wall shelf is not only incredibly rewarding but also a fantastic way to contribute to a more sustainable lifestyle. This project proves that you don’t need to spend a fortune on home decor to create a space that reflects your personality and values. The beauty of this DIY upcycled wall shelf lies in its adaptability. You can tailor it to perfectly match your existing decor and storage needs.
Think about painting your shelf a vibrant color to add a pop of personality to a neutral room, or staining it with a rich wood tone for a more rustic and classic feel. Consider adding decorative elements like stencils, decoupage, or even small mosaic tiles to truly personalize your creation. For a more industrial look, you could incorporate metal brackets or pipes into the design. If you’re using reclaimed wood, embrace the imperfections – the knots, grains, and weathered textures all add character and tell a story.
Don’t limit yourself to just one shelf! Create a whole shelving unit by stacking multiple upcycled shelves of varying sizes and shapes. This is a great way to maximize vertical space and create a visually interesting focal point in any room. You could even repurpose old drawers or crates to create unique and functional storage compartments within your shelving unit.
The possibilities are truly endless when it comes to upcycling. This project is a testament to the power of creativity and resourcefulness. It’s a chance to give new life to something old and create something beautiful and useful in the process.
We wholeheartedly encourage you to give this DIY upcycled wall shelf project a try. It’s a fun, affordable, and eco-friendly way to add a touch of personal style to your home. And most importantly, it’s a chance to make a positive impact on the environment by reducing waste and promoting sustainable practices.
Once you’ve completed your masterpiece, we’d love to see it! Share your photos and experiences with us in the comments below or on our social media channels. We’re always inspired by the creativity and ingenuity of our readers, and we can’t wait to see what you come up with. Let’s inspire each other to create a more beautiful and sustainable world, one upcycled project at a time. So grab those discarded materials, unleash your inner artist, and get ready to transform your space with a stunning DIY upcycled wall shelf!
Frequently Asked Questions (FAQ)
What types of materials are best suited for creating an upcycled wall shelf?
The beauty of upcycling is that you can use a wide variety of materials! Some popular choices include:
* Reclaimed wood: Pallets, old fence posts, barn wood, and discarded furniture are all excellent sources of reclaimed wood. Look for pieces that are structurally sound and free of excessive rot or insect damage.
* Old drawers: Drawers from dressers or nightstands can be easily transformed into charming wall shelves. Simply clean them up, paint or stain them, and add mounting hardware.
* Wooden crates: Crates are another versatile option. They can be used as is for a rustic look, or you can paint or decorate them to match your decor.
* Metal pipes and fittings: For an industrial-style shelf, consider using metal pipes and fittings as supports.
* Old books: Stacked and secured together, old hardcover books can create a unique and literary-inspired shelf.
* Ladders: An old ladder can be repurposed into a multi-tiered shelf, perfect for displaying plants or books.
Remember to always prioritize safety and choose materials that are sturdy enough to support the weight of the items you plan to display on your shelf.
How do I properly clean and prepare reclaimed wood for use in my DIY upcycled wall shelf?
Cleaning and preparing reclaimed wood is crucial for ensuring a safe and aesthetically pleasing finished product. Here’s a step-by-step guide:
1. Remove any nails, screws, or staples: Use a hammer and pliers to carefully remove any protruding fasteners.
2. Clean the wood: Use a stiff brush and soapy water to scrub away any dirt, grime, or debris. For stubborn stains, you can use a mild bleach solution (be sure to wear gloves and eye protection).
3. Sand the wood: Start with a coarse-grit sandpaper (80-grit) to remove any rough edges or splinters. Then, gradually move to finer grits (120-grit and 220-grit) to create a smooth surface.
4. Treat for pests (optional): If you suspect that the wood may contain insects, you can treat it with a borate-based wood preservative.
5. Seal the wood: Apply a sealant or primer to protect the wood from moisture and prevent it from absorbing paint or stain unevenly.
What are the best ways to attach the upcycled wall shelf to the wall securely?
The best method for attaching your shelf to the wall will depend on the type of wall you have and the weight of the items you plan to display. Here are some common options:
* Screws and anchors: This is the most common and reliable method. Use screws that are long enough to penetrate the wall studs for maximum support. If you can’t locate a stud, use wall anchors to provide additional holding power.
* Heavy-duty adhesive strips: For lightweight shelves and smooth walls, you can use heavy-duty adhesive strips. However, be sure to choose strips that are rated for the weight of your shelf and its contents.
* Brackets: Metal brackets can provide extra support and stability, especially for heavier shelves. Choose brackets that are appropriate for the size and weight of your shelf.
* French cleats: A French cleat is a two-part mounting system that provides a strong and secure hold. One part of the cleat is attached to the wall, and the other part is attached to the back of the shelf.
Always use a level to ensure that your shelf is mounted straight.
What are some creative ways to decorate my DIY upcycled wall shelf?
There are endless possibilities for decorating your upcycled wall shelf! Here are a few ideas to get you started:
* Paint or stain: Choose a color or stain that complements your existing decor.
* Stencils: Use stencils to add patterns or designs to your shelf.
* Decoupage: Decoupage is the art of gluing paper cutouts onto a surface. You can use old magazines, newspapers, or fabric scraps to create a unique and personalized design.
* Mosaic tiles: Add small mosaic tiles to create a colorful and eye-catching accent.
* Hardware: Replace the existing hardware with decorative knobs or pulls.
* Lighting: Add string lights or small spotlights to highlight your shelf and its contents.
* Plants: Display potted plants or trailing vines to add a touch of greenery to your space.
* Personal collections: Showcase your favorite books, collectibles, or artwork.
How can I ensure the safety of my DIY upcycled wall shelf, especially if I have children or pets?
Safety is paramount, especially when children or pets are involved. Here are some tips to ensure the safety of your upcycled wall shelf:
* Use sturdy materials: Choose materials that are strong and durable enough to support the weight of the items you plan to display.
* Securely mount the shelf: Use appropriate mounting hardware and ensure that the shelf is firmly attached to the wall.
* Avoid sharp edges: Sand down any sharp edges or corners to prevent injuries.
* Secure loose items: Use museum putty or other adhesive to secure items on the shelf and prevent them from falling.
* Keep heavy items low: Place heavier items on lower shelves to prevent them from falling and causing injury.
* Supervise children and pets: Keep an eye on children and pets around the shelf to prevent them from climbing or knocking it over.
* Regularly inspect the shelf: Check the shelf periodically for any signs of damage or instability.
By following these tips, you can create a beautiful and functional upcycled wall shelf that is safe for everyone in your home.
Leave a Comment