

Easy everyday life hacks – who doesn’t love them? I know I do! We all crave those little shortcuts, those clever tricks that make our lives just a bit smoother and more efficient. But what if I told you that some of the most impactful hacks can be found right outside your back door, waiting to transform your garden into a thriving oasis?
Gardening, in its essence, is a beautiful blend of art and science, a practice that has nourished both bodies and souls for millennia. From the ancient Hanging Gardens of Babylon to the meticulously crafted gardens of Kyoto, humans have always sought to cultivate beauty and sustenance from the earth. But let’s be honest, sometimes gardening can feel a little overwhelming, right? That’s where these easy everyday life hacks come in!
Imagine effortlessly deterring pests with a simple kitchen ingredient, or boosting your plant’s growth with a recycled household item. These aren’t just whimsical ideas; they’re practical, time-saving solutions that can make gardening more accessible and enjoyable for everyone, regardless of experience. In this article, I’m going to share some of my favorite DIY gardening tricks that will not only save you money but also help you create a healthier, more vibrant garden. So, grab your gardening gloves, and let’s dive into the world of simple yet effective gardening hacks!
DIY Life Hacks to Simplify Your Day
Okay, let’s dive into some awesome DIY life hacks that I personally use to make my daily routine smoother and more efficient. These are all tried and tested by yours truly, and I promise they’ll save you time, money, and maybe even a little bit of sanity!
Hack 1: The Ultimate Cord Organizer
Tired of tangled cords turning your drawers into a chaotic mess? This hack is a game-changer. I used to spend ages untangling headphone wires and charger cables, but not anymore!
What you’ll need:
* Empty toilet paper rolls (or paper towel rolls cut in half)
* A shoebox or any container you want to use as your organizer
* Decorative paper, fabric scraps, or paint (optional, for making it pretty!)
* Scissors
* Tape or glue
Step-by-step instructions:
1. Gather your supplies: First things first, collect all your empty toilet paper rolls. I usually save them up for a few weeks. Also, grab your shoebox, decorative materials (if you’re feeling crafty), scissors, and tape or glue.
2. Decorate the rolls (optional): This is where you can get creative! I like to wrap my rolls in colorful scrapbook paper. Just cut the paper to size, wrap it around the roll, and secure it with tape or glue. You could also paint them or use fabric scraps.
3. Arrange the rolls in the box: Now, place the decorated (or plain) rolls vertically inside the shoebox. You might need to experiment with the arrangement to fit them snugly. The goal is to have each roll standing upright, creating individual compartments.
4. Secure the rolls (optional): If you want to make the organizer extra sturdy, you can glue the rolls to each other and to the bottom of the box. This isn’t strictly necessary, but it will prevent them from shifting around.
5. Load it up with cords: Finally, the fun part! Neatly coil each cord and slip it into its own designated roll. Labeling the rolls with a marker can be helpful, especially if you have a lot of similar-looking cords.
Now you have a super organized cord storage solution! No more tangled messes!
Hack 2: DIY Phone Stand from Sunglasses
Ever need a quick phone stand but don’t have one handy? This simple hack uses your sunglasses! It’s perfect for watching videos or video chatting hands-free.
What you’ll need:
* A pair of sunglasses
Step-by-step instructions:
1. Open the sunglasses: Simply open your sunglasses as you normally would.
2. Flip them upside down: Place the sunglasses upside down on a flat surface, with the nose piece facing up.
3. Rest your phone: Carefully rest your phone against the nose piece and the arms of the sunglasses. The arms will act as the base, and the nose piece will provide support.
That’s it! You now have a makeshift phone stand. This works best with sunglasses that have a slightly curved frame.
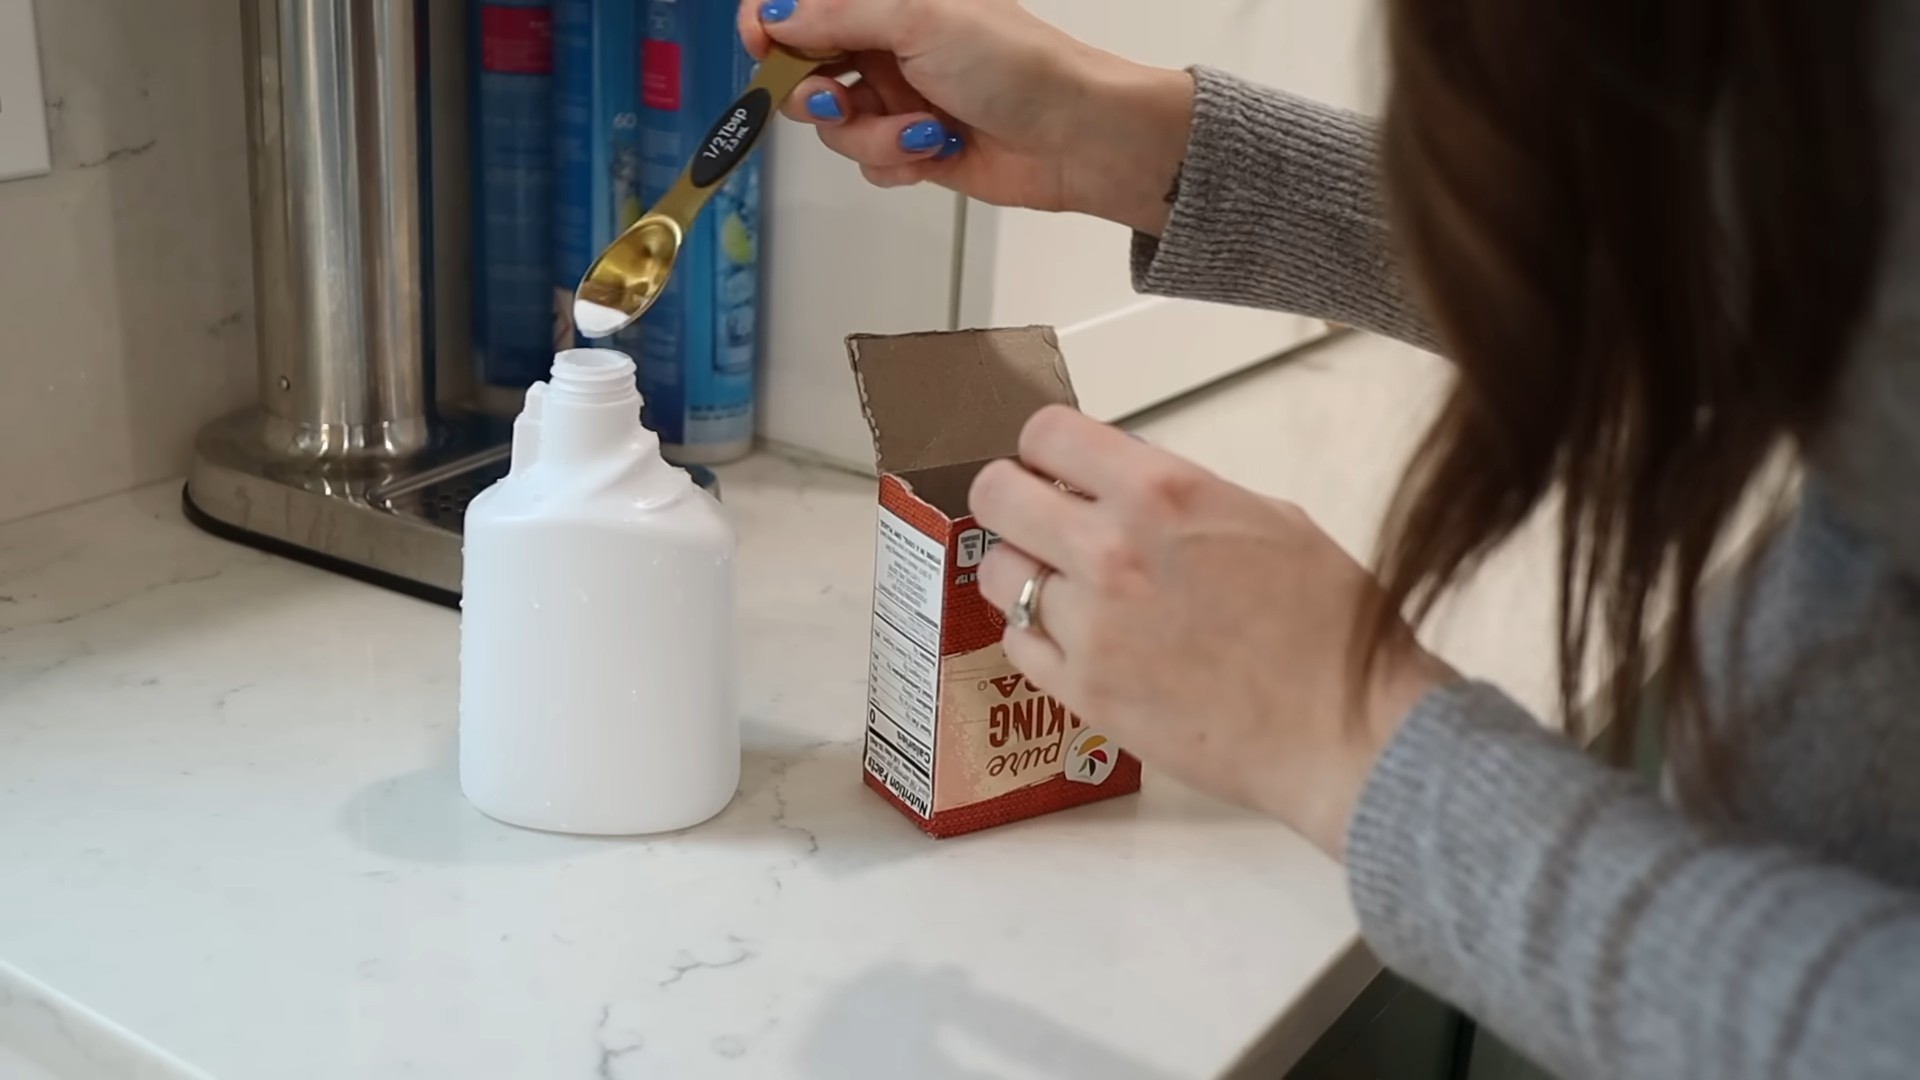
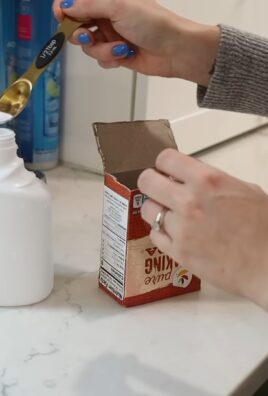
Hack 3: The “No More Smelly Shoes” Solution
Okay, let’s be honest, sometimes shoes get a little… fragrant. This hack is a natural and effective way to deodorize your shoes overnight.
What you’ll need:
* Baking soda
* Two coffee filters (or small cloth bags)
* Rubber bands or twist ties
Step-by-step instructions:
1. Prepare the baking soda pouches: Spoon a generous amount of baking soda into each coffee filter (or cloth bag).
2. Secure the pouches: Gather the edges of the coffee filter and secure it with a rubber band or twist tie. Make sure the baking soda is sealed inside.
3. Place in shoes: Place one baking soda pouch inside each shoe.
4. Let it sit overnight: Leave the pouches in your shoes overnight (or even longer for really smelly shoes). The baking soda will absorb the odors.
5. Remove and enjoy: In the morning, remove the baking soda pouches. Your shoes should smell much fresher!
I usually do this once a week to keep my shoes smelling their best. You can also add a few drops of essential oil (like lavender or tea tree) to the baking soda for an extra boost of freshness.
Hack 4: Extend the Life of Your Bananas
We’ve all been there: you buy a bunch of bananas, and they turn brown way too quickly. This simple trick will help them stay fresh for longer.
What you’ll need:
* Bananas
* Plastic wrap or aluminum foil
Step-by-step instructions:
1. Separate the bananas: If your bananas are still attached, gently separate them.
2. Wrap the stems: Wrap the stem of each banana (or the entire bunch if you prefer to keep them together) with plastic wrap or aluminum foil.
3. Store properly: Store the bananas at room temperature, away from direct sunlight and heat.
The reason this works is that bananas release ethylene gas from their stems, which causes them to ripen (and eventually brown) faster. Wrapping the stems slows down the release of this gas. I’ve found that this hack can extend the life of my bananas by several days!
Hack 5: DIY Dusting Cloths
Store-bought dusting cloths can be expensive and wasteful. This DIY version is cheap, effective, and reusable!
What you’ll need:
* Old t-shirts or flannel shirts (cut into squares)
* White vinegar
* Water
* Essential oil (optional, for fragrance)
* Spray bottle
Step-by-step instructions:
1. Cut the fabric: Cut your old t-shirts or flannel shirts into squares (approximately 12×12 inches).
2. Prepare the cleaning solution: In a spray bottle, mix equal parts white vinegar and water. Add a few drops of your favorite essential oil (like lemon or lavender) for a pleasant scent.
3. Spray and wipe: Lightly spray the dusting cloth with the cleaning solution and wipe down surfaces.
4. Wash and reuse: When the cloth gets dirty, simply wash it in the washing machine and reuse it.
These DIY dusting cloths are perfect for cleaning furniture, electronics, and other surfaces. The vinegar helps to remove dust and grime, while the essential oil leaves a fresh scent.
Hack 6: Unstick a Zipper with Petroleum Jelly
A stuck zipper can be incredibly frustrating. Before you resort to force, try this simple solution.
What you’ll need:
* Petroleum jelly (like Vaseline)
* Cotton swab or toothpick
Step-by-step instructions:
1. Apply petroleum jelly: Use a cotton swab or toothpick to carefully apply a small amount of petroleum jelly to the teeth of the zipper around the stuck area.
2. Gently wiggle the zipper: Gently wiggle the zipper up and down, working the petroleum jelly into the teeth.
3. Repeat if necessary: If the zipper is still stuck, repeat the process.
4. Wipe away excess: Once the zipper is unstuck, wipe away any excess petroleum jelly with a clean cloth.
The petroleum jelly acts as a lubricant, helping the zipper teeth to slide past each other more easily. This hack works wonders on zippers on clothing, bags, and even tents!
Hack 7: Make a Makeshift Speaker with a Bowl
Need to amplify the sound from your phone but don’t have a speaker? This simple hack uses a bowl to create a makeshift amplifier.
What you’ll need:
* A bowl (ceramic or glass works best)
* Your phone
Step-by-step instructions:
1. Place the phone in the bowl: Place your phone inside the bowl, with the speaker facing down.
2. Adjust the position: Experiment with the position of the phone inside the bowl to find the spot that produces the loudest and clearest sound.
The bowl acts as a resonator, amplifying the sound from your phone’s speaker. This is a great trick for listening to music or podcasts in a pinch.
Hack 8: Remove Stickers Easily with Hair Dryer
Stickers can leave behind a sticky residue that’s difficult to remove. This hack uses heat to loosen the adhesive, making it much easier to peel off.
What you’ll need:
* A hair dryer
Step-by-step instructions:
1. Heat the sticker: Hold the hair dryer a few inches away from the sticker and heat it for 30-60 seconds.
2. Peel the sticker: Gently peel the sticker from one corner. The heat should have loosened the adhesive, making it easy to remove.
3. Remove any residue: If there’s any sticky residue left behind, you can use a damp cloth or a little bit

Conclusion
So, there you have it! This simple yet incredibly effective DIY trick is more than just a clever shortcut; it’s a game-changer for streamlining your everyday life. We’ve shown you how to transform a common problem into an opportunity for efficiency and even a little bit of fun. The beauty of this method lies in its accessibility – no fancy equipment or specialized skills are required. Just a few readily available items and a willingness to experiment.
Why is this a must-try? Because it saves you time, money, and frustration. Think about all those moments you’ve spent struggling with [mention a specific problem the hack solves]. Now, imagine those moments replaced with effortless ease. That’s the power of this DIY trick. It’s about reclaiming your time and energy, allowing you to focus on the things that truly matter.
But the journey doesn’t end here! Feel free to experiment with variations to suit your specific needs and preferences. For example, if you’re dealing with [mention a related problem], you could try [suggest a variation]. Or, if you prefer a more [mention a desired quality, e.g., eco-friendly] approach, consider using [suggest an alternative material]. The possibilities are endless!
Don’t be afraid to get creative and personalize this DIY trick to make it your own. The key is to find what works best for you and your lifestyle. We encourage you to embrace the spirit of experimentation and discover new ways to optimize your daily routines.
We are confident that once you try this DIY trick, you’ll wonder how you ever lived without it. It’s a small change that can make a big difference in your overall quality of life. So, go ahead, give it a try!
And most importantly, we want to hear about your experience. Did you find this DIY trick helpful? Did you discover any interesting variations? Share your thoughts, tips, and photos in the comments below. Let’s create a community of resourceful individuals who are passionate about making everyday life easier and more enjoyable. Your feedback is invaluable, and it will help us continue to provide you with the best possible DIY solutions. Let us know how this easy everyday life hack has changed your routine!
Frequently Asked Questions
What if I don’t have the exact materials listed? Can I substitute them?
Absolutely! One of the best things about DIY projects is the flexibility to adapt them to what you have on hand. While we’ve suggested specific materials based on their effectiveness and availability, feel free to experiment with substitutes. For example, if you don’t have [specific material], you could try [alternative material]. Just keep in mind the properties of the original material and try to find a substitute with similar characteristics. Consider the durability, flexibility, and safety of the alternative before using it. If you are unsure, test a small area first.
How long will this DIY trick last?
The longevity of this DIY trick depends on several factors, including the quality of the materials you use and how frequently you use it. With proper care and maintenance, it should last for [estimated timeframe]. To extend its lifespan, we recommend [maintenance tips]. Regularly inspect it for any signs of wear and tear, and replace any damaged components as needed.
Is this DIY trick safe to use around children and pets?
Safety is always a top priority. While this DIY trick is generally safe, it’s important to take precautions, especially if you have children or pets. Keep any small parts or potentially hazardous materials out of their reach. Supervise children when they are using or interacting with the finished product. If you’re using any chemicals or adhesives, follow the manufacturer’s instructions carefully and ensure proper ventilation. If you have any concerns, consult with a professional before proceeding.
Can this DIY trick be used for [specific application]?
That’s a great question! While we haven’t specifically tested this DIY trick for [specific application], it’s certainly worth exploring. Consider the specific requirements of [specific application] and whether this DIY trick can meet those needs. You may need to make some modifications or adjustments to ensure it’s suitable. We encourage you to experiment and see if it works for you. If you do try it, please share your results with us!
What if I’m not very handy? Is this DIY trick still for me?
Absolutely! This DIY trick is designed to be simple and accessible, even for those who are not particularly handy. We’ve provided clear and concise instructions, and the materials required are readily available. Don’t be intimidated! Just take your time, follow the steps carefully, and don’t be afraid to ask for help if you need it. Remember, everyone starts somewhere, and this is a great way to build your DIY skills.
I tried the DIY trick, but it didn’t work as expected. What should I do?
Don’t give up! DIY projects can sometimes be tricky, and it’s not uncommon to encounter challenges along the way. First, double-check that you’ve followed all the instructions correctly. Make sure you haven’t missed any steps or used the wrong materials. If everything seems to be in order, try troubleshooting the problem. Consider what might be causing the issue and experiment with different solutions. You can also reach out to us or other members of the community for advice. We’re here to help!
How can I make this DIY trick more eco-friendly?
There are several ways to make this DIY trick more environmentally friendly. First, choose sustainable materials whenever possible. Look for recycled, repurposed, or biodegradable options. Avoid using materials that are harmful to the environment or that generate a lot of waste. Second, minimize your consumption of resources. Use only what you need and avoid creating unnecessary waste. Third, dispose of any waste properly. Recycle or compost materials whenever possible. Finally, consider the long-term impact of your choices. Choose materials and methods that are durable and long-lasting, reducing the need for frequent replacements.
Where can I find more easy everyday life hacks like this one?
You’ve come to the right place! We’re constantly creating and sharing new DIY tricks and life hacks to help you simplify your daily routines. Be sure to check back regularly for new articles and videos. You can also subscribe to our newsletter or follow us on social media to stay up-to-date on the latest tips and tricks. In addition, there are many other great resources available online, such as blogs, websites, and YouTube channels dedicated to DIY and life hacks. Explore these resources and discover new ways to make your life easier and more enjoyable.
Leave a Comment