

Grape Vine Cultivation Tips: Ever dreamt of strolling through your own miniature vineyard, plucking juicy grapes straight from the vine? I know I have! There’s something incredibly satisfying about growing your own food, and grapes are no exception. But let’s be honest, the thought of cultivating grape vines can seem a little daunting.
Grape cultivation has a rich history, dating back thousands of years. From ancient Egypt to the Roman Empire, grapes have been prized for their delicious fruit and, of course, their role in winemaking. Today, you don’t need to be a seasoned vintner to enjoy the fruits (pun intended!) of your labor.
That’s why I’ve put together this guide packed with easy-to-follow grape vine cultivation tips and DIY hacks. Whether you have a sprawling garden or just a sunny balcony, I’ll show you how to successfully grow your own grapes. Imagine the satisfaction of serving homemade grape juice, crafting delectable jams, or even trying your hand at winemaking with grapes you nurtured yourself! This article will provide you with the knowledge and confidence to embark on your grape-growing adventure. So, grab your gardening gloves, and let’s get started!
DIY: Propagating Grape Vines from Cuttings – A Beginner’s Guide
Hey there, fellow gardening enthusiasts! Ever dreamed of having your own vineyard, even if it’s just a few vines in your backyard? Well, I’m here to tell you it’s totally achievable, and it all starts with propagating grape vines from cuttings. It’s a surprisingly simple and rewarding process, and I’m excited to share my tried-and-true method with you. Forget buying expensive vines from nurseries; let’s get our hands dirty and grow our own!
What You’ll Need
Before we dive in, let’s gather our supplies. This is crucial for a smooth and successful propagation.
* Grapevine Cuttings: These are the stars of the show! We’ll talk about selecting the right ones in a bit.
* Sharp Pruning Shears: Clean cuts are essential to prevent disease.
* Rooting Hormone (Optional but Recommended): This will boost your chances of success. I personally swear by it!
* Potting Mix: A well-draining mix is key. I like a blend of peat moss, perlite, and vermiculite.
* Pots or Containers: Choose pots that are at least 6 inches deep.
* Watering Can or Spray Bottle: For gentle watering.
* Plastic Bags or Humidity Dome (Optional): To create a humid environment.
* Labels and a Permanent Marker: To keep track of your cuttings. Trust me, you’ll want to label them!
* A well-lit area, but not direct sunlight: An east-facing window is perfect.
Selecting the Right Cuttings
This is where it all begins! Choosing the right cuttings is paramount to your success.
* Time of Year: The best time to take cuttings is during the dormant season, typically late winter or early spring (before the buds start to swell). I usually aim for late February or early March in my area.
* Source Vine: Select a healthy, vigorous grapevine that produces the type of grapes you want. If you don’t have your own vine, ask a friend or neighbor who does.
* Cutting Type: We’re looking for hardwood cuttings. These are sections of mature, one-year-old wood.
* Appearance: Choose cuttings that are about the thickness of a pencil (or slightly thicker). They should be brown and have healthy-looking buds. Avoid cuttings that are thin, weak, or have any signs of disease.
* Length: Aim for cuttings that are 8-12 inches long.
* Nodes: Each cutting should have at least 3-4 nodes (the points where leaves or buds will emerge).
* Cutting Technique: Make a clean, angled cut at the bottom of the cutting, just below a node. This helps with root formation. Make a straight cut at the top, about an inch above a node. This helps prevent rot.
Taking the Cuttings: Step-by-Step
Alright, let’s get to the fun part!
1. Gather Your Materials: Make sure you have your pruning shears, source vine, and a bucket or bag to collect the cuttings.
2. Identify One-Year-Old Wood: Look for sections of the vine that grew last year. This wood will be brown and slightly smoother than older wood.
3. Make the Cuts: Using your sharp pruning shears, make the angled cut at the bottom of the cutting, just below a node. Then, make the straight cut at the top, about an inch above a node.
4. Collect Your Cuttings: Place the cuttings in your bucket or bag, keeping them moist. I like to wrap them in a damp paper towel.
5. Label Your Cuttings: If you’re taking cuttings from different grape varieties, be sure to label them clearly. This will save you a lot of confusion later on.
Preparing the Cuttings for Rooting
Now that we have our cuttings, we need to prepare them for rooting.
1. Hydrate the Cuttings: Soak the cuttings in water for 12-24 hours. This will rehydrate them and give them a good start.
2. Apply Rooting Hormone (Optional): Dip the bottom inch of each cutting in rooting hormone powder or liquid. This will stimulate root growth. Follow the instructions on the rooting hormone package. I find this step significantly increases the success rate.
3. Prepare Your Pots: Fill your pots with the well-draining potting mix. Moisten the mix thoroughly, but don’t let it get soggy.
Planting the Cuttings
Time to get those cuttings in the soil!
1. Make a Hole: Use a pencil or your finger to create a hole in the potting mix that’s deep enough to accommodate about half of the cutting.
2. Insert the Cutting: Gently insert the cutting into the hole, making sure the bottom node is buried in the soil.
3. Firm the Soil: Gently firm the soil around the cutting to secure it in place.
4. Water Gently: Water the cutting gently with a watering can or spray bottle.
5. Create a Humid Environment (Optional): Place a plastic bag over the pot or use a humidity dome to create a humid environment. This will help prevent the cutting from drying out. Make sure the bag doesn’t touch the cutting directly. You can use skewers to prop it up.
Caring for Your Cuttings
This is where patience comes in!
1. Location: Place the pots in a well-lit area, but avoid direct sunlight. An east-facing window is ideal.
2. Watering: Keep the potting mix consistently moist, but not soggy. Water when the top inch of soil feels dry to the touch.
3. Humidity: If you’re using a plastic bag or humidity dome, remove it for a few hours each day to allow for air circulation. This will help prevent fungal diseases.
4. Temperature: Maintain a temperature of around 65-75°F (18-24°C).
5. Patience: Rooting can take several weeks, so be patient! You should start to see new growth in 4-8 weeks.
Checking for Root Development
How do you know if your cuttings have rooted?
1. Gentle Tug Test: After a few weeks, gently tug on the cutting. If it resists, it has likely rooted.
2. New Growth: The appearance of new leaves is a good sign that the cutting has rooted.
3. Careful Examination: You can also gently remove the cutting from the pot to check for roots. Be very careful not to damage the delicate roots.
Transplanting Your Rooted Cuttings
Once your cuttings have developed a good root system, it’s time to transplant them into larger pots or directly into the ground.
1. Choose a Location: Select a sunny location with well-draining soil. Grape vines need at least 6-8 hours of sunlight per day.
2. Prepare the Soil: Amend the soil with compost or other organic matter to improve drainage and fertility.
3. Dig a Hole: Dig a hole that’s large enough to accommodate the root ball of the cutting.
4. Remove the Cutting from the Pot: Gently remove the cutting from its pot, being careful not to damage the roots.
5. Plant the Cutting: Place the cutting in the hole and backfill with soil.
6. Water Thoroughly: Water the cutting thoroughly after planting.
7. Provide Support: Grape vines need support, so install a trellis or stake near the cutting.
8. Mulch: Apply a layer of mulch around the base of the vine to help retain moisture and suppress weeds.
Ongoing Care
Congratulations! You’ve successfully propagated your own grape vines. Now, here’s what you need to do to keep them thriving:
* Watering: Water regularly, especially during dry periods.
* Fertilizing: Fertilize in the spring with a balanced fertilizer.
* Pruning: Prune your grape vines annually during the dormant season to maintain their shape and encourage fruit production. This is a whole other topic, but there are tons of resources online to guide you.
* Pest and Disease Control: Monitor your vines for pests and diseases and take appropriate action if necessary.
Troubleshooting
Sometimes things don’t go as planned. Here are some common problems and how to fix them:
* Cuttings Not Rooting: Make sure the cuttings are kept moist and in a humid environment. Try using rooting hormone. Ensure the temperature is warm enough.
* Cuttings Rotting: Make sure the potting mix is well-draining and avoid overwatering
Conclusion
So, there you have it! Cultivating your own thriving grape vines might seem daunting at first, but with these simple yet effective DIY tricks, you’re well on your way to enjoying the fruits (literally!) of your labor. We’ve covered everything from selecting the right variety for your climate and soil to providing the essential support structures and pruning techniques that will encourage abundant growth and delicious grapes.
Why is this a must-try? Because growing your own grapes isn’t just about the end product – it’s about the journey. It’s about connecting with nature, learning new skills, and experiencing the satisfaction of nurturing something from a tiny cutting to a bountiful vine. Plus, imagine the bragging rights when you serve your homemade wine or offer guests a platter of freshly picked, sun-ripened grapes from your very own garden.
But the benefits extend beyond personal enjoyment. Growing your own grapes is a sustainable practice that reduces your reliance on commercially grown produce, minimizes your carbon footprint, and allows you to control exactly what goes into your food. You can avoid harmful pesticides and herbicides, ensuring that your grapes are as healthy and natural as possible.
Don’t be afraid to experiment! There are countless variations you can try to personalize your grape vine cultivation experience. Consider training your vines along a pergola to create a beautiful shaded walkway, or espalier them against a sunny wall for a stunning visual display. You can also explore different pruning methods to optimize fruit production or experiment with companion planting to attract beneficial insects and deter pests.
For example, try planting rosemary or lavender near your grape vines to repel grape phylloxera, a common pest that can damage the roots. Or, consider adding clover as a ground cover to fix nitrogen in the soil and improve its fertility.
And speaking of soil, remember that proper soil preparation is crucial for success. Amend your soil with plenty of organic matter, such as compost or well-rotted manure, to improve drainage and provide essential nutrients. Regularly test your soil pH and adjust it as needed to ensure that your grape vines have the optimal growing conditions.
The key to successful grape vine cultivation is patience and observation. Pay close attention to your vines, monitor their growth, and adjust your care routine as needed. Don’t be discouraged if you encounter challenges along the way – every gardener faces setbacks. The important thing is to learn from your mistakes and keep experimenting until you find what works best for you.
We are confident that with a little effort and these DIY tips, you’ll be harvesting your own delicious grapes in no time. So, grab your gardening gloves, choose your favorite grape variety, and get started today!
We’re eager to hear about your experiences with grape vine cultivation. Share your photos, tips, and challenges in the comments below. Let’s create a community of grape-growing enthusiasts and learn from each other’s successes and failures. Happy growing!
Frequently Asked Questions (FAQ)
What is the best time of year to plant grape vines?
The best time to plant grape vines depends on your climate and the type of vine you’re planting. Generally, dormant vines are best planted in early spring or late fall. This allows the roots to establish themselves before the heat of summer or the cold of winter sets in. If you’re planting potted vines, you can plant them throughout the growing season, but be sure to provide them with plenty of water and shade during the hottest periods. Always check with your local nursery or agricultural extension office for specific recommendations for your region.
How much sun do grape vines need?
Grape vines need at least 6-8 hours of direct sunlight per day to thrive. Sunlight is essential for photosynthesis, which is the process by which plants convert sunlight into energy. Without enough sunlight, your grape vines will produce fewer grapes, and the grapes that they do produce will be smaller and less flavorful. Choose a planting location that receives full sun throughout the day, and avoid areas that are shaded by trees or buildings.
What type of soil is best for grape vines?
Grape vines prefer well-drained soil that is slightly acidic to neutral in pH (between 6.0 and 7.0). The soil should be rich in organic matter and have good drainage to prevent root rot. Before planting, amend your soil with compost, well-rotted manure, or other organic materials to improve its fertility and drainage. Avoid planting grape vines in heavy clay soils, as these soils tend to retain too much water and can suffocate the roots. If you have clay soil, consider amending it with sand or gravel to improve drainage. A soil test can help you determine the pH and nutrient content of your soil and identify any amendments that may be needed.
How often should I water my grape vines?
The watering needs of grape vines depend on the climate, soil type, and age of the vine. Newly planted vines need to be watered more frequently than established vines. Water deeply and regularly, especially during dry periods. Avoid overwatering, as this can lead to root rot. A good rule of thumb is to water your grape vines when the top inch of soil feels dry to the touch. During the growing season, you may need to water your vines several times a week, especially if you live in a hot, dry climate. In the fall and winter, you can reduce watering frequency.
How do I prune grape vines?
Pruning is essential for maintaining the health and productivity of grape vines. The best time to prune grape vines is in late winter or early spring, before the buds begin to swell. The goal of pruning is to remove dead, damaged, or diseased wood, as well as to shape the vine and encourage fruit production. There are several different pruning methods, including cane pruning and spur pruning. The best method for you will depend on the variety of grape vine you’re growing and your personal preferences. Consult a local expert or refer to a pruning guide for specific instructions.
What are some common pests and diseases that affect grape vines?
Grape vines are susceptible to a variety of pests and diseases, including grape phylloxera, Japanese beetles, powdery mildew, and black rot. Grape phylloxera is a root-feeding insect that can severely damage or kill grape vines. Japanese beetles are leaf-eating insects that can defoliate vines. Powdery mildew and black rot are fungal diseases that can affect the leaves, stems, and fruit of grape vines. To prevent pests and diseases, choose disease-resistant varieties, practice good sanitation, and monitor your vines regularly for signs of infestation or infection. If you detect pests or diseases, take action promptly to control them. Organic control methods include using insecticidal soap, neem oil, or copper-based fungicides.
How long does it take for grape vines to produce fruit?
It typically takes 2-3 years for grape vines to begin producing fruit. The first year after planting, the vine will focus on establishing its root system. In the second year, the vine will begin to grow more vigorously. In the third year, you may see a small crop of grapes. The yield will increase as the vine matures. Be patient and continue to provide your grape vines with proper care, and you’ll be rewarded with a bountiful harvest in the years to come.
Can I grow grape vines in containers?
Yes, you can grow grape vines in containers, but you’ll need to choose a large container (at least 15-20 gallons) and select a variety that is well-suited for container growing. Dwarf or compact varieties are often the best choice. Use a well-draining potting mix and provide your container-grown grape vines with plenty of sunlight and water. You’ll also need to fertilize them regularly. Container-grown grape vines may require more frequent pruning than those grown in the ground.
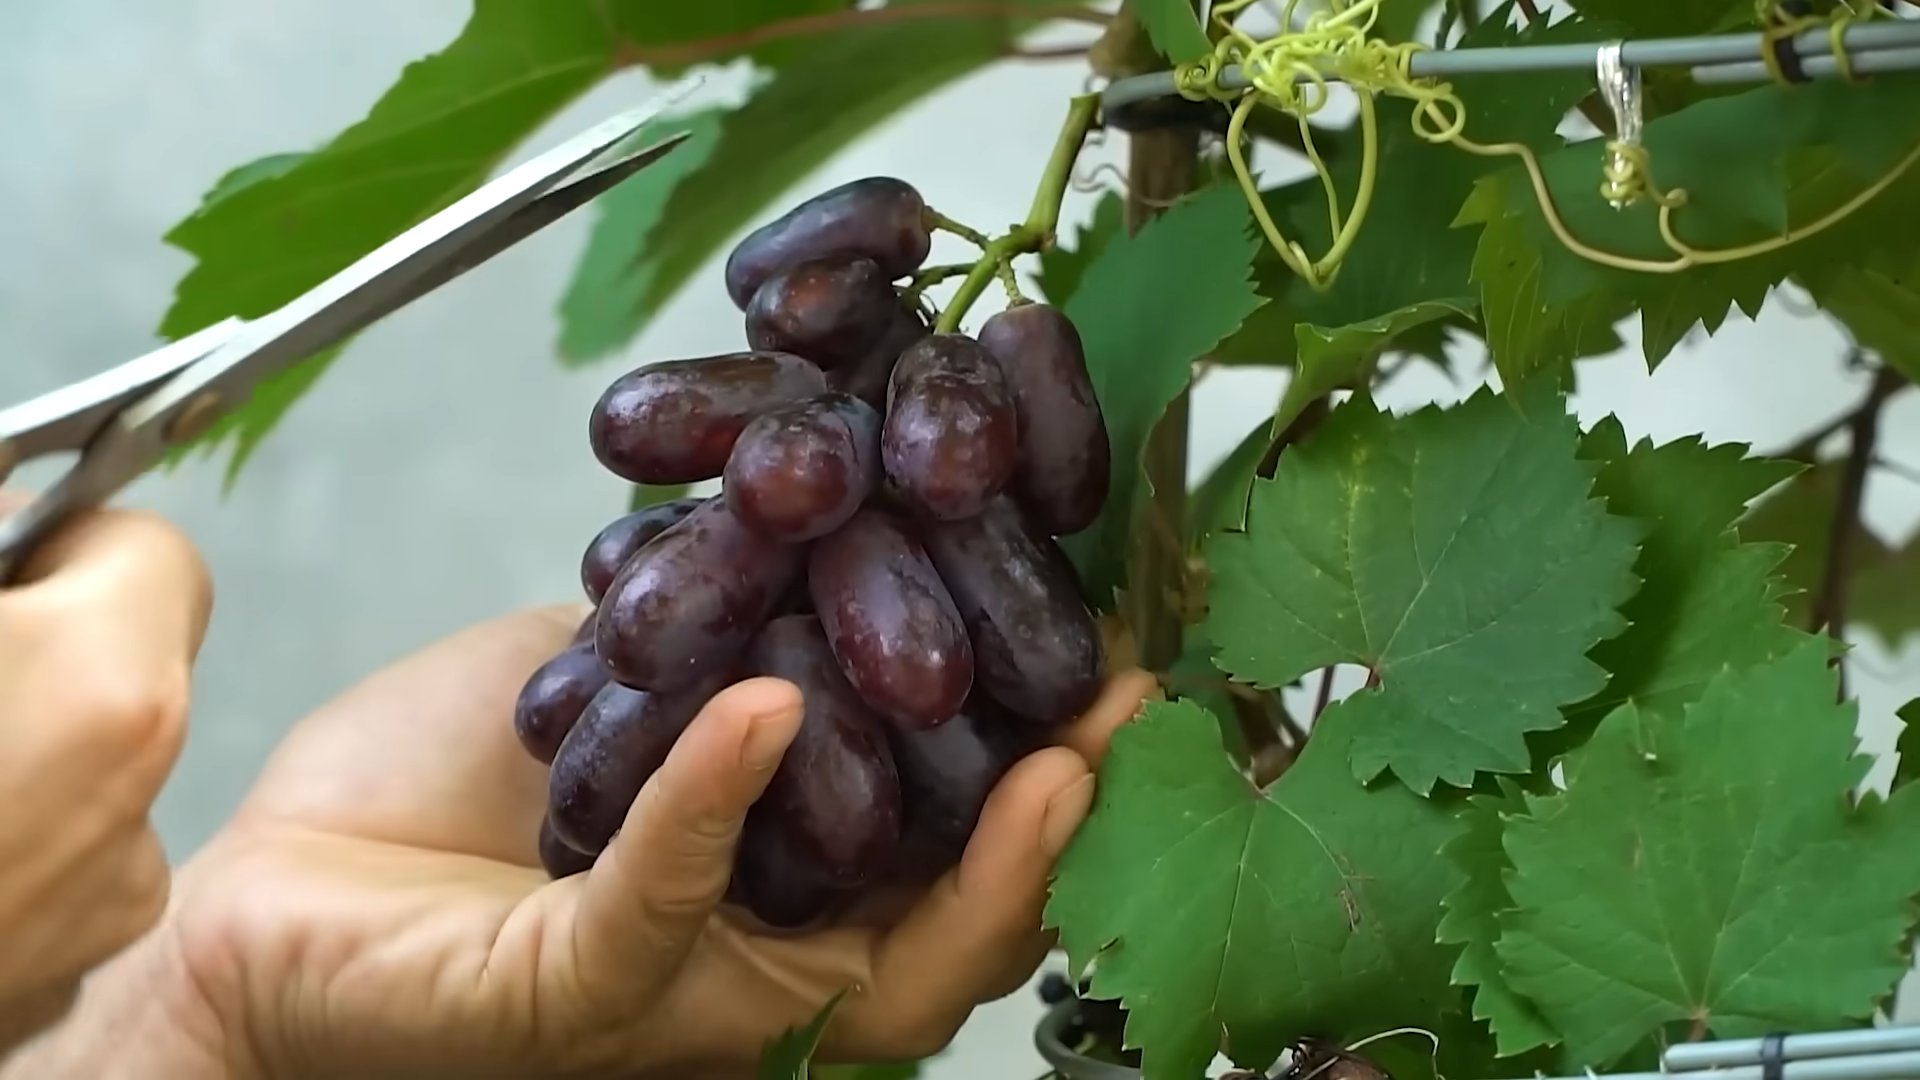
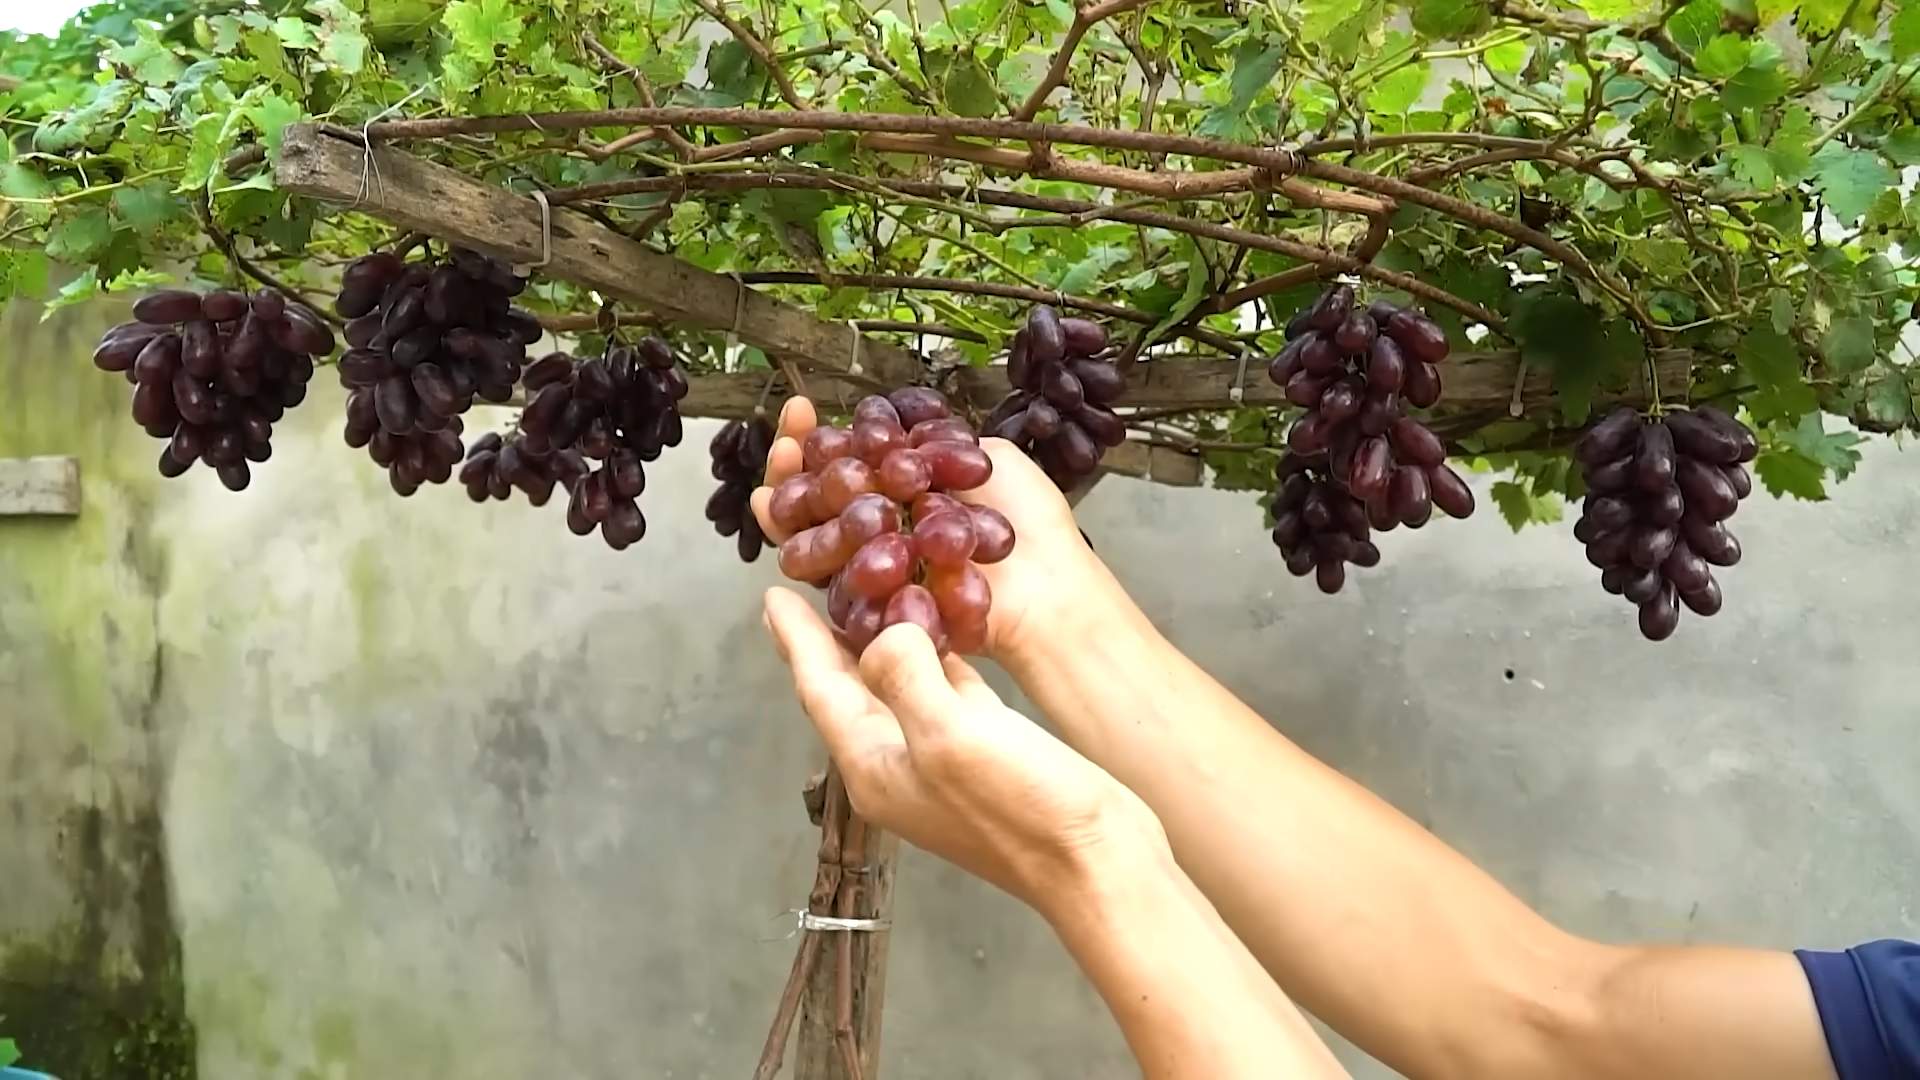
How do I harvest grapes?
Grapes are typically ready to harvest in late summer or early fall, depending on the variety and the climate. The best way to determine if your grapes are ripe is to taste them. Ripe grapes will be sweet and juicy, with a rich flavor. The color of the grapes will also change as they ripen. Use pruning shears or scissors to cut the grape clusters from the vine. Handle the grapes gently to avoid bruising them. Store harvested grapes in the refrigerator for up to a week.
Leave a Comment