

Grapevine Water Propagation DIY: Unlock the secrets to multiplying your grapevines with this simple, yet incredibly rewarding, method! Have you ever admired a friend’s lush grapevine and wished you could have one just like it? Or perhaps you’re looking to expand your vineyard without breaking the bank? Well, you’re in the right place! For centuries, gardeners have sought ways to propagate their favorite plants, and while traditional methods can be complex, water propagation offers a surprisingly easy and effective solution, especially for grapevines.
Grapevines hold a special place in history and culture, symbolizing abundance, celebration, and connection. From ancient winemaking traditions to the modern-day hobbyist, the allure of growing your own grapes remains strong. But let’s face it, buying new grapevines can be expensive, and sometimes the varieties you want are hard to find. That’s where this grapevine water propagation DIY guide comes in. I’m going to show you how to take cuttings from existing grapevines and coax them into developing roots, all in the comfort of your own home, using just water and a little bit of patience.
This DIY trick is a game-changer because it’s cost-effective, beginner-friendly, and allows you to clone your favorite grapevine varieties. Imagine having a thriving grapevine collection, all started from a single plant! Plus, it’s incredibly satisfying to watch those tiny roots emerge, knowing you’ve played a part in creating new life. So, grab your pruning shears, a jar of water, and let’s get started on this exciting journey of grapevine propagation!
DIY Grapevine Propagation: From Cutting to Rooted Vine
Hey there, fellow gardening enthusiasts! Ever wanted to clone your favorite grapevine? It’s totally doable, and honestly, super rewarding. I’m going to walk you through how to propagate grapevines using water propagation – a method that’s surprisingly simple and lets you watch those roots sprout!
What You’ll Need
Before we dive in, let’s gather our supplies. This is a pretty low-cost project, which is always a win in my book!
* Grapevine Cuttings: These are the stars of the show! You’ll want dormant, hardwood cuttings taken in late winter or early spring.
* Sharp Pruning Shears or Knife: Clean cuts are crucial for success.
* Rooting Hormone (Optional but Recommended): This gives your cuttings a little boost.
* Clean Glass Jars or Containers: For holding the water and cuttings.
* Water: Tap water is fine, but distilled or filtered water is even better.
* Spray Bottle: For misting the cuttings.
* Well-Draining Potting Mix: For planting the rooted cuttings.
* Small Pots: To house your new baby grapevines.
* Labels and a Marker: To keep track of your varieties (trust me, you’ll want this!).
* A Bright, Indirect Light Source: Think a sunny windowsill, but not direct scorching sun.
Choosing and Preparing Your Grapevine Cuttings
Okay, let’s talk cuttings. This is where it all begins!
1. Timing is Key: The best time to take cuttings is during the dormant season, typically late winter or early spring before the buds start to swell. I usually aim for February or March, depending on the weather in my area.
2. Selecting the Right Wood: Look for healthy, one-year-old wood. This means the growth from the previous season. It should be about the thickness of a pencil and have several healthy buds. Avoid cuttings that are thin, weak, or show signs of disease.
3. Making the Cuts: Using your sharp, clean pruning shears or knife, make a cut about 1/4 inch below a node (the point where a bud grows). This is where roots will often emerge. The bottom cut should be at a slight angle. Then, make another cut about 1/4 inch above a node, leaving you with a cutting that’s typically 6-12 inches long. I usually aim for around 8 inches.
4. Preparing the Cuttings: Remove any leaves or tendrils from the cutting. You want all the energy focused on root development, not leaf production.
5. Optional Rooting Hormone: Dip the bottom end of the cutting (the angled cut) into rooting hormone powder or liquid. This isn’t strictly necessary, but it can significantly increase your success rate. I’ve had good luck with both powder and liquid forms. Just follow the instructions on the product label.
The Water Propagation Process
Now for the fun part – watching those roots grow!
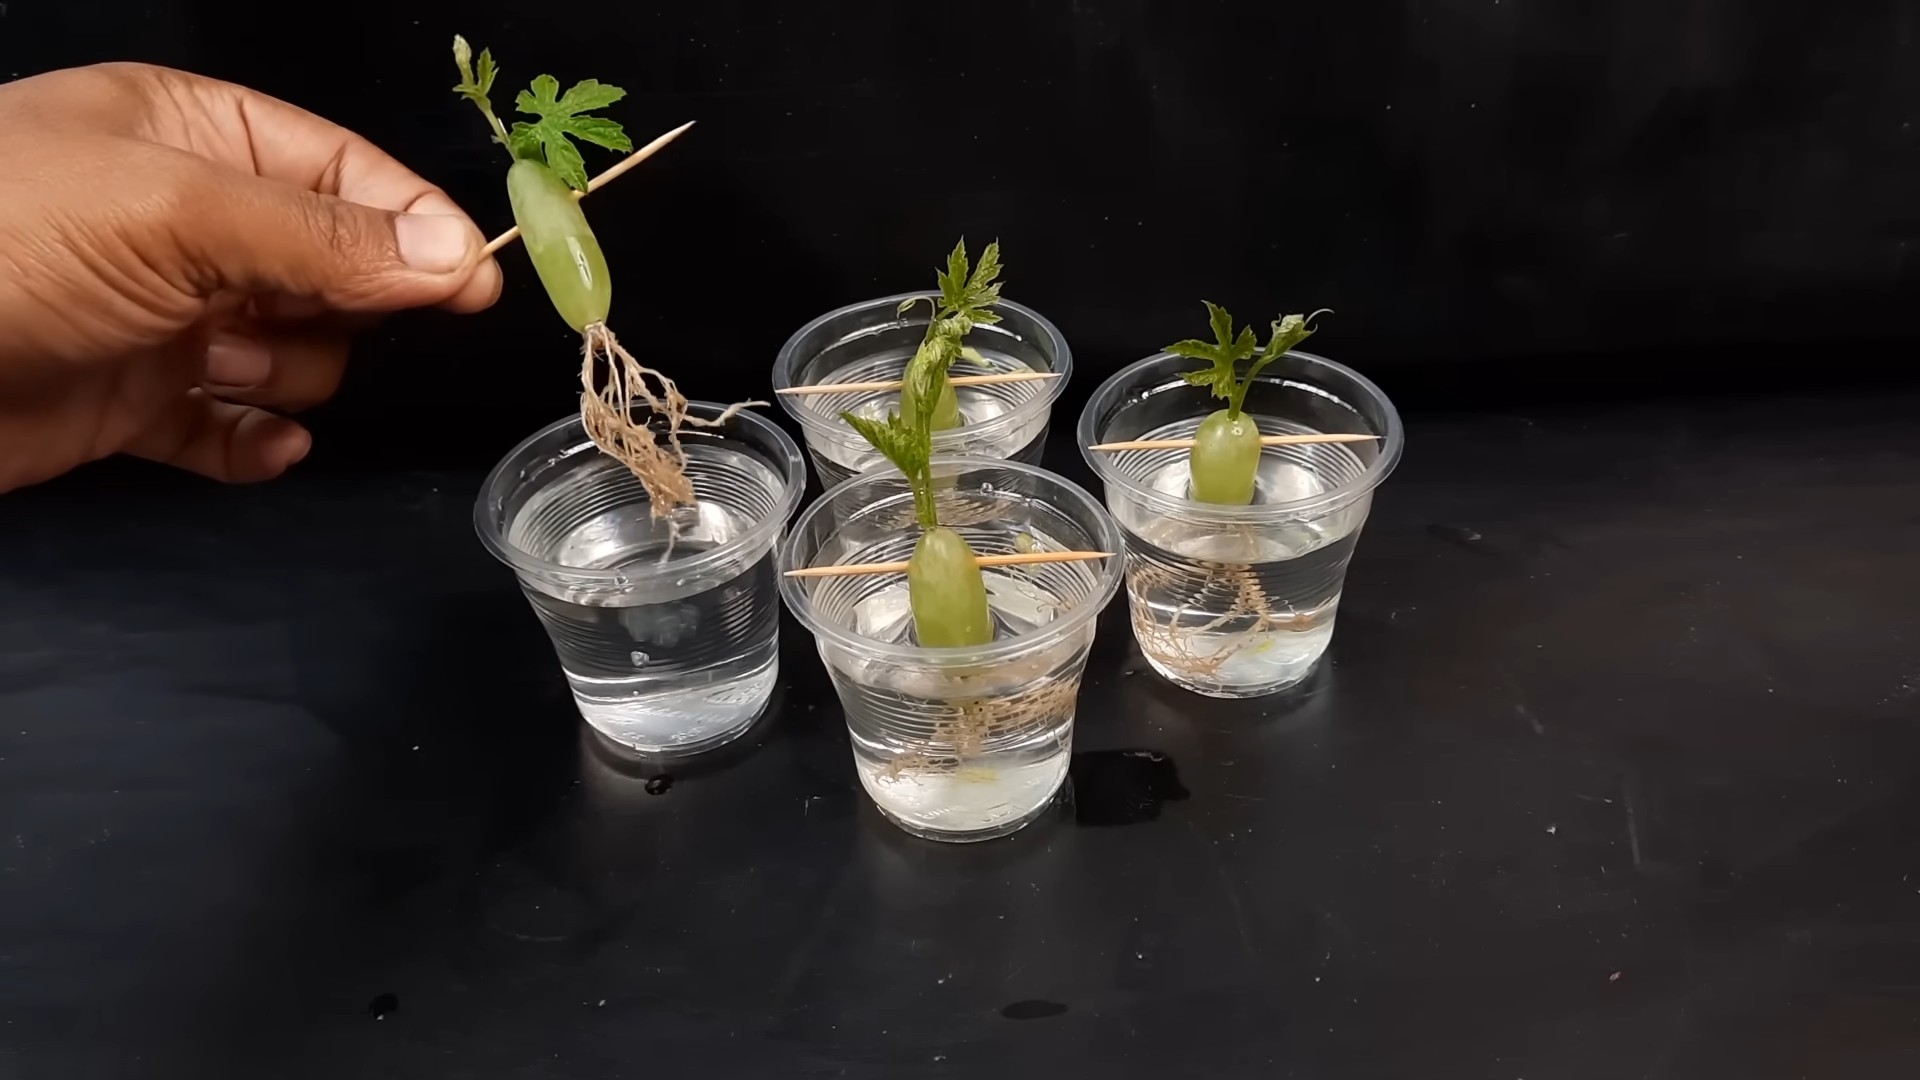
1. Prepare Your Containers: Fill your clean glass jars or containers with water. Make sure the water is fresh and clean.
2. Place the Cuttings in Water: Place the cuttings in the water, ensuring that the bottom node (the one you dipped in rooting hormone, if you used it) is submerged. Don’t overcrowd the container; give each cutting some space.
3. Find the Right Spot: Place the containers in a bright location with indirect sunlight. Avoid direct sunlight, as it can overheat the water and damage the cuttings. A sunny windowsill that gets filtered light is perfect.
4. Maintain the Water: Change the water every few days to keep it fresh and prevent the growth of algae or bacteria. This is super important! I usually change mine every 2-3 days.
5. Misting is Your Friend: Mist the cuttings with water every day to keep them hydrated. This helps prevent them from drying out before roots develop.
6. Patience is a Virtue: Now comes the waiting game. It can take several weeks for roots to start forming. Be patient and keep an eye on the cuttings. Don’t be discouraged if some cuttings don’t root; that’s perfectly normal.
Planting Your Rooted Grapevine Cuttings
Once you see a good network of roots (usually about 1-2 inches long), it’s time to plant your new grapevines!
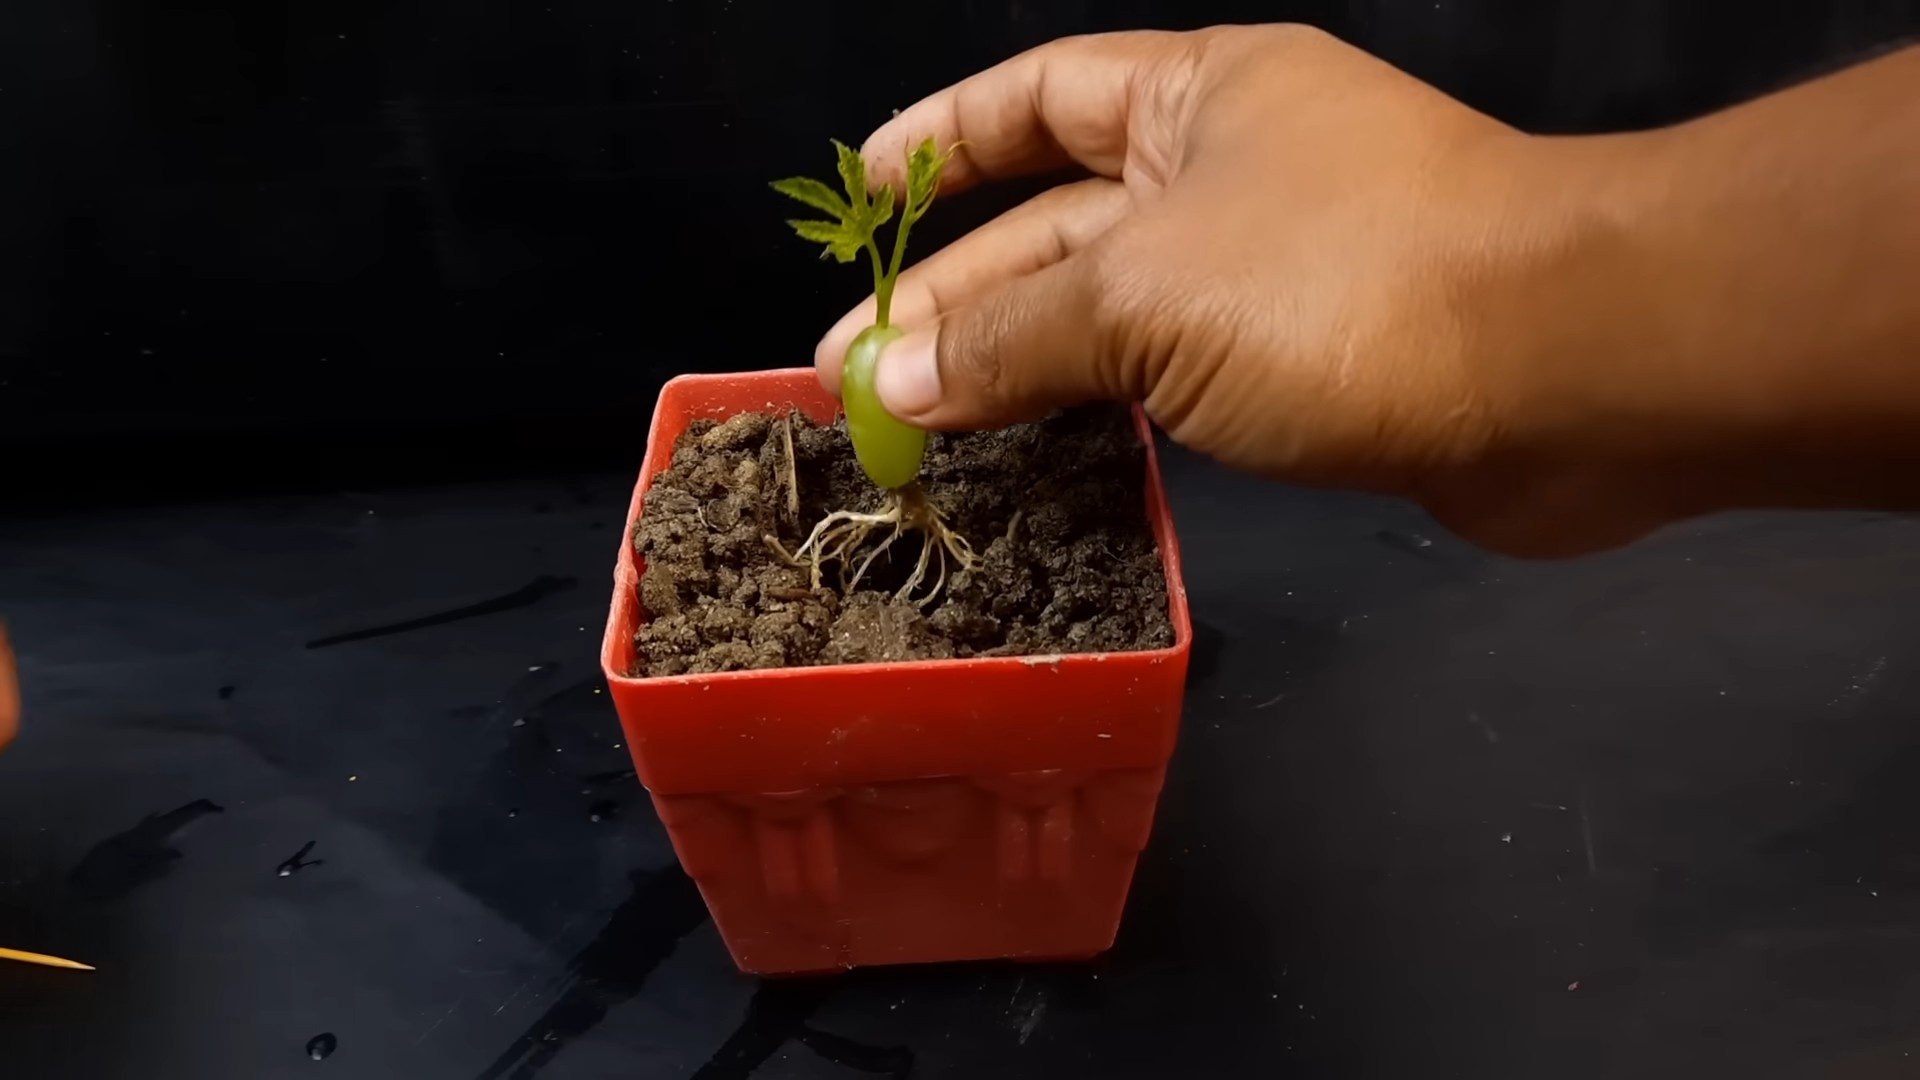
1. Prepare Your Pots: Fill your small pots with well-draining potting mix. I like to use a mix specifically formulated for seedlings or cuttings.
2. Carefully Remove the Cuttings: Gently remove the rooted cuttings from the water. Be careful not to damage the delicate roots.
3. Plant the Cuttings: Make a small hole in the potting mix and carefully place the rooted cutting in the hole. Gently backfill with potting mix, making sure the roots are covered.
4. Water Thoroughly: Water the newly planted cuttings thoroughly, allowing the excess water to drain out of the bottom of the pot.
5. Provide Consistent Moisture: Keep the potting mix consistently moist, but not soggy. Water when the top inch of soil feels dry to the touch.
6. Acclimatize to Outdoor Conditions: Gradually acclimatize the young grapevines to outdoor conditions before planting them in their permanent location. Start by placing them in a sheltered spot outdoors for a few hours each day, gradually increasing the amount of time they spend outside over the course of a week or two. This helps them adjust to the sun and wind.
7. Choose a Sunny Location: Grapevines need plenty of sunshine to thrive. Choose a location that receives at least 6-8 hours of direct sunlight per day.
8. Planting in the Ground: Dig a hole that is twice as wide and as deep as the pot. Gently remove the grapevine from the pot and place it in the hole. Backfill with soil, making sure the top of the root ball is level with the ground. Water thoroughly.
9. Support System: Grapevines need a support system to climb on. Install a trellis, arbor, or fence near the planting location.
Troubleshooting Tips
Even with the best intentions, things don’t always go as planned. Here are a few common issues you might encounter and how to deal with them:
* Cuttings Rotting: This is usually caused by bacteria or fungus in the water. Make sure to change the water frequently and use clean containers. You can also add a drop or two of hydrogen peroxide to the water to help prevent rot.
* No Root Development: This could be due to several factors, including poor quality cuttings, insufficient light, or inconsistent moisture. Make sure you’re using healthy cuttings, providing adequate light, and keeping the water fresh. Rooting hormone can also help.
* Mold Growth: If you see mold growing on the cuttings, gently wipe it off with a damp cloth. Make sure the cuttings are getting good air circulation.
* Yellowing Leaves: This could be a sign of overwatering or underwatering. Adjust your watering schedule accordingly.
Extra Tips for Success
Here are a few extra tips I’ve learned over the years that can help you increase your chances of success:
* Take More Cuttings Than You Need: Not all cuttings will root, so it’s always a good idea to take more than you need. This way, you’ll have a better chance of ending up with a few healthy, rooted grapevines.
* Label Everything: Trust me on this one! Label each container with the variety of grapevine you’re propagating. It’s easy to forget which is which, especially if you’re propagating multiple varieties.
* Be Patient: Rooting grapevines takes time. Don’t get discouraged if you don’t see roots right away. Just keep providing the cuttings with the right conditions, and they’ll eventually root.
* Research Your Grape Variety: Different grape varieties have different needs. Do some research to find out what the specific requirements are for the variety you’re propagating.
* Consider Air Layering: If you want to propagate a grapevine without taking cuttings, you can try air layering. This involves rooting a branch while it’s still attached to the parent plant.
Enjoy the Process!
Propagating grapevines is a fun and rewarding project. It’s a great way to expand your vineyard or share your favorite grape varieties with friends and family. So, grab your pruning shears, gather your supplies, and get ready to grow some grapes! Happy gardening!
Conclusion
So, there you have it! Transforming grapevine cuttings into thriving new plants using the simple yet effective water propagation method is not just a fun project; it’s a rewarding way to expand your vineyard, share the joy of grape growing with friends, and connect with nature on a deeper level. This grapevine water propagation DIY technique offers a high success rate, especially when compared to directly planting cuttings in soil, which can be more susceptible to rot and environmental stressors.
The beauty of this method lies in its simplicity and the visual feedback it provides. Watching those tiny roots emerge from the cuttings is incredibly satisfying and gives you a clear indication of when your new grapevine is ready to be planted. Plus, it’s a cost-effective way to propagate grapevines, saving you money on purchasing new plants.
Don’t be afraid to experiment with different types of grapevines. While this guide focuses on general principles, you might find that certain varieties respond better to water propagation than others. Consider trying different types of containers, too. While clear glass jars are ideal for observing root growth, you can also use opaque containers, just remember to check the water level and change it regularly.
For those looking to accelerate the rooting process, consider using a rooting hormone. While not strictly necessary, a rooting hormone can stimulate root development and increase the chances of success, especially with more challenging grapevine varieties. You can find rooting hormones at most garden centers in powder or liquid form.
Another variation to consider is the addition of an air stone to the water. An air stone, typically used in aquariums, can help oxygenate the water, which can further promote root growth. This is particularly beneficial if you’re propagating multiple cuttings in the same container.
Remember to be patient. Root development can take several weeks, so don’t be discouraged if you don’t see results immediately. Keep the water clean, the cuttings in a bright location, and trust the process.
We wholeheartedly encourage you to try this grapevine water propagation DIY method. It’s a fantastic way to learn more about plant propagation, expand your grapevine collection, and enjoy the fruits (literally!) of your labor. Once you’ve successfully propagated your grapevines, don’t hesitate to share your experiences with us! We’d love to hear about your successes, challenges, and any tips you’ve discovered along the way. Share your photos and stories on social media using relevant hashtags, and let’s build a community of grapevine propagation enthusiasts! Happy growing!
Frequently Asked Questions (FAQ)
Q: What is the best time of year to take grapevine cuttings for water propagation?
A: The ideal time to take grapevine cuttings is during the dormant season, typically in late winter or early spring, before the buds begin to swell. This is when the grapevine is storing energy and the cuttings are most likely to root successfully. Avoid taking cuttings during the growing season, as they may not root as easily and can be more susceptible to disease.
Q: How long should the grapevine cuttings be?
A: Grapevine cuttings should be approximately 6-8 inches long and about the thickness of a pencil. It’s important to select healthy, disease-free wood for your cuttings. Make sure each cutting has at least 3-4 nodes (the points where leaves or buds grow).
Q: What kind of water should I use for grapevine water propagation?
A: It’s best to use distilled or filtered water for grapevine water propagation. Tap water can contain chlorine and other chemicals that can inhibit root growth. If you must use tap water, let it sit out for 24 hours to allow the chlorine to evaporate.
Q: How often should I change the water?
A: You should change the water every 3-5 days to prevent the growth of bacteria and algae. This will also help to keep the water oxygenated, which is essential for root development. When changing the water, gently rinse the cuttings to remove any debris.
Q: How long does it take for grapevine cuttings to root in water?
A: Root development can take anywhere from 2-6 weeks, depending on the grapevine variety, environmental conditions, and the health of the cuttings. Be patient and continue to change the water regularly. You’ll know the cuttings are ready to be planted when the roots are about 1-2 inches long.
Q: What kind of light do grapevine cuttings need during water propagation?
A: Grapevine cuttings need bright, indirect light during water propagation. Avoid placing them in direct sunlight, as this can scorch the cuttings and overheat the water. A location near a window with filtered sunlight is ideal.
Q: Can I use rooting hormone to help grapevine cuttings root faster?
A: Yes, using rooting hormone can help grapevine cuttings root faster and increase the chances of success. Dip the cut end of the cutting in rooting hormone powder or liquid before placing it in water. Follow the instructions on the rooting hormone packaging.
Q: What do I do after the grapevine cuttings have rooted?
A: Once the grapevine cuttings have developed roots that are about 1-2 inches long, they are ready to be planted in soil. Choose a well-draining potting mix and plant the cuttings in individual pots. Water the newly planted cuttings thoroughly and keep the soil moist but not waterlogged. Gradually acclimate the cuttings to outdoor conditions before planting them in their permanent location.
Q: What are some common problems with grapevine water propagation and how can I fix them?
A: Some common problems include:
* **Rotting:** This can be caused by using contaminated water or allowing the cuttings to sit in stagnant water. Change the water regularly and use distilled or filtered water.
* **Lack of root growth:** This can be caused by insufficient light, poor water quality, or unhealthy cuttings. Ensure the cuttings are in a bright location, change the water regularly, and use healthy cuttings.
* **Algae growth:** This can be prevented by changing the water regularly and using a clean container.
Q: Can I propagate any type of grapevine using water propagation?
A: While water propagation can be successful with many types of grapevines, some varieties may be more challenging than others. Experimenting with different varieties is part of the fun! Research the specific needs of the grapevine variety you’re trying to propagate to increase your chances of success.

Leave a Comment