

Grow Avocados at Home? Absolutely! Imagine plucking a perfectly ripe avocado, grown with your own two hands, right from your backyard. Sounds like a dream, right? Well, it doesn’t have to be! This isn’t just about having fresh guacamole ingredients on demand; it’s about connecting with nature and experiencing the satisfaction of nurturing life from a single seed.
Avocados have a rich history, dating back thousands of years in Central and South America, where they were revered by ancient civilizations like the Aztecs and Mayans. They weren’t just a food source; they held cultural and symbolic significance. Now, you can bring a piece of that history into your own home!
Let’s face it, store-bought avocados can be a gamble. Sometimes they’re rock hard, other times they’re overripe and mushy. But when you grow avocados at home, you’re in control. You’ll know exactly when they’re ready to harvest, ensuring the perfect texture and flavor every time. Plus, it’s a fantastic way to reduce your carbon footprint and enjoy fresh, healthy food. I’m going to share some simple, yet effective DIY tricks and hacks that will guide you through the process, even if you don’t have a green thumb. Get ready to embark on an exciting journey of growing your own delicious avocados!

Grow Your Own Avocado Tree From Seed: A Step-by-Step Guide
Hey there, fellow plant enthusiasts! Ever dreamt of having your own avocado tree, laden with delicious, creamy avocados? Well, you can! Growing an avocado tree from seed is a surprisingly rewarding and relatively simple DIY project. It takes patience, sure, but the satisfaction of nurturing a tiny seed into a thriving tree is totally worth it. I’m going to walk you through the whole process, from prepping the pit to (hopefully!) enjoying your own homegrown avocados someday.
What You’ll Need
Before we dive in, let’s gather our supplies. You probably have most of these things already!
* An avocado pit (obviously!)
* Three toothpicks
* A glass or jar
* Water
* Potting soil
* A small pot (4-6 inches in diameter)
* A larger pot (8-10 inches in diameter) – for transplanting later
* A sunny spot
* Patience!
Choosing Your Avocado Pit
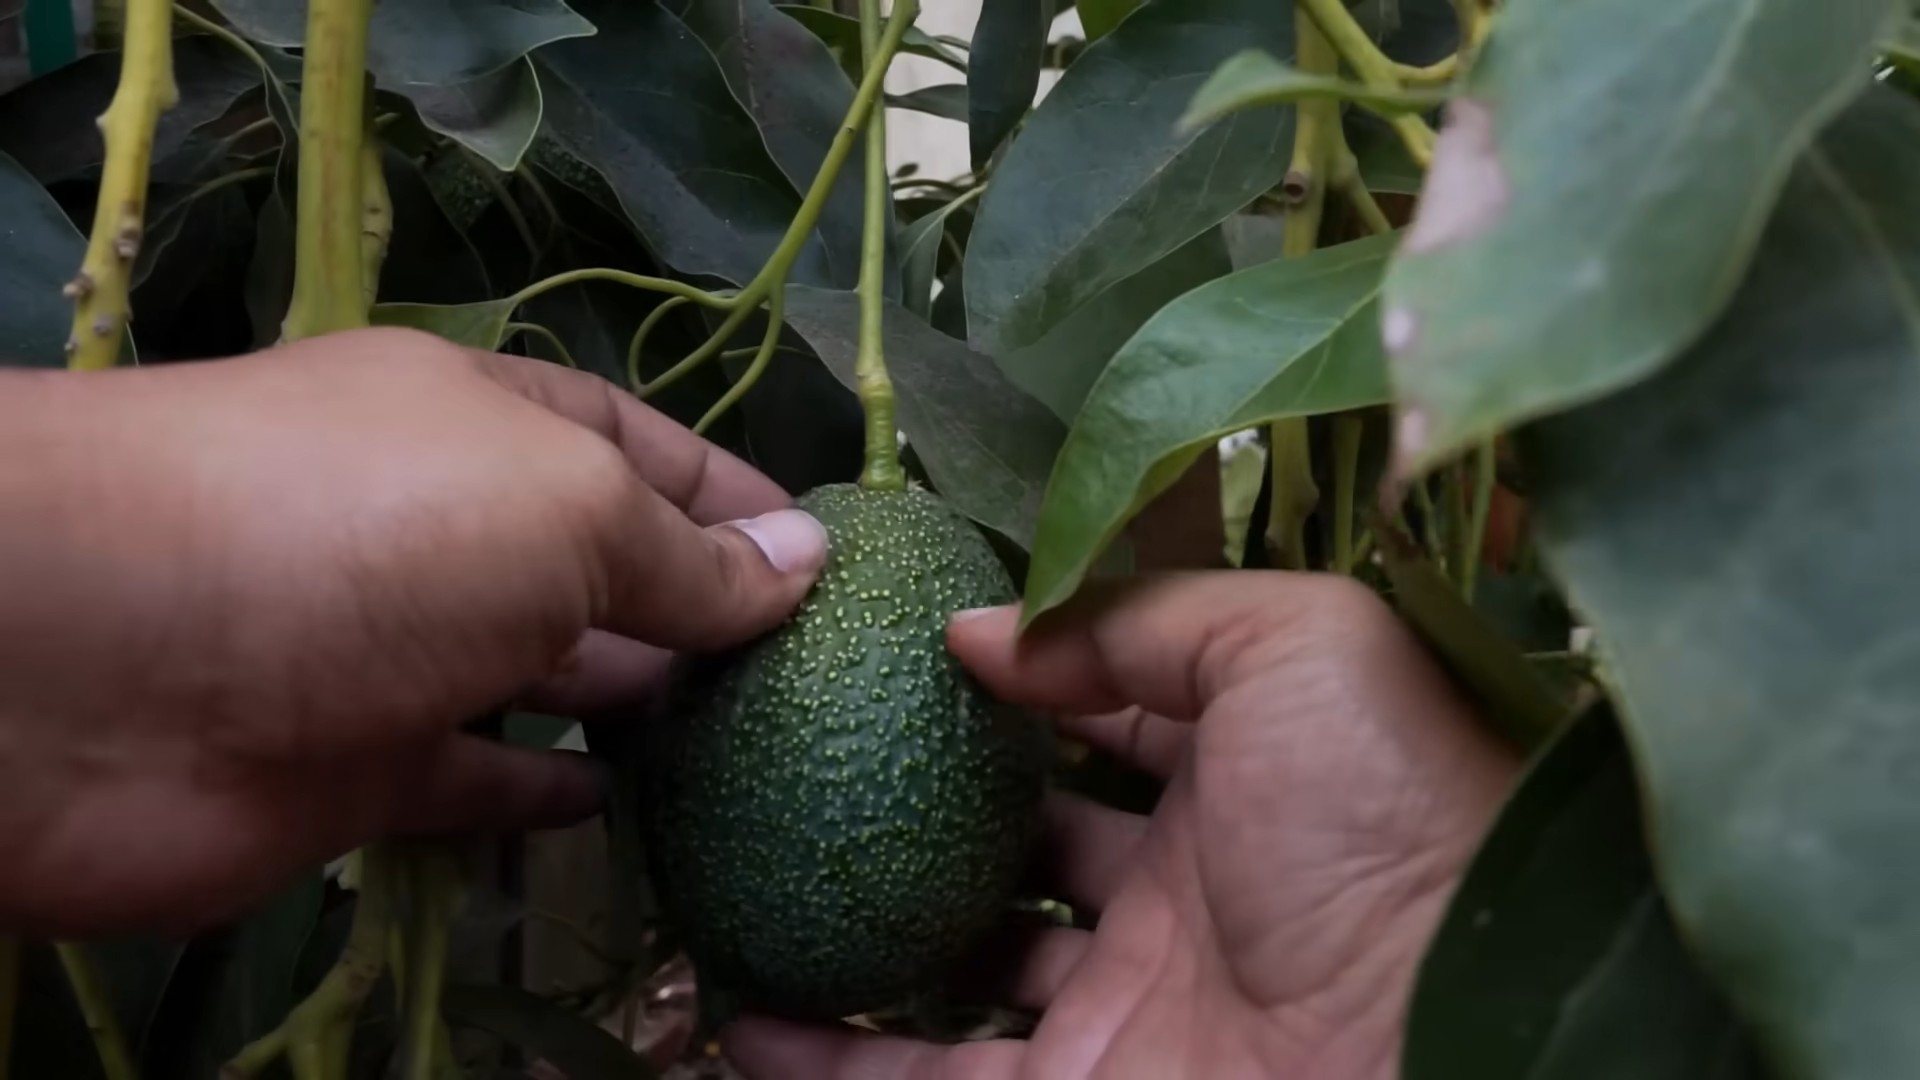
The first step is enjoying an avocado! When you’re done with the delicious green goodness, carefully remove the pit. Try not to cut into it with your knife. A clean, undamaged pit is more likely to sprout.
* Tip: The variety of avocado you eat will determine the type of avocado your tree *could* produce. However, trees grown from seed don’t always produce fruit identical to the parent avocado. It’s a bit of a genetic lottery!
Preparing the Avocado Pit for Sprouting
This is where the magic begins! We’re going to coax that pit into sprouting roots.
1. Clean the pit: Gently wash the avocado pit under cool water. Remove any remaining avocado flesh. This helps prevent mold growth.
2. Identify the top and bottom: The avocado pit has a slightly pointed end (the top) and a flatter end (the bottom). The roots will emerge from the bottom, and the sprout will emerge from the top.
3. Insert the toothpicks: This is crucial for suspending the pit in water. Insert three toothpicks evenly spaced around the middle of the pit. Angle them slightly downwards so they can rest on the rim of your glass or jar.
* Important: Don’t push the toothpicks in too far! You only need them to hold the pit in place. About 1/4 inch is usually enough.
4. Suspend the pit in water: Fill your glass or jar with enough water so that the bottom inch of the avocado pit is submerged. The toothpicks should keep the rest of the pit dry.
5. Find a sunny spot: Place the glass or jar in a warm, sunny location, but avoid direct, intense sunlight, which can overheat the water. A windowsill is usually perfect.
6. Change the water regularly: Every 1-2 days, pour out the old water and replace it with fresh water. This helps prevent bacteria and mold from growing.
The Waiting Game: Sprouting Time
Now comes the hard part: waiting! This process can take anywhere from 2 to 8 weeks, sometimes even longer. Don’t get discouraged if you don’t see anything happening right away. Just keep changing the water and be patient.
* What to look for: Eventually, you’ll notice the top of the pit starting to crack. This is a good sign! Soon, a small root will emerge from the bottom, and a sprout will appear from the top.
* Troubleshooting: If your pit develops mold, gently wash it off and change the water more frequently. If the pit rots, unfortunately, you’ll need to start with a new one.
Planting Your Sprouted Avocado Pit
Once your avocado pit has a good root system (2-3 inches long) and a sprout that’s a few inches tall, it’s time to plant it in soil!
1. Prepare your pot: Fill your small pot (4-6 inches) with well-draining potting soil. Make a hole in the center that’s large enough to accommodate the avocado pit and its roots.
2. Plant the pit: Carefully remove the avocado pit from the water. Gently place it in the hole, making sure the roots are pointing downwards. The top half of the pit should still be exposed above the soil line.
3. Water thoroughly: Water the soil until it’s evenly moist, but not soggy.
4. Place in a sunny spot: Return the pot to a sunny location.
Caring for Your Avocado Seedling
Now that your avocado pit is planted, it’s time to provide it with the care it needs to thrive.
1. Watering: Water your avocado seedling regularly, keeping the soil consistently moist but not waterlogged. Allow the top inch of soil to dry out between waterings. Overwatering can lead to root rot.
2. Sunlight: Avocado trees need plenty of sunlight. Aim for at least 6 hours of direct sunlight per day. If you don’t have a sunny spot indoors, you may need to supplement with a grow light.
3. Fertilizing: Once your seedling is a few months old, you can start fertilizing it with a balanced liquid fertilizer diluted to half strength. Fertilize every 2-3 weeks during the growing season (spring and summer).
4. Pruning: As your avocado tree grows, you may want to prune it to encourage branching and a bushier shape. You can pinch off the top growth to promote side shoots.
5. Repotting: When your avocado tree outgrows its small pot (you’ll notice roots circling the bottom), it’s time to transplant it to a larger pot (8-10 inches). Gently remove the tree from its old pot and place it in the new pot, filling in with fresh potting soil.
Overwintering Your Avocado Tree
If you live in a climate with cold winters, you’ll need to bring your avocado tree indoors during the colder months.
1. Acclimatize: Before bringing your tree indoors, gradually acclimatize it to the lower light levels by placing it in a shadier spot for a week or two.
2. Indoor care: Provide your avocado tree with as much sunlight as possible indoors. Water it less frequently during the winter months, as it won’t be growing as actively.
3. Humidity: Indoor air can be dry during the winter. Increase humidity around your avocado tree by misting it regularly or placing it on a pebble tray filled with water.
4. Pest control: Keep an eye out for pests like spider mites and aphids, which can be more common indoors. Treat any infestations promptly with insecticidal soap.
Patience is Key!
Growing an avocado tree from seed is a long-term project. It can take several years for a tree grown from seed to produce fruit, and even then, there’s no guarantee that it will. However, the journey is just as rewarding as the destination. Enjoy watching your little seedling grow into a beautiful tree!
* Important Note: Avocado trees grown from seed often don’t produce fruit that is true to the parent variety. The fruit may be different in size, shape, or flavor. Grafting a branch from a known fruiting variety onto your seedling is the best way to ensure you get the type of avocados you want. Grafting is a more advanced technique, but there are plenty of resources online if you’re interested in learning more.
Troubleshooting Common Issues
Even with the best care, you might encounter some challenges along the way. Here are a few common issues and how to address them:
* Yellowing leaves: This can be caused by overwatering, underwatering, nutrient deficiencies, or pest infestations. Check the soil moisture, fertilize if necessary, and inspect for pests.
* Brown leaf tips: This is often a sign of dry air or salt buildup in the soil. Increase humidity and flush the soil with water to remove excess salts.
* Leaf drop: This can be caused by sudden changes in temperature, light, or watering. Try to maintain consistent conditions and avoid stressing the tree.
* Slow growth: This can be due to insufficient sunlight, nutrients, or water. Make sure your tree is getting enough light, fertilize regularly, and water as needed.
Enjoy the Process!
Growing an avocado tree from seed is a fun and educational experience. Don’t be afraid to experiment and learn as you go. Even if you don’t end up with a tree full of avocados, you’ll still have a beautiful and unique plant to enjoy. Good luck, and happy growing!
Conclusion
So, there you have it! Growing avocados at home, while requiring patience, is an incredibly rewarding experience. It’s not just about having fresh avocados readily available; it’s about connecting with nature, understanding the life cycle of a plant, and enjoying the satisfaction of nurturing something from seed to (eventually!) fruit. This DIY trick, using the water suspension method, is a fantastic starting point for anyone curious about cultivating their own avocado tree.
Why is this a must-try? Because it’s accessible, affordable, and educational. You likely already have everything you need in your kitchen. It’s a fantastic project for families, teaching children about botany and the importance of sustainable practices. Plus, imagine the bragging rights when you can say, “I grew this avocado myself!”
But don’t stop there! Once your avocado seed sprouts and develops a healthy root system, consider experimenting with different potting mixes. Some gardeners swear by well-draining soil rich in organic matter, while others prefer a slightly acidic blend. You can also explore different varieties of avocados. While starting from seed won’t guarantee the same type of avocado as the parent fruit, it opens the door to a unique and potentially delicious surprise.
Another variation to consider is grafting. Once your seedling is established, you can graft a cutting from a known, high-yielding avocado tree onto your seedling’s rootstock. This ensures you get the specific type of avocado you desire and accelerates the fruiting process. Grafting requires some skill and research, but it’s a worthwhile endeavor for serious avocado enthusiasts.
Remember, growing avocados at home is a journey, not a race. There will be challenges along the way, but the rewards are well worth the effort. From the initial excitement of seeing the seed crack open to the eventual (and potentially years-away) harvest of your own homegrown avocados, this is a project that will bring joy and satisfaction for years to come.
We wholeheartedly encourage you to try this DIY trick for growing avocados at home. It’s a simple, effective, and engaging way to bring a touch of the tropics to your own backyard. And most importantly, don’t forget to share your experience! Post pictures of your sprouting seeds, share your tips and tricks, and let us know what challenges you encounter. Your insights can help other aspiring avocado growers on their own journey. Let’s create a community of home avocado growers, sharing our knowledge and celebrating our successes together. So, grab an avocado seed, some toothpicks, and a glass of water, and get started today! You might be surprised at what you can achieve.
Frequently Asked Questions (FAQ)
Q: How long does it take for an avocado seed to sprout?
A: The sprouting time for an avocado seed can vary significantly. Generally, you can expect to see the seed crack open and begin to sprout within 2 to 8 weeks. However, some seeds may take longer, even up to 3 months. Factors such as the freshness of the seed, the temperature, and the humidity can all influence the sprouting time. Patience is key! Ensure the bottom half of the seed remains submerged in water and that the water is changed regularly to prevent mold growth.
Q: What kind of water should I use?
A: Tap water is generally fine to use for sprouting avocado seeds. However, if your tap water is heavily chlorinated, it’s best to let it sit out for 24 hours before using it to allow the chlorine to dissipate. Alternatively, you can use filtered water or bottled water. The most important thing is to ensure the water is clean and changed regularly to prevent the growth of bacteria or mold.
Q: My avocado seed split, but nothing else is happening. Is this normal?
A: Yes, the splitting of the avocado seed is the first step in the germination process. It indicates that the seed is absorbing water and preparing to sprout. After the seed splits, you should eventually see a root emerge from the bottom and a sprout emerge from the top. Continue to keep the bottom half of the seed submerged in water and be patient. It can take several weeks or even months for the root and sprout to appear.
Q: The water is turning pink/red. Is this a problem?
A: A slight pink or reddish tint to the water is usually not a cause for concern. It’s often due to natural pigments leaching from the avocado seed. However, if the water becomes cloudy or develops a foul odor, it could indicate bacterial or fungal growth. In this case, discard the water, gently rinse the seed, and refill the glass with fresh water.
Q: When should I plant my avocado seedling in soil?
A: You should plant your avocado seedling in soil when the root is several inches long (ideally 3-4 inches) and the sprout has developed a few leaves. Choose a pot that is at least 6-8 inches in diameter and has drainage holes. Use a well-draining potting mix that is rich in organic matter. Gently remove the seedling from the water, being careful not to damage the roots. Plant the seedling so that the top of the seed is just above the soil line. Water thoroughly after planting.
Q: What kind of soil is best for avocado trees?
A: Avocado trees thrive in well-draining soil that is slightly acidic (pH 6.0-6.5). A good potting mix for avocados should contain a blend of ingredients such as peat moss, perlite, vermiculite, and compost. Avoid heavy clay soils, as they can retain too much water and lead to root rot. You can also amend your soil with organic matter, such as compost or aged manure, to improve drainage and fertility.
Q: How much sunlight does an avocado tree need?
A: Avocado trees need plenty of sunlight to thrive. Aim for at least 6 hours of direct sunlight per day. If you are growing your avocado tree indoors, place it near a sunny window or supplement with a grow light. When moving your avocado tree outdoors, gradually acclimate it to the sun to prevent sunburn.
Q: How often should I water my avocado tree?
A: Water your avocado tree deeply but infrequently. Allow the soil to dry out slightly between waterings. Overwatering can lead to root rot, which is a common problem for avocado trees. Check the soil moisture by sticking your finger into the soil. If the top inch or two feels dry, it’s time to water.
Q: Will my avocado tree produce fruit if grown from seed?
A: Avocado trees grown from seed can produce fruit, but it can take several years (5-13 years or more) for them to mature and begin fruiting. Also, the fruit produced may not be the same as the parent avocado. To ensure you get a specific type of avocado and accelerate the fruiting process, consider grafting a cutting from a known, high-yielding avocado tree onto your seedling’s rootstock.
Q: My avocado leaves are turning brown. What could be the problem?
A: Brown leaves on an avocado tree can be caused by several factors, including:
* **Overwatering or underwatering:** Check the soil moisture and adjust your watering accordingly.
* **Salt buildup:** Avocado trees are sensitive to salt. Flush the soil with plenty of water to remove excess salt.
* **Sunburn:** If the leaves are turning brown on the edges, it could be due to sunburn. Provide some shade during the hottest part of the day.
* **Nutrient deficiencies:** Avocado trees need a balanced supply of nutrients. Fertilize your tree with a fertilizer specifically formulated for avocado trees.
* **Pests or diseases:** Inspect your tree for signs of pests or diseases and treat accordingly.
Q: Can I grow avocados indoors permanently?
A: While you can start an avocado tree indoors, it will eventually need to be moved outdoors to thrive and potentially produce fruit. Indoor conditions often lack the necessary sunlight and humidity for optimal growth. If you live in a climate with cold winters, you can bring your avocado tree indoors during the winter months and move it back outdoors in the spring. However, keep in mind that indoor avocado trees may not fruit as readily as those grown outdoors.

Leave a Comment