

Grow Bitter Melon Successfully and unlock a world of culinary possibilities right in your backyard! Have you ever dreamt of harvesting your own vibrant, knobbly gourds, ready to be transformed into delicious and healthy dishes? Well, stop dreaming and start doing! This DIY guide is your passport to mastering the art of cultivating this unique vegetable, even if you’re a complete beginner.
Bitter melon, also known as bitter gourd or karela, boasts a rich history deeply intertwined with traditional medicine and cuisine across Asia, Africa, and the Caribbean. For centuries, it’s been revered for its potential health benefits and distinctive, albeit acquired, taste. But don’t let the “bitter” scare you away! With the right techniques, you can minimize the bitterness and maximize the flavor and yield of your homegrown crop.
Why should you embark on this grow bitter melon successfully journey? Because store-bought bitter melon often lacks the freshness and vibrancy of homegrown varieties. Plus, you’ll have complete control over the growing process, ensuring your gourds are free from harmful pesticides and chemicals. Imagine the satisfaction of serving a meal featuring bitter melon you nurtured from seed to table! This DIY guide will provide you with the essential tips and tricks to overcome common challenges, from germination to pest control, ensuring a bountiful harvest. Let’s get started and transform your garden into a bitter melon paradise!
Growing Bitter Melon: A Comprehensive DIY Guide
Hey there, fellow gardening enthusiasts! I’m so excited to share my secrets to successfully growing bitter melon, also known as bitter gourd or karela. It’s a unique and nutritious vegetable, and while it can be a bit challenging, the reward of harvesting your own fresh, bitter melons is totally worth it. This guide will walk you through every step, from seed to harvest, ensuring you have a thriving bitter melon vine.
Choosing the Right Variety and Starting Seeds
First things first, let’s talk about choosing the right variety. There are several types of bitter melon, varying in size, shape, and bitterness. Some popular choices include:
* Chinese Bitter Melon: These are typically longer and lighter green, with smoother skin. They tend to be less bitter than other varieties.
* Indian Bitter Melon: These are smaller, darker green, and have a more bumpy, ridged skin. They are generally more bitter.
* Japanese Bitter Melon: This variety is known for its mild bitterness and is often used in stir-fries.
I personally prefer the Chinese variety because of its milder flavor, but feel free to experiment and find what you like best!
Now, let’s get those seeds started. Bitter melon seeds have a tough outer shell, so scarification and soaking are crucial for successful germination.
1. Scarification: Gently nick the seed coat with a nail file or sandpaper. Be careful not to damage the inner part of the seed. This helps water penetrate the seed more easily.
2. Soaking: Soak the scarified seeds in warm water for 24-48 hours. This further softens the seed coat and encourages germination. I like to change the water every 12 hours to keep it fresh.
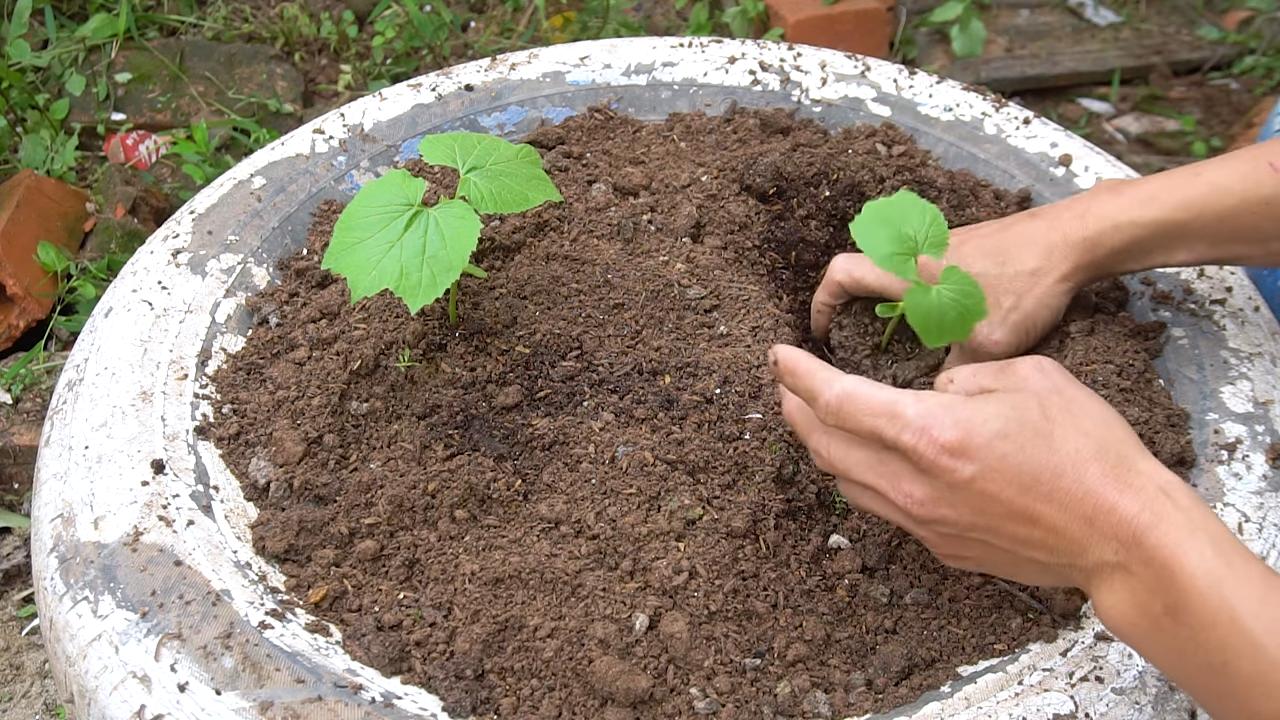
3. Planting: Fill small pots (about 3-4 inches in diameter) with a well-draining potting mix. Plant the soaked seeds about ½ inch deep.
4. Warmth and Moisture: Bitter melon loves warmth! Keep the pots in a warm location (ideally between 75-85°F or 24-29°C). A heat mat can be really helpful if you live in a cooler climate. Water gently to keep the soil consistently moist, but not soggy.
5. Germination: You should see seedlings emerge in about 7-14 days. Once they sprout, move them to a sunny location or under grow lights.
Preparing the Garden Bed and Transplanting Seedlings
Bitter melon needs a sunny spot with well-drained soil. Before transplanting, it’s essential to prepare the garden bed properly.
1. Sunlight: Choose a location that receives at least 6-8 hours of direct sunlight per day.
2. Soil Preparation: Bitter melon prefers slightly acidic to neutral soil (pH 6.0-7.0). Amend the soil with compost or well-rotted manure to improve drainage and fertility. I usually add a generous amount of compost to my garden bed.
3. Trellis Support: Bitter melon is a vine, so it needs a strong trellis or support structure to climb on. You can use a fence, arbor, or build your own trellis using bamboo poles or metal stakes and netting. I’ve found that a sturdy trellis about 6-8 feet tall works best.
4. Transplanting: Once the seedlings have developed a few sets of true leaves (usually after 3-4 weeks), they’re ready to be transplanted. Choose a cloudy day or transplant in the late afternoon to minimize stress on the plants.
5. Spacing: Space the seedlings about 18-24 inches apart along the trellis.
6. Watering: Water the transplanted seedlings thoroughly after planting.
Caring for Your Bitter Melon Vine
Now that your bitter melon is in the ground, it’s time to provide the care it needs to thrive.
1. Watering: Bitter melon needs consistent moisture, especially during hot weather. Water deeply whenever the top inch of soil feels dry. Avoid overwatering, as this can lead to root rot.
2. Fertilizing: Feed your bitter melon plants every 2-3 weeks with a balanced liquid fertilizer. I like to use a fertilizer that’s high in phosphorus and potassium to encourage flowering and fruit production.
3. Pruning: Pruning can help improve air circulation and encourage fruit production. Remove any yellowing or dead leaves. You can also pinch off the tips of the vines to encourage branching.
4. Pollination: Bitter melon has separate male and female flowers. Bees and other pollinators usually take care of pollination, but if you’re not seeing many fruits, you may need to hand-pollinate. To hand-pollinate, use a small paintbrush to transfer pollen from the male flower to the female flower. The female flowers have a small, immature fruit behind the flower.
5. Pest and Disease Control: Keep an eye out for common pests like aphids, spider mites, and squash bugs. You can control these pests with insecticidal soap or neem oil. Powdery mildew can also be a problem, especially in humid conditions. Improve air circulation and treat with a fungicide if necessary.
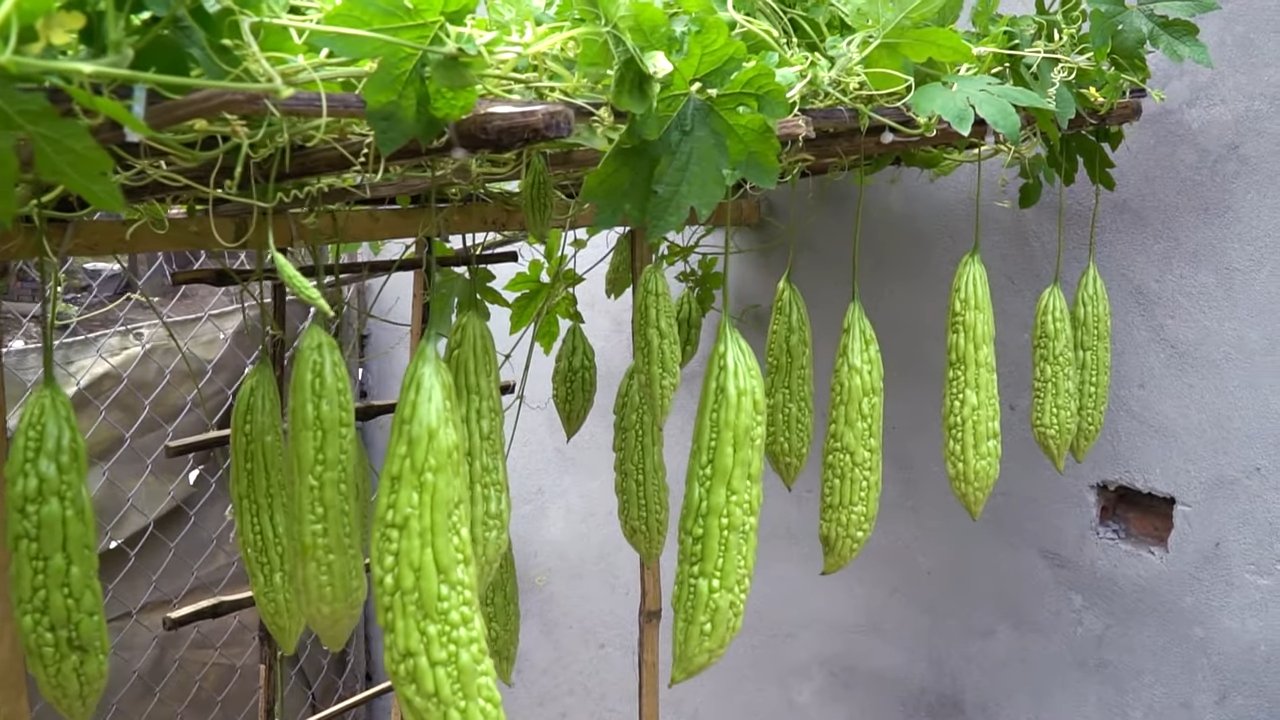
Harvesting Your Bitter Melon
The moment you’ve been waiting for! Harvesting your own bitter melon is so rewarding.
1. Timing: Bitter melon is typically ready to harvest about 2-3 months after planting. The fruits should be firm and have a vibrant green color (or the color specific to your chosen variety).
2. Size: Harvest the fruits when they reach the desired size, depending on the variety. Chinese bitter melons are usually harvested when they are about 8-12 inches long, while Indian bitter melons are harvested when they are about 4-6 inches long.
3. Harvesting Technique: Use a sharp knife or pruning shears to cut the fruit from the vine, leaving a short stem attached.
4. Taste: The bitterness of the fruit increases as it ripens, so harvest when it’s at your preferred level of bitterness.
5. Storage: Store harvested bitter melons in the refrigerator for up to a week.
Troubleshooting Common Problems
Even with the best care, you might encounter some challenges along the way. Here are some common problems and how to address them:
* Poor Germination: If your seeds aren’t germinating, make sure you’ve scarified and soaked them properly. Also, ensure the soil is warm enough.
* Yellowing Leaves: Yellowing leaves can be a sign of overwatering, nutrient deficiency, or pest infestation. Adjust your watering schedule, fertilize regularly, and inspect the plants for pests.
* Lack of Fruit Production: This could be due to poor pollination, insufficient sunlight, or nutrient deficiency. Hand-pollinate if necessary, ensure the plants are getting enough sunlight, and fertilize with a balanced fertilizer.
* Pest Infestation: Regularly inspect your plants for pests and treat them promptly with insecticidal soap or neem oil.
* Disease: Improve air circulation and treat with a fungicide if necessary.
Enjoying Your Harvest
Now that you’ve harvested your bitter melon, it’s time to enjoy the fruits of your labor! Bitter melon can be used in a variety of dishes, from stir-fries to soups to curries. Here are a few tips for preparing bitter melon:
* Reduce Bitterness: To reduce the bitterness, you can soak the sliced bitter melon in salted water for about 30 minutes before cooking. You can also blanch it in boiling water for a few minutes.
* Stir-Fries: Bitter melon is a popular ingredient in stir-fries. It pairs well with ingredients like eggs, tofu, and pork.
* Soups: Add bitter melon to soups for a unique flavor and nutritional boost.
* Juice: Some people enjoy drinking bitter melon juice for its health benefits.
Growing bitter melon can be a rewarding experience. With a little patience and care, you can enjoy fresh, homegrown bitter melon in your favorite dishes. Happy gardening!
Conclusion
So, there you have it! Growing bitter melon successfully doesn’t have to be a daunting task. By implementing these simple yet effective DIY tricks, you can transform your garden into a thriving haven for this unique and nutritious vegetable. We’ve covered everything from seed preparation and soil amendments to trellising techniques and pest control, all designed to maximize your yield and minimize potential frustrations.
Why is this a must-try? Because store-bought bitter melon simply can’t compare to the vibrant flavor and freshness of homegrown. Plus, you have complete control over the growing process, ensuring that your bitter melon is free from harmful pesticides and chemicals. You’ll be rewarded with a bounty of crisp, slightly bitter gourds that are packed with vitamins, minerals, and antioxidants. Think of the delicious and healthy dishes you can create – from stir-fries and soups to refreshing juices and even stuffed bitter melon!
But the benefits extend beyond just the culinary. Gardening itself is a therapeutic activity, offering a chance to connect with nature, reduce stress, and enjoy the satisfaction of nurturing something from seed to harvest. Growing bitter melon successfully adds an element of challenge and reward, making it a truly fulfilling gardening experience.
Consider these variations to personalize your bitter melon growing journey:
* Experiment with different varieties: Explore the diverse world of bitter melon! From the smaller, smoother Chinese varieties to the larger, more heavily textured Indian types, each offers a unique flavor profile and appearance. Try growing a few different varieties side-by-side to discover your personal favorite.
* Vertical gardening: If you’re short on space, embrace vertical gardening! Bitter melon thrives on trellises, fences, or even repurposed structures like old ladders or pallets. This not only maximizes your growing area but also adds visual interest to your garden.
* Companion planting: Enhance your bitter melon’s growth by incorporating companion plants. Marigolds, basil, and nasturtiums can help deter pests, while beans and peas can fix nitrogen in the soil, benefiting your bitter melon plants.
* Seed saving: Once you’ve successfully grown your bitter melon, consider saving the seeds for future planting. This allows you to perpetuate your favorite varieties and become more self-sufficient in your gardening endeavors.
Don’t be intimidated by the slightly bitter taste – it’s an acquired taste that many find incredibly appealing. And remember, the bitterness can be mitigated by blanching the bitter melon before cooking or soaking it in salted water.
We wholeheartedly encourage you to give these DIY tricks a try. Start small, be patient, and don’t be afraid to experiment. The rewards of growing your own bitter melon are well worth the effort.
We’re eager to hear about your experiences! Share your successes, challenges, and any unique tips you discover along the way in the comments section below. Let’s create a community of bitter melon enthusiasts and learn from each other. Happy gardening!
Frequently Asked Questions (FAQ)
What is the best time of year to plant bitter melon?
Bitter melon is a warm-season crop, so the best time to plant it is in late spring or early summer, after the last frost has passed and the soil has warmed up to at least 65°F (18°C). In warmer climates, you can even plant it earlier, as long as you protect the seedlings from any unexpected cold snaps. The key is to ensure that the plants have a long, warm growing season to produce a good harvest. If you live in an area with a short growing season, consider starting the seeds indoors 4-6 weeks before the last expected frost.
How much sunlight does bitter melon need?
Bitter melon thrives in full sunlight, requiring at least 6-8 hours of direct sunlight per day. Insufficient sunlight can lead to weak growth, reduced flowering, and smaller, less flavorful fruits. Choose a planting location that receives ample sunlight throughout the day. If you’re growing bitter melon indoors, use grow lights to supplement natural sunlight, especially during the shorter days of winter.
What type of soil is best for growing bitter melon?
Bitter melon prefers well-drained, fertile soil that is rich in organic matter. The ideal soil pH is between 6.0 and 7.0. Before planting, amend the soil with compost, aged manure, or other organic materials to improve its drainage, fertility, and water-holding capacity. Avoid heavy clay soils, as they can become waterlogged and hinder root growth. If you have clay soil, consider growing bitter melon in raised beds or containers with a well-draining potting mix.
How often should I water bitter melon plants?
Bitter melon plants need consistent moisture, especially during hot, dry weather. Water deeply and regularly, aiming to keep the soil consistently moist but not waterlogged. Check the soil moisture regularly by sticking your finger about an inch deep into the soil. If it feels dry, it’s time to water. Avoid overhead watering, as it can promote fungal diseases. Instead, water at the base of the plants, using a soaker hose or drip irrigation system. Mulching around the plants can also help retain moisture and suppress weeds.
How do I control pests and diseases on my bitter melon plants?
Bitter melon plants can be susceptible to various pests and diseases, including aphids, spider mites, squash bugs, and powdery mildew. To prevent problems, practice good garden hygiene, such as removing weeds and debris around the plants. Inspect your plants regularly for signs of pests or diseases, and take action promptly if you notice any problems. You can use organic pest control methods, such as insecticidal soap, neem oil, or diatomaceous earth, to control pests. For fungal diseases, ensure good air circulation around the plants and avoid overhead watering. You can also use organic fungicides, such as copper fungicide or sulfur, to control fungal diseases. Companion planting with marigolds, basil, or nasturtiums can also help deter pests.
How do I know when my bitter melon is ready to harvest?
Bitter melon is typically ready to harvest about 8-12 weeks after planting, depending on the variety and growing conditions. The fruits are usually harvested when they are still green and firm, before they turn yellow or orange. The size of the fruit at harvest will vary depending on the variety, but generally, you should harvest them when they are about 6-10 inches long. Use a sharp knife or pruning shears to cut the fruit from the vine, leaving a short stem attached. Overripe bitter melon will become bitter and less palatable.
Can I grow bitter melon in containers?
Yes, you can successfully grow bitter melon in containers, especially if you have limited garden space. Choose a large container, at least 12-18 inches in diameter, with good drainage holes. Use a well-draining potting mix that is rich in organic matter. Provide a trellis or other support for the vines to climb on. Water regularly and fertilize every 2-3 weeks with a balanced fertilizer. Place the container in a sunny location that receives at least 6-8 hours of direct sunlight per day.
How do I reduce the bitterness of bitter melon?
The bitterness of bitter melon is a characteristic flavor, but it can be reduced by various methods. Before cooking, you can soak the sliced bitter melon in salted water for about 30 minutes. This helps to draw out some of the bitter compounds. You can also blanch the bitter melon in boiling water for a few minutes before cooking. Another method is to remove the seeds and pith (the white, spongy part inside the fruit) before cooking, as these are the most bitter parts. Cooking bitter melon with acidic ingredients, such as vinegar or lemon juice, can also help to balance the bitterness.


Leave a Comment