

Grow cucumbers at home, even if you think you don’t have the space or the green thumb! Have you ever dreamed of biting into a crisp, refreshing cucumber, bursting with flavor, that you nurtured from seed to harvest? It’s easier than you think, and this DIY guide is your secret weapon to cucumber-growing success.
Cucumbers have a rich history, dating back thousands of years to their origins in India. They were prized by the ancient Greeks and Romans for their refreshing qualities and medicinal properties. Today, they’re a staple in salads, pickles, and countless other dishes around the world. But why settle for store-bought cucumbers when you can experience the unparalleled taste of homegrown goodness?
In today’s busy world, finding moments of peace and connection with nature can be challenging. That’s where home gardening comes in! Learning how to grow cucumbers at home offers a therapeutic escape, a chance to nurture life, and a rewarding sense of accomplishment. Plus, you’ll have a steady supply of fresh, organic cucumbers right at your fingertips. This DIY article will provide you with simple, effective tricks and hacks to maximize your cucumber yield, even in small spaces. Get ready to impress your friends and family with your homegrown bounty!
Growing Cucumbers at Home: A Comprehensive DIY Guide
Hey there, fellow gardening enthusiasts! I’m so excited to share my tried-and-true method for growing delicious, crisp cucumbers right in your own backyard (or even on your balcony!). Forget those bland, store-bought cucumbers – nothing beats the taste of a homegrown beauty. This guide will walk you through every step, from choosing the right variety to harvesting your bounty. Let’s get started!
Choosing Your Cucumber Variety
Before we even think about soil, let’s talk cucumbers! There are so many varieties to choose from, and the best one for you will depend on your space, climate, and what you plan to do with your cucumbers.
* Slicing Cucumbers: These are your classic cucumbers, perfect for salads and sandwiches. They typically have smooth, dark green skin. Some popular varieties include ‘Marketmore 76’, ‘Straight Eight’, and ‘Burpee Hybrid’.
* Pickling Cucumbers: These are smaller and have thicker skin, making them ideal for pickling. ‘National Pickling’ and ‘Boston Pickling’ are excellent choices.
* Bush Cucumbers: If you’re short on space, bush cucumbers are your best friend! They grow in a compact form, making them perfect for containers. ‘Spacemaster’ and ‘Bush Champion’ are great options.
* Gherkin Cucumbers: These are tiny, bumpy cucumbers that are often used for making cornichons.
* Seedless Cucumbers: These are usually longer and thinner than slicing cucumbers and have a mild flavor. ‘English Telegraph’ is a popular seedless variety.
My Recommendation: For beginners, I often suggest starting with a bush variety like ‘Spacemaster’ or a reliable slicing cucumber like ‘Marketmore 76’. They’re relatively easy to grow and produce a good yield.
Preparing Your Cucumber Patch
Cucumbers are sun-loving plants, so you’ll need to choose a spot that gets at least 6-8 hours of direct sunlight per day. They also need well-drained soil that’s rich in organic matter.
* Sunlight: Full sun (6-8 hours) is crucial.
* Soil: Well-drained, fertile soil with a pH of 6.0-7.0.
* Watering: Consistent moisture is key, especially during fruiting.
* Support: Vining varieties need a trellis or other support.
Step-by-Step Soil Preparation
1. Clear the Area: Remove any weeds, rocks, or debris from the area where you plan to plant your cucumbers.
2. Amend the Soil: This is where the magic happens! Cucumbers are heavy feeders, so you’ll want to amend your soil with plenty of organic matter. I like to use compost, well-rotted manure, or a combination of both. Dig in a generous amount of compost (about 2-3 inches) into the top 6-8 inches of soil.
3. Check the Drainage: Cucumbers hate soggy feet! If your soil is heavy clay, you may need to add some sand or perlite to improve drainage.
4. Test the pH (Optional): A soil test can tell you the pH of your soil. Cucumbers prefer a pH of 6.0-7.0. If your soil is too acidic (below 6.0), you can add lime to raise the pH. If it’s too alkaline (above 7.0), you can add sulfur to lower the pH. You can purchase a soil test kit at most garden centers.
5. Rake it Smooth: Once you’ve amended the soil, rake it smooth to create a level planting surface.
Starting Your Cucumber Seeds
You can either start your cucumber seeds indoors or direct sow them in your garden. Starting them indoors gives you a head start, especially if you live in a cooler climate with a shorter growing season.
* Indoor Starting: Start seeds 3-4 weeks before the last expected frost.
* Direct Sowing: Sow seeds directly into the garden after the last frost, when the soil has warmed up to at least 60°F (15°C).
Starting Seeds Indoors
1. Choose Your Containers: Use small pots or seed trays filled with a seed-starting mix. I prefer peat pots or biodegradable pots because you can plant them directly into the ground, which minimizes root disturbance.
2. Sow the Seeds: Plant 2-3 seeds per pot, about ½ inch deep.
3. Water Gently: Water the soil gently to moisten it, but don’t overwater.
4. Provide Warmth: Cucumbers need warmth to germinate. Place the pots in a warm location, such as on top of a refrigerator or on a heat mat.
5. Provide Light: Once the seeds germinate (usually in 5-10 days), move the pots to a sunny window or under grow lights.
6. Thin the Seedlings: Once the seedlings have their first true leaves (the second set of leaves), thin them to one seedling per pot. Choose the strongest, healthiest seedling and snip off the others at the soil line.
7. Harden Off the Seedlings: Before transplanting the seedlings into your garden, you’ll need to harden them off. This means gradually exposing them to outdoor conditions over a period of 7-10 days. Start by placing the seedlings in a sheltered location outdoors for a few hours each day, gradually increasing the amount of time they spend outside.
Direct Sowing Seeds
1. Prepare the Soil: Make sure the soil is warm and well-drained.
2. Sow the Seeds: Plant the seeds about ½ inch deep and 12-18 inches apart.
3. Water Gently: Water the soil gently to moisten it.
4. Keep the Soil Moist: Keep the soil consistently moist until the seeds germinate.
5. Thin the Seedlings: Once the seedlings have emerged, thin them to one plant per 12-18 inches.
Transplanting Your Cucumber Seedlings
Once your seedlings have been hardened off (if you started them indoors) and the danger of frost has passed, it’s time to transplant them into your garden.
1. Choose a Cloudy Day: Transplanting on a cloudy day will help prevent the seedlings from getting stressed.
2. Dig the Holes: Dig holes that are slightly larger than the root balls of the seedlings.
3. Gently Remove the Seedlings: Gently remove the seedlings from their pots, being careful not to damage the roots. If you used peat pots, you can plant the entire pot directly into the ground.
4. Plant the Seedlings: Place the seedlings in the holes and backfill with soil.
5. Water Thoroughly: Water the seedlings thoroughly after planting.
6. Mulch: Apply a layer of mulch around the plants to help retain moisture and suppress weeds. I like to use straw or wood chips.
Caring for Your Cucumber Plants
Once your cucumber plants are in the ground, it’s important to provide them with the care they need to thrive.
* Watering: Cucumbers need consistent moisture, especially during fruiting. Water deeply and regularly, especially during hot, dry weather. Aim for about 1 inch of water per week.
* Fertilizing: Cucumbers are heavy feeders, so you’ll need to fertilize them regularly. Use a balanced fertilizer (such as 10-10-10) every 2-3 weeks. You can also side-dress the plants with compost or well-rotted manure.
* Weeding: Keep the area around your cucumber plants free of weeds. Weeds compete with the plants for water and nutrients.
* Pest and Disease Control: Keep an eye out for pests and diseases. Common cucumber pests include aphids, cucumber beetles, and squash bugs. Common diseases include powdery mildew and downy mildew. I prefer to use organic pest and disease control methods whenever possible. Neem oil is a great all-purpose organic insecticide and fungicide.
* Support: Vining cucumber varieties need a trellis or other support to climb on. This will help keep the fruits off the ground and prevent them from rotting. You can use a trellis, fence, or even a tomato cage.
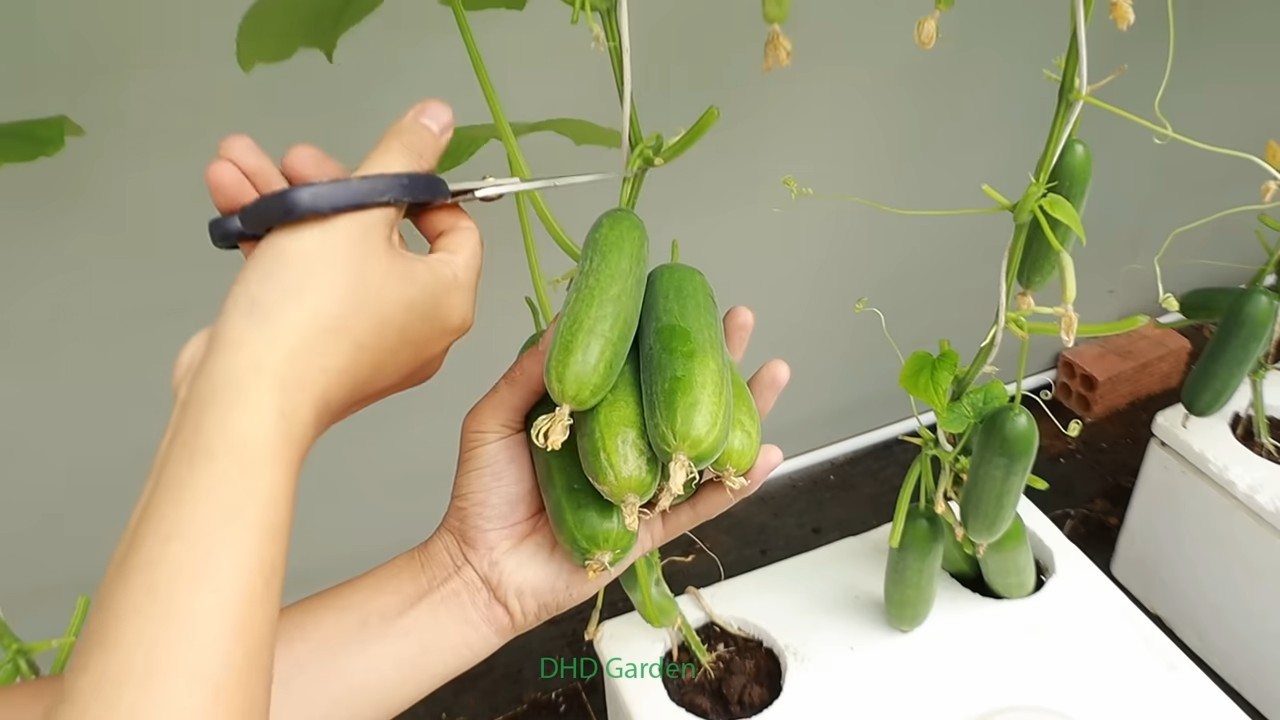
Harvesting Your Cucumbers
The moment we’ve all been waiting for! Harvesting your cucumbers is the most rewarding part of the process.
* Harvest Time: Cucumbers are typically ready to harvest 50-70 days after planting, depending on the variety.
* Harvesting Tips: Harvest cucumbers when they are the desired size and color. Slicing cucumbers are usually harvested when they are 6-8 inches long and dark green. Pickling cucumbers are harvested when they are 3-4 inches long.
* How to Harvest: Use a sharp knife or pr
Conclusion
So, there you have it! Growing cucumbers at home, especially using our simple DIY trick, is not just a gardening project; it’s an investment in fresh, flavorful produce and a rewarding experience that connects you to the natural world. We’ve shown you how to bypass some of the common challenges and unlock a bountiful harvest, even if you’re short on space or time.
Why is this DIY method a must-try? Because it simplifies the process, maximizes your yield, and minimizes the potential for common cucumber-growing problems like pests and diseases. By focusing on creating a supportive and well-drained environment, you’re setting your cucumber plants up for success from the very beginning. Plus, there’s nothing quite like the satisfaction of biting into a crisp, homegrown cucumber that you nurtured from a tiny seed.
But don’t stop there! Feel free to experiment with different cucumber varieties. Try pickling cucumbers for making your own crunchy pickles, or opt for burpless varieties if you’re sensitive to cucurbitacin, the compound that can sometimes cause bitterness. You can also explore different trellising methods to find what works best for your space and aesthetic preferences. Consider companion planting with herbs like basil or marigolds to deter pests naturally and enhance the flavor of your cucumbers.
Remember, gardening is a journey of learning and discovery. Don’t be afraid to make mistakes and adapt your approach as needed. The most important thing is to get started and enjoy the process. We are confident that with a little effort and our DIY trick, you’ll be enjoying delicious, homegrown cucumbers in no time.
We wholeheartedly encourage you to give this DIY cucumber-growing method a try. We’re eager to hear about your experiences! Share your photos, tips, and challenges in the comments below. Let’s build a community of cucumber enthusiasts and learn from each other’s successes. Happy gardening!
Frequently Asked Questions (FAQ)
What are the best cucumber varieties to grow at home?
The “best” variety really depends on your personal preferences and growing conditions. For pickling, ‘National Pickling’ and ‘Bush Pickle’ are popular choices. For slicing, ‘Marketmore 76’ and ‘Straight Eight’ are reliable options. If you’re looking for burpless varieties, consider ‘English Telegraph’ or ‘Armenian’ cucumbers. Bush varieties like ‘Spacemaster’ are great for containers and smaller gardens. Consider your climate and the amount of space you have when making your selection. Local nurseries can also provide recommendations based on what thrives in your area.
How often should I water my cucumber plants?
Cucumbers need consistent moisture, especially during hot weather and when they are fruiting. Aim to water deeply at least 2-3 times per week, ensuring the soil is moist but not waterlogged. A good rule of thumb is to provide about 1 inch of water per week. Check the soil moisture regularly by sticking your finger about an inch into the soil. If it feels dry, it’s time to water. Using a soaker hose or drip irrigation can help deliver water directly to the roots and minimize water loss through evaporation.
What kind of fertilizer should I use for cucumbers?
Cucumbers are heavy feeders, so they benefit from regular fertilization. Start with a balanced fertilizer (e.g., 10-10-10) at planting time. Once the plants start to flower and fruit, switch to a fertilizer higher in phosphorus and potassium (e.g., 5-10-10) to support fruit development. You can also supplement with compost tea or liquid seaweed fertilizer every few weeks. Avoid over-fertilizing, as this can lead to excessive foliage growth at the expense of fruit production. Always follow the instructions on the fertilizer label.
How do I prevent common cucumber pests and diseases?
Prevention is key when it comes to pests and diseases. Start by choosing disease-resistant varieties. Ensure good air circulation around your plants by spacing them properly and pruning excess foliage. Regularly inspect your plants for signs of pests like aphids, cucumber beetles, and squash bugs. Handpick pests or use insecticidal soap or neem oil as needed. To prevent fungal diseases like powdery mildew, avoid overhead watering and ensure good drainage. Copper fungicide can be used as a preventative measure. Crop rotation can also help reduce the buildup of soilborne diseases.
Why are my cucumber flowers falling off without producing fruit?
This is often due to a lack of pollination. Cucumbers have separate male and female flowers, and the female flowers need to be pollinated in order to produce fruit. If you’re growing cucumbers indoors or in an area with limited bee activity, you may need to hand-pollinate them. Use a small paintbrush to transfer pollen from the male flowers to the female flowers. You can identify female flowers by the small cucumber-like structure at the base of the flower. Also, ensure your plants are getting adequate sunlight and water, as stress can also lead to flower drop.
How do I know when my cucumbers are ready to harvest?
The size and color of mature cucumbers will vary depending on the variety. Generally, cucumbers are ready to harvest when they are firm, have a deep green color (unless it’s a variety that changes color when ripe), and are the appropriate size for their type. Overripe cucumbers can become bitter and seedy. Harvest regularly to encourage continued fruit production. Use a sharp knife or pruners to cut the cucumber from the vine, leaving a small stem attached.
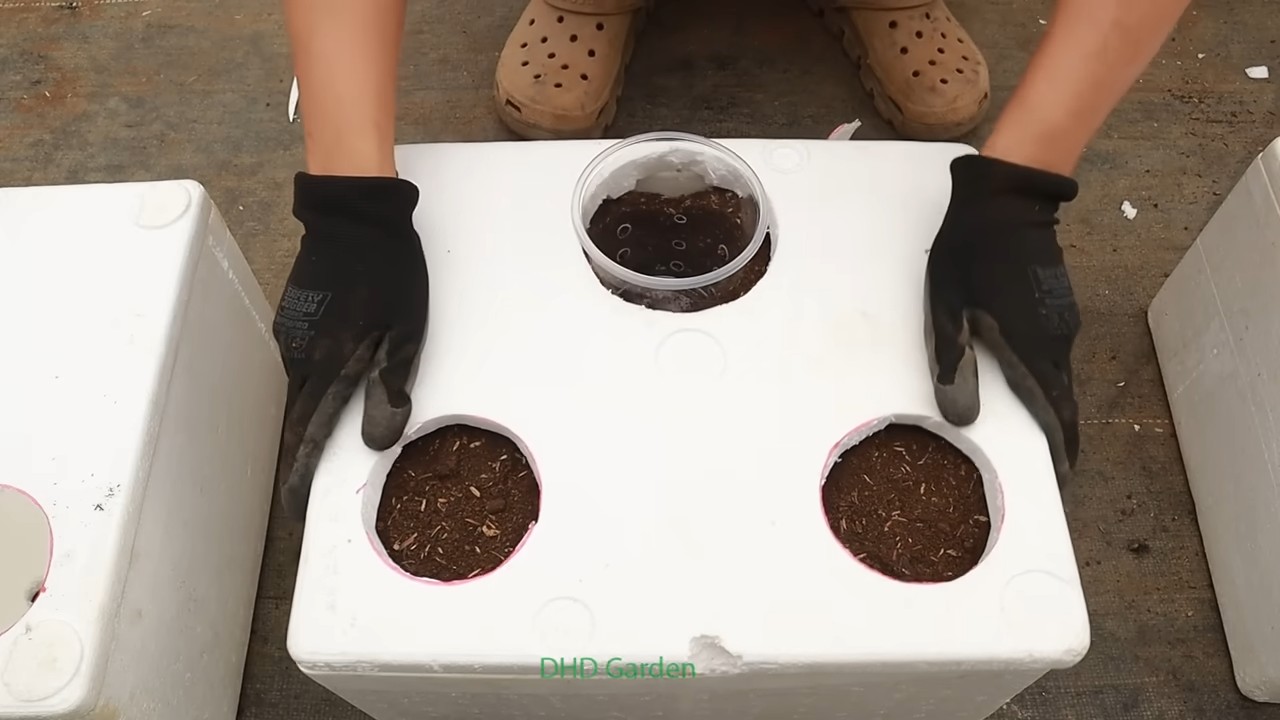
Can I grow cucumbers in containers?
Yes, you can absolutely grow cucumbers in containers! Choose a large container (at least 5 gallons) with good drainage. Bush varieties are particularly well-suited for containers. Use a high-quality potting mix and provide a trellis or support for the vines to climb. Container-grown cucumbers may need more frequent watering and fertilization than those grown in the ground.
What is the DIY trick mentioned in the article?
The DIY trick refers to a specific method detailed in the main body of the article (which is not included here). It likely involves a simple, cost-effective technique to improve cucumber growth, such as a specific soil amendment, trellising method, or watering technique. Refer to the full article for the specifics of the DIY trick.
My cucumbers are bitter. What can I do?
Bitterness in cucumbers is often caused by stress, such as inconsistent watering, high temperatures, or poor soil conditions. Ensure your plants are getting adequate water and nutrients. Choose burpless varieties, which are less prone to bitterness. You can also try peeling the cucumber before eating it, as the bitterness is often concentrated in the skin.
How can I encourage more female flowers on my cucumber plants?
Some varieties are bred to produce more female flowers. Ensure your plants are getting adequate sunlight and water. Avoid over-fertilizing with nitrogen, as this can promote foliage growth at the expense of flower production. Maintaining consistent temperatures can also help encourage female flower development.
Leave a Comment