

Grow Jicama at Home? Absolutely! Imagine biting into a crisp, refreshing jicama you nurtured from a tiny seed right in your own backyard. It’s easier than you think, and this guide is your passport to a bountiful harvest. For centuries, jicama has been a staple in Mexican and Asian cuisines, prized for its sweet, nutty flavor and satisfying crunch. It’s not just delicious; it’s packed with fiber and nutrients, making it a healthy addition to any diet.
But why should you bother growing your own? Well, store-bought jicama can sometimes be bland or lack that vibrant freshness. Plus, there’s something incredibly rewarding about cultivating your own food. I’ve found that growing my own jicama allows me to control the growing conditions, ensuring a truly organic and flavorful experience. This DIY project is perfect for anyone looking to add a unique and healthy vegetable to their garden, regardless of space. Whether you have a sprawling garden or a small balcony, I’ll show you how to successfully grow jicama at home and enjoy its delicious benefits. Let’s get started!
Growing Jicama at Home: A Beginner’s Guide
Hey there, fellow gardening enthusiasts! Ever wanted to try growing something a little different, something that adds a unique crunch to your salads and stir-fries? Well, look no further than jicama! This root vegetable, also known as yam bean or Mexican turnip, is surprisingly easy to grow at home, and I’m here to guide you through the entire process. Trust me, the satisfaction of harvesting your own jicama is totally worth it.
What You’ll Need
Before we dive in, let’s gather our supplies. Here’s a list of everything you’ll need to successfully grow jicama:
* Jicama Seeds: You can find these online or at your local garden center. Make sure to choose a variety that’s suitable for your climate.
* Seed Starting Trays or Pots: These will be used to germinate the seeds indoors.
* Seed Starting Mix: A light and airy mix that promotes healthy seedling growth.
* Larger Pots (if starting indoors): These should be at least 5 gallons in size, as jicama needs room to grow.
* Well-Draining Soil: Jicama thrives in soil that’s rich in organic matter and drains well.
* Compost or Aged Manure: To enrich the soil and provide essential nutrients.
* Trellis or Stakes: Jicama vines can get quite long, so they’ll need support.
* Watering Can or Hose: For regular watering.
* Gardening Gloves: To protect your hands.
* Optional: Row covers to protect young plants from pests and frost.
* Optional: Fertilizer formulated for root vegetables.
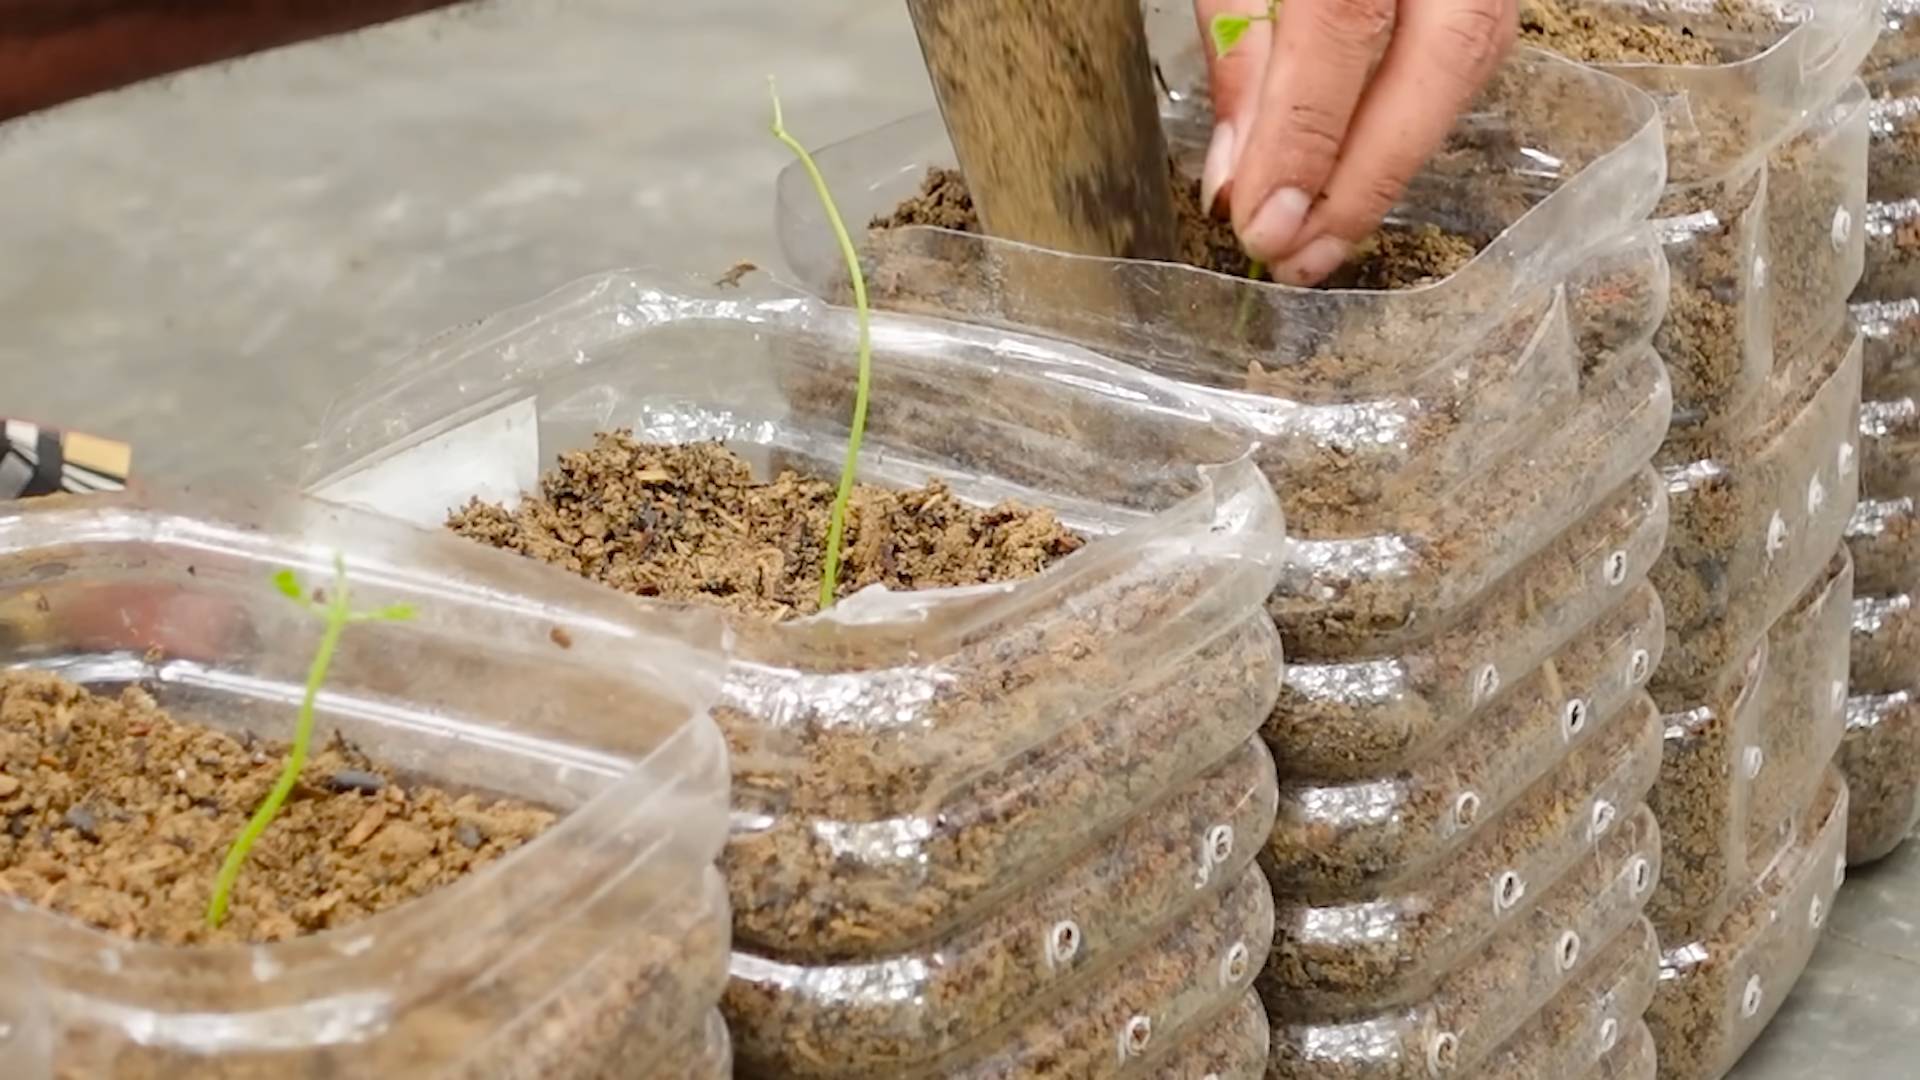
Starting Jicama Seeds
Jicama has a long growing season, so starting the seeds indoors is highly recommended, especially if you live in a cooler climate. This gives the plants a head start and ensures a good harvest.
1. Soak the Seeds: Before planting, soak the jicama seeds in warm water for 24 hours. This helps to soften the hard seed coat and improve germination rates. I’ve found this step makes a huge difference!
2. Prepare the Seed Starting Trays: Fill your seed starting trays or pots with seed starting mix. Moisten the mix thoroughly, but don’t let it become waterlogged.
3. Sow the Seeds: Plant the seeds about 1/2 inch deep in the soil. Place 2-3 seeds in each cell or pot to increase your chances of germination.
4. Provide Warmth and Light: Jicama seeds need warmth to germinate. Place the trays in a warm location, such as on top of a refrigerator or on a heat mat. You can also use a grow light to provide consistent light.
5. Keep the Soil Moist: Water the seeds regularly to keep the soil moist, but not soggy. Use a spray bottle to gently mist the soil.
6. Germination: Jicama seeds typically germinate in 7-14 days. Once the seedlings emerge, move them to a sunny location or under a grow light.
7. Thin the Seedlings: Once the seedlings have developed a few sets of true leaves, thin them to one plant per cell or pot. Choose the strongest and healthiest seedling to keep.
Transplanting Jicama Seedlings
Once the weather warms up and the danger of frost has passed, it’s time to transplant your jicama seedlings outdoors.
1. Harden Off the Seedlings: Before transplanting, you need to harden off the seedlings. This means gradually exposing them to outdoor conditions over a period of 7-10 days. Start by placing the seedlings in a sheltered location for a few hours each day, gradually increasing the amount of time they spend outdoors.
2. Prepare the Garden Bed: Choose a sunny location in your garden with well-draining soil. Jicama needs at least 6-8 hours of sunlight per day. Amend the soil with compost or aged manure to improve its fertility and drainage.
3. Planting: Dig holes that are slightly larger than the root balls of the seedlings. Space the plants about 12-18 inches apart. Gently remove the seedlings from their pots and place them in the holes. Backfill with soil and water thoroughly.
4. Trellising: Jicama vines can grow quite long, so they’ll need support. Install a trellis or stakes near the plants to provide support. As the vines grow, train them to climb the trellis.
Caring for Jicama Plants
Once your jicama plants are established, it’s important to provide them with proper care to ensure a good harvest.
1. Watering: Water the plants regularly, especially during dry periods. Jicama needs consistent moisture to develop large, healthy roots. Aim for about 1 inch of water per week.
2. Fertilizing: Fertilize the plants every 4-6 weeks with a fertilizer formulated for root vegetables. Follow the instructions on the fertilizer label.
3. Weeding: Keep the garden bed free of weeds. Weeds can compete with jicama plants for nutrients and water.
4. Pest Control: Jicama plants are relatively pest-resistant, but they can be susceptible to aphids, spider mites, and bean beetles. Inspect the plants regularly for pests and take action if necessary. You can use insecticidal soap or neem oil to control these pests.
5. Pruning: To encourage larger root development, you can prune the flowers that appear on the vine. Jicama prioritizes vine growth and flower production, so removing the flowers redirects energy to the root. I usually pinch off the flowers as soon as I see them.
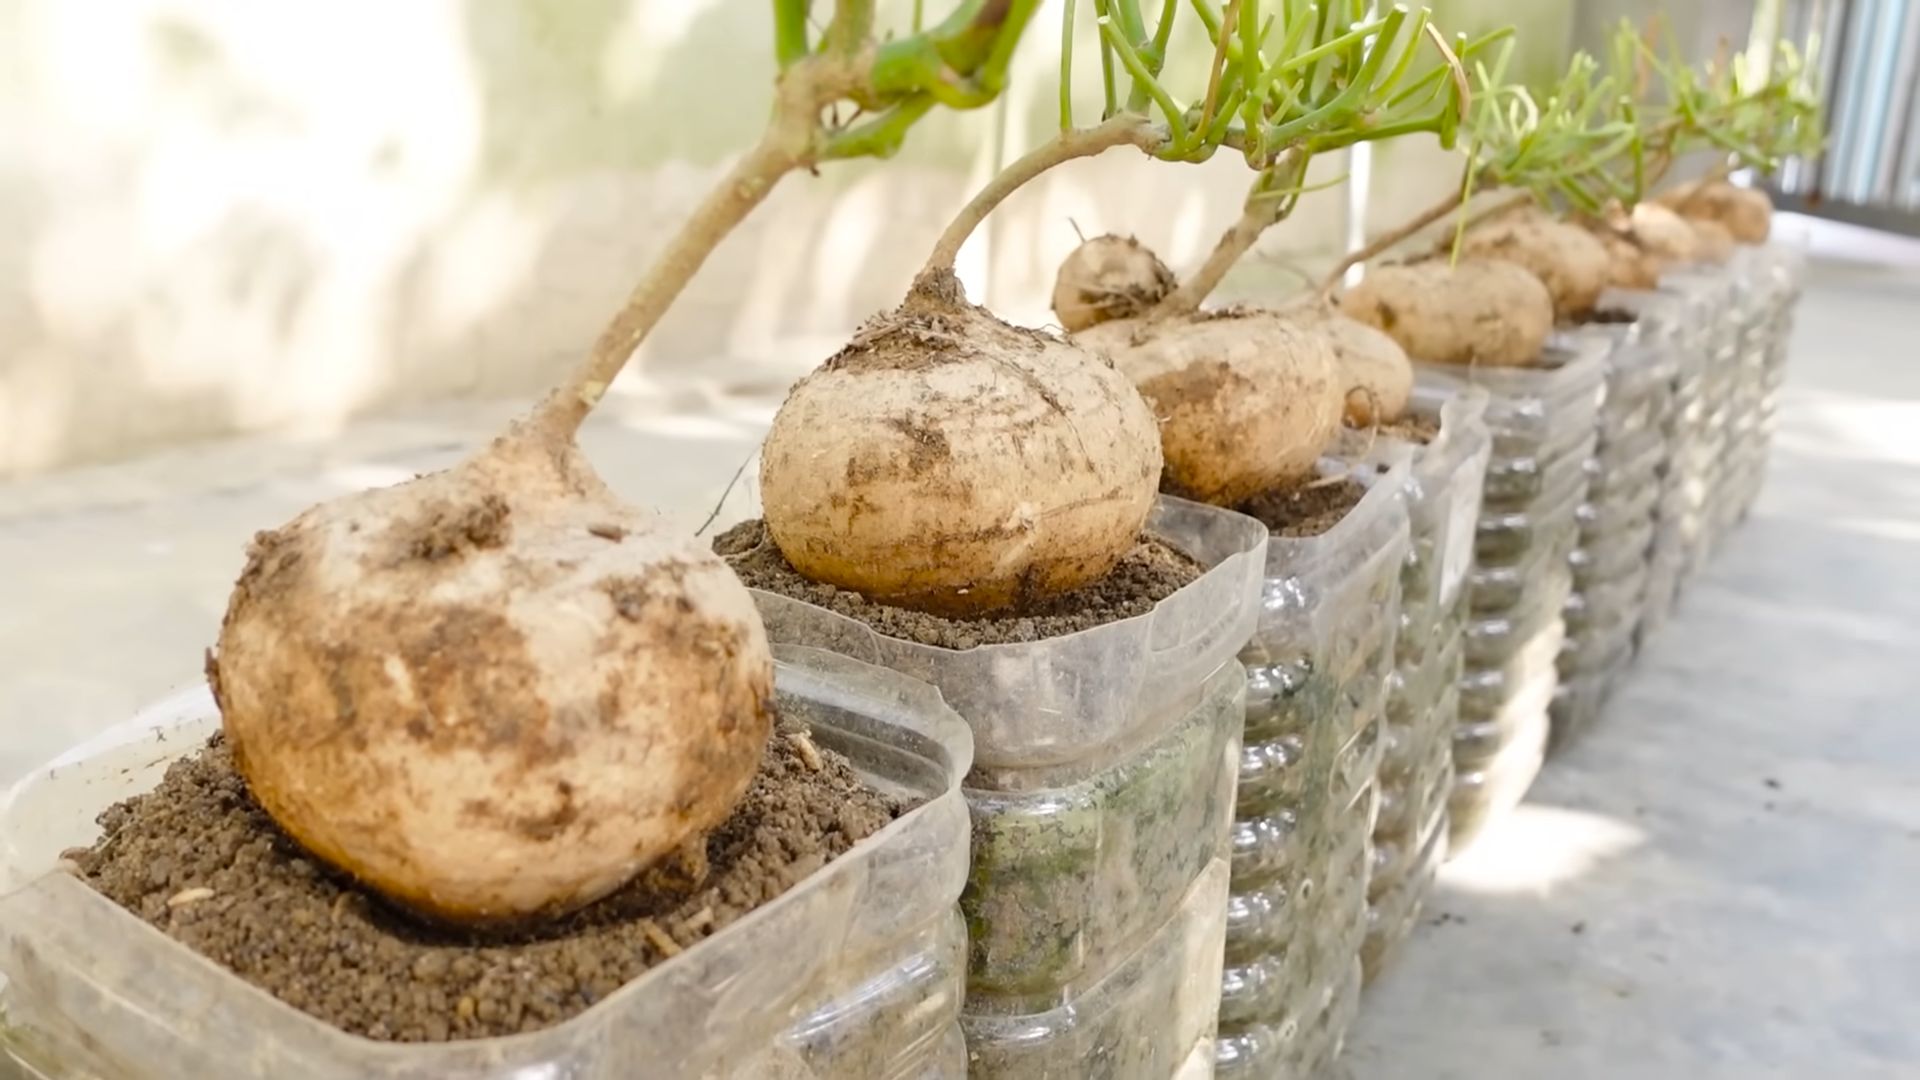
Harvesting Jicama
Jicama typically takes 150-200 days to mature, so be patient! The best time to harvest is in the fall, after the vines have started to die back.
1. Check for Maturity: To check for maturity, dig around the base of the plant and feel the size of the root. The root should be at least 4-6 inches in diameter.
2. Harvesting: Carefully dig up the jicama roots, being careful not to damage them. Use a garden fork to loosen the soil around the roots and then gently lift them out of the ground.
3. Cleaning: Brush off any excess soil from the roots.
4. Curing: Cure the jicama roots in a cool, dry place for a few days. This will help to improve their flavor and storage life.
Storing Jicama
Jicama can be stored in a cool, dry place for several months. The ideal storage temperature is between 50-60°F. You can also store jicama in the refrigerator, but it may lose some of its crispness.
Troubleshooting
Even with the best care, you might encounter some challenges while growing jicama. Here are a few common problems and how to address them:
* Poor Germination: If your jicama seeds aren’t germinating, make sure they’re getting enough warmth and moisture. Soaking the seeds before planting can also help.
* Slow Growth: If your jicama plants are growing slowly, make sure they’re getting enough sunlight, water, and nutrients. Amend the soil with compost or aged manure to improve its fertility.
* Pest Infestations: If your jicama plants are infested with pests, use insecticidal soap or neem oil to control them.
* Root Rot: Root rot can occur if the soil is too wet. Make sure the soil is well-draining and avoid overwatering.
Enjoying Your Homegrown Jicama
Now that you’ve successfully grown your own jicama, it’s time to enjoy the fruits (or rather, roots!) of your labor. Jicama is a versatile vegetable that can be eaten raw or cooked. It has a crisp, slightly sweet flavor that’s perfect for salads, stir-fries, and slaws.
Here are a few ideas for using your homegrown jicama:
* Jicama Salad: Combine jicama with carrots, cucumbers, and a light vinaigrette dressing.
* Jicama Fries: Cut jicama into fries and bake or air fry them until crispy.
* Jicama Slaw: Shred jicama and combine it with cabbage, carrots, and a creamy dressing.
* Jicama Stir-Fry: Add jicama to your favorite stir-fry recipe.
Growing jicama at home is a rewarding experience that allows you to enjoy fresh, healthy vegetables right from your own garden. With a little patience and care, you can successfully grow jicama and add a unique and delicious ingredient to your meals. Happy gardening!
Conclusion
So, there you have it! Growing jicama at home is not only achievable but also incredibly rewarding. Imagine the satisfaction of harvesting your own crisp, sweet, and juicy jicama, knowing exactly where it came from and how it was grown. Forget the often-lackluster, store-bought versions; homegrown jicama offers a superior flavor and texture that you simply can’t replicate. This DIY project is a must-try for any gardener, whether you’re a seasoned pro or just starting out.
Why is this a must-try? Because it empowers you to take control of your food source, reduce your carbon footprint, and enjoy a truly fresh and delicious vegetable. Plus, it’s a fantastic learning experience, connecting you more deeply with the natural world. Think about the possibilities: adding your homegrown jicama to salads, stir-fries, or enjoying it as a refreshing snack with a squeeze of lime and chili powder. The possibilities are endless!
But the fun doesn’t stop there. Feel free to experiment with different growing techniques. For example, try growing your jicama in raised beds for improved drainage, especially if you have heavy clay soil. Or, consider using companion planting to deter pests and attract beneficial insects. Marigolds, for instance, are known to repel nematodes, which can sometimes affect jicama roots.
Variations and Suggestions:
* Vertical Growing: If you’re short on space, consider training your jicama vines to grow vertically on a trellis or fence. This not only saves space but also improves air circulation, reducing the risk of fungal diseases.
* Container Gardening: Jicama can also be successfully grown in large containers, making it a great option for apartment dwellers or those with limited garden space. Just be sure to choose a container that is at least 20 gallons in size and has good drainage.
* Different Varieties: While the most common type of jicama is the Pachyrhizus erosus, there are other varieties available. Experiment with different types to find the one that best suits your taste and growing conditions.
* Seed Saving: If you’re feeling adventurous, you can even try saving seeds from your jicama plants to grow next year’s crop. However, keep in mind that jicama is a cross-pollinating plant, so the seeds may not produce plants that are exactly like the parent plant.
We are confident that you’ll find growing jicama at home to be a fulfilling and enjoyable experience. Don’t be intimidated by the process; with a little patience and care, you’ll be harvesting your own delicious jicama in no time.
So, what are you waiting for? Grab your seeds, prepare your soil, and get ready to embark on this exciting gardening adventure. We encourage you to try this DIY trick and share your experiences with us! Let us know how your jicama plants are growing, what challenges you encounter, and what delicious recipes you create with your homegrown harvest. Share your photos and stories on social media using #HomegrownJicama and inspire others to join the fun. We can’t wait to see what you create!
Frequently Asked Questions (FAQ)
What is the best time to plant jicama?
The best time to plant jicama is in the spring, after the last frost. Jicama requires a long growing season of at least 150 days, so it’s important to get it started early enough to allow the tubers to mature properly. If you live in a colder climate with a shorter growing season, you can start the seeds indoors 6-8 weeks before the last frost and then transplant them outdoors once the weather warms up. In warmer climates, you can plant the seeds directly in the ground in the spring.
How much sunlight does jicama need?
Jicama thrives in full sun, meaning it needs at least 6-8 hours of direct sunlight per day. Insufficient sunlight can result in smaller tubers and reduced yields. Choose a planting location that receives plenty of sunlight throughout the day. If you’re growing jicama in containers, make sure to place them in a sunny spot.
What kind of soil is best for growing jicama?
Jicama prefers well-drained, sandy loam soil with a pH between 6.0 and 7.0. The soil should be rich in organic matter to provide the plants with the nutrients they need to grow. Before planting, amend the soil with compost or well-rotted manure to improve its fertility and drainage. Avoid heavy clay soils, as they can become waterlogged and hinder tuber development. If you have clay soil, consider growing jicama in raised beds or containers.
How often should I water jicama plants?
Jicama plants need consistent moisture, especially during hot and dry weather. Water deeply and regularly, aiming to keep the soil consistently moist but not waterlogged. Avoid overhead watering, as it can increase the risk of fungal diseases. Instead, water at the base of the plants. Mulching around the plants can help to retain moisture in the soil and suppress weed growth. During periods of heavy rainfall, you may need to reduce watering to prevent the soil from becoming waterlogged.
How do I fertilize jicama plants?
Jicama plants benefit from regular fertilization, especially during the early stages of growth. Use a balanced fertilizer with a ratio of 10-10-10 or 14-14-14. Apply the fertilizer according to the package instructions, being careful not to over-fertilize, as this can lead to excessive foliage growth at the expense of tuber development. You can also supplement with organic fertilizers such as compost tea or fish emulsion. Avoid using fertilizers that are high in nitrogen, as they can promote leafy growth and reduce tuber production.
Are there any common pests or diseases that affect jicama?
While jicama is relatively pest-resistant, it can be susceptible to certain pests and diseases. Common pests include aphids, spider mites, and nematodes. Aphids and spider mites can be controlled with insecticidal soap or neem oil. Nematodes can be a more serious problem, as they can damage the roots and reduce yields. To prevent nematode infestations, practice crop rotation and avoid planting jicama in areas where nematodes have been a problem in the past. Common diseases that can affect jicama include fungal diseases such as powdery mildew and leaf spot. To prevent these diseases, ensure good air circulation around the plants and avoid overhead watering. If you notice signs of disease, treat the plants with a fungicide.
When is jicama ready to harvest?
Jicama is typically ready to harvest 4-6 months after planting, depending on the variety and growing conditions. The tubers should be at least 4-6 inches in diameter. To harvest, carefully dig around the base of the plant and lift the tubers out of the ground. Be careful not to damage the tubers during harvesting. After harvesting, brush off any excess soil and store the jicama in a cool, dry place. Jicama can be stored for several months if properly stored.
Can I eat the leaves and seeds of jicama?
No, the leaves and seeds of jicama are toxic and should not be eaten. They contain rotenone, a natural insecticide that can be harmful to humans and animals. Only the tubers are edible. Be sure to wash the tubers thoroughly before eating to remove any traces of rotenone.
How do I store jicama after harvesting?
After harvesting, brush off any excess soil and store the jicama in a cool, dry, and dark place. The ideal storage temperature is between 55-60°F (13-16°C). Jicama can be stored for several months if properly stored. Avoid storing jicama in the refrigerator, as it can become chilled and develop a bitter taste.
Can I grow jicama in containers?
Yes, jicama can be successfully grown in large containers. Choose a container that is at least 20 gallons in size and has good drainage. Use a well-draining potting mix that is rich in organic matter. Water regularly and fertilize as needed. Place the container in a sunny location that receives at least 6-8 hours of direct sunlight per day.

Leave a Comment