

Grow Mustard Greens at Home – and unlock a world of peppery flavor right outside your door! Have you ever dreamt of snipping fresh, vibrant greens just moments before adding them to your salad or stir-fry? Well, dream no more! This isn’t just about gardening; it’s about embracing a sustainable lifestyle and enjoying the freshest ingredients imaginable. For centuries, mustard greens have been a staple in various cuisines, from Asian stir-fries to Southern comfort food. Their cultivation dates back to ancient civilizations, prized not only for their distinctive taste but also for their nutritional benefits.
But why should you learn to grow mustard greens at home? In today’s world, where we’re increasingly conscious of where our food comes from, having control over your produce is incredibly empowering. Plus, store-bought greens often lack the vibrancy and freshness of homegrown ones. Imagine the satisfaction of knowing exactly what went into your food, free from pesticides and full of flavor. This DIY guide will provide you with simple, effective tricks and hacks to cultivate a thriving mustard green patch, even if you have limited space or gardening experience. Let’s get our hands dirty and bring the taste of fresh, homegrown mustard greens to your table!
Growing Mustard Greens at Home: A Beginner’s Guide
Hey there, fellow gardening enthusiasts! I’m so excited to share my experience with growing mustard greens at home. It’s surprisingly easy, incredibly rewarding, and you get a constant supply of fresh, peppery greens for salads, stir-fries, and more! Trust me, once you taste homegrown mustard greens, you’ll never go back to the store-bought stuff.
What You’ll Need
Before we dive in, let’s gather our supplies. This is a pretty low-key project, so you probably have most of this stuff already:
* **Mustard Green Seeds:** Choose your variety! There are tons of options, from mild to super spicy. I personally love ‘Florida Broadleaf’ for its classic flavor and ‘Red Giant’ for its beautiful color and slightly milder taste.
* **Potting Mix:** A good quality potting mix is essential, especially if you’re growing in containers. Avoid using garden soil, as it can compact and not drain well.
* **Containers (Optional):** If you’re growing indoors or have limited space, containers are the way to go. Choose pots that are at least 6 inches deep to give the roots room to grow.
* **Garden Bed (Optional):** If you have a garden bed, that’s fantastic! Just make sure the soil is well-draining and amended with compost.
* **Watering Can or Hose:** For keeping your greens hydrated.
* **Fertilizer (Optional):** A balanced liquid fertilizer can give your mustard greens a boost, but it’s not strictly necessary.
* **Gardening Gloves (Optional):** To keep your hands clean.
* **Trowel or Small Shovel:** For planting seeds.
* **Sunlight:** Mustard greens need at least 4-6 hours of sunlight per day.
Getting Started: Planting Your Mustard Greens
Okay, let’s get our hands dirty! Here’s how to plant your mustard green seeds:
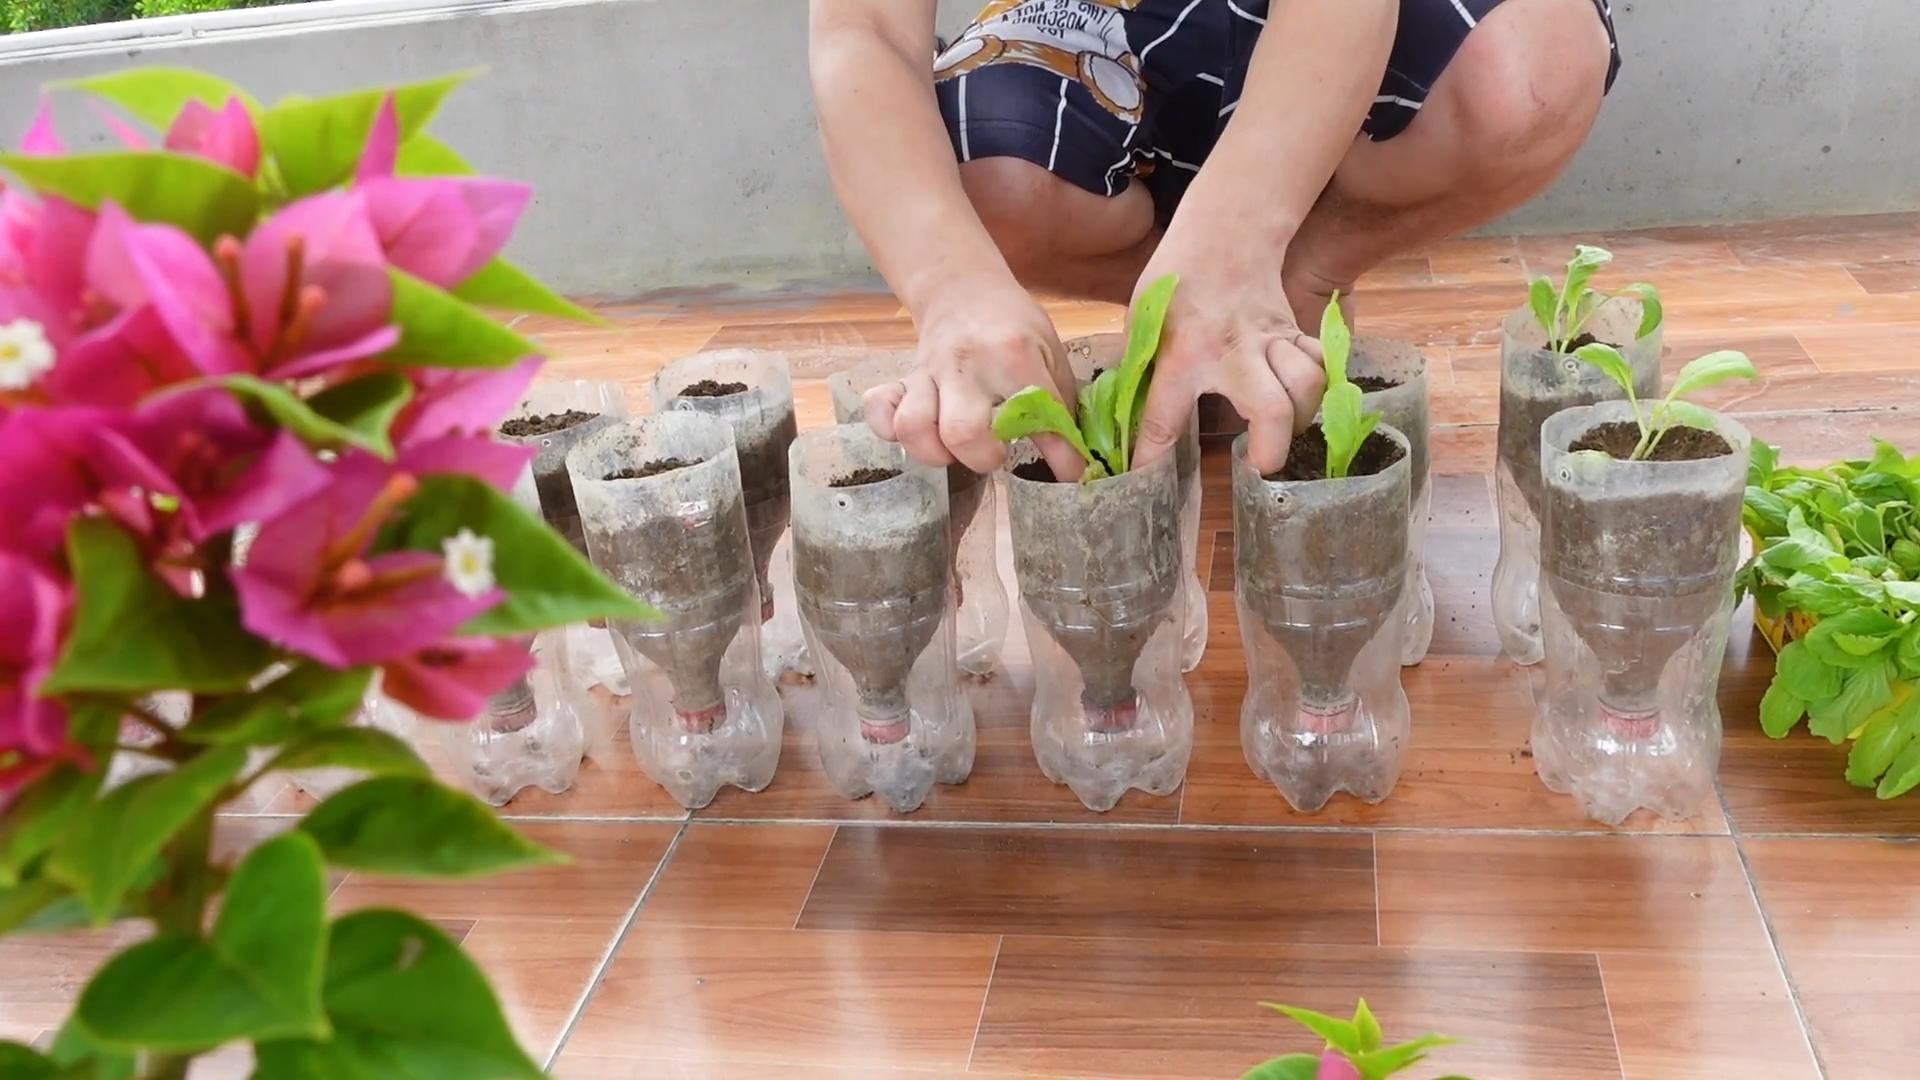
1. **Prepare Your Soil:** Whether you’re using containers or a garden bed, make sure the soil is loose and free of any large clumps. If you’re using containers, fill them with potting mix, leaving about an inch of space at the top. If you’re using a garden bed, till the soil to a depth of about 6 inches and mix in some compost.
2. **Sow the Seeds:** Mustard green seeds are tiny, so you don’t need to plant them very deep. Sprinkle the seeds evenly over the surface of the soil. For containers, aim for about 5-7 seeds per pot. For garden beds, sow the seeds in rows, spacing them about 1-2 inches apart.
3. **Cover the Seeds:** Gently cover the seeds with a thin layer of soil, about ¼ inch deep. You can use your fingers or a trowel to do this.
4. **Water Gently:** Water the soil gently using a watering can or hose with a gentle spray nozzle. You want to moisten the soil without disturbing the seeds.
5. **Provide Sunlight:** Place your containers in a sunny location that receives at least 4-6 hours of sunlight per day. If you’re growing in a garden bed, make sure the area is also sunny.
Caring for Your Mustard Greens: Keeping Them Happy and Healthy
Now that your mustard greens are planted, it’s time to take care of them. Here’s what you need to do:
1. **Water Regularly:** Mustard greens need consistent moisture to thrive. Water them whenever the top inch of soil feels dry to the touch. Avoid overwatering, as this can lead to root rot. I usually water mine every other day, but it depends on the weather.
2. **Thin Seedlings (If Necessary):** Once your seedlings emerge (usually within 5-7 days), you may need to thin them out. This means removing some of the seedlings to give the remaining ones more space to grow. For containers, aim for about 3-4 plants per pot. For garden beds, thin the seedlings to about 2-3 inches apart. I know it feels cruel to pull out the little guys, but it’s necessary for healthy growth!
3. **Fertilize (Optional):** If you want to give your mustard greens a boost, you can fertilize them every 2-3 weeks with a balanced liquid fertilizer. Follow the instructions on the fertilizer label. I usually use a fish emulsion fertilizer, which is organic and gentle.
4. **Weed Regularly:** If you’re growing in a garden bed, be sure to weed regularly to prevent weeds from competing with your mustard greens for nutrients and water.
5. **Pest Control:** Mustard greens are generally pest-resistant, but they can sometimes be bothered by aphids, flea beetles, or cabbage worms. If you notice any pests, you can try spraying them with insecticidal soap or neem oil. I prefer to use organic methods whenever possible.
Harvesting Your Mustard Greens: The Best Part!
This is the moment we’ve been waiting for! Harvesting your own mustard greens is so satisfying. Here’s how to do it:
1. **When to Harvest:** You can start harvesting your mustard greens when the leaves are about 4-6 inches long. This usually takes about 30-40 days from planting.
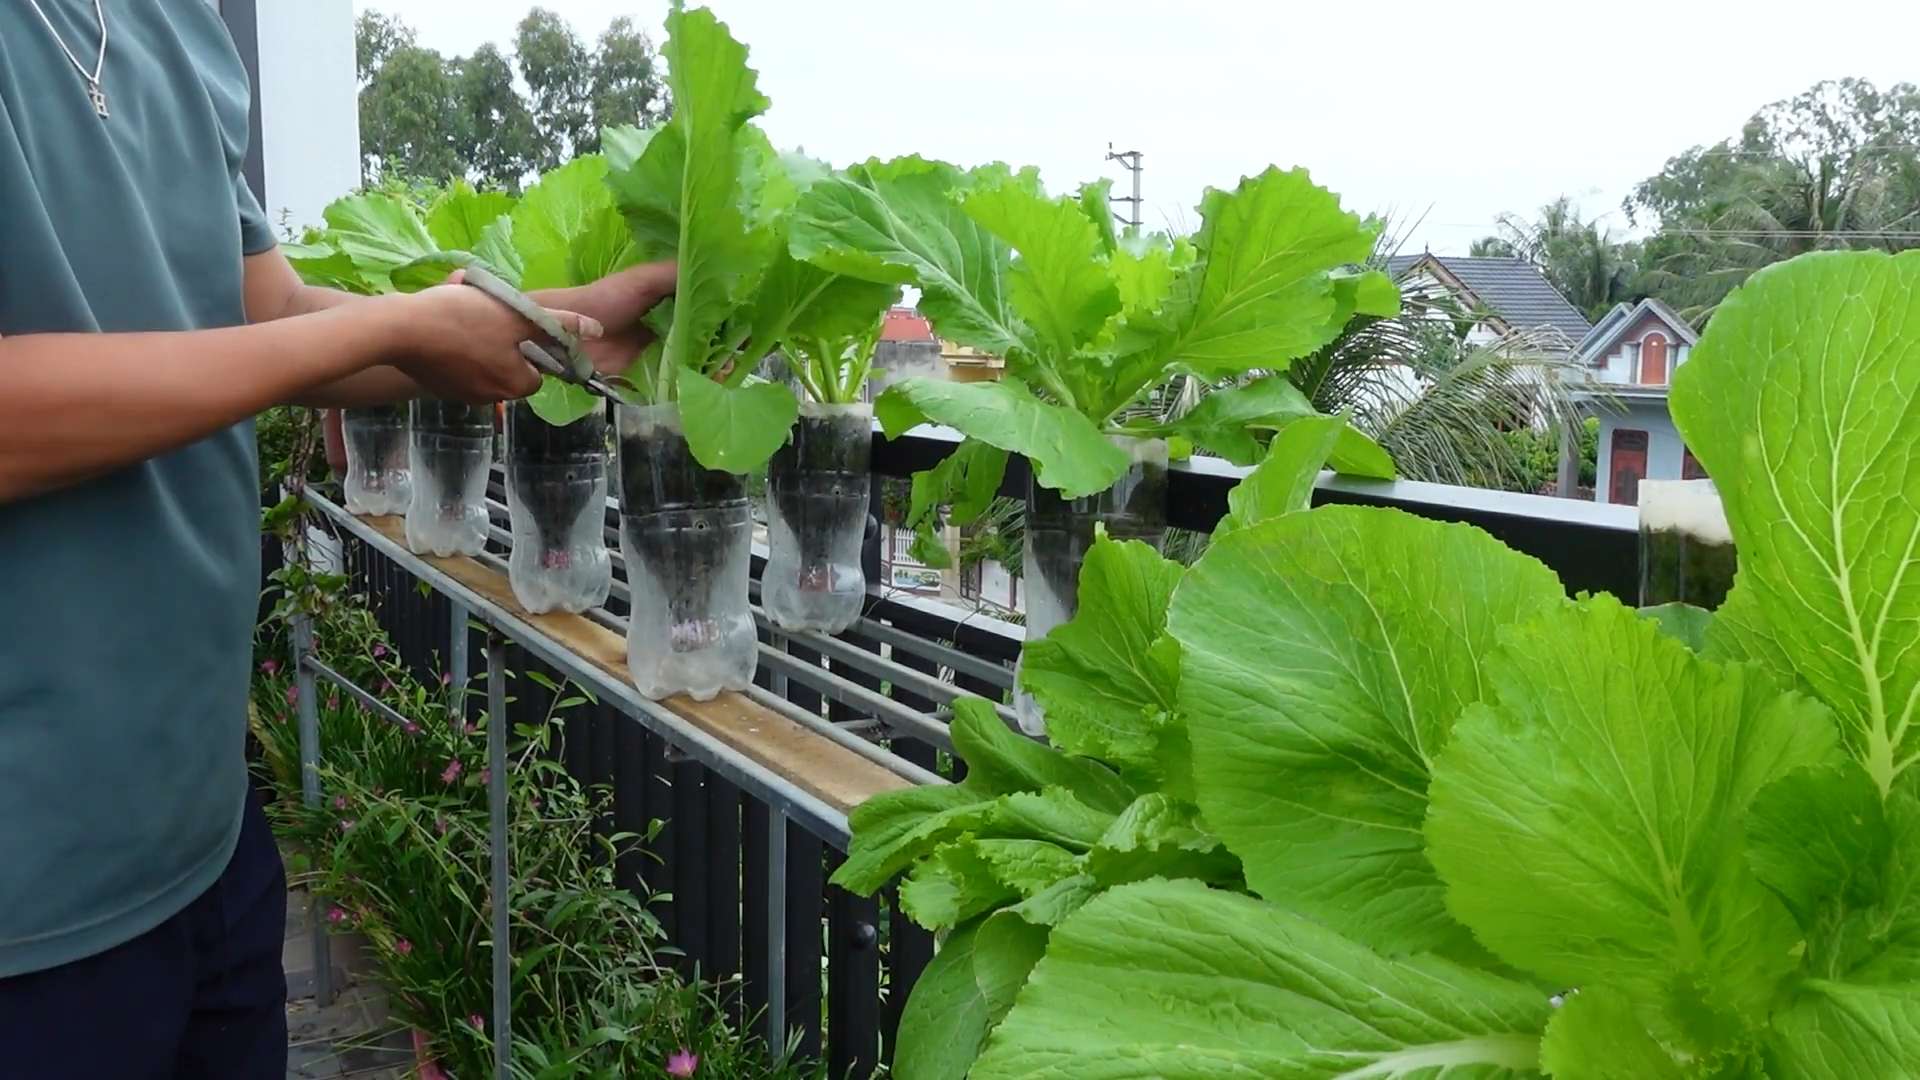
2. **How to Harvest:** You can harvest the entire plant at once, or you can harvest individual leaves as needed. If you harvest individual leaves, the plant will continue to produce new leaves. I usually prefer to harvest individual leaves, as it allows me to have a continuous supply of greens.
3. **Harvesting Technique:** To harvest individual leaves, simply snip them off at the base of the plant using scissors or a knife. Be careful not to damage the rest of the plant.
4. **Washing and Storing:** After harvesting, wash your mustard greens thoroughly to remove any dirt or debris. You can store them in the refrigerator in a plastic bag for up to a week.
Troubleshooting: Common Problems and Solutions
Even with the best care, you might encounter some problems along the way. Here are a few common issues and how to fix them:
* **Yellowing Leaves:** This could be a sign of overwatering, underwatering, or nutrient deficiency. Make sure you’re watering properly and fertilizing if necessary.
* **Leggy Seedlings:** This means your seedlings aren’t getting enough sunlight. Move them to a sunnier location or provide supplemental lighting.
* **Pest Infestation:** As mentioned earlier, aphids, flea beetles, and cabbage worms can sometimes be a problem. Use insecticidal soap or neem oil to control them.
* **Slow Growth:** This could be due to poor soil, lack of nutrients, or insufficient sunlight. Amend the soil with compost, fertilize regularly, and make sure your plants are getting enough sunlight.
Mustard Green Varieties: Explore Your Options!
One of the best things about growing mustard greens is the variety! Here are a few of my favorites:
* **Florida Broadleaf:** A classic variety with a mild, slightly peppery flavor. It’s very easy to grow and produces large, broad leaves.
* **Red Giant:** A beautiful variety with reddish-purple leaves and a slightly milder flavor than Florida Broadleaf. It adds a pop of color to your garden and your salads.
* **Southern Giant Curled:** A very hardy variety with deeply curled leaves and a strong, pungent flavor. It’s great for cooking and adds a lot of flavor to stir-fries.
* **Mizuna:** A Japanese mustard green with feathery leaves and a mild, slightly sweet flavor. It’s delicious in salads and stir-fries.
* **Osaka Purple:** Another Japanese variety with purple leaves and a slightly spicy flavor. It’s very ornamental and adds a unique touch to your garden.
Using Your Homegrown Mustard Greens: Delicious Recipes and Ideas
Now that you have a bounty of fresh mustard greens, it’s time to get cooking! Here are a few ideas:
* **Salads:** Mustard greens add a peppery kick to any salad. Try pairing them with other greens, vegetables, and a vinaigrette dressing.
* **Stir-Fries:** Mustard greens are a great addition to stir-fries. They cook quickly and add a lot of flavor.
* **Soups:** Add mustard greens to soups for a boost of nutrients and flavor.
* **Sautéed:** Sauté mustard greens with garlic and olive oil for a simple and delicious side dish.
* **Pickled:** Pickled mustard greens are a traditional Southern dish. They’re tangy, spicy, and delicious.
* **Smoothies:** Add a handful of mustard greens to your smoothies for a healthy and nutritious boost.
Conclusion
Growing mustard greens at home is a fun, easy, and rewarding experience. With a little bit of care and attention, you can have a constant supply of fresh, peppery greens for all your culinary creations. So, what are you waiting for? Get out there and start planting! Happy gardening!
Conclusion
So, there you have it! Growing your own mustard greens at home is not just a fun project; it’s a gateway to fresher, more flavorful meals and a deeper connection with the food you eat. Forget those limp, pre-packaged greens from the supermarket. Imagine the vibrant, peppery bite of freshly harvested mustard greens gracing your salads, stir-fries, and side dishes. The difference is truly remarkable, and once you’ve tasted the homegrown variety, you’ll never want to go back.
This DIY trick is a must-try for several compelling reasons. First and foremost, it puts you in complete control of the growing process. You can choose organic seeds, avoid harmful pesticides, and ensure that your greens are nurtured with the utmost care. Secondly, it’s incredibly cost-effective. A single packet of seeds can yield multiple harvests, saving you money in the long run. Thirdly, it’s a fantastic way to reduce your environmental impact by minimizing transportation and packaging waste. Finally, and perhaps most importantly, it’s incredibly rewarding to watch your own food grow from seed to table.
But the beauty of growing mustard greens at home lies in its adaptability. Feel free to experiment with different varieties of mustard greens to discover your favorite flavor profiles. Some popular choices include ‘Red Giant’ for its beautiful color and mild flavor, ‘Florida Broadleaf’ for its classic mustard taste, and ‘Osaka Purple’ for its spicy kick. You can also adjust the growing conditions to influence the flavor. For example, cooler temperatures tend to produce milder greens, while warmer temperatures can intensify the peppery notes.
Consider adding companion plants to your mustard green patch. Herbs like dill and cilantro can help deter pests and enhance the flavor of your greens. Marigolds are also a great choice for their pest-repelling properties and cheerful blooms.
Don’t be afraid to get creative with your harvest. Mustard greens are incredibly versatile in the kitchen. Use them in salads, soups, stews, stir-fries, and even smoothies. They can also be pickled, fermented, or used as a flavorful addition to sandwiches and wraps.
We wholeheartedly encourage you to try this DIY trick and experience the joy of growing your own mustard greens. It’s a simple, rewarding, and delicious way to enhance your culinary adventures. And most importantly, don’t forget to share your experiences with us! We’d love to hear about your successes, challenges, and favorite ways to use your homegrown mustard greens. Share your photos and tips on social media using #HomegrownMustardGreens. Let’s build a community of passionate home gardeners and inspire others to embrace the joys of growing their own food. So grab some seeds, get your hands dirty, and prepare to be amazed by the flavor and freshness of homegrown mustard greens. You’ll be amazed at how easy it is to grow mustard greens at home.
Frequently Asked Questions (FAQ)
What are the best conditions for growing mustard greens?
Mustard greens thrive in cool weather, ideally between 60°F and 75°F (15°C and 24°C). They prefer well-drained soil that is rich in organic matter. Full sun is ideal, but they can tolerate partial shade, especially in hotter climates. Consistent moisture is crucial, so water regularly, especially during dry spells. Aim for at least one inch of water per week.
How long does it take for mustard greens to grow?
Mustard greens are relatively fast-growing. You can typically harvest baby greens in about 3-4 weeks after planting. For mature leaves, expect to wait around 6-8 weeks. The exact time will depend on the variety, growing conditions, and your desired leaf size.
What are some common pests and diseases that affect mustard greens?
Common pests include aphids, flea beetles, cabbage worms, and slugs. Diseases can include downy mildew, white rust, and leaf spot. To prevent these issues, practice good garden hygiene, such as removing plant debris and weeds. Use row covers to protect plants from pests. Organic pest control methods, such as insecticidal soap or neem oil, can be effective for managing infestations. Ensure proper air circulation to minimize the risk of fungal diseases.
Can I grow mustard greens in containers?
Yes, mustard greens are well-suited for container gardening. Choose a pot that is at least 6-8 inches deep and wide to allow for adequate root growth. Use a high-quality potting mix that drains well. Place the container in a sunny location and water regularly. Container-grown mustard greens may require more frequent watering and fertilization than those grown in the ground.
How do I harvest mustard greens?
You can harvest mustard greens at any stage of growth, depending on your preference. For baby greens, simply snip off the leaves with scissors when they reach a few inches in length. For mature leaves, harvest the outer leaves first, allowing the inner leaves to continue growing. Avoid harvesting more than one-third of the plant at a time to ensure continued growth.
How do I store mustard greens after harvesting?
To store mustard greens, rinse them thoroughly and pat them dry. Wrap them loosely in a paper towel and place them in a plastic bag in the refrigerator. They will typically last for about 3-5 days. For longer storage, you can blanch and freeze them.
Can I eat the stems of mustard greens?
Yes, the stems of mustard greens are edible, but they can be a bit tough. To make them more palatable, remove the tough outer layer with a vegetable peeler. You can then chop the stems and add them to stir-fries, soups, or stews.
Are mustard greens nutritious?
Yes, mustard greens are packed with nutrients. They are an excellent source of vitamins A, C, and K, as well as folate, calcium, and fiber. They also contain antioxidants and other beneficial compounds.
Can I grow mustard greens indoors?
Yes, you can grow mustard greens indoors, but you will need to provide adequate light. A sunny windowsill or grow lights are essential for successful indoor growing. Use a well-draining potting mix and water regularly.
What are some creative ways to use mustard greens in cooking?
Mustard greens are incredibly versatile in the kitchen. They can be used in salads, soups, stews, stir-fries, and even smoothies. They can also be pickled, fermented, or used as a flavorful addition to sandwiches and wraps. Try adding them to egg dishes, pasta sauces, or as a side dish with grilled meats or fish. Experiment with different flavor combinations to discover your favorite ways to enjoy this nutritious and delicious green.

Leave a Comment