

Grow Pea Shoots Easily and unlock a world of fresh, vibrant flavor right in your own home! Have you ever wondered how chefs get those delicate, flavorful greens that add a touch of elegance to salads and sandwiches? Well, I’m here to let you in on a little secret: you can easily cultivate these culinary gems yourself, no sprawling garden required!
Pea shoots, also known as pea tendrils, have been a staple in Asian cuisine for centuries, prized for their sweet, subtly grassy flavor and tender texture. From stir-fries to salads, they add a nutritional boost and a delightful crunch. But beyond their culinary appeal, growing your own pea shoots is incredibly rewarding. In today’s fast-paced world, we’re often disconnected from the food we eat. This simple DIY project reconnects you with nature, allowing you to nurture something from seed to table. Plus, it’s a fantastic way to add fresh greens to your diet, especially during the colder months when garden produce is scarce.
This DIY guide will show you how to grow pea shoots easily, even if you have limited space or gardening experience. I’ll walk you through each step, from selecting the right seeds to harvesting your first batch of delicious, homegrown pea shoots. Get ready to transform your kitchen into a mini-farm and enjoy the satisfaction of growing your own food!
Grow Your Own Delicious Pea Shoots: A Simple DIY Guide
Hey there, fellow plant enthusiasts! Are you looking for a quick, easy, and incredibly rewarding gardening project? Look no further than growing pea shoots! These tender, flavorful greens are packed with nutrients and add a delightful crunch to salads, sandwiches, and stir-fries. Plus, they’re super easy to grow indoors, even if you don’t have a green thumb. I’m going to walk you through everything you need to know to get started.
What You’ll Need
Before we dive in, let’s gather our supplies. The beauty of this project is that you probably already have most of these items at home!
* Pea Seeds: You’ll want to use dried peas specifically for sprouting. Look for varieties like ‘Dun’ peas, ‘Maple’ peas, or even regular garden peas. Avoid using treated seeds, as they may contain chemicals you don’t want to consume. I usually get mine from the bulk section of my local health food store or online.
* Growing Trays or Containers: You can use anything from shallow plastic trays (like the ones you get from the grocery store) to repurposed takeout containers. Just make sure they have drainage holes! I personally love using old salad containers – they’re the perfect size.
* Growing Medium: You have a few options here. You can use potting soil, coconut coir, or even just paper towels. I prefer using potting soil because it provides a bit more nutrients to the pea shoots, but coconut coir is a great sustainable alternative.
* Watering Can or Spray Bottle: You’ll need something to keep your pea shoots moist. A gentle watering can or spray bottle works best to avoid disturbing the seeds.
* Dark Cover (Optional): A dark cover, like a towel or a piece of cardboard, can help with germination.
* Scissors or Kitchen Shears: For harvesting your delicious pea shoots!
Step-by-Step Instructions: From Seed to Salad
Okay, let’s get our hands dirty (or not, if you’re using paper towels!). Here’s a detailed guide to growing your own pea shoots:
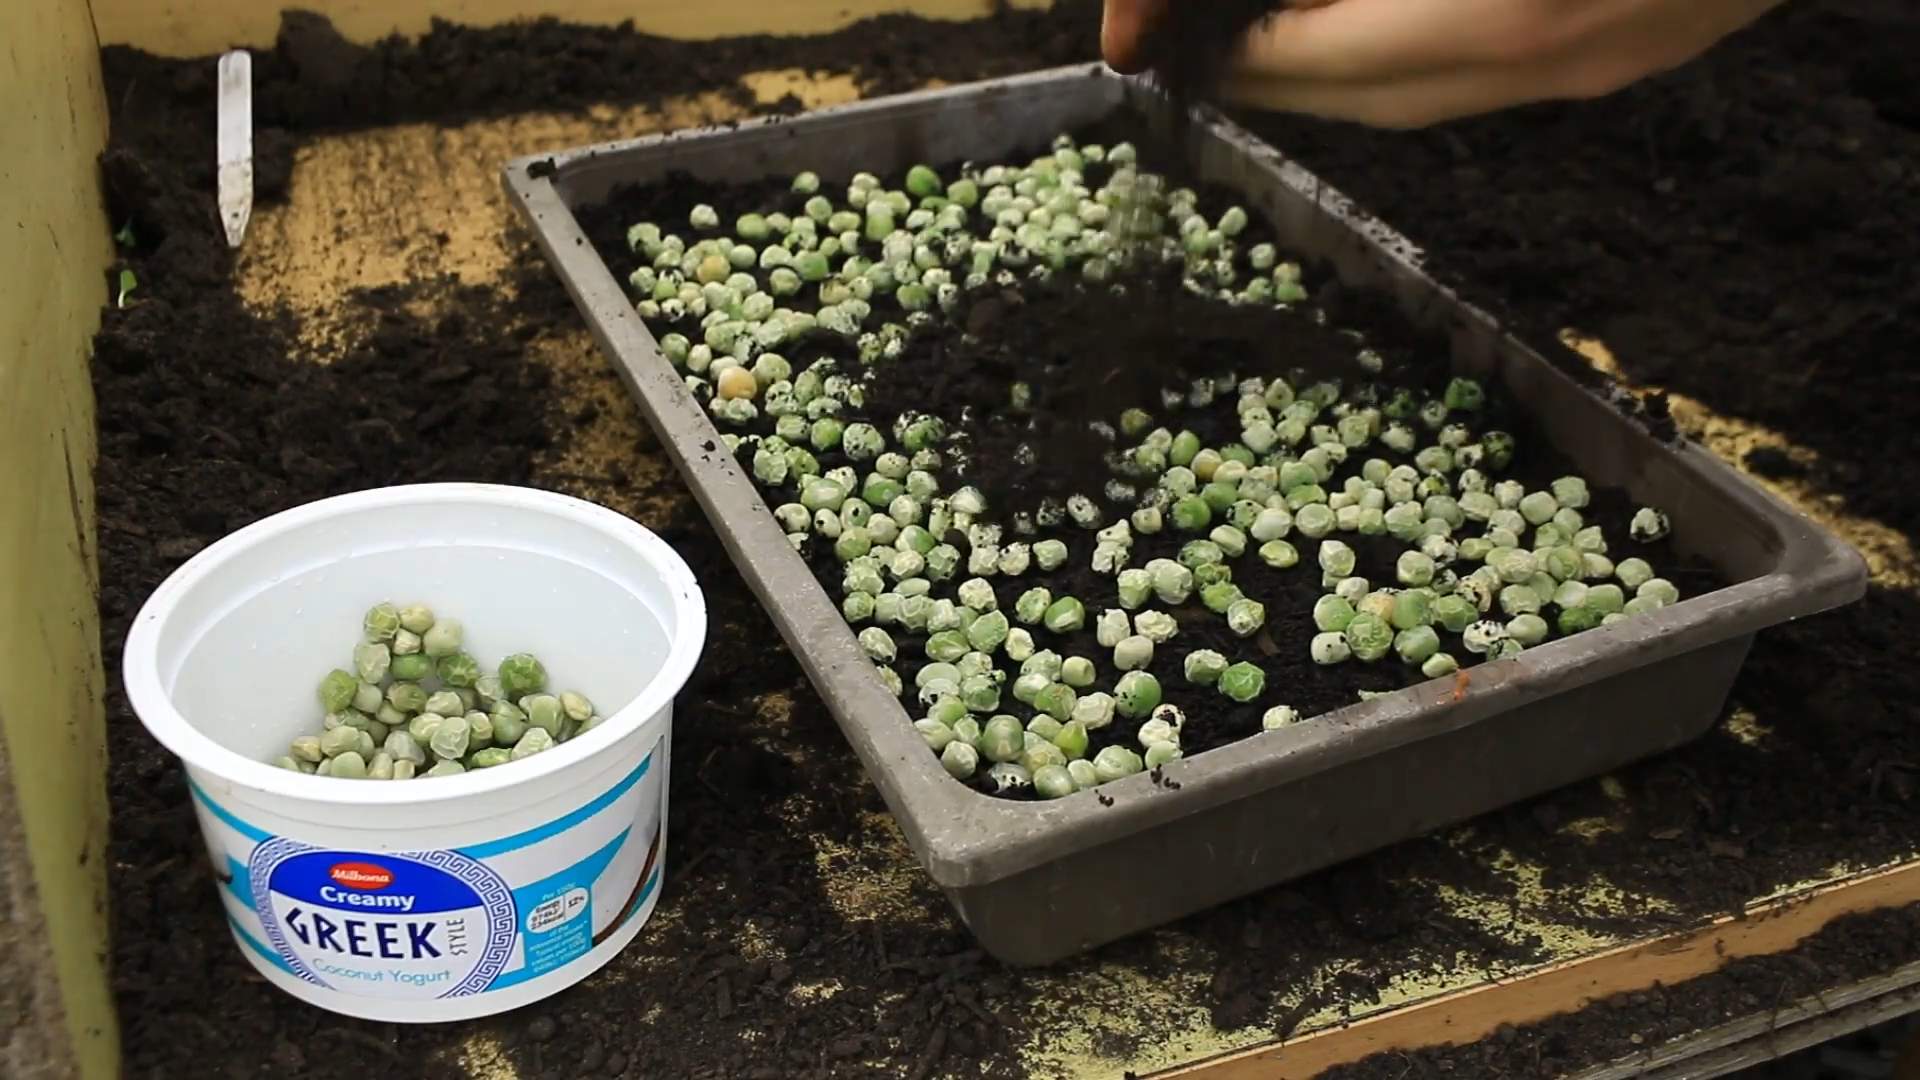
1. Soak the Pea Seeds: This is a crucial step to kickstart the germination process. Place your pea seeds in a bowl and cover them with cool water. Let them soak for 8-12 hours, or even overnight. You’ll notice they’ll plump up as they absorb the water. This helps soften the seed coat and makes it easier for the sprouts to emerge. I usually do this before I go to bed so they’re ready to go in the morning.
2. Prepare Your Growing Container: Now it’s time to get your container ready. If you’re using potting soil or coconut coir, fill your tray or container with about 1-2 inches of the growing medium. Gently pat it down to create a level surface. If you’re using paper towels, layer a few sheets at the bottom of the container and moisten them thoroughly.
3. Sow the Pea Seeds: Drain the soaked pea seeds and spread them evenly over the surface of your growing medium. Don’t overcrowd them, but you can pack them in pretty tightly. They don’t need a lot of space to grow. If you’re using soil or coir, gently press the seeds into the surface. If you’re using paper towels, just make sure they’re in contact with the moist paper.
4. Cover the Seeds (Optional): This step is optional, but I find it helps with germination. Cover the seeds with a dark cover, like a towel or a piece of cardboard. This creates a dark, humid environment that encourages sprouting.
5. Water Thoroughly: Gently water the seeds using your watering can or spray bottle. Make sure the growing medium is evenly moist, but not soggy. You don’t want to drown the seeds.
6. Place in a Cool, Dark Place: Place your container in a cool, dark place, like a cupboard or a basement. This is where the magic happens!
7. Check Daily and Water as Needed: Check on your pea shoots daily. Make sure the growing medium stays moist. If it starts to dry out, give them a gentle watering. You might need to water them once or twice a day, depending on the humidity and temperature.
8. Remove the Cover: After 2-3 days, you should start to see the pea seeds sprouting. Once they’ve sprouted, remove the dark cover and move the container to a bright location. A windowsill that gets indirect sunlight is perfect.
9. Provide Light: Pea shoots need light to grow strong and healthy. If you don’t have a sunny windowsill, you can use a grow light. Just make sure the light is not too intense, as it can burn the delicate shoots.
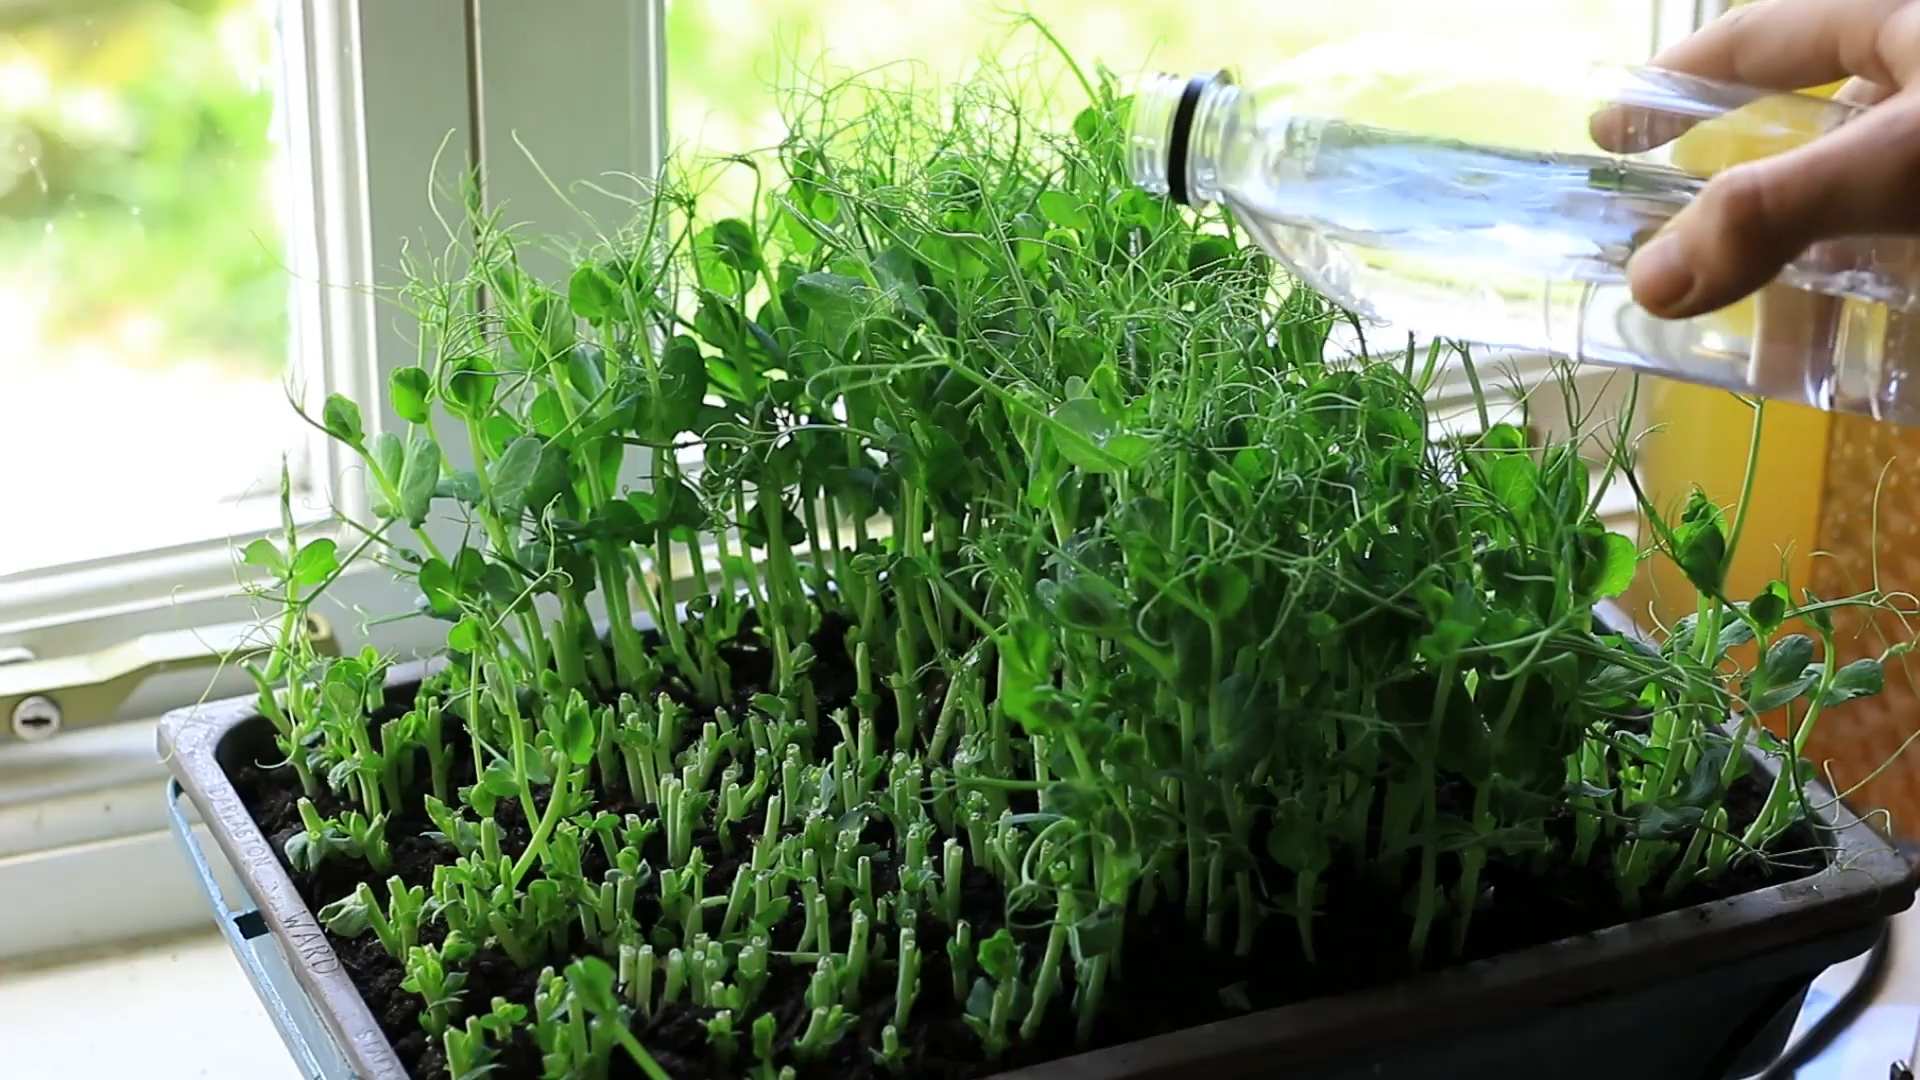
10. Water Regularly: Continue to water your pea shoots regularly, keeping the growing medium moist but not soggy.
11. Harvest Your Pea Shoots: After about 1-2 weeks, your pea shoots will be ready to harvest! They should be about 4-6 inches tall and have several leaves. Use scissors or kitchen shears to cut the shoots just above the lowest set of leaves. This will encourage them to regrow, giving you multiple harvests.
12. Enjoy Your Harvest! Rinse your pea shoots and enjoy them in salads, sandwiches, stir-fries, or as a garnish. They’re also delicious on their own with a little bit of olive oil and salt.
Troubleshooting Tips
Even with the best instructions, sometimes things don’t go exactly as planned. Here are a few common issues you might encounter and how to fix them:
* Seeds Not Germinating: If your seeds aren’t germinating, make sure they’re getting enough moisture. Also, check the temperature. Pea seeds germinate best in cool temperatures (around 60-70°F). If it’s too hot or too cold, they might not sprout.
* Mold Growth: If you see mold growing on your pea shoots or in the growing medium, it’s usually a sign of overwatering or poor ventilation. Make sure your container has drainage holes and that you’re not watering too much. You can also try increasing the airflow around the plants.
* Leggy Pea Shoots: If your pea shoots are tall and spindly, they’re probably not getting enough light. Move them to a brighter location or use a grow light.
* Yellowing Leaves: Yellowing leaves can be a sign of nutrient deficiency. If you’re using potting soil, it should provide enough nutrients. However, if you’re using paper towels or coconut coir, you might need to add a diluted liquid fertilizer.
Maximizing Your Harvest: Tips and Tricks
Want to get the most out of your pea shoot growing experience? Here are a few extra tips and tricks I’ve learned along the way:
* Succession Planting: To have a continuous supply of pea shoots, try succession planting. Sow a new batch of seeds every week or two. This way, you’ll always have fresh pea shoots ready to harvest.
* Regrowing Pea Shoots: As I mentioned earlier, you can regrow pea shoots after harvesting. Just leave a few leaves on the stem and continue to water them. They’ll usually regrow in a week or two.
* Experiment with Different Varieties: There are many different varieties of pea seeds you can use to grow pea shoots. Try experimenting with different varieties to find your favorite flavor.
* Use a Seed Sprouter: If you want to make the process even easier, you can use a seed sprouter. These devices provide the perfect environment for sprouting seeds and can help prevent mold growth.
* Compost Spent Shoots: Once your pea shoots have finished producing, you can compost the spent shoots and growing medium. This is a great way to recycle nutrients back into your garden.
Choosing the Right Pea Variety
Not all peas are created equal when it comes to growing shoots. Some varieties are better suited for this purpose than others. Here’s a breakdown of some popular choices:
* Dun Peas: These are a classic choice for pea shoots. They have a mild, sweet flavor and grow quickly. They’re also relatively inexpensive and easy to find.
* Maple Peas: Maple peas have a slightly nutty flavor and are also a good choice for pea shoots. They tend to be a bit more expensive than Dun peas.
* Snow Peas: While you can technically grow snow pea shoots, they tend to be a bit more delicate and less flavorful than other varieties.
* Garden Peas: Regular garden peas can also be used for pea shoots, but they may take a bit longer to germinate and grow.
Important Note: Always make sure you’re using untreated pea seeds for sprouting. Treated seeds may contain chemicals that are harmful to consume.
Choosing Your Growing Medium
The growing medium you choose will affect the flavor and nutrient content of your pea shoots. Here’s a closer look at the different options
Conclusion
So, there you have it! Growing your own pea shoots is not only incredibly simple, but it’s also a rewarding experience that brings fresh, vibrant flavor right to your kitchen. Forget those expensive, pre-packaged containers from the grocery store. With just a few basic supplies and a little bit of patience, you can cultivate a continuous supply of these nutritious and delicious greens.
The beauty of this DIY project lies in its accessibility. Whether you have a sprawling garden or just a sunny windowsill, you can successfully grow pea shoots. It’s a fantastic way to introduce children to the wonders of gardening, teaching them about the life cycle of plants and the importance of fresh, healthy food. Plus, it’s a sustainable practice that reduces your reliance on commercially grown produce, minimizing your environmental footprint.
But the benefits extend far beyond convenience and sustainability. Pea shoots are packed with vitamins, minerals, and antioxidants, making them a nutritional powerhouse. Adding them to your salads, sandwiches, stir-fries, or even using them as a garnish will instantly elevate your meals, both in terms of flavor and nutritional value.
Don’t be afraid to experiment with different varieties of peas to discover your favorite flavor profile. Snow peas, sugar snap peas, and even dried green peas can all be used to grow delicious shoots. You can also try varying the growing medium. While soil is a classic choice, you can also use coconut coir, vermiculite, or even just damp paper towels. Each medium will yield slightly different results, so have fun exploring the possibilities.
Consider using different containers as well. Shallow trays, repurposed plastic containers, or even terracotta pots can all work well. Just make sure your container has adequate drainage to prevent waterlogging.
And if you’re feeling adventurous, why not try adding a little bit of organic fertilizer to your growing medium? This can help to boost the growth of your pea shoots and enhance their flavor. Just be sure to follow the instructions on the fertilizer package carefully to avoid over-fertilizing.
The key to success with this DIY trick is consistency. Make sure to water your pea shoots regularly, keeping the growing medium consistently moist but not soggy. And be sure to provide them with plenty of light, either natural or artificial. With a little bit of care and attention, you’ll be harvesting your own fresh pea shoots in no time.
We are confident that once you experience the satisfaction of growing your own pea shoots, you’ll be hooked. It’s a simple, rewarding, and delicious way to add a touch of freshness to your life. So, gather your supplies, plant your seeds, and get ready to enjoy the bounty of your own homegrown pea shoots.
We encourage you to try this DIY trick and share your experiences with us! Let us know what varieties of peas you used, what growing medium you preferred, and any tips or tricks you discovered along the way. We’d love to hear from you and see your beautiful pea shoot creations. Share your photos and stories on our social media channels using #HomegrownPeaShoots. Happy growing!
Frequently Asked Questions (FAQ)
What kind of peas should I use to grow pea shoots?
You have several options when choosing peas for growing pea shoots. Snow peas and sugar snap peas are popular choices because they produce sweet and tender shoots. You can also use dried green peas, which are readily available and often more economical. Experiment with different varieties to find your favorite flavor. Just make sure the peas are intended for planting and haven’t been treated with any chemicals.
How long does it take to grow pea shoots?
One of the great things about growing pea shoots is how quickly they grow. You can typically harvest your first batch of shoots within 10-14 days of planting. The exact time will depend on factors such as temperature, light, and the variety of peas you’re using.
What kind of light do pea shoots need?
Pea shoots need plenty of light to thrive. Ideally, they should receive at least 6 hours of direct sunlight per day. If you don’t have a sunny windowsill, you can use grow lights to supplement the natural light. Position the grow lights a few inches above the pea shoots and keep them on for 12-16 hours per day.
How often should I water pea shoots?
It’s important to keep the growing medium consistently moist, but not soggy. Water your pea shoots regularly, typically every day or every other day, depending on the humidity and temperature. Check the moisture level of the soil or growing medium by sticking your finger in it. If it feels dry to the touch, it’s time to water.
How do I harvest pea shoots?
Harvesting pea shoots is easy. Simply use scissors or shears to cut the shoots just above the lowest set of leaves. This will encourage the plant to produce more shoots. You can harvest pea shoots multiple times from the same planting.
Can I eat the pea shoots raw?
Yes, pea shoots are delicious raw. They have a sweet, slightly grassy flavor and a tender texture. They’re a great addition to salads, sandwiches, and wraps. You can also cook pea shoots by stir-frying, steaming, or sautéing them.
What are the nutritional benefits of pea shoots?
Pea shoots are packed with vitamins, minerals, and antioxidants. They’re a good source of vitamin C, vitamin A, folate, and fiber. They also contain antioxidants that can help protect your body against damage from free radicals.
Can I grow pea shoots indoors year-round?
Yes, you can grow pea shoots indoors year-round. This makes them a great option for people who live in climates with cold winters or limited outdoor space. Just make sure to provide them with adequate light and water.
What if my pea shoots start to mold?
Mold can sometimes be a problem when growing pea shoots, especially in humid environments. To prevent mold, make sure to provide good ventilation and avoid overwatering. If you see any mold, remove the affected shoots immediately. You can also try spraying the shoots with a diluted solution of hydrogen peroxide and water.
Can I reuse the soil after harvesting pea shoots?
It’s generally not recommended to reuse the soil after harvesting pea shoots, as it may contain residual nutrients and pathogens. It’s best to start with fresh soil for each planting. You can compost the old soil to enrich your garden.
Are there any variations I can try when growing pea shoots?
Absolutely! Experiment with different varieties of peas, growing mediums, and containers to find what works best for you. You can also try adding a little bit of organic fertilizer to your growing medium to boost growth and flavor. Consider adding companion plants like basil or cilantro nearby to enhance the flavor of your pea shoots.
How do I store harvested pea shoots?
To store harvested pea shoots, gently rinse them with cold water and pat them dry. Wrap them in a paper towel and store them in a plastic bag in the refrigerator. They should stay fresh for up to a week.
Why are my pea shoots not growing?
Several factors can contribute to pea shoots not growing. Ensure they are receiving adequate light (at least 6 hours of direct sunlight or 12-16 hours under grow lights). Check the moisture level of the soil; it should be consistently moist but not waterlogged. Also, make sure the temperature is suitable; pea shoots prefer cooler temperatures (60-70°F). Finally, ensure the peas you used were viable and not treated with chemicals.
Is growing pea shoots a good way to introduce kids to gardening?
Yes! Growing pea shoots is an excellent way to introduce children to the joys of gardening. It’s a quick and easy project that yields visible results in a short amount of time, which can be very rewarding for kids. They can learn about the life cycle of plants, the importance of healthy food, and the satisfaction of growing their own food.
Leave a Comment