

Grow tasty tomatoes, right in your backyard! Imagine biting into a sun-ripened, juicy tomato, bursting with flavor, that you nurtured from a tiny seed. Sounds idyllic, doesn’t it? For centuries, cultivating tomatoes has been a cherished tradition, dating back to the Aztecs and Incas who first domesticated this vibrant fruit. Today, the joy of harvesting your own tomatoes is within everyone’s reach, regardless of garden size or experience level.
But let’s be honest, sometimes growing those perfect, flavorful tomatoes can feel like a real challenge. Pests, diseases, and unpredictable weather can quickly derail your dreams of a bountiful harvest. That’s where these DIY tricks and hacks come in! I’m going to share some simple, yet incredibly effective, techniques that will help you grow tasty tomatoes like a pro, even if you’re a complete beginner.
This article is packed with practical tips to overcome common tomato-growing hurdles, from choosing the right varieties for your climate to creating the ideal soil conditions and warding off unwanted critters. So, get ready to roll up your sleeves and discover the secrets to a thriving tomato garden that will have you enjoying delicious, homegrown tomatoes all season long!
Growing Delicious Tomatoes: A DIY Guide for a Bountiful Harvest
Okay, tomato lovers, let’s get down to business! I’m going to walk you through everything you need to know to grow the juiciest, most flavorful tomatoes you’ve ever tasted, right in your own backyard (or even on your balcony!). This isn’t just about throwing some seeds in the ground; we’re going for tomato perfection!
Choosing the Right Tomato Variety
Before we even think about soil, we need to pick the right tomato for *you*. There are literally hundreds of varieties, and it can be overwhelming. Here’s a quick breakdown to help you decide:
* **Determinate vs. Indeterminate:** This is crucial!
* **Determinate:** These tomatoes grow to a certain size and then produce all their fruit at once, making them great for canning or making sauce. They’re also bushier and more compact, ideal for smaller spaces. Think Roma or Celebrity.
* **Indeterminate:** These are the vining types that keep growing and producing fruit throughout the season. They need staking or caging and will give you a continuous harvest. Think Beefsteak, Cherry, or Heirloom varieties.
* **Size and Use:**
* **Cherry/Grape:** Small, sweet, and perfect for salads or snacking.
* **Roma/Plum:** Meaty, with fewer seeds, ideal for sauces and canning.
* **Beefsteak:** Large, juicy, and great for slicing on sandwiches.
* **Heirloom:** Often have unique flavors and colors, but can be more susceptible to diseases.
* **Disease Resistance:** Look for varieties labeled with letters like V, F, N, T, or A. These indicate resistance to common tomato diseases like Verticillium wilt, Fusarium wilt, Nematodes, Tobacco Mosaic Virus, and Alternaria.
My personal recommendation? Start with a mix! Try a reliable determinate like Roma for sauce and an indeterminate like Early Girl for slicing.
Getting Started: Seeds vs. Seedlings
You have two options here: starting from seeds indoors or buying seedlings from a nursery.
* **Starting from Seeds:** This gives you more control over the variety and can be cheaper, but it requires more time and effort. You’ll need seed starting trays, seed starting mix, and a grow light.
* **Buying Seedlings:** This is the easier option, especially for beginners. Just make sure to choose healthy-looking plants with sturdy stems and no signs of disease.
I usually start some seeds indoors and buy a few seedlings to get a head start. It’s the best of both worlds!
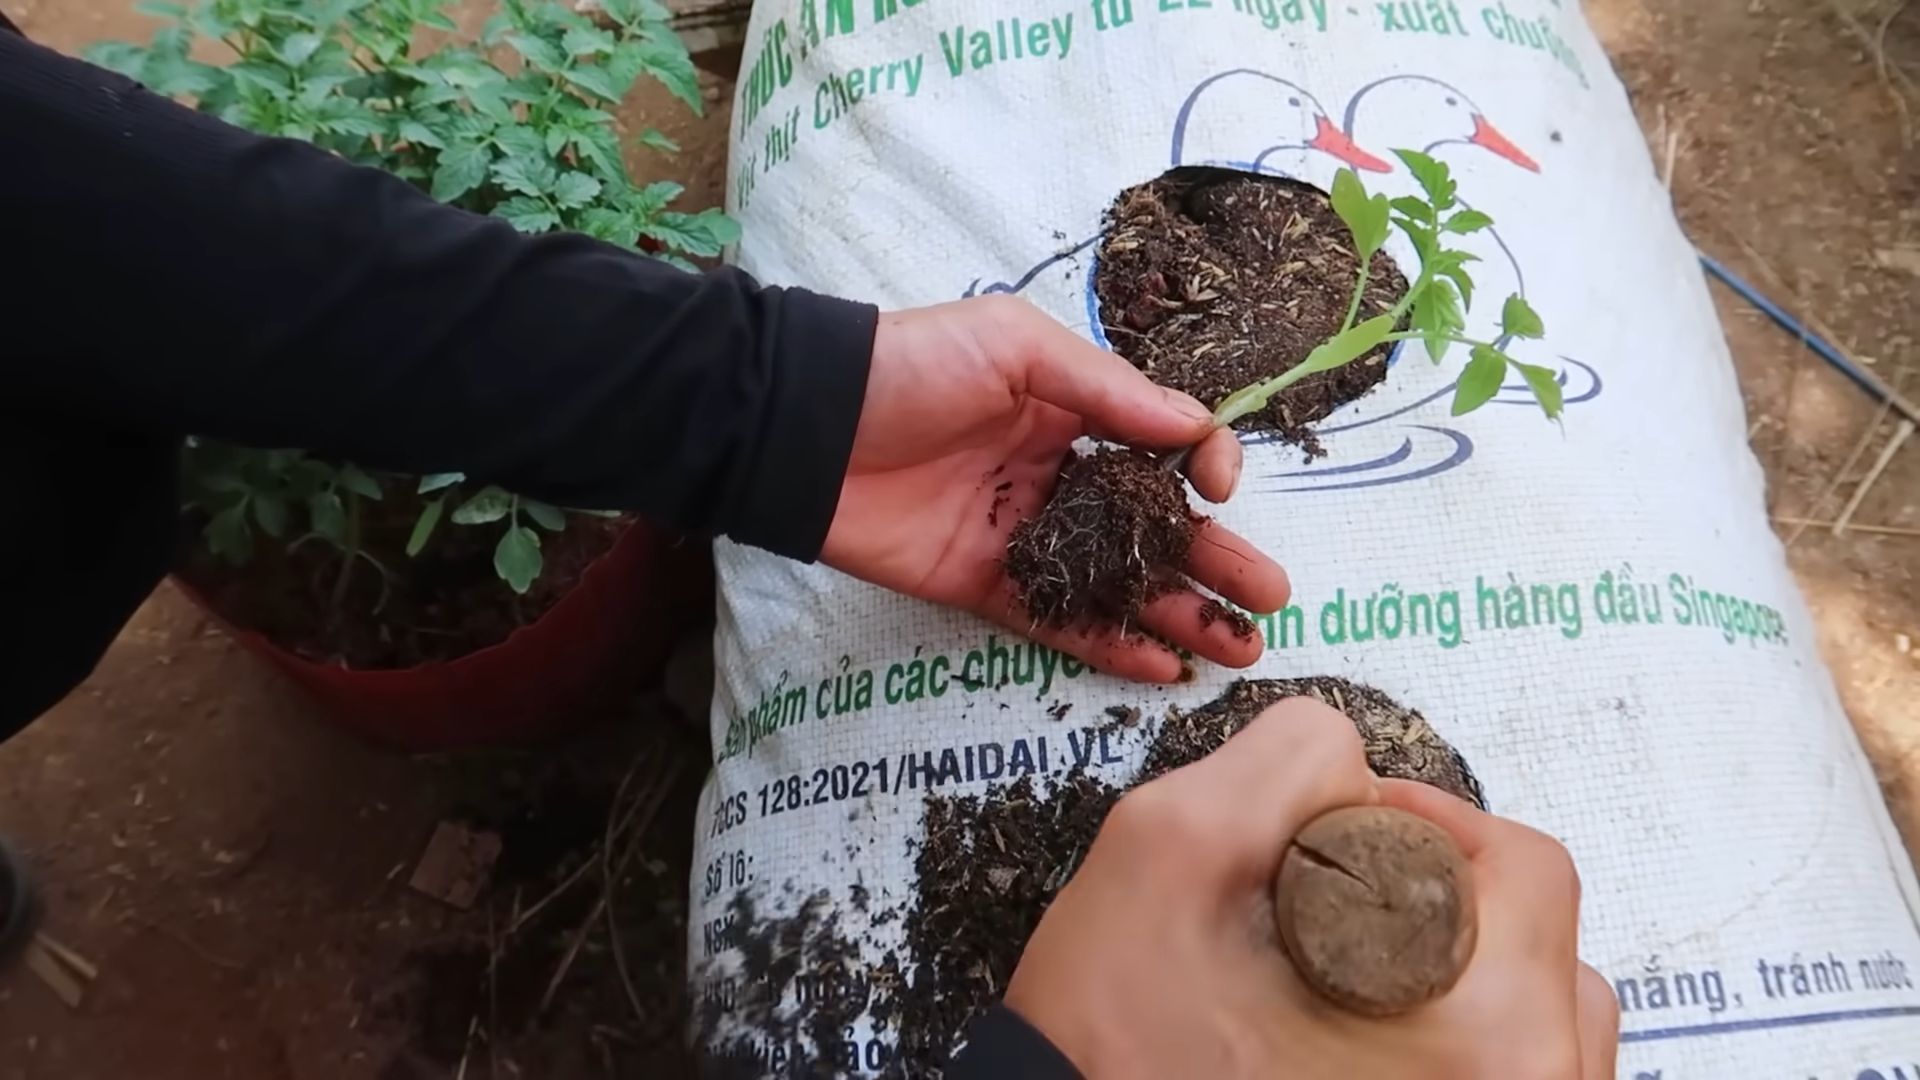
Step-by-Step Guide: Growing Tomatoes from Seedlings
Okay, let’s assume you’ve opted for the seedling route. Here’s how to get those little guys thriving:
1. **Choose the Right Location:** Tomatoes need at least 6-8 hours of direct sunlight per day. Pick a spot in your garden that gets plenty of sun.
2. **Prepare the Soil:** This is super important! Tomatoes need well-draining soil that’s rich in organic matter.
* Amend the soil: Dig in plenty of compost, aged manure, or other organic matter. This will improve drainage, add nutrients, and help retain moisture.
* Check the pH: Tomatoes prefer a slightly acidic soil pH of around 6.0-6.8. You can test your soil with a pH meter or a soil testing kit. If your soil is too alkaline, you can amend it with sulfur.
3. **Dig the Planting Hole:** Dig a hole that’s twice as wide as the seedling’s root ball and just as deep.
4. **Planting Deep:** This is a trick I swear by! Remove the bottom leaves from the seedling and plant it deep, burying the stem up to the first set of leaves. This encourages the plant to develop more roots along the buried stem, making it stronger and more productive.
5. **Water Thoroughly:** After planting, water the seedlings thoroughly to help them settle in.
6. **Add Support:** If you’re growing indeterminate varieties, you’ll need to provide support.
* Staking: Drive a sturdy stake into the ground next to the plant and tie the stem to the stake with soft twine or plant ties.
* Caging: Place a tomato cage around the plant to provide support as it grows.
7. **Mulch:** Apply a layer of mulch around the base of the plants to help retain moisture, suppress weeds, and regulate soil temperature. Straw, wood chips, or shredded leaves work well.
Watering and Fertilizing
Watering and fertilizing are key to healthy tomato plants.
* **Watering:** Water deeply and regularly, especially during hot, dry weather. Aim to water at the base of the plant to avoid wetting the leaves, which can lead to disease. A good rule of thumb is to water when the top inch of soil feels dry.
* **Fertilizing:** Tomatoes are heavy feeders, so you’ll need to fertilize them regularly.
* At planting: Add a slow-release fertilizer to the planting hole.
* During the growing season: Fertilize every 2-3 weeks with a balanced fertilizer or a tomato-specific fertilizer. Follow the instructions on the fertilizer label.
* Epsom Salts: I also like to give my tomato plants a boost with Epsom salts. Dissolve 1 tablespoon of Epsom salts in a gallon of water and spray the foliage every 2-3 weeks. This helps prevent magnesium deficiency, which can cause blossom end rot.
Pruning Your Tomato Plants
Pruning can help improve air circulation, reduce disease, and encourage fruit production.
* **Suckers:** These are the small shoots that grow in the “V” between the main stem and the branches. Remove them regularly, especially on indeterminate varieties. This will help the plant focus its energy on producing fruit.
* **Lower Leaves:** As the plant grows, remove the lower leaves that are touching the ground. This will help prevent soil-borne diseases from spreading to the plant.
* Yellowing Leaves:** Remove any yellowing or diseased leaves promptly.
Dealing with Pests and Diseases
Unfortunately, tomatoes are susceptible to a variety of pests and diseases. Here are some common problems and how to deal with them:
* **Aphids:** These tiny insects suck the sap from plants. Spray them with a strong stream of water or use insecticidal soap.
* **Tomato Hornworms:** These large green caterpillars can quickly defoliate a tomato plant. Pick them off by hand or use Bacillus thuringiensis (Bt), a natural insecticide.
* **Blossom End Rot:** This is caused by a calcium deficiency and results in a dark, leathery spot on the bottom of the tomato. Ensure consistent watering and add calcium to the soil.
* **Early Blight:** This fungal disease causes dark spots on the leaves. Remove infected leaves and spray with a fungicide.
* **Septoria Leaf Spot:** This fungal disease causes small, circular spots on the leaves. Remove infected leaves and spray with a fungicide.
Prevention is key! Good air circulation, proper watering, and healthy soil can help prevent many pest and disease problems.
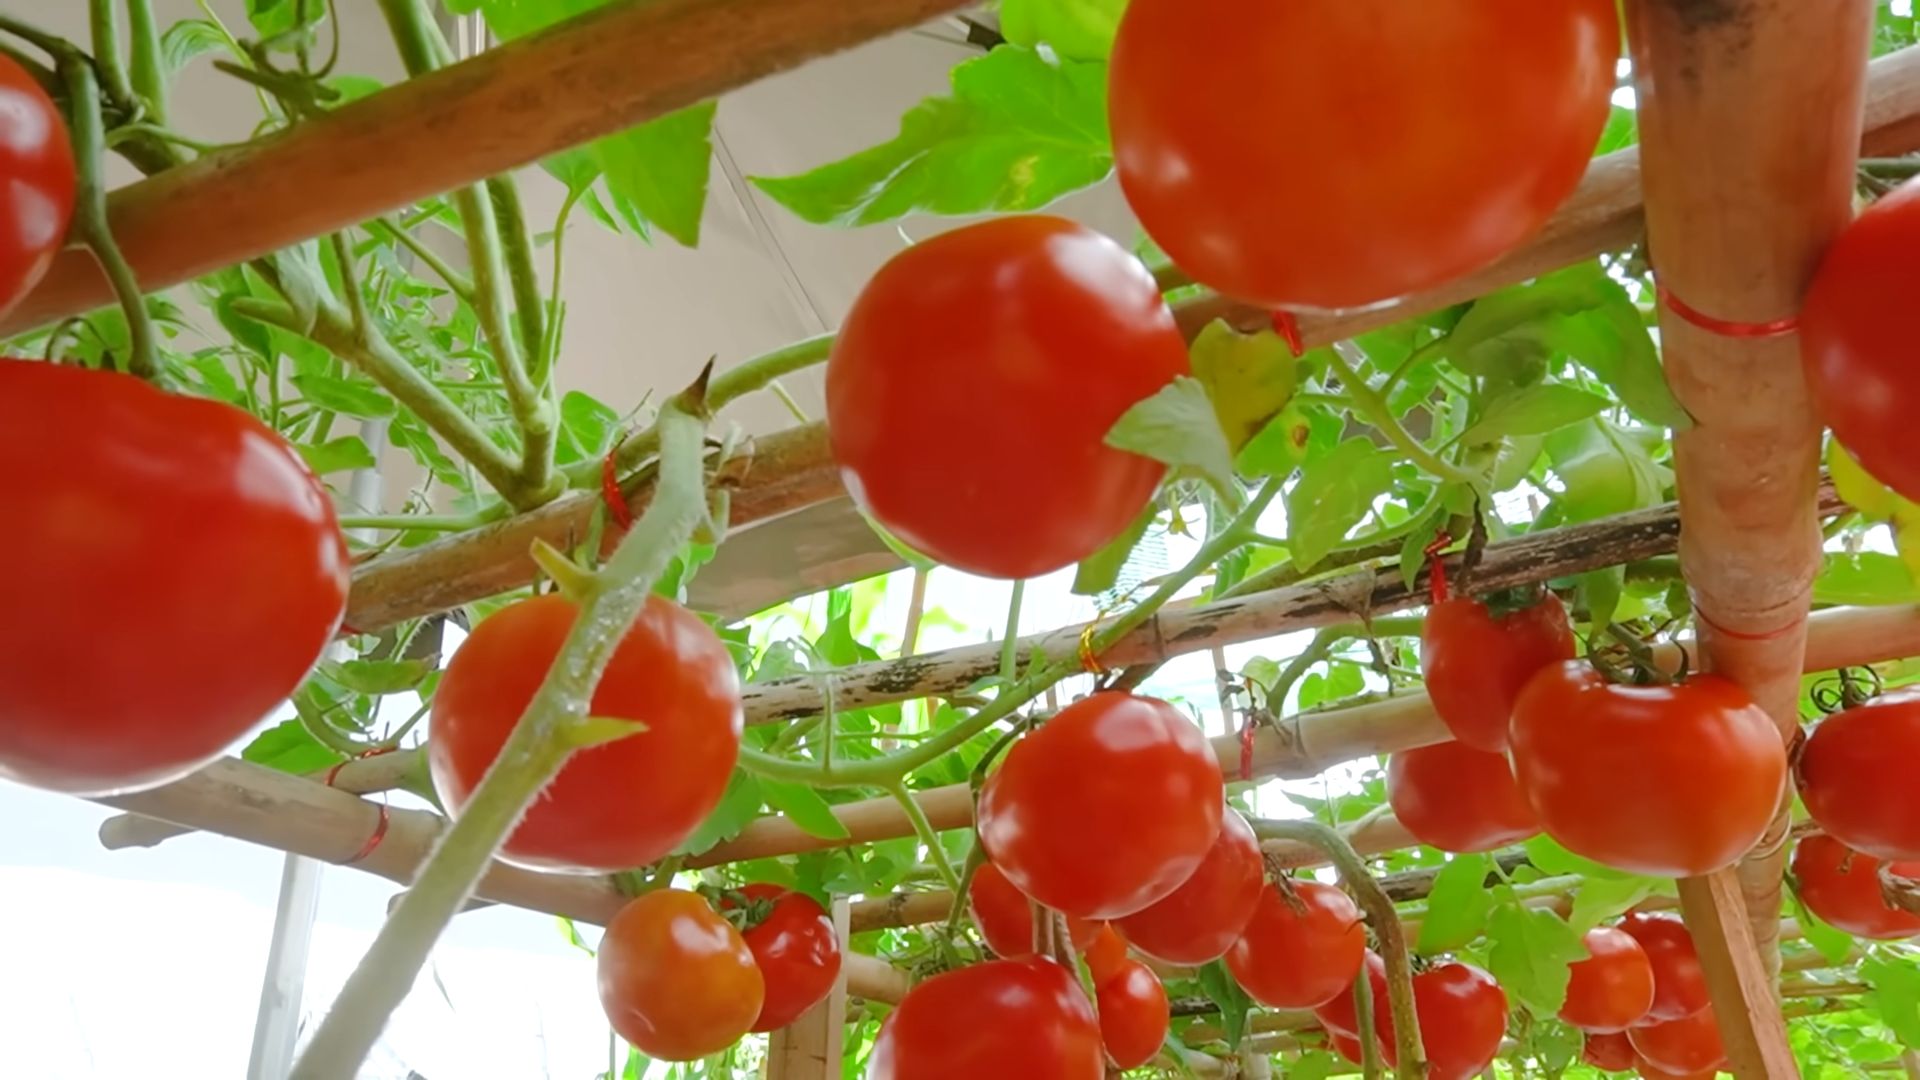
Harvesting Your Tomatoes
The moment we’ve all been waiting for!
* **Ripeness:** Tomatoes are ripe when they are fully colored and slightly soft to the touch.
* **Harvesting:** Gently twist the tomato off the vine.
* **Storage:** Store ripe tomatoes at room temperature. Refrigerating them can affect their flavor and texture.
There’s nothing quite like the taste of a homegrown tomato, still warm from the sun. Enjoy!
Growing Tomatoes in Containers
Don’t have a garden? No problem! You can still grow tomatoes in containers.
* **Choose the Right Container:** Select a large container, at least 20 gallons in size.
* **Use a Good Quality Potting Mix:** Don’t use garden soil in containers, as it can become compacted and drain poorly.
* **Choose the Right Variety:** Determinate varieties are generally better suited for containers, but you can also grow smaller indeterminate varieties with proper support.
* **Water and Fertilize Regularly:** Container plants dry out more quickly than plants in the ground, so you’ll need to water them more frequently. You’ll also need to fertilize them regularly, as the nutrients in the potting mix will be depleted over time.
* **Provide Support:** Even determinate varieties may need some support in containers.
Troubleshooting Common Tomato Problems
Let’s tackle some common issues you might encounter:
* **Yellowing Leaves:** Could be overwatering, underwatering, nutrient deficiency, or disease. Check the soil moisture, fertilize, and inspect for pests or diseases.
* **Blossom Drop:** This happens when the flowers fall off without setting fruit. It can be caused by extreme temperatures, poor pollination, or nutrient deficiencies. Ensure consistent watering, provide shade during hot weather, and gently shake the plants to encourage pollination.
* **Cracked Tomatoes:** This is usually caused by
Conclusion
So, there you have it! This simple, yet incredibly effective DIY trick for growing tasty tomatoes is a game-changer for any gardener, regardless of experience level. We’ve shown you how to unlock the full potential of your tomato plants, leading to a harvest bursting with flavor and abundance. Forget bland, store-bought tomatoes – with this method, you’ll be enjoying the sweet, tangy taste of homegrown goodness all season long.
Why is this a must-try? Because it addresses the core needs of tomato plants in a way that’s both sustainable and cost-effective. By focusing on nutrient delivery and soil health, you’re creating an environment where your plants can thrive. This translates to stronger, healthier plants that are more resistant to disease and produce significantly more fruit. Plus, it’s incredibly satisfying to know you’re nurturing your plants with a homemade solution.
But don’t stop there! Feel free to experiment with variations to tailor this trick to your specific needs and preferences. For example, if you’re growing organic tomatoes, ensure all your ingredients are certified organic. You could also try adding a small amount of Epsom salts to the mixture for an extra boost of magnesium, which is known to promote fruit production. Another variation is to adjust the ratio of ingredients based on your soil type. If you have heavy clay soil, you might want to use a slightly higher proportion of compost to improve drainage. If you have sandy soil, you might want to add more water-retaining materials like peat moss or coconut coir.
Consider using different types of compost. Worm castings are an excellent choice for their rich nutrient content and beneficial microbes. Aged manure can also be a great addition, but be sure it’s fully composted to avoid burning your plants. You can even incorporate coffee grounds into your compost mix for an extra nitrogen boost.
Remember, gardening is all about experimentation and learning what works best for you. Don’t be afraid to try new things and adapt this trick to your unique growing conditions. The most important thing is to pay attention to your plants and observe how they respond to different treatments.
We’re confident that this DIY trick will transform your tomato-growing experience. It’s easy to implement, affordable, and delivers remarkable results. So, grab your supplies, get your hands dirty, and prepare to be amazed by the abundance of delicious tomatoes you’ll be harvesting in no time.
Now, we want to hear from you! Give this DIY trick a try and share your results with us. Post pictures of your thriving tomato plants and tell us about your experience in the comments section below. We’re eager to see how this method works for you and learn from your insights. Let’s create a community of tomato-growing enthusiasts who are passionate about sharing their knowledge and helping each other succeed.
This DIY trick to grow tasty tomatoes is not just about growing bigger tomatoes; it’s about growing better tomatoes. It’s about connecting with nature, nurturing your plants, and enjoying the fruits (or vegetables!) of your labor. So, what are you waiting for? Get started today and experience the joy of growing your own delicious, homegrown tomatoes!
Frequently Asked Questions (FAQ)
What exactly does this DIY trick do for my tomato plants?
This DIY trick primarily focuses on improving soil health and providing essential nutrients directly to the roots of your tomato plants. It helps to create a more balanced and fertile growing environment, which leads to stronger, healthier plants that are better able to resist disease and produce more fruit. The specific ingredients in the mixture provide a range of benefits, including improved drainage, increased water retention, and a slow-release source of nutrients.
How often should I apply this DIY trick to my tomato plants?
The frequency of application will depend on the specific needs of your plants and the quality of your soil. As a general guideline, you can apply this trick every 2-3 weeks during the growing season. However, if you notice that your plants are showing signs of nutrient deficiency, such as yellowing leaves or stunted growth, you may need to apply it more frequently. Conversely, if your plants are growing vigorously and appear healthy, you can reduce the frequency of application. Always observe your plants carefully and adjust your watering and feeding schedule accordingly.
Can I use this DIY trick on other types of plants besides tomatoes?
While this trick is specifically formulated for tomatoes, it can also be beneficial for other fruiting vegetables, such as peppers, eggplants, and cucumbers. The nutrient-rich mixture can help to promote healthy growth and abundant fruit production in these plants as well. However, it’s important to note that different plants have different nutrient requirements, so you may need to adjust the ratio of ingredients accordingly. For example, peppers may benefit from a slightly higher proportion of phosphorus, while cucumbers may prefer a more nitrogen-rich mixture. Always research the specific needs of your plants before applying this trick.
What if I don’t have all the ingredients listed in the recipe? Can I substitute anything?
While it’s best to use all the ingredients listed in the recipe for optimal results, you can make some substitutions if necessary. For example, if you don’t have access to compost, you can use well-rotted manure or other organic matter. If you don’t have bone meal, you can use rock phosphate or another source of phosphorus. However, keep in mind that substitutions may affect the overall effectiveness of the trick. It’s always best to use the recommended ingredients whenever possible.
Is this DIY trick safe for organic gardening?
Yes, this DIY trick can be used in organic gardening as long as you use organic ingredients. Make sure that your compost, bone meal, and other ingredients are certified organic to avoid introducing synthetic chemicals or pesticides into your garden. Organic gardening is all about using natural methods to promote healthy plant growth, and this DIY trick fits perfectly into that philosophy.
My tomato plants are already producing fruit. Is it too late to use this DIY trick?
No, it’s never too late to use this DIY trick! Even if your tomato plants are already producing fruit, applying this mixture can still provide them with a boost of nutrients and help them to produce even more delicious tomatoes. In fact, providing your plants with extra nutrients during the fruiting stage can help to improve the size, flavor, and overall quality of your tomatoes.
How do I know if my tomato plants are getting too much or too little of this DIY trick?
The best way to determine if your tomato plants are getting the right amount of this DIY trick is to observe them carefully. If your plants are growing vigorously, have healthy green leaves, and are producing plenty of fruit, then you’re likely on the right track. However, if you notice signs of nutrient deficiency, such as yellowing leaves, stunted growth, or blossom end rot, then you may need to apply the trick more frequently. Conversely, if your plants are showing signs of nutrient toxicity, such as burnt leaf tips or excessive growth, then you may need to reduce the frequency of application.
Can I store the leftover mixture for later use?
Yes, you can store the leftover mixture for later use. Simply store it in an airtight container in a cool, dark place. The mixture should last for several weeks, or even months, if stored properly. However, it’s important to note that the mixture may become more concentrated over time, so you may need to dilute it with water before using it.
What kind of water should I use to mix with the ingredients?
Ideally, you should use rainwater or well water to mix with the ingredients. These types of water are free of chlorine and other chemicals that can harm your plants. However, if you don’t have access to rainwater or well water, you can use tap water. Just be sure to let the tap water sit out for 24 hours before using it to allow the chlorine to evaporate.
Will this DIY trick protect my tomato plants from pests and diseases?
While this DIY trick can help to improve the overall health and vigor of your tomato plants, it is not a substitute for proper pest and disease control. Healthy plants are generally more resistant to pests and diseases, but they can still be affected by them. It’s important to monitor your plants regularly for signs of pests or diseases and take appropriate action if necessary. This may involve using organic pesticides, fungicides, or other control methods.

Leave a Comment