

Grow Yellow Watermelon at Home: Imagine biting into a juicy, vibrant watermelon, but instead of the familiar red, you’re greeted with a burst of sunshine yellow! Sounds intriguing, right? For centuries, watermelons have been a symbol of summer, abundance, and refreshment, enjoyed across cultures from ancient Egypt to modern-day picnics. While the classic red reigns supreme, the yellow watermelon offers a unique twist on this beloved fruit, and I’m here to tell you that you can absolutely cultivate this sunny delight in your own backyard!
But why bother with yellow watermelons? Well, besides their stunning color and slightly sweeter, honey-like flavor, growing your own produce is incredibly rewarding. In a world where we’re increasingly disconnected from our food sources, grow yellow watermelon at home allows you to reconnect with nature, enjoy fresh, healthy food free from harmful chemicals, and impress your friends and family with your gardening prowess. Plus, who wouldn’t want to be the talk of the neighborhood with a unique and delicious homegrown treat? This DIY guide will provide you with simple, step-by-step instructions and insider tips to ensure your yellow watermelon growing journey is a success. Let’s get started!
Grow Your Own Sweet Sunshine: A Guide to Yellow Watermelons at Home
Hey there, fellow gardening enthusiasts! Ever dreamt of slicing into a vibrant, yellow watermelon you grew yourself? It’s totally achievable, and I’m here to guide you through the process. It’s not as tricky as you might think, and the reward of that first juicy bite is absolutely worth it. Let’s get started!
Choosing the Right Variety and Starting Seeds
First things first, you need to pick the right yellow watermelon variety. Some popular and delicious options include ‘Yellow Doll’, ‘Buttercup Yellow’, and ‘Honey Heart’. These are all known for their sweetness and relatively easy growth.
* Seed Selection: Opt for seeds from a reputable source. This ensures you’re getting genuine yellow watermelon seeds and increases your chances of success. Look for seeds labeled as disease-resistant, which will save you some headaches down the line.
* Starting Indoors (Recommended): Watermelons thrive in warm weather, so starting seeds indoors gives them a head start, especially if you live in a cooler climate.
1. Gather Your Supplies: You’ll need seed starting trays or small pots (peat pots are great because you can plant them directly into the ground later), seed starting mix (this is lighter and better draining than regular potting soil), a spray bottle, and a warm, sunny location or a grow light.
2. Sow the Seeds: Fill your trays or pots with seed starting mix, leaving about half an inch of space at the top. Moisten the soil gently with your spray bottle – you want it damp, not soggy. Plant 2-3 seeds per cell or pot, about half an inch deep.
3. Provide Warmth and Light: Watermelon seeds need warmth to germinate. Aim for a soil temperature of 70-85°F (21-29°C). A heat mat can be super helpful for this. Place your trays or pots in a warm, sunny spot or under a grow light. If using a grow light, keep it a few inches above the soil surface and provide 14-16 hours of light per day.
4. Keep the Soil Moist: Check the soil moisture daily and mist with your spray bottle as needed to keep it consistently damp. Avoid overwatering, which can lead to rot.
5. Thin the Seedlings: Once the seedlings emerge (usually within 7-10 days), thin them to one strong seedling per cell or pot. Snip off the weaker seedlings at the soil line with scissors – don’t pull them out, as this can disturb the roots of the remaining seedling.
* Direct Sowing (If Weather Permits): If you live in a region with a long, warm growing season, you can direct sow watermelon seeds into the ground.
1. Prepare the Soil: Choose a sunny spot with well-drained soil. Amend the soil with plenty of compost or well-rotted manure to improve fertility and drainage. Watermelons are heavy feeders!
2. Sow the Seeds: Sow the seeds about an inch deep and 2-3 feet apart. Water thoroughly after planting.
3. Protect from Pests: Keep an eye out for pests like cucumber beetles and squash bugs, which can damage young seedlings. You can use row covers to protect them until they are larger and more established.
Preparing the Garden Bed
Watermelons need plenty of space to sprawl, so choose a location with at least 6-8 hours of direct sunlight per day and plenty of room for the vines to grow.
* Soil Testing: Ideally, test your soil to determine its pH and nutrient levels. Watermelons prefer a slightly acidic to neutral soil pH (6.0-7.0). Amend the soil as needed based on your soil test results.
* Soil Amendment: Watermelons are heavy feeders, so amending the soil with plenty of organic matter is crucial. Work in a generous amount of compost, well-rotted manure, or other organic amendments into the soil before planting. This will improve drainage, fertility, and water retention.
* Raised Beds (Optional): Growing watermelons in raised beds can improve drainage and soil temperature, especially in areas with heavy clay soil.
* Spacing: Give your watermelon plants plenty of room to grow. Space them at least 2-3 feet apart in rows that are 6-8 feet apart. This allows for good air circulation, which helps prevent fungal diseases.
* Mulching: Mulch around the plants with straw, hay, or black plastic. Mulch helps retain moisture, suppress weeds, and warm the soil. Black plastic mulch can be particularly beneficial in cooler climates.
Transplanting Seedlings (If Starting Indoors)
Once your seedlings have developed a few sets of true leaves and the weather has warmed up (soil temperature consistently above 60°F or 15°C), it’s time to transplant them into the garden.
1. Harden Off the Seedlings: Before transplanting, you need to “harden off” the seedlings to acclimate them to outdoor conditions. Gradually expose them to increasing amounts of sunlight and wind over a period of 7-10 days. Start by placing them in a sheltered location for a few hours each day, and gradually increase the time they spend outdoors.
2. Prepare the Planting Holes: Dig holes that are slightly larger than the root balls of the seedlings. Space the holes according to the recommended spacing for your watermelon variety.
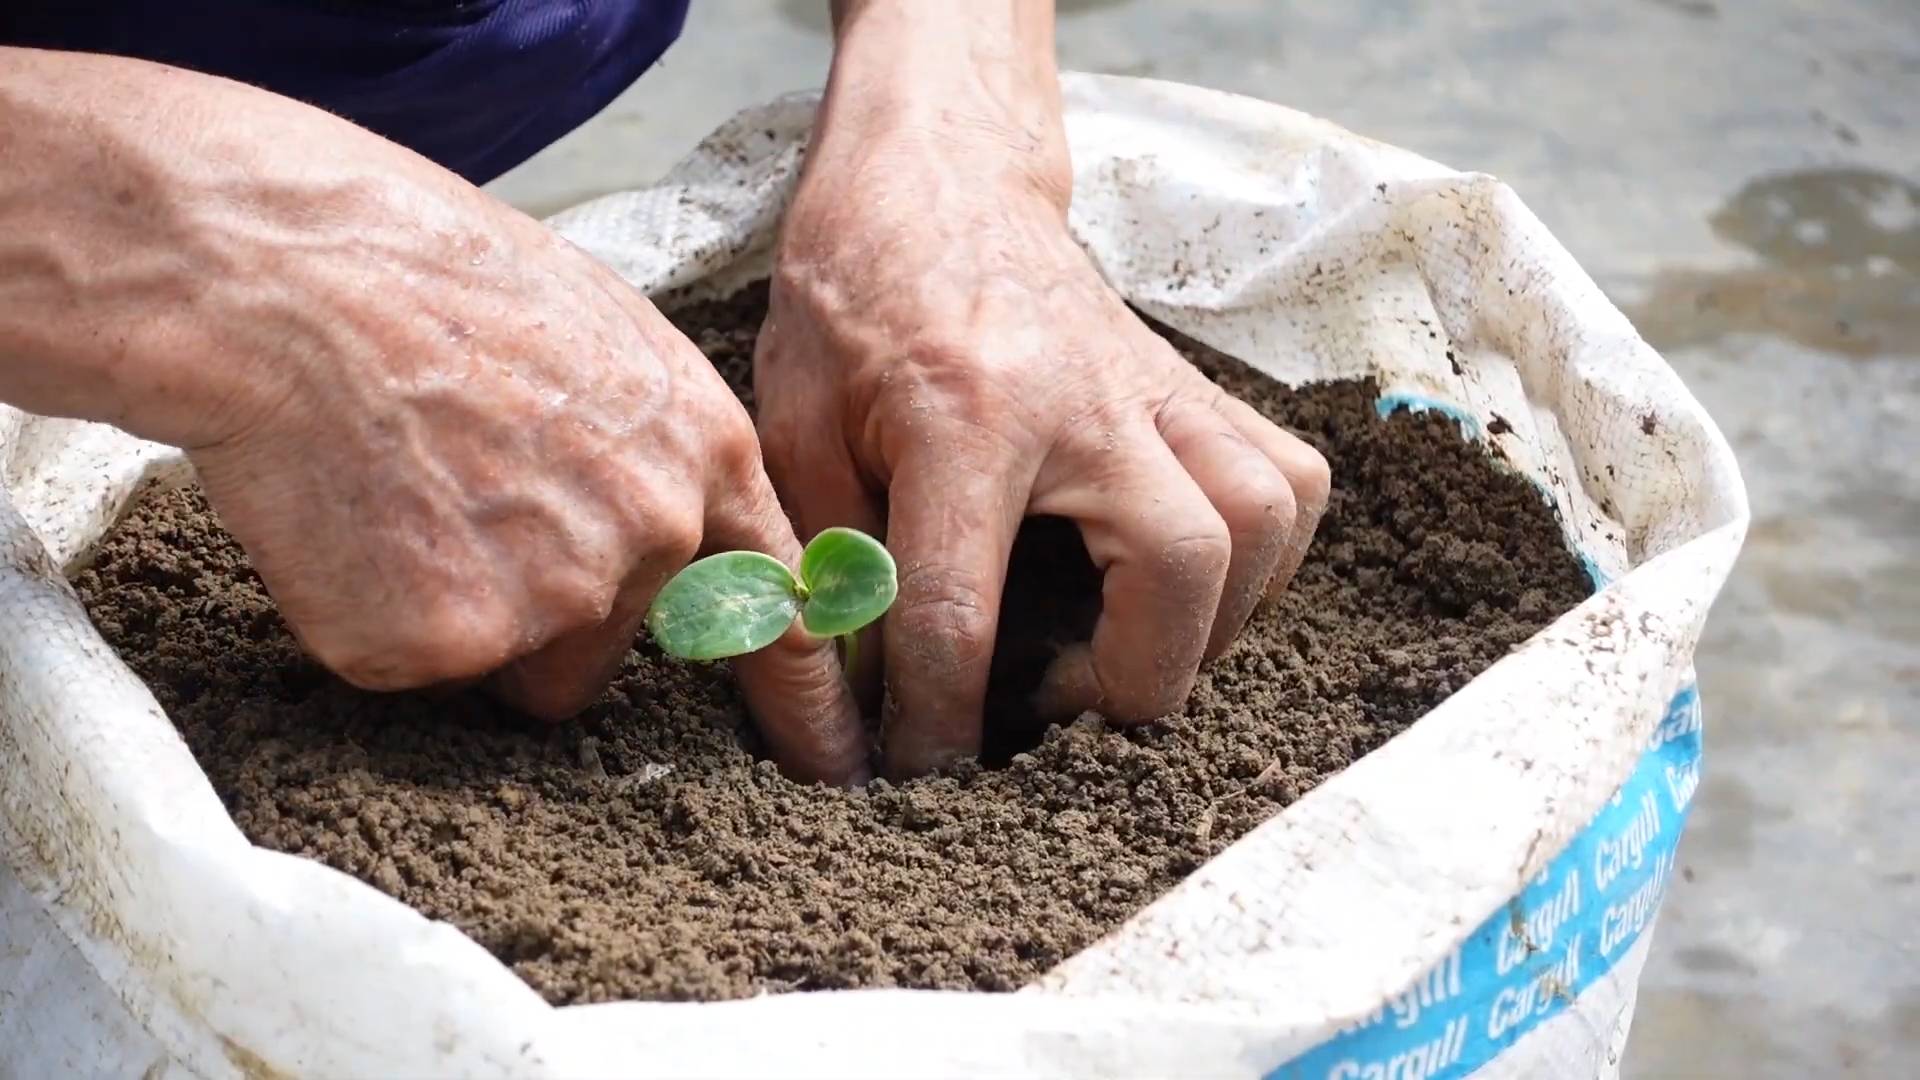
3. Transplant Carefully: Gently remove the seedlings from their pots or trays, being careful not to damage the roots. If you used peat pots, you can plant them directly into the ground. Otherwise, gently loosen the roots before planting.
4. Plant at the Correct Depth: Plant the seedlings at the same depth they were growing in their pots or trays.
5. Water Thoroughly: Water the newly transplanted seedlings thoroughly to help them settle in.
6. Protect from Pests: Protect the young plants from pests with row covers or other protective measures.
Caring for Your Watermelon Plants
Once your watermelon plants are established, it’s important to provide them with proper care to ensure a bountiful harvest.
* Watering: Watermelons need consistent moisture, especially during fruit development. Water deeply and regularly, especially during dry spells. Avoid overhead watering, which can promote fungal diseases. Drip irrigation is an excellent option for watering watermelons.
* Fertilizing: Watermelons are heavy feeders, so fertilize them regularly with a balanced fertilizer. Start with a fertilizer high in nitrogen to promote vegetative growth, and then switch to a fertilizer higher in phosphorus and potassium once the plants start to flower. Follow the instructions on the fertilizer label for application rates.
* Weeding: Keep the garden bed free of weeds, which can compete with the watermelon plants for nutrients and water. Hand-pull weeds or use a hoe to cultivate the soil. Be careful not to damage the watermelon roots when weeding.
* Pruning (Optional): Some gardeners prune their watermelon plants to encourage larger fruit. To prune, remove any suckers (small shoots that grow from the base of the plant) and any excess vines. This will direct the plant’s energy towards fruit production.
* Pollination: Watermelons need to be pollinated in order to produce fruit. Bees are the primary pollinators, so encourage them to visit your garden by planting flowers that attract bees. If you don’t see many bees, you may need to hand-pollinate the flowers. To hand-pollinate, use a small paintbrush to transfer pollen from the male flowers to the female flowers. Female flowers have a small, immature watermelon at the base of the flower.
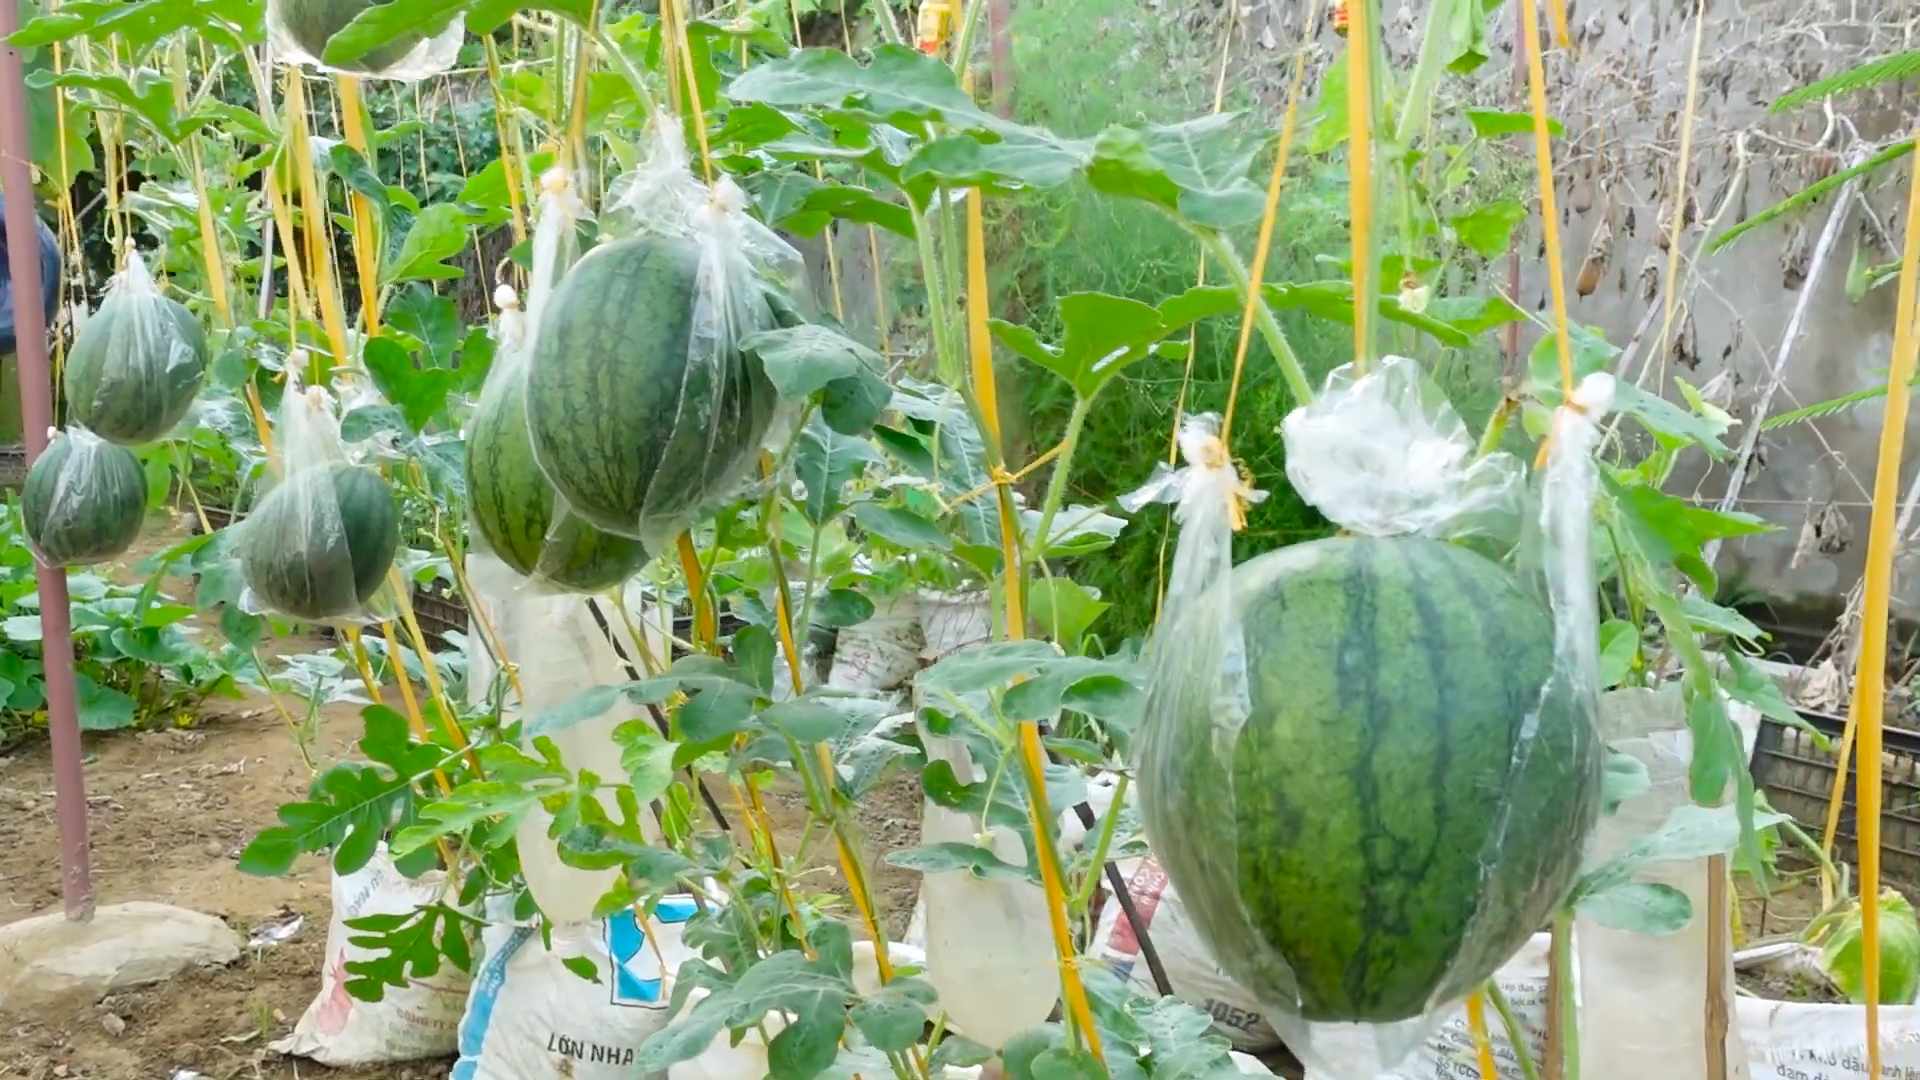
* Supporting the Fruit (Optional): As the watermelons grow larger, you may need to support them to prevent them from rotting on the ground. You can use straw, wood, or even old tires to elevate the fruit.
Dealing with Pests and Diseases
Watermelons are susceptible to a variety of pests and diseases. Here are some common problems and how to deal with them:
* Cucumber Beetles: These small, yellow and black beetles can damage young seedlings and transmit diseases. Control them with insecticides or by covering the plants with row covers.
* Squash Bugs: These large, brown bugs can suck the sap from watermelon plants, causing them to wilt and die. Hand-pick the bugs and their eggs, or use insecticides.
* Aphids: These small, sap-sucking insects can weaken watermelon plants. Control them with insecticidal soap or by releasing beneficial insects like ladybugs.
* Powdery Mildew: This fungal disease causes a white, powdery coating on the leaves. Prevent it by providing good air circulation and avoiding overhead watering. Treat it with fungicides if necessary.
* Fusarium Wilt: This fungal disease causes the plants to wilt and die. Choose disease-resistant varieties and practice crop rotation to prevent it.
Harvesting Your Yellow Watermelons
Knowing when to harvest your yellow watermelons is key to enjoying their sweet
Conclusion
So, there you have it! Growing your own yellow watermelon at home isn’t just a fun gardening project; it’s a gateway to experiencing a truly unique and delicious fruit that you won’t easily find in your local grocery store. Think about it: the vibrant sunshine-yellow flesh, the crisp, refreshing sweetness, and the bragging rights that come with cultivating something so special. This isn’t just about growing a watermelon; it’s about creating an experience, a conversation starter, and a source of immense personal satisfaction.
Why is this DIY trick a must-try? Because it empowers you to take control of your food source, connect with nature, and enjoy the unparalleled flavor of a homegrown yellow watermelon. You’re not just buying a fruit; you’re nurturing a plant from seed to harvest, witnessing the miracle of growth, and ultimately reaping the rewards of your labor. Plus, let’s be honest, who wouldn’t want to impress their friends and family with a stunning yellow watermelon they grew themselves?
Beyond the basic method outlined, there are countless ways to personalize your yellow watermelon growing journey. Consider experimenting with different soil amendments to optimize nutrient uptake and enhance flavor. Try companion planting with herbs like basil or marigolds to deter pests naturally. You could even explore different trellis systems to maximize space and support the growing vines. For those in cooler climates, starting your seeds indoors and using row covers can significantly extend your growing season.
Don’t be afraid to get creative and adapt the process to suit your specific environment and preferences. The beauty of gardening lies in its adaptability and the constant opportunity to learn and improve.
We wholeheartedly encourage you to embark on this exciting adventure and try growing your own yellow watermelon at home. It’s a rewarding experience that will not only provide you with delicious fruit but also deepen your appreciation for the natural world.
Once you’ve harvested your first yellow watermelon, we’d love to hear about your experience! Share your photos, tips, and stories with us in the comments below. Let’s create a community of yellow watermelon enthusiasts and inspire others to discover the joy of homegrown goodness. What challenges did you face? What successes did you celebrate? What unique techniques did you discover? Your insights could be invaluable to fellow gardeners.
Remember, gardening is a journey, not a destination. There will be ups and downs, triumphs and setbacks. But with patience, perseverance, and a little bit of love, you’ll be amazed at what you can achieve. So, grab your seeds, get your hands dirty, and prepare to be amazed by the magic of growing your own yellow watermelon. Happy gardening!
Frequently Asked Questions (FAQ)
1. What exactly *is* a yellow watermelon, and how is it different from a red watermelon?
Yellow watermelons are a variety of watermelon that, instead of having the typical red flesh, have a vibrant yellow interior. The difference in color comes from different levels of lycopene, the antioxidant responsible for the red color in many fruits and vegetables. Yellow watermelons generally have a slightly sweeter, honey-like flavor compared to the more tart taste of red watermelons. The texture is usually similar, crisp and juicy. Genetically, they are watermelons, just a different cultivar.
2. Are yellow watermelon seeds different from red watermelon seeds? Where can I buy yellow watermelon seeds?
The seeds of yellow watermelons are generally similar in appearance to those of red watermelons – small, black, and teardrop-shaped. The key difference is that the seeds you need to plant to *grow yellow watermelon* will be specifically labeled as such. You can find yellow watermelon seeds at most reputable online seed retailers, garden centers, and even some larger hardware stores that carry gardening supplies. Look for varieties like ‘Yellow Doll,’ ‘Yellow Crimson,’ or ‘Buttercup Yellow.’ Always purchase seeds from a trusted source to ensure viability and authenticity.
3. How long does it take to grow a yellow watermelon from seed to harvest?
Generally, it takes between 75 and 90 days to grow a yellow watermelon from seed to harvest. This timeframe can vary depending on the specific variety, your climate, and growing conditions. Warmer temperatures and plenty of sunlight will accelerate growth, while cooler temperatures and cloudy weather can slow it down. Starting seeds indoors 4-6 weeks before the last expected frost can give you a head start.
4. What are the ideal growing conditions for yellow watermelons?
Yellow watermelons thrive in warm, sunny conditions. They need at least 6-8 hours of direct sunlight per day. The ideal soil is well-draining, sandy loam with a pH between 6.0 and 6.8. Watermelons are heavy feeders, so enriching the soil with compost or well-rotted manure before planting is crucial. Consistent watering is also essential, especially during fruit development. Avoid overhead watering, as this can promote fungal diseases.
5. How much space do yellow watermelon plants need?
Yellow watermelon vines can spread quite extensively, so they require ample space. Allow at least 3-4 feet between plants and 6-8 feet between rows. If you’re short on space, consider growing them on a trellis. This will not only save space but also improve air circulation and reduce the risk of disease. Make sure the trellis is sturdy enough to support the weight of the mature watermelons.
6. What are some common pests and diseases that affect yellow watermelons, and how can I prevent or treat them?
Common pests that can affect yellow watermelons include aphids, squash bugs, cucumber beetles, and vine borers. Diseases include powdery mildew, fusarium wilt, and anthracnose. To prevent these problems, practice good garden hygiene, such as removing plant debris and weeds. Use row covers to protect young plants from pests. Encourage beneficial insects like ladybugs and lacewings to control aphids. If necessary, use organic insecticides or fungicides as directed. Crop rotation can also help prevent soilborne diseases.
7. How do I know when a yellow watermelon is ripe and ready to harvest?
Determining ripeness can be tricky, but here are a few indicators:
* **The tendril closest to the fruit should be brown and dry.**
* **The underside of the watermelon (where it rests on the ground) should turn from white to a creamy yellow.**
* **The watermelon should sound hollow when you thump it.**
* **The rind should be dull rather than shiny.**
With experience, you’ll develop a feel for when your yellow watermelons are perfectly ripe.
8. Can I grow yellow watermelons in containers?
Yes, you can grow yellow watermelons in containers, but you’ll need a large container (at least 20 gallons) with good drainage. Choose a dwarf or bush variety of yellow watermelon that is better suited for container growing. Provide adequate support for the vines and ensure the container receives plenty of sunlight. Water regularly and fertilize frequently, as container-grown plants tend to dry out and deplete nutrients more quickly.
9. What are some creative ways to use yellow watermelon?
Beyond simply slicing and enjoying it fresh, yellow watermelon can be used in a variety of creative ways:
* **Salads:** Add diced yellow watermelon to salads with feta cheese, mint, and a balsamic vinaigrette.
* **Smoothies:** Blend yellow watermelon with other fruits like strawberries, mangoes, or bananas for a refreshing smoothie.
* **Juice:** Juice yellow watermelon for a hydrating and flavorful beverage.
* **Grilled:** Grill slices of yellow watermelon for a smoky and caramelized treat.
* **Salsa:** Make a watermelon salsa with red onion, cilantro, jalapeno, and lime juice.
* **Pickled:** Pickle the rind of yellow watermelon for a unique and tangy condiment.
10. Is growing yellow watermelon organically possible?
Absolutely! Growing yellow watermelon organically is not only possible but also highly rewarding. Focus on building healthy soil with compost and other organic amendments. Use organic fertilizers and pest control methods. Choose disease-resistant varieties. Practice crop rotation and companion planting. By following these principles, you can enjoy delicious, organically grown yellow watermelons without the use of synthetic chemicals.

Leave a Comment