

Grow Your Own Potatoes, and unlock a world of fresh, flavorful possibilities right in your backyard! Imagine the satisfaction of harvesting your own spuds, knowing exactly where they came from and how they were grown. Forget those bland, store-bought potatoes – we’re talking about earthy, delicious goodness straight from your garden to your plate.
For centuries, potatoes have been a staple food around the globe, playing a vital role in feeding communities and shaping cultures. From the Inca civilization in the Andes Mountains, where potatoes were first cultivated, to the Irish potato famine, this humble vegetable has a rich and complex history. Today, we’re bringing this tradition home, empowering you to cultivate your own potato patch, no matter the size of your space.
Why should you learn to grow your own potatoes? Well, besides the unparalleled taste and freshness, it’s a fantastic way to connect with nature, reduce your carbon footprint, and save money on groceries. Plus, it’s incredibly rewarding to watch those tiny seed potatoes transform into a bountiful harvest. In this DIY guide, I’ll share my favorite tricks and hacks for successful potato growing, from choosing the right varieties to maximizing your yield. Get ready to dig in and discover the joy of homegrown potatoes!
Grow Your Own Potatoes: A Beginner’s Guide to Bountiful Harvests
Hey there, fellow garden enthusiasts! Ever dreamt of digging up your own fresh, earthy potatoes right from your backyard? Well, dream no more! Growing potatoes is surprisingly easy and incredibly rewarding. I’m going to walk you through everything you need to know to cultivate your own spud-tastic crop, even if you’re a complete beginner. Let’s get our hands dirty!
Choosing Your Potato Variety
First things first, let’s talk potatoes! There are so many varieties to choose from, each with its own unique flavor, texture, and growing characteristics. Here’s a quick rundown of some popular options:
* Russet: The classic baking potato. They’re large, starchy, and perfect for fries and mashed potatoes.
* Yukon Gold: These have a buttery flavor and creamy texture, making them great for roasting, boiling, and mashing.
* Red Potatoes: Known for their thin skin and waxy texture, they hold their shape well when cooked, making them ideal for potato salads and boiling.
* Fingerling Potatoes: These are small, elongated potatoes with a firm texture and nutty flavor. They’re delicious roasted or steamed.
* Purple Potatoes: These add a pop of color to your plate and have a slightly earthy flavor. They’re great for roasting, mashing, or adding to salads.
Consider your climate and what you plan to use the potatoes for when making your selection. I personally love Yukon Golds for their versatility!
Preparing Your Seed Potatoes
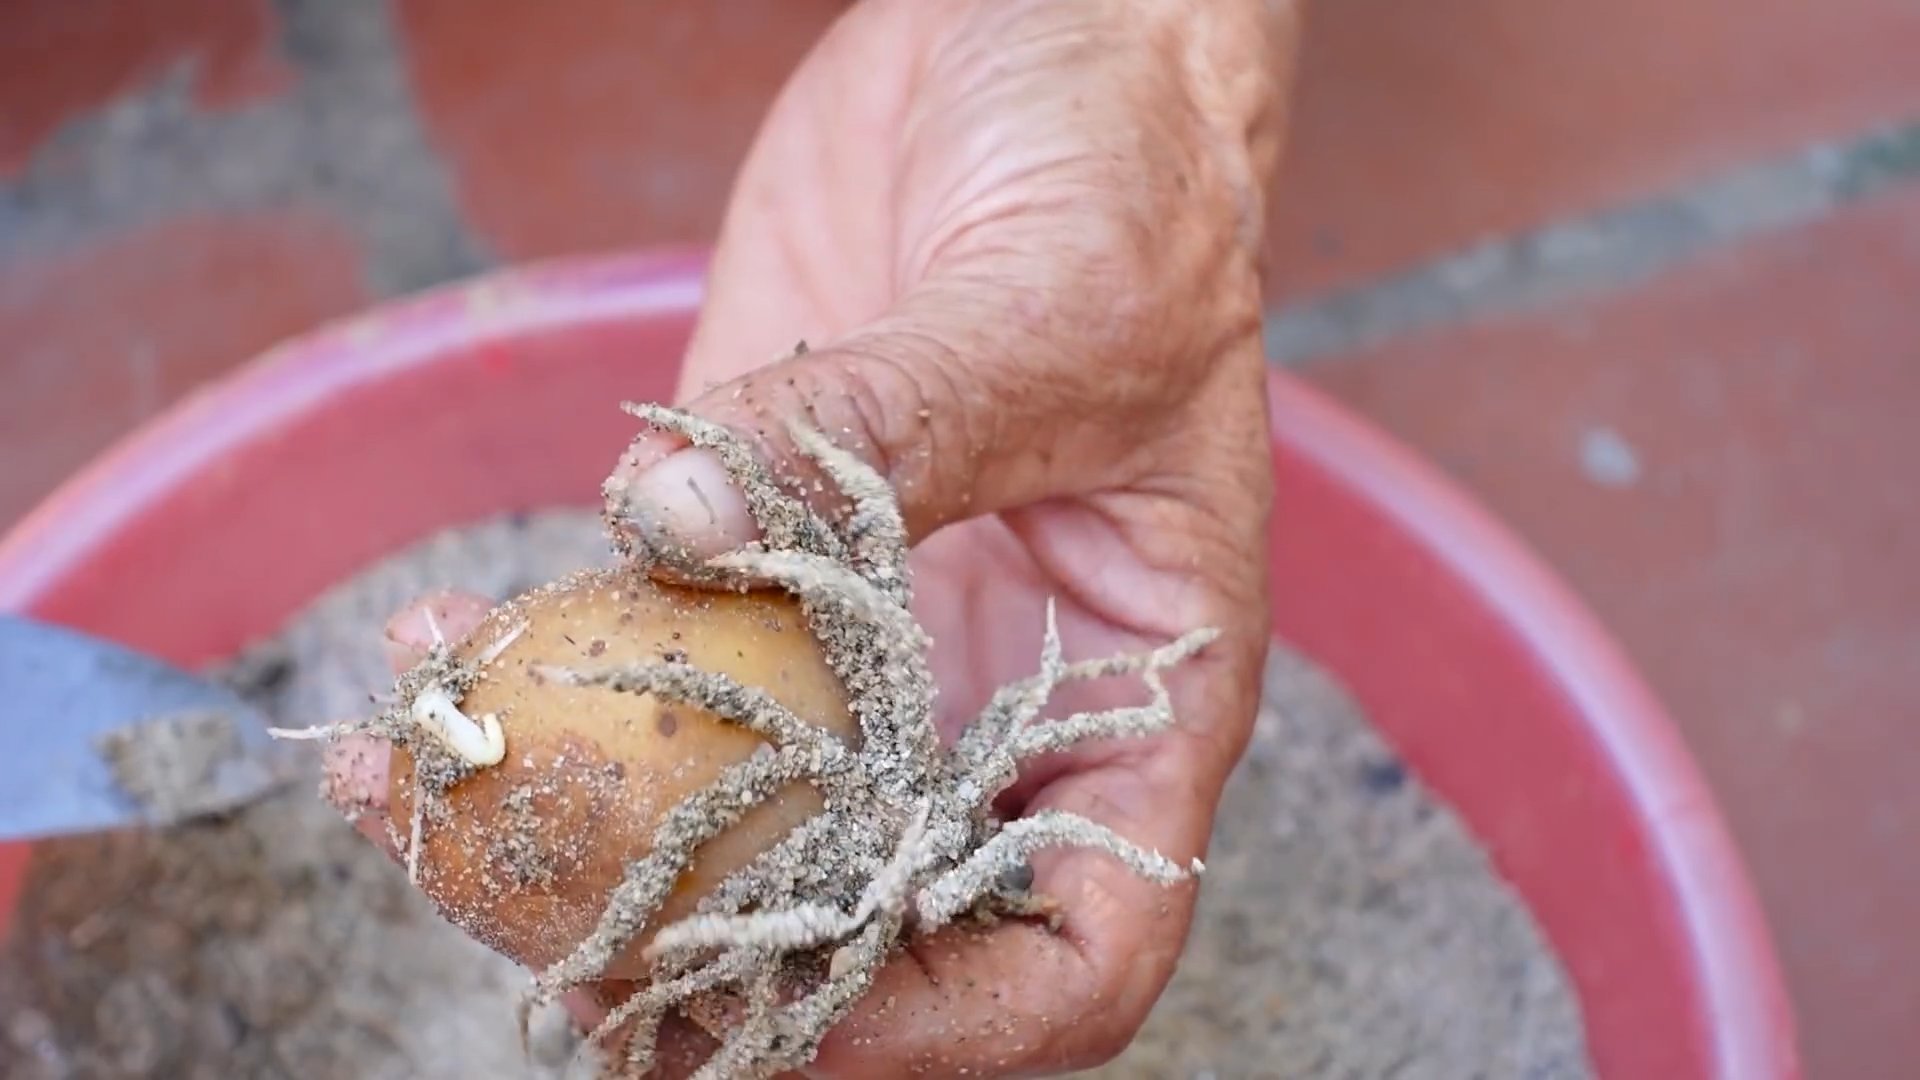
Now that you’ve chosen your variety, you’ll need seed potatoes. These aren’t seeds in the traditional sense; they’re actually small potatoes or pieces of potatoes that will sprout and grow into new plants.
* Buying Seed Potatoes: You can purchase seed potatoes from garden centers, nurseries, or online retailers. Make sure they’re certified disease-free.
* Chitting (Sprouting) Your Potatoes: This is an optional but highly recommended step that will give your potatoes a head start. About 4-6 weeks before planting, place your seed potatoes in a cool, bright location (around 60-70°F) to encourage them to sprout. An egg carton or a tray works well. You’ll notice small, green sprouts (called “eyes”) emerging from the potatoes.
* Cutting Seed Potatoes (If Necessary): If your seed potatoes are large (bigger than an egg), you can cut them into smaller pieces, ensuring that each piece has at least 1-2 “eyes.” Let the cut pieces dry for a day or two to allow the cut surfaces to callous over. This will help prevent rot. I usually aim for pieces about 2 inches square.
Preparing the Planting Site
Potatoes need well-drained, loose soil that’s rich in organic matter. Here’s how to get your garden bed ready:
* Choose a Sunny Location: Potatoes need at least 6-8 hours of sunlight per day.
* Test Your Soil: A soil test will tell you the pH level and nutrient content of your soil. Potatoes prefer a slightly acidic soil (pH 6.0-6.5).
* Amend the Soil: Amend your soil with compost, aged manure, or other organic matter to improve drainage and fertility. I like to add a generous amount of compost to my potato patch.
* Loosen the Soil: Use a garden fork or tiller to loosen the soil to a depth of at least 12 inches. This will allow the potato roots to grow easily.
* Create Rows or Hills: You can plant potatoes in rows or hills. Rows are easier for larger gardens, while hills are better for smaller spaces. For rows, create furrows about 6-8 inches deep and 3 feet apart. For hills, create mounds of soil about 1 foot high and 3 feet apart.
Planting Your Potatoes
Now for the fun part – planting!
1. Planting Time: Plant your potatoes in early spring, about 2-4 weeks before the last expected frost. The soil temperature should be at least 45°F.
2. Planting Depth: Place your seed potatoes (sprouts facing up) in the furrows or hills, about 12 inches apart.
3. Cover the Potatoes: Cover the seed potatoes with 4-6 inches of soil.
4. Water Thoroughly: Water the planting area thoroughly after planting.
Hilling Your Potatoes
As your potato plants grow, you’ll need to “hill” them. This involves gradually adding more soil around the base of the plants. Hilling encourages more potato production and protects the developing tubers from sunlight (which can cause them to turn green and produce solanine, a toxic compound).
1. First Hilling: When the potato plants are about 6-8 inches tall, use a hoe or shovel to pull soil from between the rows or hills up around the base of the plants, burying the stems up to the bottom leaves.
2. Second Hilling: Repeat the hilling process every 2-3 weeks as the plants continue to grow. Aim to keep the developing tubers covered with soil. I usually hill my potatoes 2-3 times during the growing season.
Watering and Fertilizing
Potatoes need consistent moisture, especially during tuber formation.
* Watering: Water deeply and regularly, especially during dry periods. Aim for about 1-2 inches of water per week.
* Fertilizing: Fertilize your potato plants with a balanced fertilizer (e.g., 10-10-10) about 4-6 weeks after planting. You can also side-dress with compost or aged manure. I like to use a fertilizer specifically formulated for potatoes.
Pest and Disease Control
Potatoes can be susceptible to various pests and diseases. Here are some common problems and how to deal with them:
* Colorado Potato Beetles: These beetles can defoliate your potato plants. Handpick them off the plants or use an organic insecticide like neem oil or spinosad.
* Flea Beetles: These tiny beetles can create small holes in the leaves. Cover your plants with row covers or use an organic insecticide.
* Potato Blight: This fungal disease can cause brown spots on the leaves and tubers. Choose blight-resistant varieties and practice good sanitation (remove infected plants).
* Scab: This bacterial disease causes rough, scabby patches on the potato skin. Plant in well-drained soil and avoid overwatering.
I always inspect my potato plants regularly for any signs of pests or diseases. Early detection is key!
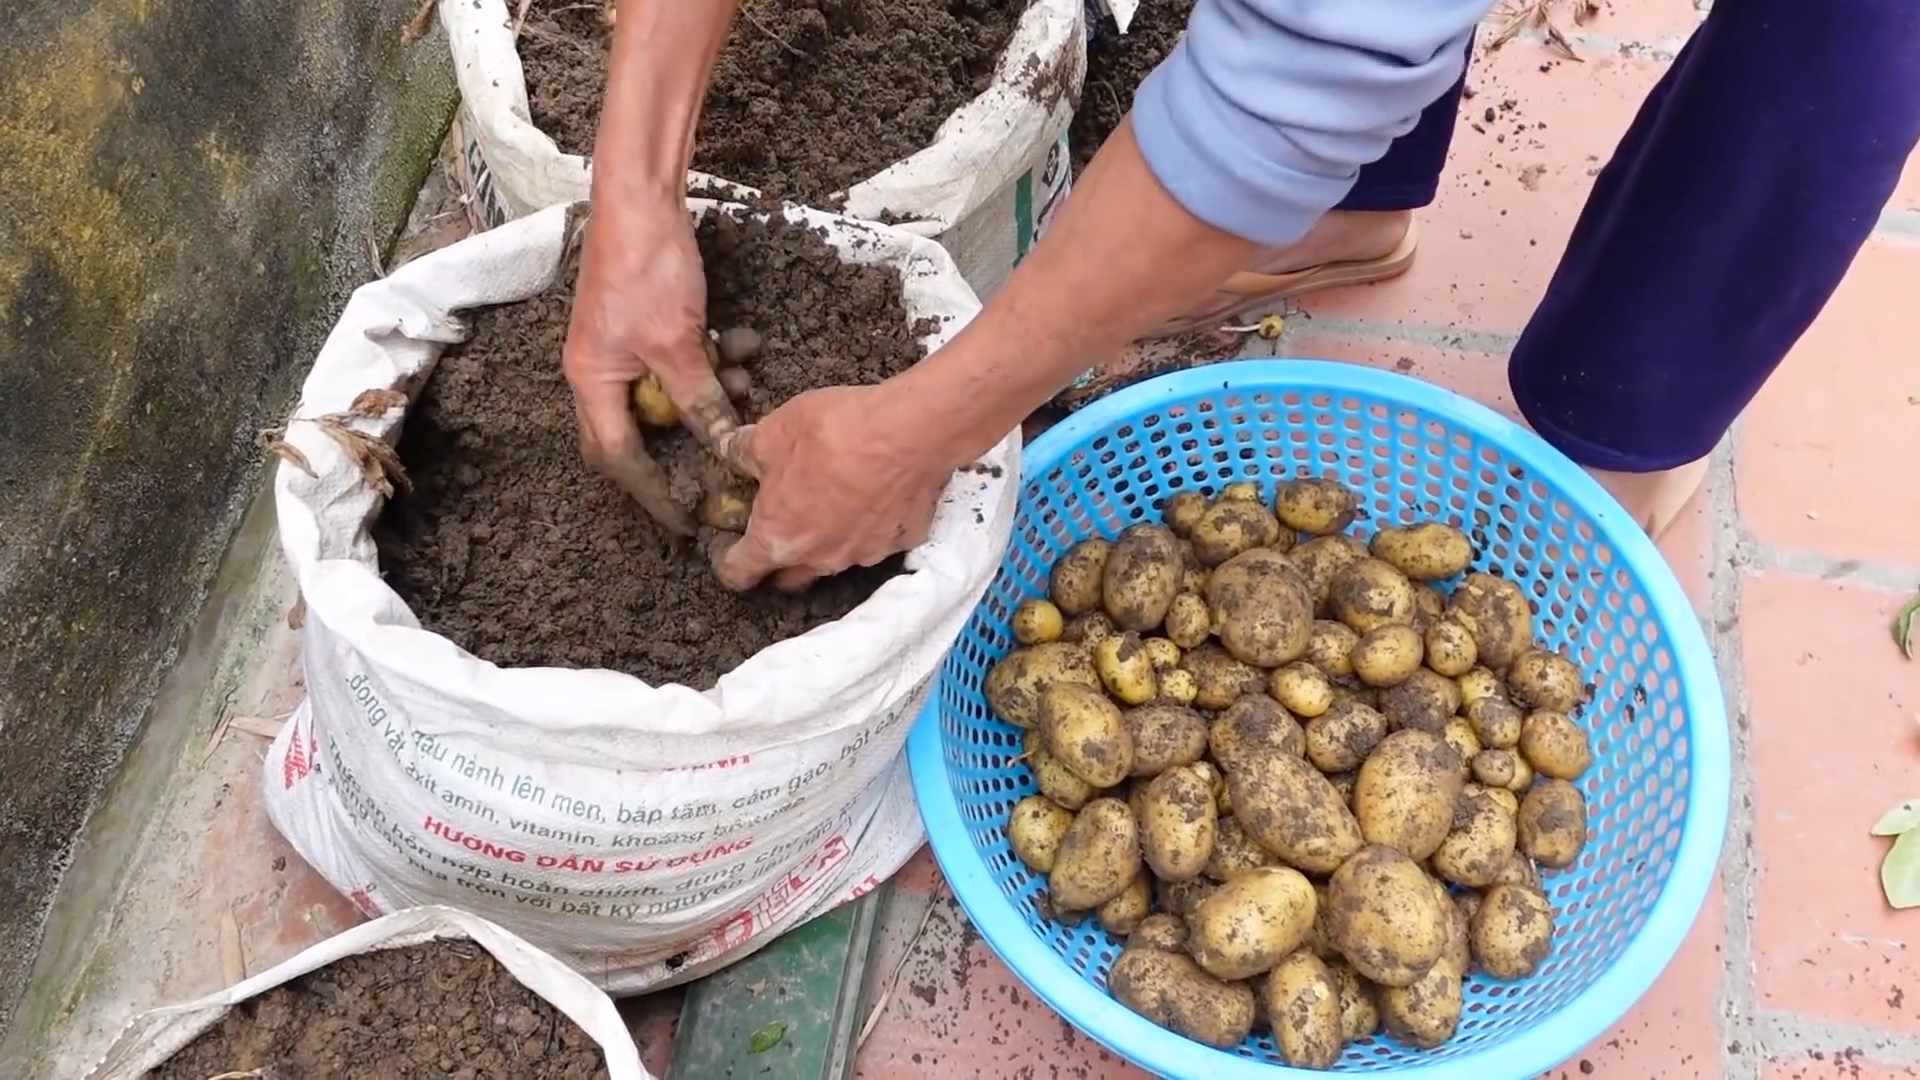
Harvesting Your Potatoes
The moment we’ve all been waiting for – harvest time!
1. Harvest Time: Potatoes are typically ready to harvest about 80-100 days after planting, depending on the variety.
2. Signs of Maturity: The potato plants will start to flower and then the foliage will begin to yellow and die back. This is a sign that the potatoes are maturing.
3. Test Dig: Dig up a few plants to check the size and maturity of the potatoes. If they’re the size you want, you can start harvesting.
4. Harvesting: Use a garden fork or shovel to carefully dig up the potatoes, being careful not to damage them.
5. Curing: After harvesting, let the potatoes dry in a cool, dark, well-ventilated place for about 1-2 weeks. This will help them to cure and develop a thicker skin, which will improve their storage life.
Storing Your Potatoes
Proper storage is essential for keeping your potatoes fresh and delicious for months.
* Storage Conditions: Store your cured potatoes in a cool, dark, and dry place (around 40-50°F) with good ventilation. A root cellar or unheated garage is ideal.
* Avoid Sunlight: Exposure to sunlight can cause potatoes to turn green and produce solanine.
* Don’t Wash: Don’t wash your potatoes before storing them, as this can promote rot.
* Check Regularly: Check your stored potatoes regularly for any signs of spoilage. Remove any rotten potatoes to prevent them from affecting the others.
Troubleshooting Common Potato Problems
Even with the best planning, sometimes things don’t go exactly as expected. Here are a few common problems you might encounter and how to address them:
* Small Potatoes: This could be due to overcrowding, poor soil fertility, or insufficient watering. Make sure to space your plants properly, amend the soil with compost, and water regularly.
* Green Potatoes: This is caused by exposure to sunlight. Make sure to hill your potatoes properly and store them in a dark place. Green potatoes contain solanine and should not be eaten.
* Rotting Potatoes: This can be caused by overwatering, poor drainage, or disease. Plant in well-drained soil, avoid overwatering, and choose disease
Conclusion
So, there you have it! Growing your own potatoes isn’t just a fun gardening project; it’s a rewarding experience that connects you to your food in a profound way. From the satisfaction of nurturing a tiny seed potato to the joy of harvesting a bounty of fresh, flavorful spuds, this DIY trick is a must-try for any home gardener, food enthusiast, or anyone simply looking for a more sustainable and delicious way to enjoy this versatile vegetable.
Think about it: no more mystery potatoes from the grocery store, potentially treated with chemicals or shipped from far away. Instead, you’ll have organically grown, freshly dug potatoes bursting with flavor, ready to be transformed into your favorite dishes. Imagine the creamy mashed potatoes, the crispy roasted potatoes, the hearty potato soup – all made with potatoes you grew yourself!
But the benefits extend beyond just taste and freshness. Growing your own potatoes is also an incredibly educational experience, especially for children. It teaches them about the life cycle of plants, the importance of soil health, and the satisfaction of hard work. Plus, it’s a fantastic way to get them involved in the kitchen and excited about eating their vegetables.
Don’t be afraid to experiment with different varieties of potatoes to discover your favorites. Try growing Yukon Golds for their buttery texture, Russets for their perfect baking qualities, or fingerling potatoes for their unique shape and nutty flavor. You can also try different growing methods, such as container gardening or using potato towers, to maximize your yield in a small space. Consider adding companion plants like marigolds to deter pests naturally.
And if you’re feeling adventurous, why not try growing potatoes from seed? While it takes longer than using seed potatoes, it’s a fascinating way to learn about potato genetics and potentially develop your own unique varieties.
Growing your own potatoes is easier than you might think. With a little planning, preparation, and care, you can enjoy a bountiful harvest of delicious, homegrown potatoes.
We encourage you to give this DIY trick a try. Start small, learn as you go, and don’t be discouraged by setbacks. Gardening is a journey, and every season brings new lessons and opportunities.
Once you’ve harvested your first crop of homegrown potatoes, we’d love to hear about your experience! Share your photos, tips, and recipes in the comments below. Let’s build a community of potato-growing enthusiasts and inspire others to discover the joy of growing their own food. What varieties did you grow? What challenges did you face? What were your favorite ways to prepare your homegrown potatoes? Your insights can help others succeed and make their potato-growing journey even more rewarding.
So, grab your seed potatoes, get your hands dirty, and get ready to experience the satisfaction of growing your own delicious, homegrown potatoes. You won’t regret it!
Frequently Asked Questions (FAQ)
What are seed potatoes, and where can I get them?
Seed potatoes are potatoes specifically grown to be planted and produce new potato plants. They are different from the potatoes you buy at the grocery store, which may have been treated to prevent sprouting. Seed potatoes are certified disease-free and are available at garden centers, nurseries, and online retailers. Look for varieties that are well-suited to your climate and growing conditions. You can also sometimes use potatoes from the grocery store if they are organic and have started to sprout, but be aware that they may carry diseases.
How much space do I need to grow potatoes?
The amount of space you need depends on the variety of potato you’re growing and the growing method you choose. Generally, you’ll need about 12-18 inches of space between plants in rows that are 30-36 inches apart. Container gardening is a great option for those with limited space. You can grow potatoes in large pots or grow bags, allowing you to grow them on patios, balconies, or even indoors with sufficient light. Potato towers are another space-saving option, allowing you to grow multiple plants in a vertical structure.
What kind of soil is best for growing potatoes?
Potatoes prefer well-drained, loose soil that is rich in organic matter. Amend your soil with compost or well-rotted manure before planting to improve drainage and fertility. Avoid heavy clay soils, as they can become waterlogged and prevent proper tuber development. The ideal soil pH for potatoes is between 6.0 and 6.5. You can test your soil pH with a home testing kit or by sending a sample to a local agricultural extension office.
How often should I water my potato plants?
Water your potato plants regularly, especially during dry periods. Keep the soil consistently moist, but avoid overwatering, which can lead to rot. Water deeply and less frequently, rather than shallowly and more often. The frequency of watering will depend on the weather, soil type, and drainage. Check the soil moisture regularly by sticking your finger into the soil a few inches deep. If the soil feels dry, it’s time to water.
How do I know when my potatoes are ready to harvest?
The timing of harvest depends on the variety of potato and when you planted them. Generally, early-season potatoes are ready to harvest about 70-80 days after planting, while late-season potatoes take 90-120 days. You can harvest “new potatoes” early, when the plants are flowering, for smaller, tender potatoes. For larger, mature potatoes, wait until the foliage starts to die back. To check if your potatoes are ready, carefully dig around a plant and check the size of the tubers. If they are the size you want, you can harvest the rest of the plants.
What are common potato pests and diseases, and how can I prevent them?
Common potato pests include potato beetles, aphids, and flea beetles. Common diseases include early blight, late blight, and scab. To prevent pests and diseases, choose disease-resistant varieties, practice crop rotation, and maintain good soil health. You can also use organic pest control methods, such as insecticidal soap or neem oil, to control pests. Ensure good air circulation around your plants to prevent fungal diseases. If you suspect a disease, remove affected foliage immediately to prevent it from spreading.
Can I grow potatoes in containers?
Yes, growing potatoes in containers is a great option for those with limited space. Choose a large container with drainage holes and fill it with a well-draining potting mix. Plant your seed potatoes about 4 inches deep and water regularly. As the plants grow, add more soil to the container, burying the stems to encourage more tuber development. This is similar to the hilling method used in traditional potato growing.
How do I store my harvested potatoes?
Store your harvested potatoes in a cool, dark, and well-ventilated place. The ideal temperature is between 40 and 50 degrees Fahrenheit. Avoid storing potatoes in direct sunlight or near ethylene-producing fruits, such as apples and bananas, as this can cause them to sprout prematurely. Store potatoes in a single layer in a breathable container, such as a cardboard box or burlap sack. Properly stored potatoes can last for several months.
Can I grow potatoes from store-bought potatoes?
While it’s possible to grow potatoes from store-bought potatoes, it’s not always recommended. Store-bought potatoes may have been treated to prevent sprouting, and they may also carry diseases. If you do choose to grow potatoes from store-bought potatoes, select organic potatoes that have started to sprout. Cut the potatoes into pieces, ensuring that each piece has at least one “eye” or sprout. Allow the cut pieces to dry for a few days before planting to prevent rot. Be aware that the resulting plants may not be true to type, and they may be more susceptible to diseases.
What are some good companion plants for potatoes?
Companion planting can help to deter pests, attract beneficial insects, and improve soil health. Good companion plants for potatoes include marigolds, nasturtiums, basil, and thyme. Marigolds and nasturtiums deter potato beetles, while basil and thyme repel aphids and other pests. Legumes, such as beans and peas, can help to fix nitrogen in the soil, benefiting potato growth. Avoid planting potatoes near tomatoes, cucumbers, and raspberries, as they can compete for nutrients or attract similar pests and diseases.

Leave a Comment