

Growing Bananas at Home might sound like a tropical dream reserved for those living in sun-drenched climates, but I’m here to tell you it’s more achievable than you think! Forget expensive imported fruit – imagine plucking a sweet, creamy banana straight from your own backyard (or even your living room!).
For centuries, bananas have been a staple food and a symbol of prosperity in many cultures, particularly in Southeast Asia and parts of Africa. Their journey to global popularity is a fascinating tale of trade and cultivation. Now, you can participate in this rich history by bringing a piece of the tropics to your own home.
Why should you try this DIY project? Well, besides the obvious bragging rights, growing bananas at home offers a unique connection to nature. It’s incredibly rewarding to nurture a plant from a small seedling to a fruit-bearing beauty. Plus, think of the fresh, organic bananas you’ll have access to! In this article, I’ll share some simple yet effective tricks and hacks that will guide you through the process, even if you’re a complete beginner. So, let’s ditch the grocery store bananas and embark on this exciting gardening adventure together!
Growing Bananas at Home: A DIY Guide to Tropical Delights
Hey there, fellow plant enthusiasts! Ever dreamt of harvesting your own bananas right in your backyard? It might sound like a tropical fantasy, but trust me, with a little know-how and some patience, you can absolutely grow bananas at home! I’ve been doing it for a few years now, and the satisfaction of biting into a homegrown banana is simply unmatched. So, let’s dive into this exciting DIY project!
Choosing the Right Banana Variety
Before we get our hands dirty, it’s crucial to pick the right banana variety for your climate and space. Not all bananas are created equal! Some are better suited for warmer climates, while others are more cold-hardy. Also, consider the size of the mature plant. You don’t want a towering banana tree taking over your entire garden if you only have limited space.
Here’s a breakdown of some popular banana varieties for home growing:
* Dwarf Cavendish: This is a classic choice for home gardeners. It’s relatively small (reaching about 6-10 feet), cold-tolerant (to a degree), and produces delicious, sweet bananas. It’s also widely available.
* Grand Nain: Similar to Dwarf Cavendish, but slightly larger (8-12 feet). It’s known for its high yields and excellent fruit quality.
* Ice Cream (Blue Java): This variety is a bit more exotic. The bananas have a unique, creamy texture and a slightly tangy flavor, reminiscent of vanilla ice cream! The fruit has a bluish tint before ripening. It’s moderately cold-hardy.
* Rajapuri: Another dwarf variety (5-8 feet) that’s well-suited for containers. It produces sweet, slightly tangy bananas.
* Orinoco: A very cold-hardy variety, tolerating temperatures down to the low 20s (Fahrenheit) for short periods. The bananas are thick-skinned and slightly tart, making them great for cooking.
Important Note: Research the specific cold hardiness of any variety you choose for your region. While some are more tolerant than others, bananas are generally tropical plants and will suffer damage from prolonged freezing temperatures.
Preparing the Planting Site
Bananas are heavy feeders and thrive in rich, well-draining soil. Proper site preparation is key to a healthy and productive banana plant.
* Sunlight: Bananas need at least 6-8 hours of direct sunlight per day. Choose a location that receives plenty of sunshine.
* Soil: The soil should be loose, fertile, and well-draining. Bananas don’t like to sit in soggy soil. Amend heavy clay soil with plenty of organic matter, such as compost, aged manure, or peat moss. Sandy soil should also be amended with organic matter to improve its water-holding capacity.
* Wind Protection: Banana plants have large leaves that can be easily damaged by strong winds. Choose a location that is sheltered from strong winds, or provide some wind protection, such as a fence or wall.
* Space: Consider the mature size of the banana variety you’ve chosen and provide adequate space for it to grow. Dwarf varieties need at least 6-8 feet of space, while larger varieties may need 10-12 feet or more.
Planting Your Banana Plant
Now for the fun part! Planting your banana plant is relatively straightforward. You can start with either a banana pup (a small offshoot from an existing plant) or a rhizome (an underground stem). Pups are generally easier to establish.
Step-by-Step Planting Instructions:
1. Dig the Hole: Dig a hole that is twice as wide and as deep as the root ball of your banana pup or rhizome.
2. Amend the Soil: Mix the soil you removed from the hole with plenty of compost or other organic matter. This will provide your banana plant with the nutrients it needs to thrive.
3. Plant the Pup or Rhizome: Carefully place the banana pup or rhizome in the hole, making sure that the top of the root ball is level with the surrounding soil. For rhizomes, plant them horizontally with the “eyes” (small buds) facing upwards.
4. Backfill the Hole: Gently backfill the hole with the amended soil, tamping it down lightly to remove any air pockets.
5. Water Thoroughly: Water the newly planted banana plant thoroughly to help settle the soil and encourage root growth.
6. Mulch: Apply a layer of mulch around the base of the plant to help retain moisture, suppress weeds, and regulate soil temperature. Use organic mulch such as straw, wood chips, or shredded leaves.
Caring for Your Banana Plant
Once your banana plant is in the ground, it’s important to provide it with the proper care to ensure healthy growth and fruit production.
* Watering: Bananas need plenty of water, especially during the growing season. Water deeply and regularly, keeping the soil consistently moist but not waterlogged. During the winter months, reduce watering frequency.
* Fertilizing: Bananas are heavy feeders and require regular fertilization. Use a balanced fertilizer with a high potassium content. Apply fertilizer every 2-3 months during the growing season. You can also supplement with organic fertilizers such as compost tea or fish emulsion.
* Pruning: Remove any dead or damaged leaves regularly. Also, remove any suckers (small offshoots) that grow from the base of the plant, unless you want to propagate new plants. Allowing too many suckers to grow will compete with the main plant for nutrients and reduce fruit production.
* Pest and Disease Control: Bananas are relatively pest-resistant, but they can be susceptible to certain pests and diseases, such as aphids, spider mites, and fungal infections. Inspect your plants regularly for any signs of problems and take appropriate action if necessary. Use organic pest control methods whenever possible.
* Cold Protection: If you live in an area with cold winters, you’ll need to protect your banana plant from freezing temperatures. There are several ways to do this:
* Mulch Heavily: Apply a thick layer of mulch around the base of the plant to insulate the roots.
* Wrap the Trunk: Wrap the trunk of the plant with burlap or other insulating material.
* Build a Frame: Build a frame around the plant and cover it with plastic or fabric to create a mini-greenhouse.
* Dig Up and Store: In very cold climates, you may need to dig up the plant and store it indoors over the winter. Store the rhizome in a cool, dark place and replant it in the spring.
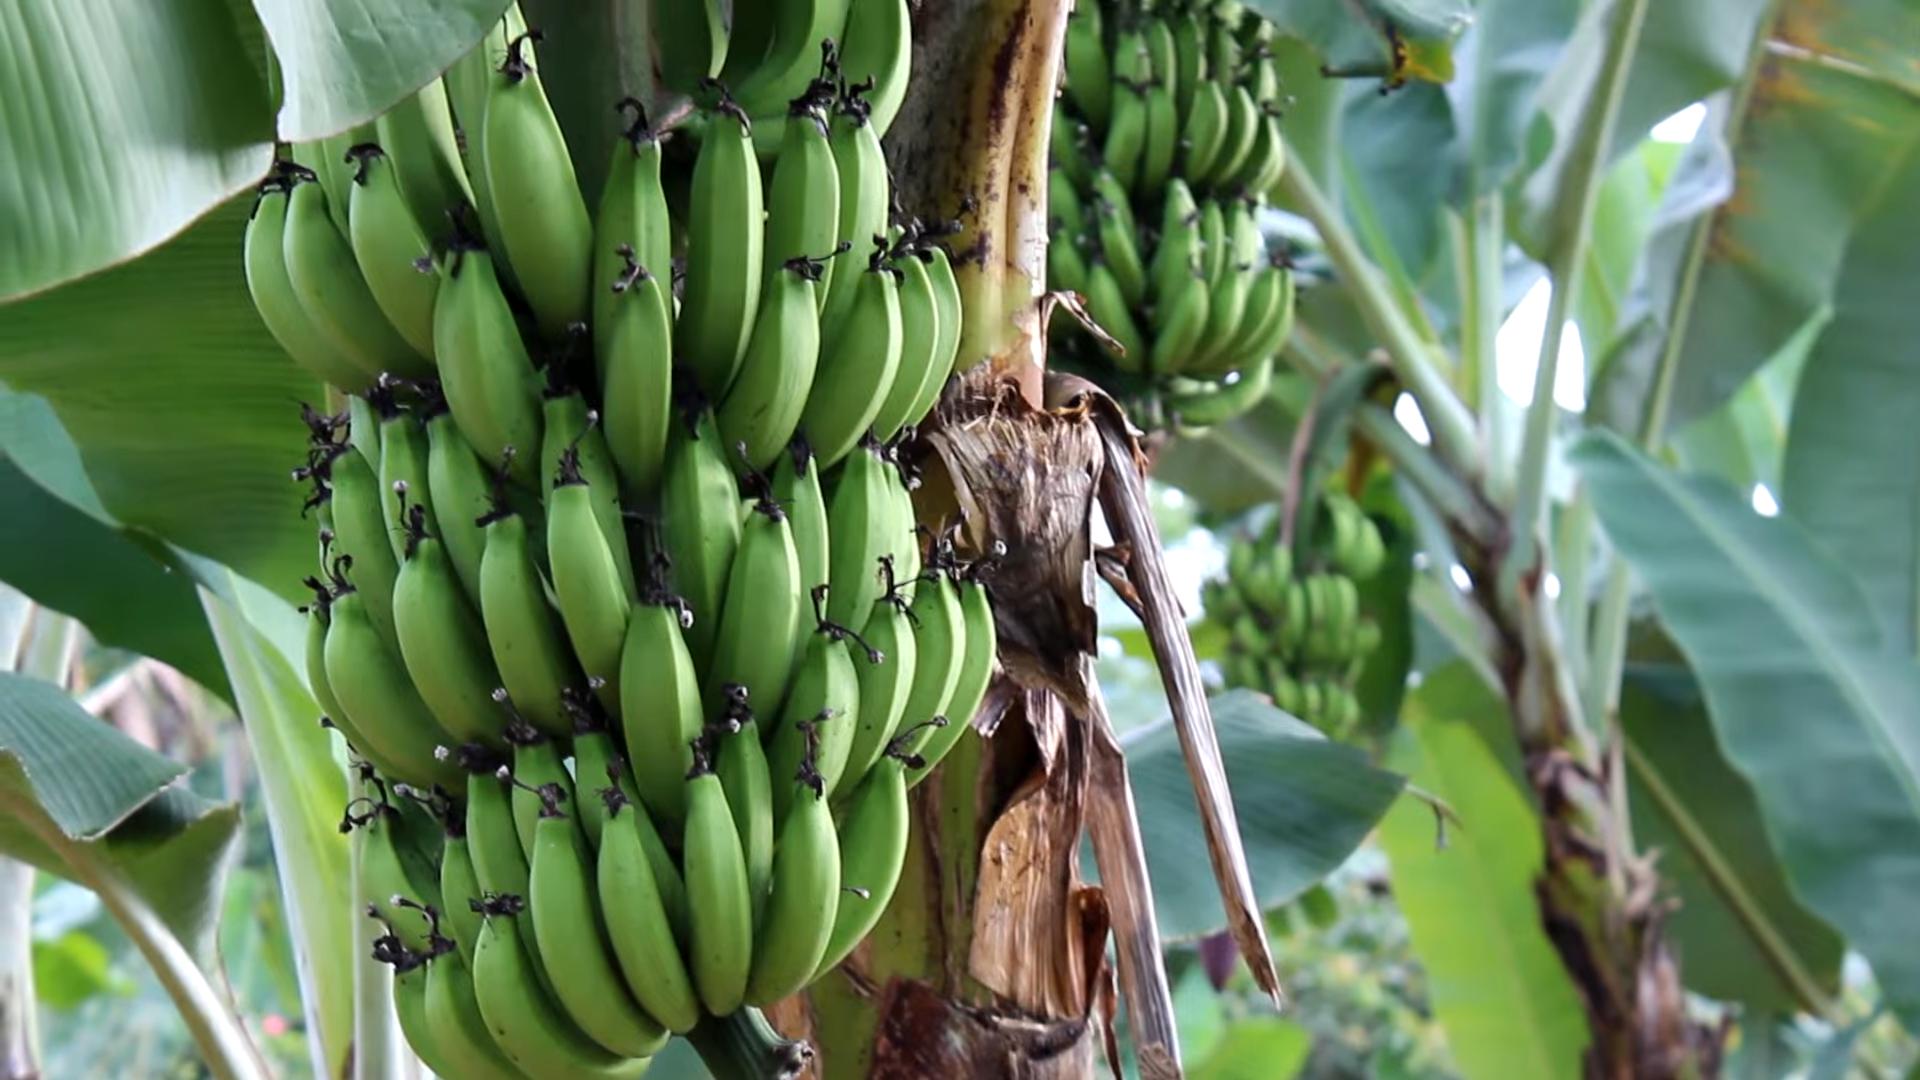
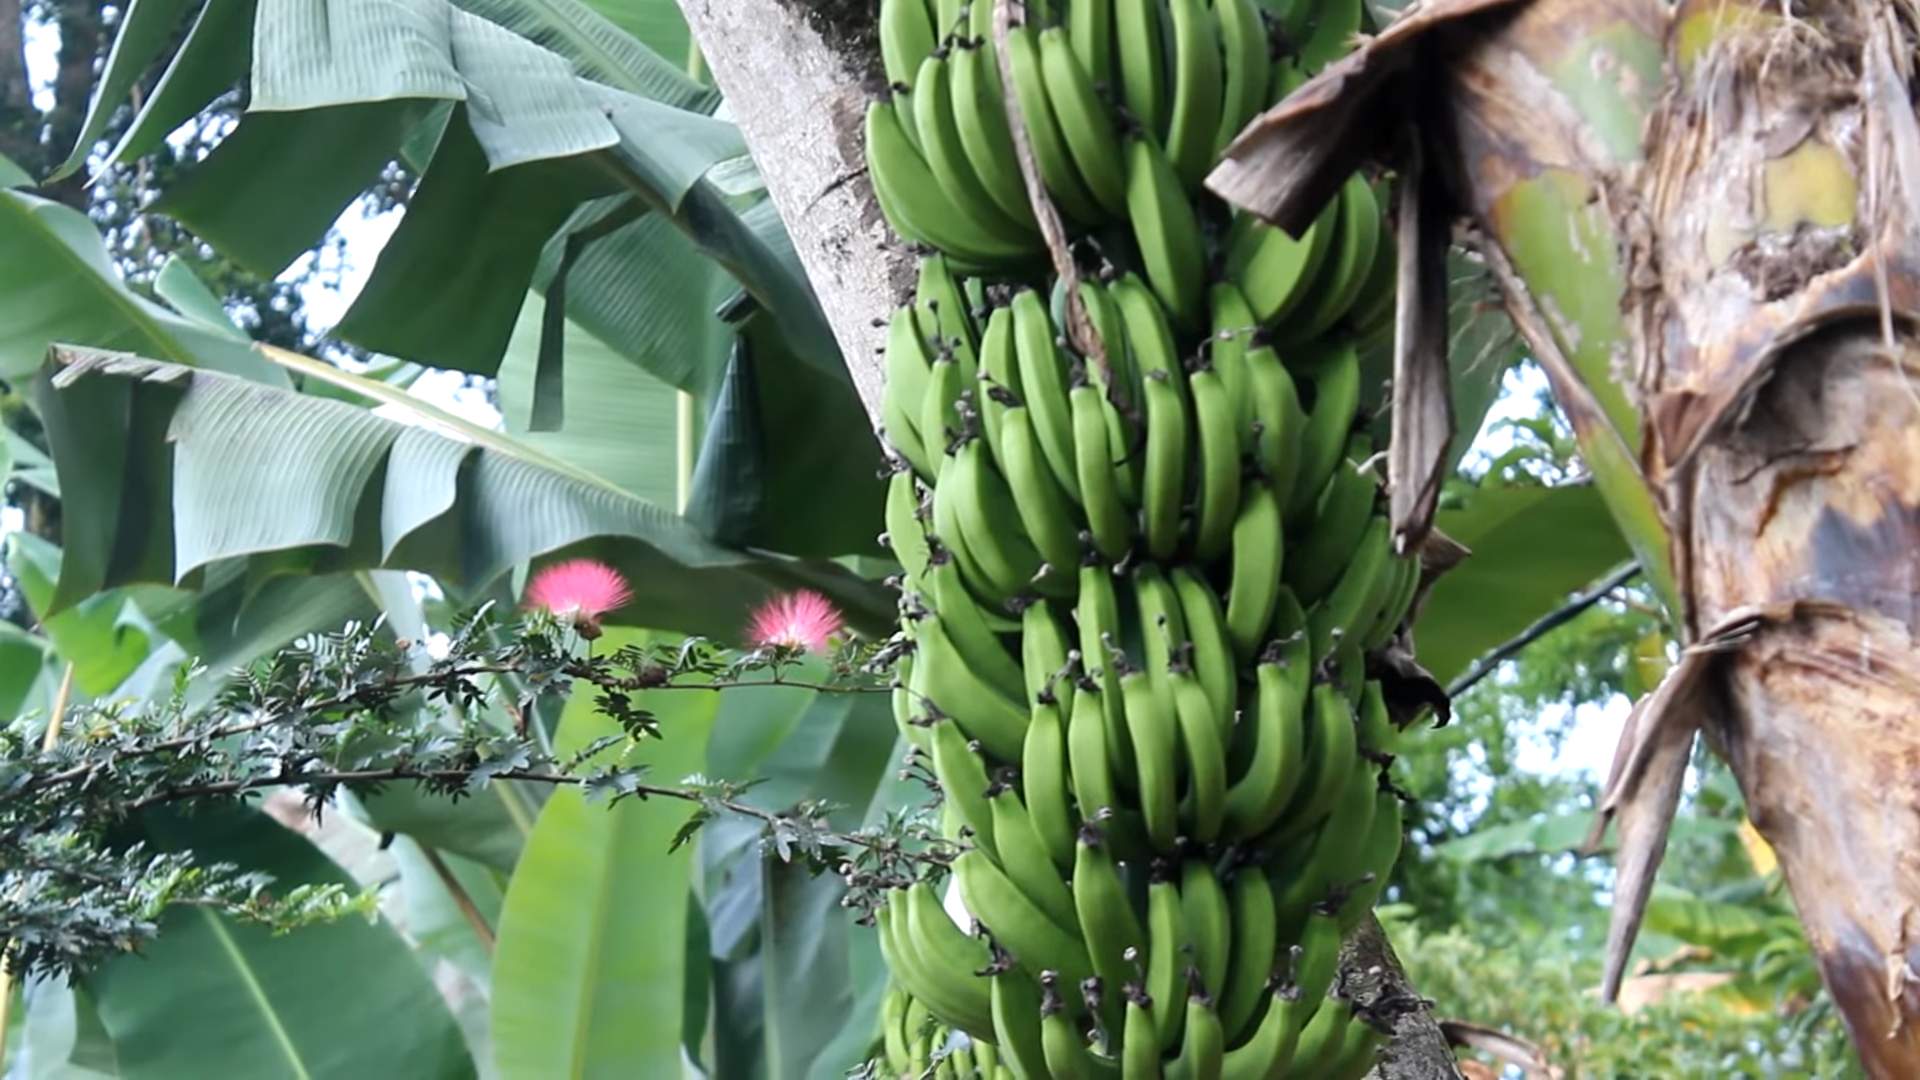
Harvesting Your Bananas
After about 9-12 months, your banana plant should be ready to produce fruit. The first sign of fruit is the appearance of a large, purple flower stalk. This stalk will eventually develop into a bunch of bananas.
Here’s how to know when your bananas are ready to harvest:
* The Bananas are Plump: The bananas should be plump and well-rounded.
* The Ribs are Less Prominent: The ribs on the bananas should be less prominent than when they were first developing.
* The Color Changes: The color of the bananas will change from dark green to a lighter green or yellowish-green.
Harvesting Instructions:
1. Cut the Stalk: Use a sharp knife or machete to cut the stalk of bananas from the plant.
2. Handle with Care: Bananas are delicate and can bruise easily, so handle them with care.
3. Hang to Ripen: Hang the stalk of bananas in a cool, dry place to ripen. You can also separate the bananas from the stalk and ripen them in a paper bag with an apple or banana. The ethylene gas produced by the apple or banana will help to speed up the ripening process.
Propagating New Banana Plants
One of the great things about banana plants is that they readily produce suckers, which can be used to propagate new plants.
Here’s how to propagate banana plants from suckers:
1. Choose a Healthy Sucker: Select a healthy sucker that is at least 1-2 feet tall.
2. Carefully Dig Up the Sucker: Use a sharp shovel to carefully dig up the sucker, making sure to get as much of the root system as possible.
3. Separate the Sucker: Separate the sucker from the main plant by cutting the rhizome connecting them with a sharp knife.
4. Plant the Sucker: Plant the sucker in a pot filled with well-draining potting mix.
5. Water Thoroughly: Water the newly planted sucker thoroughly.
6. Keep it Warm and Humid: Keep the sucker in a warm, humid location until it develops new roots.
7. Transplant: Once the sucker has developed new roots, you can transplant it into the garden.
Troubleshooting Common Banana Growing Problems
Conclusion
So, there you have it! Growing bananas at home, while it might seem like a tropical dream reserved for equatorial climates, is surprisingly achievable with a little know-how and dedication. This DIY trick, focusing on creating the optimal microclimate and providing the necessary nutrients, unlocks the potential for even those in cooler regions to enjoy the fruits (literally!) of their labor.
Why is this a must-try? Because beyond the sheer novelty of harvesting your own bananas, you’re engaging in a rewarding and educational experience. You’ll learn about plant biology, soil science, and the delicate balance of ecosystems, all while nurturing a beautiful and productive plant. Plus, imagine the bragging rights! “Oh, these bananas? I grew them myself.” It’s a conversation starter and a testament to your green thumb.
But the benefits extend beyond personal satisfaction. Homegrown bananas are often far superior in taste and texture to those found in supermarkets. They’re allowed to ripen more fully on the plant, developing a richer, sweeter flavor that’s simply unmatched. And, of course, you have complete control over the growing process, ensuring that your bananas are free from harmful pesticides and chemicals.
Don’t be afraid to experiment with variations! Consider trying different banana varieties suited to container growing, such as Dwarf Cavendish or Rajapuri. You can also adjust the soil mix to better suit your local conditions, adding more perlite for drainage in wetter climates or more compost for water retention in drier areas. Another variation is to use different types of organic fertilizers to see which yields the best results for your specific banana plant. Perhaps you’ll find that a specific blend of compost tea and bone meal works wonders!
We wholeheartedly encourage you to give this DIY trick a try. It’s an investment of time and effort, but the rewards – fresh, delicious bananas and a deeper connection to nature – are well worth it. Remember to document your progress, take pictures, and share your experiences with us! We’d love to hear about your successes, your challenges, and any innovative techniques you discover along the way. Let’s build a community of home banana growers, sharing knowledge and inspiring others to embark on this exciting journey. So, grab your pots, prepare your soil, and get ready to experience the joy of growing bananas at home! We are confident that with this guide, you can successfully cultivate your own banana plant and enjoy the delicious fruits of your labor.
Frequently Asked Questions (FAQ)
Q: What banana variety is best for growing indoors or in containers?
A: The best banana varieties for indoor or container growing are dwarf varieties, such as Dwarf Cavendish, Rajapuri, and Williams Hybrid. These varieties are naturally smaller, reaching a manageable size for indoor spaces and producing fruit within a reasonable timeframe. They are also more tolerant of cooler temperatures than some of the larger varieties. Avoid taller varieties like Gros Michel, as they will quickly outgrow their containers and become difficult to manage. Research the specific needs of each dwarf variety to ensure you provide the optimal growing conditions.
Q: How much sunlight does my banana plant need?
A: Banana plants are sun-loving and require at least 6-8 hours of direct sunlight per day to thrive and produce fruit. If you’re growing your banana plant indoors, place it near a south-facing window where it can receive the most sunlight. If you don’t have enough natural light, consider supplementing with grow lights. Rotate the plant regularly to ensure all sides receive adequate light exposure. Insufficient sunlight can lead to stunted growth, reduced fruit production, and pale leaves.
Q: What type of soil is best for growing bananas?
A: Banana plants prefer well-draining, fertile soil that is rich in organic matter. A good soil mix would include equal parts of potting soil, compost, and perlite or vermiculite. The potting soil provides a base, the compost adds nutrients and improves water retention, and the perlite or vermiculite ensures proper drainage. Avoid heavy clay soils, as they can become waterlogged and lead to root rot. The ideal pH level for banana plants is between 6.0 and 7.0.
Q: How often should I water my banana plant?
A: Banana plants are heavy drinkers and require consistent watering, especially during the growing season. Water deeply whenever the top inch of soil feels dry to the touch. Avoid overwatering, as this can lead to root rot. Ensure that your pot has adequate drainage holes to prevent water from accumulating at the bottom. Reduce watering during the winter months when the plant’s growth slows down. Monitor the plant’s leaves for signs of underwatering (wilting) or overwatering (yellowing).
Q: What kind of fertilizer should I use for my banana plant?
A: Banana plants are heavy feeders and require regular fertilization to support their rapid growth and fruit production. Use a balanced fertilizer with a ratio of 10-10-10 or 15-15-15, or a fertilizer specifically formulated for fruit trees. Apply the fertilizer according to the package instructions, typically every 2-3 weeks during the growing season. You can also supplement with organic fertilizers, such as compost tea or fish emulsion. Avoid over-fertilizing, as this can burn the roots.
Q: How do I protect my banana plant from frost?
A: Banana plants are sensitive to frost and can be damaged or killed by freezing temperatures. If you live in an area with cold winters, you’ll need to take steps to protect your banana plant from frost. If it’s in a container, move it indoors to a warm, sunny location. If it’s planted in the ground, you can wrap the trunk with burlap or blankets to insulate it. You can also build a temporary shelter around the plant using plastic sheeting or tarps. In extremely cold climates, you may need to cut the plant back to the ground and mulch heavily to protect the roots.
Q: How long does it take for a banana plant to produce fruit?
A: The time it takes for a banana plant to produce fruit varies depending on the variety, growing conditions, and climate. Generally, it takes about 9-15 months from planting to harvest. Dwarf varieties tend to fruit sooner than taller varieties. Providing optimal growing conditions, such as plenty of sunlight, water, and fertilizer, can help to speed up the process. Once the plant flowers, it takes about 3-6 months for the bananas to ripen.
Q: How do I know when my bananas are ripe?
A: Bananas are typically harvested when they are still green but have reached their full size. The bananas will then ripen off the plant. To determine if your bananas are ready to harvest, look for the following signs: the bananas should be plump and rounded, the ridges on the bananas should be less prominent, and the color of the bananas should start to turn from dark green to light green or yellow. You can also gently squeeze the bananas to see if they give slightly. Once harvested, store the bananas at room temperature until they are fully ripe.
Q: My banana plant has brown spots on its leaves. What should I do?
A: Brown spots on banana leaves can be caused by a variety of factors, including fungal diseases, pests, and nutrient deficiencies. Inspect the leaves carefully to identify the cause. If the spots are small and isolated, it may be a minor issue that can be resolved by improving air circulation and reducing humidity. If the spots are spreading rapidly, it may be a sign of a fungal disease, such as Sigatoka leaf spot. Treat the plant with a fungicide according to the package instructions. Pests, such as spider mites or aphids, can also cause brown spots. Treat the plant with an insecticide or insecticidal soap. Nutrient deficiencies can also cause leaf discoloration. Fertilize the plant with a balanced fertilizer to address any deficiencies.
Q: Can I grow bananas from seed?
A: While it is possible to grow bananas from seed, it is a very slow and challenging process. Banana seeds have a hard outer coating that needs to be scarified before they will germinate. Even with scarification, germination rates are often low. Additionally, banana plants grown from seed may not produce fruit that is true to the parent plant. For these reasons, it is generally recommended to propagate banana plants from suckers or rhizomes.
Leave a Comment